zabbix源码安装
1.zabbix-server安装
下载zabbix-3.4.11.tar.gz软件包到/usr/local目录,同时新建一个/usr/local/zabbix的目录,准备把zabbix安装到这个文件夹下。然后解压缩源码包,查看:
[root@bogon zabbix-3.4.11]# ls
aclocal.m4  bin    ChangeLog  conf          config.log  configure     COPYING   depcomp    include  install-sh  Makefile.am  man   missing  README  src
AUTHORS     build  compile    config.guess  config.sub  configure.ac  database  frontends  INSTALL  m4          Makefile.in  misc  NEWS     sass    upgrades
因为没有./configure,所以还没有makefile文件。我们看看./configure有什么选项:
[root@bogon zabbix-3.4.11]# ./configure --help
`configure' configures Zabbix 3.4.11 to adapt to many kinds of systems.

Usage: ./configure [OPTION]... [VAR=VALUE]...

To assign environment variables (e.g., CC, CFLAGS...), specify them as
VAR=VALUE.  See below for descriptions of some of the useful variables.

Defaults for the options are specified in brackets.

Configuration:
  -h, --help              display this help and exit
      --help=short        display options specific to this package
      --help=recursive    display the short help of all the included packages
  -V, --version           display version information and exit
  -q, --quiet, --silent   do not print `checking ...' messages
      --cache-file=FILE   cache test results in FILE [disabled]
  -C, --config-cache      alias for `--cache-file=config.cache'
  -n, --no-create         do not create output files
      --srcdir=DIR        find the sources in DIR [configure dir or `..']

Installation directories:
  --prefix=PREFIX         install architecture-independent files in PREFIX
                          [/usr/local]
  --exec-prefix=EPREFIX   install architecture-dependent files in EPREFIX
                          [PREFIX]

By default, `make install' will install all the files in
`/usr/local/bin', `/usr/local/lib' etc.  You can specify
an installation prefix other than `/usr/local' using `--prefix',
for instance `--prefix=$HOME'.
选项很多,不一一列举了。我尽量多的选了几项,开始编译。
[root@bogon zabbix-3.4.11]# ./configure --prefix=/usr/local/zabbix --enable-FEATURE --disable-silent-rules --enable-dependency-tracking  --enable-server --enable-proxy --enable-agent --enable-java --enable-ipv6 --with-PACKAGE --with-mysql   --with-jabber --with-libxml2  --with-unixodbc --with-net-snmp  --with-ssh2   --with-openipmi --with-libevent --with-libevent-include --with-libevent-lib --with-mbedtls --with-gnutls --with-openssl --with-ldap --with-libcurl --with-libpcre --with-libpcre-include --with-libpcre-lib --with-iconv --with-iconv-include --with-iconv-lib
configure: WARNING: unrecognized options: --enable-FEATURE, --with-PACKAGE
checking for a BSD-compatible install... /usr/bin/install -c
checking whether build environment is sane... yes
checking for a thread-safe mkdir -p... /bin/mkdir -p
checking for gawk... gawk
checking whether make sets $(MAKE)... yes
checking whether make supports nested variables... yes
configure: Configuring Zabbix 3.4.11
checking whether make sets $(MAKE)... (cached) yes
...
一开始提醒我不应该加入--enable-FEATURE, --with-PACKAGE选项,后面也报错“configure: error: Jabber library not found”。
checking for Oracle support... no
checking for Zabbix server/proxy database selection... ok
checking for multirow insert statements... yes
checking for pkg-config... /usr/bin/pkg-config
checking pkg-config is at least version 0.9.0... yes
checking for IKSEMEL... no
configure: error: Jabber library not found
网上搜了一下,应该是确少iksemel包,由于操作系统是centos6.5,所以即使安装epel源,也不能yum安装。centos7就可以yum安装了。下载了源码包iksemel-1.4.tar.gz,解压缩准备./configure:
[root@bogon iksemel-1.4]# ./configure --prefix=/usr/local/iksemel --enable-FEATURE --enable-dependency-tracking --enable-shared --enable-static --with-PACKAGE --with-gnu-ld
configure: WARNING: Unrecognized options: --enable-FEATURE, --with-PACKAGE
checking for a BSD-compatible install... /usr/bin/install -c
checking whether build environment is sane... yes
checking for a thread-safe mkdir -p... /bin/mkdir -p
checking for gawk... gawk
checking whether make sets $(MAKE)... yes
checking build system type... x86_64-unknown-linux-gnu
checking host system type... x86_64-unknown-linux-gnu
checking for gcc... gcc
然后make&&make install,顺利安装完成。接下来继续安装zabbix。一定要注意,如果iksemel是源码安装,zabbix ./configure的时候一定要加上iksemel源码安装的地址--with-jabber=/usr/local/iksemel。接着编译出现了新的报错“configure: error: Invalid Net-SNMP directory - unable to find net-snmp-config”,安装net-snmp-devel.x86_64包之后修复。
checking for xmlReadMemory in -lxml2... yes
checking for odbc_config... /usr/bin/odbc_config
checking for SQLAllocHandle in -lodbc... yes
checking for net-snmp-config... no
configure: error: Invalid Net-SNMP directory - unable to find net-snmp-config
继续编译,出现新的报错“configure: error: SSH2 library not found”,安装libssh2-devel包后修复。
checking for odbc_config... /usr/bin/odbc_config
checking for SQLAllocHandle in -lodbc... yes
checking for net-snmp-config... /usr/bin/net-snmp-config
checking for main in -lnetsnmp... yes
checking for localname in struct snmp_session... yes
checking for SSH2 support... no
configure: error: SSH2 library not found
继续编译,出现新的报错“configure: error: Invalid OPENIPMI directory - unable to find ipmiif.h”,安装OpenIPMI OpenIPMI-devel包之后修复。
checking for odbc_config... /usr/bin/odbc_config
checking for SQLAllocHandle in -lodbc... yes
checking for net-snmp-config... /usr/bin/net-snmp-config
checking for main in -lnetsnmp... yes
checking for localname in struct snmp_session... yes
checking for SSH2 support... yes
checking for OPENIPMI support... no
configure: error: Invalid OPENIPMI directory - unable to find ipmiif.h
继续编译,出现新的报错“checking for libevent support... configure: error: Unable to use libevent (libevent check failed)”,安装libevent-devel包之后修复。
checking for SQLAllocHandle in -lodbc... yes
checking for net-snmp-config... /usr/bin/net-snmp-config
checking for main in -lnetsnmp... yes
checking for localname in struct snmp_session... yes
checking for SSH2 support... yes
checking for OPENIPMI support... yes
checking for libevent support... configure: error: Unable to use libevent (libevent check failed)
继续编译,出现新报错“configure: error: mbed TLS (PolarSSL) library libpolarssl not found”,这个报错我找了很久,源码安装mbed包之后--with-mbedtls=/usr/local/zabbix-3.4.11/m4/libmbedtls.m4编译不行,yum安装mbedtls,mbedtls-devel始终没解决,最后在./configure的时候把--with-mbedtls去掉了。
checking for SSH2 support... yes
checking for OPENIPMI support... yes
checking for libevent support... yes
checking for mbed TLS (PolarSSL) support... no
configure: error: mbed TLS (PolarSSL) library libpolarssl not found
同样的,还有这个报错“configure: error: GnuTLS library version requirement not met (>= 3.1.18)”,看上去是库版本低的原因。当我准备卸载的时候,看到了1.6G这个字符,吓得我赶紧取消了。
[root@bogon zabbix-3.4.11]# yum remove gnutls gnutls-devel gnutls-utils
Loaded plugins: fastestmirror, refresh-packagekit, security
Setting up Remove Process
Resolving Dependencies
--> Running transaction check
---> Package gnutls.x86_64 0:2.8.5-10.el6_4.2 will be erased
--> Processing Dependency: libgnutls.so.26()(64bit) for package: gtk-vnc-0.3.10-3.el6.x86_64
--> Processing Dependency: libgnutls.so.26()(64bit) for package: 1:cups-1.4.2-50.el6_4.5.x86_64
--> Processing Dependency: libgnutls.so.26()(64bit) for package: virt-viewer-0.5.6-8.el6.x86_64
--> Processing Dependency: libgnutls.so.26()(64bit) for package: gvfs-afc-1.4.3-15.el6.x86_64
xulrunner x86_64 17.0.10-1.el6_4 @anaconda-RedHatEnterpriseLinux-201311111358.x86_64/6.5 40 M
yelp x86_64 2.28.1-17.el6_3 @anaconda-RedHatEnterpriseLinux-201311111358.x86_64/6.5 3.6 M
zenity x86_64 2.28.0-1.el6 @anaconda-RedHatEnterpriseLinux-201311111358.x86_64/6.5 4.1 M
Transaction Summary
==================================================================================================================================================================
Remove 403 Package(s)
Installed size: 1.6 G
Is this ok [y/N]:
Exiting on user Command
Your transaction was saved, rerun it with:
yum load-transaction /tmp/yum_save_tx-2018-07-18-05-32BwiqHi.yumtx从网上下了个gnutls-3.5.19.tar.xz的包,准备源码安装gnutls的时候,报错了:
[root@bogon gnutls-3.5.19]# ./configure --prefix=/usr/local/gnutls
configure: error: cannot find install-sh, install.sh, or shtool in build-aux "."/build-aux
可能下载的包有缺失吧,实在不想找原因了,就把这个编译项去掉了。
继续编译,出现报错“checking for libpcre support... configure: error: Unable to use libpcre (libpcre check failed)”,安装pcre-devel包之后解决。
checking for main in -lcurl... yes
checking whether libcurl is usable... yes
checking for curl_free... yes
checking for curl_easy_escape... yes
checking for libpcre support... configure: error: Unable to use libpcre (libpcre check failed)
最后./configure成功,生成makefile文件。
  Enable Java gateway:   yes
  Java gateway details:
    Java compiler:         javac
    Java archiver:         jar

  LDAP support:          yes
  IPv6 support:          yes

***********************************************************
*            Now run 'make install'                       *
*                                                         *
*            Thank you for using Zabbix!                  *
*                                  *
***********************************************************

[root@bogon zabbix-3.4.11]# ls
aclocal.m4  build      conf          config.status  configure.ac  depcomp    INSTALL     Makefile     man      NEWS    src
AUTHORS     ChangeLog  config.guess  config.sub     COPYING       frontends  install-sh  Makefile.am  misc     README  upgrades
bin         compile    config.log    configure      database      include    m4          Makefile.in  missing  sass
当我make的时候,出现了一大段报错。因为计划mysql和zabbix-server分离到不同的主机上,所以没有配置mysql,所以产生大量报错。那就先在本机上搭建完整的zabbix-server,zabbix-web和mysql,再分离。
...
gcc -DHAVE_CONFIG_H -I. -I../../../include    -I../../../src/zabbix_server/ -I/usr/include -g -O2 -Iyes -MT libzbxdbhigh_a-odbc.o -MD -MP -MF .deps/libzbxdbhigh_a-odbc.Tpo -c -o libzbxdbhigh_a-odbc.o `test -f 'odbc.c' || echo './'`odbc.c
In file included from odbc.c:25:
../../../include/zbxodbc.h:23:17: error: sql.h: No such file or directory
../../../include/zbxodbc.h:24:20: error: sqlext.h: No such file or directory
../../../include/zbxodbc.h:25:22: error: sqltypes.h: No such file or directory
In file included from odbc.c:25:
../../../include/zbxodbc.h:32: error: expected specifier-qualifier-list before ‘SQLHENV’
odbc.c: In function ‘odbc_free_row_data’:
odbc.c:58: error: ‘SQLSMALLINT’ undeclared (first use in this function)
odbc.c:58: error: (Each undeclared identifier is reported only once
odbc.c:58: error: for each function it appears in.)
odbc.c:58: error: expected ‘;’ before ‘i’
odbc.c:60: error: ‘ZBX_ODBC_DBH’ has no member named ‘row_data’
odbc.c:62: error: ‘i’ undeclared (first use in this function)
odbc.c:62: error: ‘ZBX_ODBC_DBH’ has no member named ‘col_num’
odbc.c:63: error: ‘ZBX_ODBC_DBH’ has no member named ‘row_data’
odbc.c:63: error: ‘ZBX_ODBC_DBH’ has no member named ‘row_data’
...
https://www.zabbix.com/documentation/3.4/zh/manual/installation/install 结合官网指导进行源码的安装是最权威的,网上的各种教程虽然一搜一大把,但是质量良莠不齐,别人实践成功的,不见得适合自己,所以需要参考权威,也就是官方指导。源码安装对于数据库只有这短短的一段指导。
3 创建Zabbix数据库


对于Zabbix server 和 proxy 守护进程以及Zabbix前端,都需要连接到一个数据库。Zabbix agent不需要数据库的支持。

SQL 脚本 用于创建数据库架构(schema)并插入数据集(dataset)。 Zabbix proxy数据库只需要数据库架构(schema),而Zabbix server数据库在建立数据库架构(schema)后,还需要数据集(dataset)。

建立Zabbix数据库后,可以开始对Zabbix进行编译。
不得不承认,惜墨如金啊!我完全没看明白,直到看到这里,比较着看才慢慢懂了。
ht看tps://www.zabbix.com/documentation/3.4/zh/manual/appendix/install/db_scripts
我使用的mysql,代码如下:
shell> mysql -uroot -p
mysql> create database zabbix character set utf8 collate utf8_bin;
mysql> grant all privileges on zabbix.* to zabbix@localhost identified by '';
mysql> quit;
shell> cd database/mysql
shell> mysql -uzabbix -p zabbix < schema.sql
# stop here if you are creating database for Zabbix proxy
shell> mysql -uzabbix -p zabbix < images.sql
shell> mysql -uzabbix -p zabbix < data.sql
需要注意的是,如果你需要使用zabbix远程连接数据库,权限大一些,要修改zabbix@localhost为zabbix@'%' 。
schema.sql, images.sql and data.sql 这些文件在Zabbix的子目录 database 下,如果找不到,就locate一下
[root@bogon zabbix-3.4.11]# locate schema.sql
/usr/local/zabbix-3.4.11/database/ibm_db2/schema.sql
/usr/local/zabbix-3.4.11/database/mysql/schema.sql
/usr/local/zabbix-3.4.11/database/oracle/schema.sql
/usr/local/zabbix-3.4.11/database/postgresql/schema.sql
/usr/local/zabbix-3.4.11/database/sqlite3/schema.sql
/usr/share/pgsql/information_schema.sql
本机的mysql还没使用过,使用mysql_secure_installation完成root密码设置。然后创建数据库架构(schema)并插入数据集(dataset)。
[root@centos6 mysql]# mysql -uzabbix -pxxxxxx zabbix < schema.sql
[root@centos6 mysql]# mysql -uzabbix -pxxxxxx zabbix < images.sql
[root@centos6 mysql]# mysql -uzabbix -pxxxxxx zabbix < data.sql
但是make install依然报错,zabbix无法安装成功。和上面贴过的报错一样,装不成功的地方没有变化,大片大片的报错“odbc.c:63: error: ‘ZBX_ODBC_DBH’ has no member named ‘xxxxxx’”类似。网上找了很久没有解决方法,尝试自己解决。
[root@centos6 yum.repos.d]# yum list *odbc*
Loaded plugins: fastestmirror, refresh-packagekit, security
Loading mirror speeds from cached hostfile
 * epel: mirrors.tuna.tsinghua.edu.cn
Installed Packages
mysql-connector-odbc.x86_64                               5.1.5r1144-7.el6                                 @anaconda-RedHatEnterpriseLinux-201311111358.x86_64/6.5
postgresql-odbc.x86_64                                    08.04.0200-1.el6                                 @anaconda-RedHatEnterpriseLinux-201311111358.x86_64/6.5
unixODBC.x86_64                                           2.2.14-12.el6_3                                  @anaconda-RedHatEnterpriseLinux-201311111358.x86_64/6.5
Available Packages
R-RODBC.x86_64                                            1.3.6-1.el6                                      epel
apr-util-odbc.x86_64                                      1.3.9-3.el6_0.1                                  CentOS
asterisk-odbc.x86_64                                      1.8.32.3-2.el6                                   epel
asterisk-voicemail-odbc.x86_64                            1.8.32.3-2.el6                                   epel
erlang-odbc.x86_64                                        R14B-04.3.el6                                    epel
freeradius-unixODBC.x86_64                                2.2.6-7.el6_9                                    CentOS
libiodbc.i686                                             3.52.7-1.el6                                     epel
libiodbc.x86_64                                           3.52.7-1.el6                                     epel
libiodbc-devel.i686                                       3.52.7-1.el6                                     epel
libiodbc-devel.x86_64                                     3.52.7-1.el6                                     epel
ogdi-odbc.x86_64                                          3.2.0-0.14.beta2.el6                             epel
opensips-unixodbc.x86_64                                  1.7.2-2.el6                                      epel
perl-DBD-ODBC.x86_64                                      1.50-3.el6                                       epel
php-odbc.x86_64                                           5.3.3-49.el6                                     CentOS
poco-odbc.i686                                            1.4.2p1-3.el6                                    epel
poco-odbc.x86_64                                          1.4.2p1-3.el6                                    epel
pyodbc.x86_64                                             2.1.7-1.el6                                      epel
qt-odbc.i686                                              1:4.6.2-28.el6_5                                 CentOS
qt-odbc.x86_64                                            1:4.6.2-28.el6_5                                 CentOS
qt3-ODBC.i686                                             3.3.8b-30.el6                                    CentOS
qt3-ODBC.x86_64                                           3.3.8b-30.el6                                    CentOS
qt5-qtbase-odbc.i686                                      5.6.1-3.el6                                      epel
qt5-qtbase-odbc.x86_64                                    5.6.1-3.el6                                      epel
rekall-odbc.i686                                          2.4.6-13.el6                                     epel
rekall-odbc.x86_64                                        2.4.6-13.el6                                     epel
root-sql-odbc.x86_64                                      5.34.36-1.el6                                    epel
soci-odbc.i686                                            3.2.2-2.el6                                      epel
soci-odbc.x86_64                                          3.2.2-2.el6                                      epel
soci-odbc-devel.i686                                      3.2.2-2.el6                                      epel
soci-odbc-devel.x86_64                                    3.2.2-2.el6                                      epel
unixODBC.i686                                             2.2.14-14.el6                                    CentOS
unixODBC.x86_64                                           2.2.14-14.el6                                    CentOS
unixODBC-devel.i686                                       2.2.14-14.el6                                    CentOS
unixODBC-devel.x86_64                                     2.2.14-14.el6                                    CentOS
unixODBC-kde.i686                                         2.2.14-14.el6                                    CentOS
unixODBC-kde.x86_64                                       2.2.14-14.el6                                    CentOS
看到一个unixODBC-devel的包,装一下试试。再安装zabbix-server,成功了。
[root@centos6 zabbix-3.4.11]# make install
Making install in src
make[1]: Entering directory `/usr/local/zabbix-3.4.11/src'
Making install in libs
...
...
...
make[1]: Entering directory `/usr/local/zabbix-3.4.11'
make[2]: Entering directory `/usr/local/zabbix-3.4.11'
make[2]: Nothing to be done for `install-exec-am'.
make[2]: Nothing to be done for `install-data-am'.
make[2]: Leaving directory `/usr/local/zabbix-3.4.11'
make[1]: Leaving directory `/usr/local/zabbix-3.4.11'
最后的./configure是这样的:
./configure --prefix=/usr/local/zabbix --disable-silent-rules --enable-dependency-tracking --enable-server --enable-proxy --enable-agent --enable-java --enable-ipv6 --with-mysql --with-jabber=/usr/local/iksemel --with-libxml2 --with-unixodbc --with-net-snmp --with-ssh2 --with-openipmi --with-libevent --with-libevent-include --with-libevent-lib --with-openssl --with-ldap --with-libcurl --with-libpcre --with-libpcre-include --with-libpcre-lib --with-iconv --with-iconv-include --with-iconv-lib2.zabbix-web安装
官网的安装说明依然很简单,让我看完之后无话可说,“Zabbix前端使用PHP写的,所以必须运行在PHP支持的Web服务器上。只需要简单的从frontends/php路径下复制PHP文件到Web服务器的HTML文件目录,就可以完成安装。”,只能“呵呵”了。
操作系统是centos6.5,检查了一下,系统已经安装了php,http,mysql,配置文件已经修改,好的,开始启动,打开浏览器,结果一片空白。为什么没有登陆首页?找了很久,才发现是php版本问题。centos6.5最高支持php5.3.3,而官网上明白无误的写着:
只怪自己太年轻!
老老实实的找来php-5.6.36.tar.gz安装包,解压缩,编译安装。
[root@centos6 php-5.6.36]# ./configure --prefix=/usr/local/php --with-config-file-path=/usr/local/php --enable-opcache --enable-fpm --with-libxml-dir --with-zlib --with-curl --enable-dba --enable-ftp --with-freetype-dir  --with-gd --with-jpeg-dir --with-png-dir --with-zlib-dir --enable-gd-native-ttf --with-gettext  --enable-mbstring --with-mcrypt=/usr/local/libmcrypt/ --with-mysql --with-mysqli --enable-pcntl --with-pdo-mysql --without-pdo-sqlite  --enable-shmop --enable-sockets --enable-sysvmsg --enable-sysvsem --enable-sysvshm --enable-zip
checking for grep that handles long lines and -e... /bin/grep
checking for egrep... /bin/grep -E
...
报错“configure: error: mcrypt.h not found. Please reinstall libmcrypt.”,yum install libmcrypt libmcrypt-devel解决。
顺利安完php,“frontends/php”是个什么路径,通过查找,发现就位于zabbix源码包内,里面全是网站素材。
[root@centos6 php]# ls
actionconf.php                 applications.php    conf                         host_screen.php  latest.php          report4.php        sysmap.php
adm.gui.php                    audio               conf.import.php              hosts.php        local               robots.txt         sysmaps.php
adm.housekeeper.php            auditacts.php       correlation.php              httpconf.php     locale              screenconf.php     templates.php
adm.iconmapping.php            auditlogs.php       discoveryconf.php            httpdetails.php  maintenance.php     screenedit.php     toptriggers.php
adm.images.php                 authentication.php  disc_prototypes.php          image.php        map.import.php      screen.import.php  tr_comments.php
adm.macros.php                 browserwarning.php  favicon.ico                  images           map.php             screens.php        tr_events.php
adm.other.php                  chart2.php          fonts                        img              overview.php        scripts_exec.php   trigger_prototypes.php
adm.regexps.php                chart3.php          graphs.php                   imgstore.php     popup_httpstep.php  search.php         triggers.php
adm.triggerdisplayoptions.php  chart4.php          history.php                  include          popup_media.php     services.php       tr_logform.php
adm.triggerseverities.php      chart5.php          host_discovery.php           index.php        popup.php           setup.php          tr_status.php
adm.valuemapping.php           chart6.php          hostgroups.php               items.php        popup_trexpr.php    slideconf.php      tr_testexpr.php
adm.workingtime.php            chart7.php          hostinventoriesoverview.php  js               profile.php         slides.php         usergrps.php
api_jsonrpc.php                chart.php           hostinventories.php          jsLoader.php     queue.php           srv_status.php     users.php
app                            charts.php          host_prototypes.php          jsrpc.php        report2.php         styles             zabbix.php
[root@centos6 php]# cp -a . /var/www/html/zabbix/ 复制到apache站点。启动apache。
有几点需要注意:
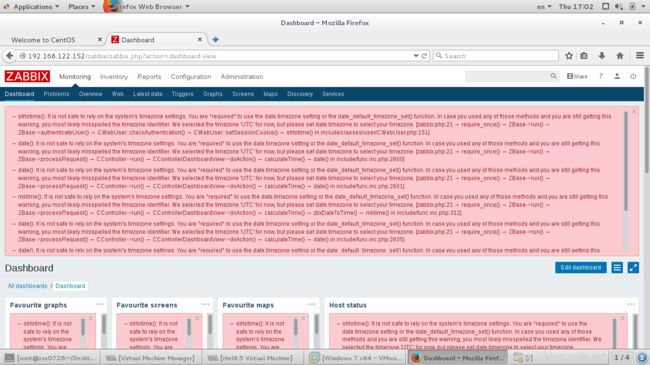
(1)确保php.ini文件放在正确的位置上。一开始我将php.ini文件放在/usr/local/php/etc下,登陆zabbix管理界面报错时间问题:
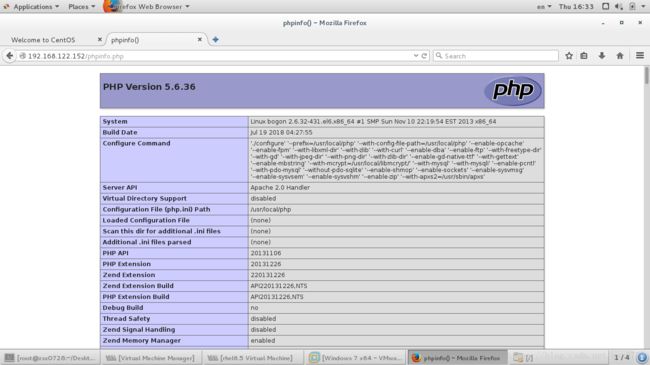
已经修改php.ini时间也没有用。没办法,找不到原因,在/var/www/html下写了个phpinfo.php文件,才发现“loaded configuration file”未加载。排查好久,才发现应该将php.ini文件放在/usr/local/php文件下。php问题现象如下:
解决之后应该是这样:
(2)注意php源码编译时要带着--with-apxs2,--enable-bcmath,--enable-ctype,同时修改http.conf文件,这样,php编译完才有libphp5.so,apache才能支持动态页面。唉,都是坑。
最后./configure php的语句应该是这样:
./configure --prefix=/usr/local/php --with-config-file-path=/usr/local/php --enable-opcache --enable-fpm --with-libxml-dir --with-zlib --with-curl --enable-dba --enable-ftp --with-freetype-dir --with-gd --with-jpeg-dir --with-png-dir --with-zlib-dir --enable-gd-native-ttf --with-gettext --enable-mbstring --with-mcrypt=/usr/local/libmcrypt/ --with-mysql --with-mysqli --enable-pcntl --with-pdo-mysql --without-pdo-sqlite --enable-shmop --enable-sockets --enable-sysvmsg --enable-sysvsem --enable-sysvshm --enable-zip --with-apxs2=/usr/sbin/apxs --enable-bcmath --enable-ctype(3)熟读官网安装要求,注意每个配置细节。
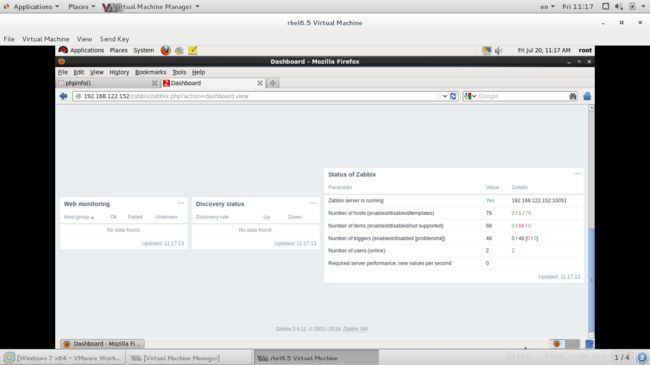
最后,启动成功的界面如下:


