SpringMVC学习(一)——快速搭建SpringMVC开发环境(非注解方式)
目录
- 1、开发环境准备
- 1.1、首先电脑需要安装JDK环境(略)
- 1.2、准备一个以供开发的tomcat
- 1.3、准备Maven工具
- 1.4、准备IDE编译器
- 1.5、准备一个本地的数据库,
- 2、搭建SpringMVC开发环境
- 2.1、创建web工程
- 2.2、使用maven引入相关的依赖
- 2.3、项目的整体结构图
- 2.4、新增springmvc-servlet的配置文件
- 2.5、web.xml核心配置
- 2.5、第一个HelloController
- 2.6、配置Tomcat服务并启动
- 2.7、增加数据库配置
- 2.8、访问数据库测试
- 3、框架搭建过程注意事项
- 3.1、创建maven项目特别缓慢?
- 3.2、applicationContext.xml和springmvc-servlet.xml区别?
- 3.3、ApplicationContext和WebApplicationContext的关系?
1、开发环境准备
1.1、首先电脑需要安装JDK环境(略)
说明:本机使用的是JDK1.8.0_45,一定要记得配置环境变量。
1.2、准备一个以供开发的tomcat
说明:本机使用的是Tomcat 8.0.35。
1.3、准备Maven工具
说明:因为本机使用的是maven构建项目,本机使用的Maven版本为apache-maven-3.1.0。
1.4、准备IDE编译器
说明:本次开发使用的是IDEA,如果使用Eclipse也不影响开发。
1.5、准备一个本地的数据库,
说明:本机使用的是mysql数据库,目的是为了测试数据库连接以及访问,数据库版本为mysql 5.1.41。
注意一下,上面是本次开发使用的开发环境的前期准备工作,如果是没有进行过开发的小白可提前把开发环境搭建好,搭建开发环境的案例很多,本次就不再赘述了。
2、搭建SpringMVC开发环境
2.1、创建web工程
首先使用Maven工具创建一个webapp工程,选择 File -> New Module ->Maven,选中“Create from archetype”,选择如下图的webapp工程
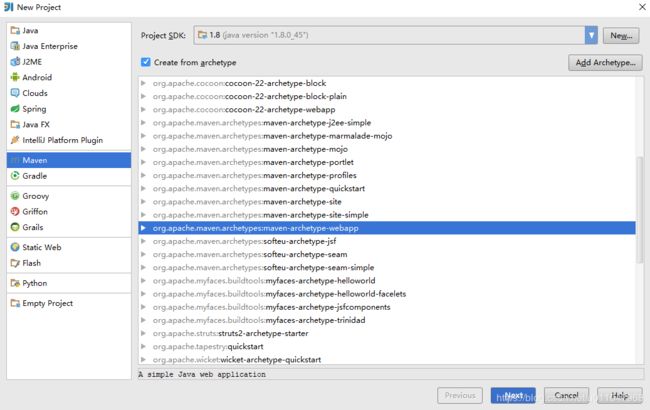
然后选择“下一步”填入相应的字段知道完成项目创建,如果此处创建过程非常慢,请参考注意事项3.1。
2.2、使用maven引入相关的依赖
本例中使用的spirngmvc的版本为4.3.25.RELEASE
            junit
            junit
            4.12
            test


            org.springframework
            spring-webmvc
            ${spring.version}


            javax.servlet
            javax.servlet-api
            3.0.1
            provided


            javax.servlet.jsp
            jsp-api
            2.2
            provided


            org.springframework
            spring-jdbc
            ${spring.version}


            mysql
            mysql-connector-java
            5.1.30


            org.springframework
            spring-test
            ${spring.version}
            test
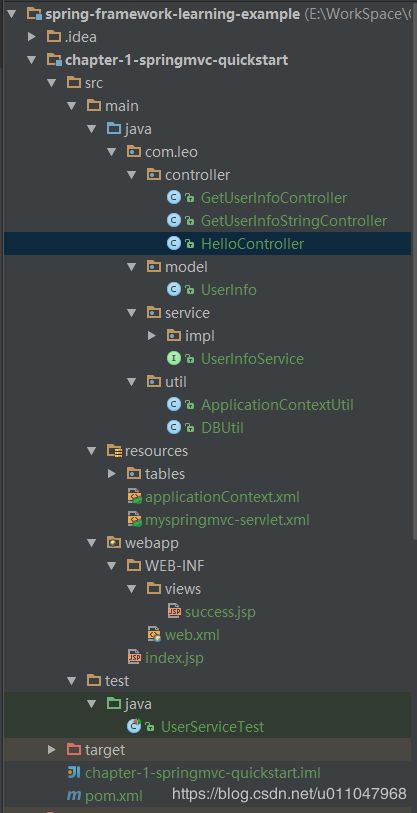
2.3、项目的整体结构图
2.4、新增springmvc-servlet的配置文件
在resources目录下新增加一个myspringmvc-servelet.xml文件,可以参考一下配置:
2.5、web.xml核心配置
增加springmvc的核心配置DispatcherServlet,配置效果如下所示:
        myspringmvc
        org.springframework.web.servlet.DispatcherServlet


            contextConfigLocation
            classpath:myspringmvc-servlet.xml


        1


        myspringmvc

        /
2.5、第一个HelloController
编写第一个SpringMVC的Controller,需要继承自org.springframework.web.servlet.mvc.Controller
示例代码如下:
public class HelloController implements Controller {
    @Override
    public ModelAndView handleRequest(HttpServletRequest request, HttpServletResponse response) throws ServletException, IOException {
        System.out.println("hello controller 跳转到 success");
        ModelAndView modelAndView = new ModelAndView();
        modelAndView.addObject("data", "恭喜您,测试成功了");
        modelAndView.setViewName("success");//跳转到/WEB-INF/views/success.jsp
        return modelAndView;
    }
}
上面的示例中需要在/WEB-INF/views/增加一个“success”的测试页面,测试页面的代码如下:
<%@ page contentType="text/html;charset=UTF-8" language="java" %>


你好,跳转到success了!!!
${data}
编写完HelloController后需要在myspringmvc-servlet.xml中增加这个controller的配置
好了,第一个Controller到这里已经编写完毕了,现在开始启动测试一下了。
2.6、配置Tomcat服务并启动

然后配置启动的tomcat的位置和参数,可以参考笔者配置
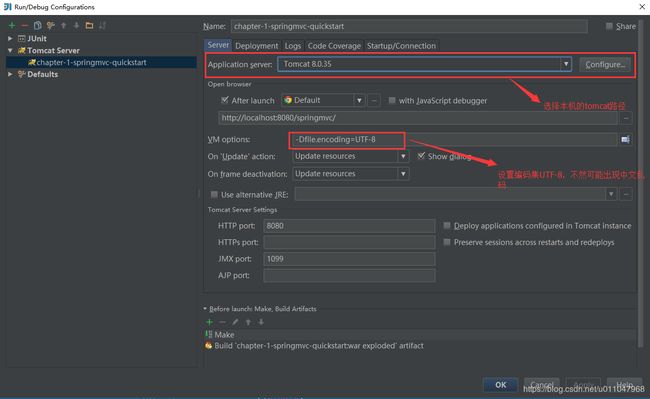
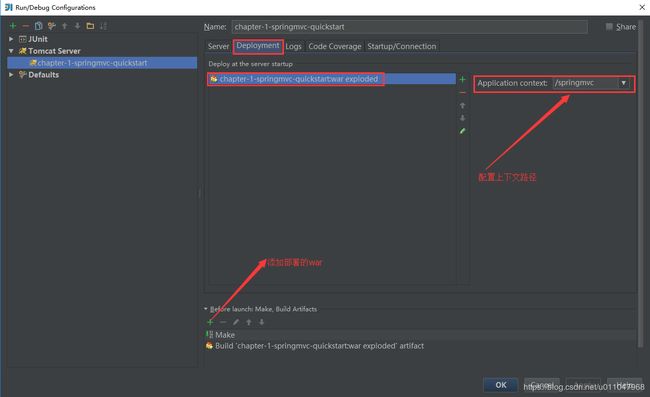
部署项目的war包并且配置上下文路径,参考笔者如下图
启动tomcat
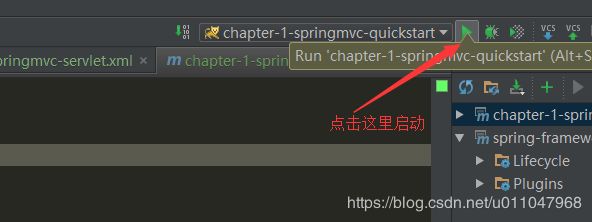
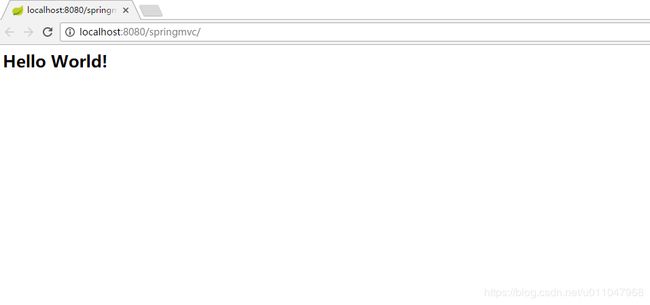
访问地址:http://localhost:8080/springmvc/
2.7、增加数据库配置
新增加数据库的配置信息,在pom.xml中增加如下配置(如果已经添加的请忽略),本示例中没有引入第三方框架,使用的是spring内置的jdbc框架
            org.springframework
            spring-jdbc
            ${spring.version}


            mysql
            mysql-connector-java
            5.1.30
在resources目录下新增applicationContext.xml配置文件,并且添加如下内容:
并且在web.xml中将配置文件applicationContext.xml添加进去
        contextConfigLocation
        classpath:applicationContext.xml


    org.springframework.web.context.ContextLoaderListener
这里要注意一下applicationContext.xml和myspringmvc-servlet.xml都可以注入bean那他们的区别是什么?答案参考3.2
2.8、访问数据库测试
需要新写一个Controller,代码参考如下
public class GetUserInfoController implements Controller {

    @Override
    public ModelAndView handleRequest(HttpServletRequest httpServletRequest, HttpServletResponse httpServletResponse) throws Exception {
        UserInfoService userInfoService = (UserInfoService) ApplicationContextUtil.getBean("userInfoService");
        System.out.println("GetUserInfoController获取用户信息");
        ModelAndView modelAndView = new ModelAndView();
        //访问数据库
        List userInfoList = userInfoService.getUserInfoList();
        System.out.println(userInfoList);
        modelAndView.addObject("data", userInfoList);
        modelAndView.setViewName("success");//跳转到/WEB-INF/views/success.jsp
        return modelAndView;
    }
}
还需要将新的Controller注册到myspringmvc-servlet.xml配置文件中
然后启动tomcat访问:http://localhost:8080/springmvc/getUserInfo

具体的代码地址为:chapter-1-springmvc-quickstart
(https://gitee.com/leo825/spring-framework-learning-example.git)
3、框架搭建过程注意事项
3.1、创建maven项目特别缓慢?
如果遇到创建maven过程特别缓慢的情况,需要在Setting添加一些mirror配置。操作如下:
首先找到项目中maven的settings配置文件位置,File -> Settings -> Build,Execution,Deployment -> Build Tools -> Maven
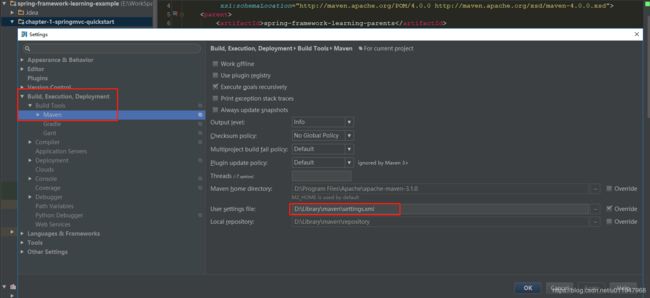
其次,在maven的settings配置文件的“mirrors”节点下添加mirror配置,然后保存,重新创建一下webapp试试。
    alimaven
    aliyun maven
    http://maven.aliyun.com/nexus/content/groups/public/
    central


    CN
    OSChina Central
    http://maven.oschina.net/content/groups/public/
    central


    repo2
    central
    Human Readable Name for this Mirror.
    http://repo2.maven.org/maven2/


    net-cn
    central
    Human Readable Name for this Mirror.
    http://maven.net.cn/content/groups/public/


    ui
    central
    Human Readable Name for this Mirror.
    http://uk.maven.org/maven2/


    ibiblio
    central
    Human Readable Name for this Mirror.
    http://mirrors.ibiblio.org/pub/mirrors/maven2/


    jboss-public-repository-group
    central
    JBoss Public Repository Group
    http://repository.jboss.org/nexus/content/groups/public


    JBossJBPM
    central
    JBossJBPM Repository
    https://repository.jboss.org/nexus/content/repositories/releases/


    antelink
    central
    antelink Repository
    http://maven.antelink.com/content/repositories/central/


    openkoala
    central
    openkoala Repository
    http://nexus.openkoala.org/nexus/content/groups/Koala-release/


    tmatesoft
    central
    tmatesoft Repository
    http://maven.tmatesoft.com/content/groups/public/


    mavensync
    central
    mavensync Repository
    http://mavensync.zkoss.org/maven2/
3.2、applicationContext.xml和springmvc-servlet.xml区别?
二者区别如下:
applicationContext.xml这个一般是采用非spring mvc架构,用来加载Application Context。应用于多个servlet,配合listener一起使用。
如果直接采用SpringMVC,只需要把所有相关配置放到xxx-servlet.xml中就OK了。 如果直接使用SpringMVC是可以不添加applicationContext.xml文件的。 也可以使用applicationContext.xml添加一些公共类的bean和配置。
3.3、ApplicationContext和WebApplicationContext的关系?
ApplicationContext是Spring容器上下文,WebApplicationContext是Web容器上下文,WebApplicationContext继承自ApplicationContext,因此只要是ApplicationContext中注册的Bean都能在WebApplicationContext中获取到,反之则不然。
