【JPA】一个简单的应用--使用JPA持久化对象
这篇笔记主要是简单的介绍如何使用JPA和hibernate持久化一个对象,就是将一个对象的数据信息传递到数据库中。
1.创建一个JPA工程
首先创建一个新的JPA工程:

工程的名字可以随便取,JPA的版本这里选择2.0版本

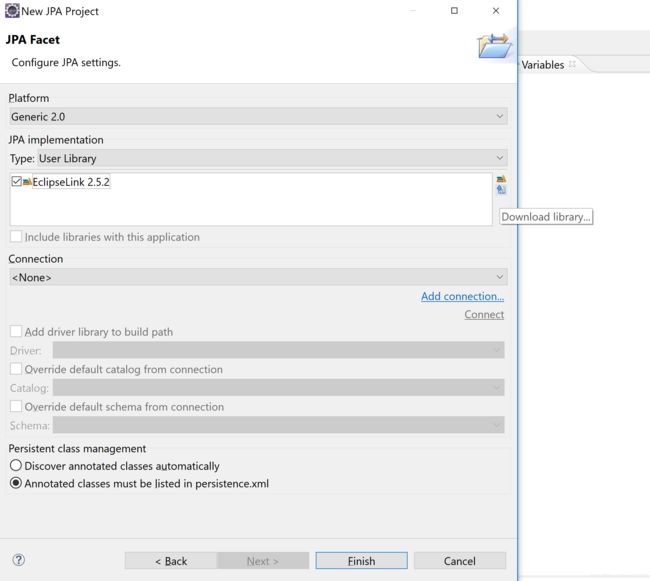
创建工程的时候需要指定一个user library。我这里的库是EclipseLink2.5.2,如果你没有这个库的话可以通过右边的下载按钮"Download library"下载一个库。

然后配置一下这个工程。首先在整个工程下添加lib文件夹,此时整个工程的文件结构如下图所示:

工程需要导入一些库文件和jar包到lib文件夹中。需要导入的库文件有:
hibernate/lib/required下的所有jar包

hibernate/lib/jpa中的jar包:

还有MySQL的驱动:

将这些文件全部都放到lib的文件夹下,然后选中所有lib文件下的jar包,右键选择build path–add to build path将这些jar包加载到类路径下。
导入需要jar包后,配置一下persistence.xml文件
刚创建完JPA工程时的persistence.xml文件内容如下:
<persistence version="2.0" xmlns="http://java.sun.com/xml/ns/persistence" xmlns:xsi="http://www.w3.org/2001/XMLSchema-instance" xsi:schemaLocation="http://java.sun.com/xml/ns/persistence http://java.sun.com/xml/ns/persistence/persistence_2_0.xsd">
	<persistence-unit name="jpa_01" transaction-type="RESOURCE_LOCAL">
	persistence-unit>
persistence>
此时还没有任何的配置信息。这个配置文件中需要配置的内容有:
- 连接数据库的基本信息
- 配置hibernate的基本信息
- 配置使用什么ORM产品作为JPA的实现
1.实际上配置的是javax.persistence.spi.PersistenceProvider接口的实现类
2.如果JPA项目中只有一个JPA的实现产品,则也可以不配置该节点
JPA是需要Provider来实现其功能的,Hibernate就是JPA Provider中很强的一个。功能上
JPA是Hibernate的一个子集。
首先配置一下连接数据库的基本信息
选择persistence.xml文件底下的Connection一栏,Transaction Type选择Resource Local,然后填写一下Driver、URL、User和Password四栏的内容:

注意URL地址一栏添加的是jdbc:mysql:///jpa,而不是jdbc:mysql://jpa 是三个斜杠
这里jpa指的是数据库的名字,这个数据库是新建的,里面还没有任何表。
配置完数据库的基本信息后,persistence.xml的内容变为:
<persistence version="2.0" xmlns="http://java.sun.com/xml/ns/persistence" xmlns:xsi="http://www.w3.org/2001/XMLSchema-instance" xsi:schemaLocation="http://java.sun.com/xml/ns/persistence http://java.sun.com/xml/ns/persistence/persistence_2_0.xsd">
	<persistence-unit name="jpa_01" transaction-type="RESOURCE_LOCAL">
		<properties>

			<property name="javax.persistence.jdbc.driver" value="com.mysql.jdbc.Driver"/>
			<property name="javax.persistence.jdbc.url" value="jdbc:mysql:///jpa"/>
			<property name="javax.persistence.jdbc.user" value="root"/>
		properties>
	persistence-unit>
persistence>
配置hibernate的基本信息
直接手动添加下面的代码:
<property name="javax.persistence.jdbc.driver" value="com.mysql.jdbc.Driver"/>
<property name="javax.persistence.jdbc.url" value="jdbc:mysql:///jpa"/>
<property name="javax.persistence.jdbc.user" value="root"/>
添加完hibernate信息的persisten.xml的内容如下:
<persistence version="2.0" xmlns="http://java.sun.com/xml/ns/persistence" xmlns:xsi="http://www.w3.org/2001/XMLSchema-instance" xsi:schemaLocation="http://java.sun.com/xml/ns/persistence http://java.sun.com/xml/ns/persistence/persistence_2_0.xsd">
	<persistence-unit name="jpa_01" transaction-type="RESOURCE_LOCAL">
		<properties>

			<property name="javax.persistence.jdbc.driver" value="com.mysql.jdbc.Driver"/>
			<property name="javax.persistence.jdbc.url" value="jdbc:mysql:///jpa"/>
			<property name="javax.persistence.jdbc.user" value="root"/>


			<property name="hibernate.format_sql" value="true"/>
			<property name="hibernate.show_sql" value="true"/>
			<property name="hibernate.hbm2ddl.auto" value="update"/>
			<property name="javax.persistence.jdbc.password" value="123456"/>
		properties>
	persistence-unit>
persistence>
配置JPA的实现
按Ctl+Shift+T可以打开Open Type选择框,在选择框中输入:HibernatePersistence来找HibernatePersistence.class这个类

打开这个类后选中这个类的全称,然后粘贴到persistence.xml文件中:

配置完JPA实现的persistence.xml文件内容为:
<persistence version="2.0" xmlns="http://java.sun.com/xml/ns/persistence" xmlns:xsi="http://www.w3.org/2001/XMLSchema-instance" xsi:schemaLocation="http://java.sun.com/xml/ns/persistence http://java.sun.com/xml/ns/persistence/persistence_2_0.xsd">
	<persistence-unit name="jpa_01" transaction-type="RESOURCE_LOCAL">

		<provider>org.hibernate.ejb.HibernatePersistenceprovider>

		<properties>

			<property name="javax.persistence.jdbc.driver" value="com.mysql.jdbc.Driver"/>
			<property name="javax.persistence.jdbc.url" value="jdbc:mysql:///jpa"/>
			<property name="javax.persistence.jdbc.user" value="root"/>


			<property name="hibernate.format_sql" value="true"/>
			<property name="hibernate.show_sql" value="true"/>
			<property name="hibernate.hbm2ddl.auto" value="update"/>
			<property name="javax.persistence.jdbc.password" value="123456"/>
		properties>
	persistence-unit>
persistence>
上面的代码就是我们配置完所有必要信息后的persistence.xml文件。
2.写个实体
这里我们写一个Customer的类实体,首先在工程的src文件夹下创建一个包,然后在包下创建Customer类文件:

Customer的代码如下:
package com.learning.jpa.helloworld;

import javax.persistence.*;

@Table(name="JPA_CUSTOMERS")
@Entity
public class Customer {
	private Integer id;
	private String lastName;
	private String email;
	private int age;

	@GeneratedValue(strategy=GenerationType.AUTO)
	@Id
	public Integer getId() {
		return id;
	}
	public void setId(Integer id) {
		this.id = id;
	}

	@Column(name="LAST_NAME")
	public String getLastName() {
		return lastName;
	}
	public void setLastName(String lastName) {
		this.lastName = lastName;
	}
	public String getEmail() {
		return email;
	}
	public void setEmail(String email) {
		this.email = email;
	}
	public int getAge() {
		return age;
	}
	public void setAge(int age) {
		this.age = age;
	}
}
创建完这个实体后,在persisitence.xml文件中添加这个持久化类:
添加的代码段为:
<class>com.learning.jpa.helloworld.Customerclass>
添加完这个代码段后,整个persistence.xml的内容为:
<persistence version="2.0" xmlns="http://java.sun.com/xml/ns/persistence" xmlns:xsi="http://www.w3.org/2001/XMLSchema-instance" xsi:schemaLocation="http://java.sun.com/xml/ns/persistence http://java.sun.com/xml/ns/persistence/persistence_2_0.xsd">
	<persistence-unit name="jpa_01" transaction-type="RESOURCE_LOCAL">

		<provider>org.hibernate.ejb.HibernatePersistenceprovider>


		<class>com.learning.jpa.helloworld.Customerclass>

		<properties>

			<property name="javax.persistence.jdbc.driver" value="com.mysql.jdbc.Driver"/>
			<property name="javax.persistence.jdbc.url" value="jdbc:mysql:///jpa"/>
			<property name="javax.persistence.jdbc.user" value="root"/>


			<property name="hibernate.format_sql" value="true"/>
			<property name="hibernate.show_sql" value="true"/>
			<property name="hibernate.hbm2ddl.auto" value="update"/>
			<property name="javax.persistence.jdbc.password" value="123456"/>
		properties>
	persistence-unit>
persistence>
3.写个主类测试一下
在Customer类的同级目录下创建一个主类Main.java:

主类的测试代码如下:
package com.learning.jpa.helloworld;

import javax.persistence.*;

public class Main {
	public static void main(String[] args) {
		// 1. 创建EntitymanagerFactory
		String persistenceUnitName="jpa_01";
		EntityManagerFactory entityManagerFactory=
				Persistence.createEntityManagerFactory(persistenceUnitName);
		// 2. 创建EntityManager
		EntityManager entityManager=entityManagerFactory.createEntityManager();

		// 3. 开启事务
		EntityTransaction transaction=entityManager.getTransaction();
		transaction.begin();
		// 4. 进行持久化操作
	 	Customer customer=new Customer();
	 	customer.setAge(12);
	 	customer.setEmail("[email protected]");
		customer.setLastName("Tom");

		entityManager.persist(customer);
		// 5. 提交事务
		transaction.commit();
		// 6. 关闭EntityManager
		entityManager.close();
		// 7. 关闭EntityManagerFactory
		entityManagerFactory.close();
	}
}

