MacOSX系统下HomeBrew安装指定版本的软件 & IntelliJ IDEA 设置多个Go语言版本开发
HomeBrew安装指定版本的软件
快速多版本切换
- 通过 brew install [formula]@[tag] 安装多个版本,然后把其他版本移动到[formula]默认目录中,然后通过brew switch
切换
# 举例 安装多个go语言版本并切换
$ brew install go
$ brew install [email protected]
$ brew install [email protected]
$ brew install [email protected]

# 然后把 [email protected]/[email protected]/[email protected]安装目录下的文件移动或者复制到go目录下 ,通过 brew switch go [version]切换版本
# 切换版本语法 brew switch

# 移动其他版本目录示例
MacBookPro:go mac$ pwd
/usr/local/Cellar/go
MacBookPro:go mac$ ls
1.10.3  1.11.2  1.11.4
MacBookPro:go mac$ cd ../[email protected]
MacBookPro:[email protected] mac$ ls
1.10.7
MacBookPro:[email protected] mac$ mv 1.10.7/ ../go/

# 把其他多个版本移动到go默认目录后,查看当前目录下有哪些go版本
MacBookPro:go mac$ ls
1.10.3  1.10.7  1.11.2  1.11.4  1.8.7   1.9.7

# 切换版本并查看 切换到go 1.9.7
MacBookPro:go mac$ brew switch go 1.9.7
Cleaning /usr/local/Cellar/go/1.9.7
Cleaning /usr/local/Cellar/go/1.10.3
Cleaning /usr/local/Cellar/go/1.11.2
Cleaning /usr/local/Cellar/go/1.11.4
Cleaning /usr/local/Cellar/go/1.10.7
Cleaning /usr/local/Cellar/go/1.8.7
3 links created for /usr/local/Cellar/go/1.9.7
MacBookPro:go mac$ go version
go version go1.9.7 darwin/amd64

# 切换版本并查看 切换到go 1.10.7
MacBookPro:go mac$ brew switch go 1.10.7
Cleaning /usr/local/Cellar/go/1.9.7
Cleaning /usr/local/Cellar/go/1.10.3
Cleaning /usr/local/Cellar/go/1.11.2
Cleaning /usr/local/Cellar/go/1.11.4
Cleaning /usr/local/Cellar/go/1.10.7
Cleaning /usr/local/Cellar/go/1.8.7
3 links created for /usr/local/Cellar/go/1.10.7
MacBookPro:go mac$ go version
go version go1.10.7 darwin/amd64

# 切换版本并查看 切换到go 1.8.7
MacBookPro:go mac$ brew switch go 1.8.7
Cleaning /usr/local/Cellar/go/1.9.7
Cleaning /usr/local/Cellar/go/1.10.3
Cleaning /usr/local/Cellar/go/1.11.2
Cleaning /usr/local/Cellar/go/1.11.4
Cleaning /usr/local/Cellar/go/1.10.7
Cleaning /usr/local/Cellar/go/1.8.7
3 links created for /usr/local/Cellar/go/1.8.7
MacBookPro:go mac$ go version
go version go1.8.7 darwin/amd64
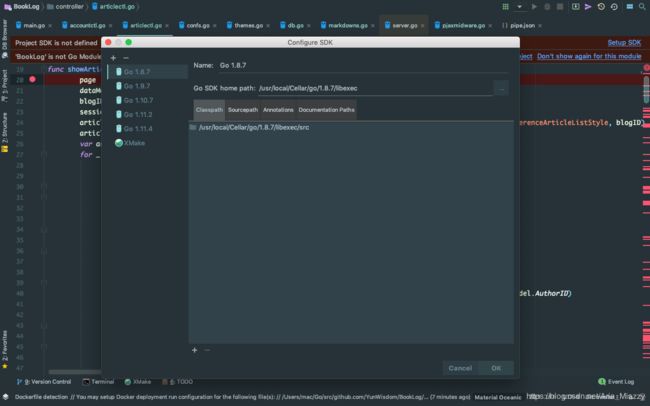
安装完毕多个版本go语言后,需要在IntelliJ IDEA 中 Setup SDK 选择对应的版本进行开发
IntelliJ IDEA -> Setup SDK
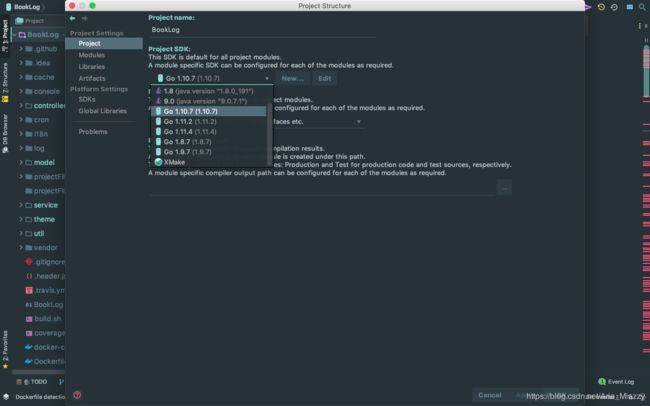
左侧菜单栏 -> 项目名 -> 鼠标右击 -> Open Module Settings 或者 按 F4
Project Settings -> Project -> 选择相应的 Go 语言版本 ,示例 1.10.7
Project Settings -> Project -> New 添加新增的Go语言版本
PS: 目前来看的话 go 1.11.* 版本暂时不支持 debug模式、但支持run模式 , go 1.10.7 以下版本,支持 run & debug 模式
IntelliJ IDEA 171.* - 173.* 版本 & 以下版本,目前是可用添加 Go 语言支持插件的,当前最新版本 IntelliJ IDEA 181.* - 183.* 目前来看暂时不支持 Go 语言插件,如果是 Intellij IDEA 181.* - 183.* 版本的同学,请选择低版本的IntelliJ IDEA 开发,当前时间2018年-2019年。
以下内容为转载
- 下文原作者:乾九二 转载来源:https://www.jianshu.com/p/aadb54eac0a8
其他方法
- 在mac中使用
brew install安装的软件默认都是最新版本的。有时候我们需要旧版本(指定版本)的时候,应该怎么做呢? - 由于在学习
thrift的过程中,希望安装0.9.3版本的thrift,但是默认brew install thrift安装的是0.10.0版本,所以就查看了下brew install是如何进行安装的。
安装源
- 其实安装主要应该是先找到对应的软件安装源,以前没有认真看
brew是如何找这个源的,今天使用命令brew info thrift看了下,发现是有一个From的:
$> brew info thrift
thrift: stable 0.10.0 (bottled), HEAD
Framework for scalable cross-language services development
https://thrift.apache.org/
/usr/local/Cellar/thrift/0.9.3 (95 files, 5.7M) *
  Poured from bottle on 2017-02-08 at 19:52:24
From: https://github.com/Homebrew/homebrew-core/blob/master/Formula/thrift.rb
==> Dependencies
Build: bison ✔
Required: boost ✔, openssl ✔
Optional: libevent ✘
==> Requirements
Optional: python ✔
==> Options
--with-erlang
    Install Erlang binding
--with-haskell
    Install Haskell binding
--with-java
    Install Java binding
--with-libevent
    Install nonblocking server libraries
--with-perl
    Install Perl binding
--with-php
    Install PHP binding
--with-python
    Build with python support
--HEAD
    Install HEAD version
==> Caveats
To install Ruby binding:
  gem install thrift

To install PHP extension for e.g. PHP 5.5:
  brew install homebrew/php/php55-thrift
- 可以看到,我这里是已经安装好的,第一行显示了
brew使用的bottled里的thrift为0.10.0版本!而我安装的为0.9.3版本,在第4行中有路径。第6行显示了From!这个很重要。 - 在我没安装之前,我查找到了这个
From,然后在浏览器中打开了 https://github.com/Homebrew/homebrew-core。并找到对应的文件:Formula/thrift.rb,发现这里其实是一个 ruby文件,打开后看到了下面主要的信息:
url "https://www.apache.org/dyn/closer.cgi?path=/thrift/0.10.0/thrift-0.10.0.tar.gz"
sha256 "2289d02de6e8db04cbbabb921aeb62bfe3098c4c83f36eec6c31194301efa10b"
- 看到这基本知道了软件安装源的相关信息了。所以,不同版本的
thrift.rb中应该是包含对应版本的软件源url和sha256的。接下来查看thrift.rb文件修改历史,提示太多,所以简单粗暴的直接将homebrew-core整个仓库git clone了下来:
git clone [email protected]:Homebrew/homebrew-core.git
- 有了本地clone的仓库,直接查看对应
0.9.3版本的thrift.rb文件log:
git log ./Formula/thrift.rb | less
- 找到后搜索
0.9.3就可以定位到对应的commit,然后获取到commmit:9d524e4。接下来切换到对应的commit:
git checkout 9d524e4
- 查看了下
./Formula/thrift.rb,发现此时里面的url和sha256变成了如下:
url "https://www.apache.org/dyn/closer.cgi?path=/thrift/0.9.3/thrift-0.9.3.tar.gz"
sha256 "b0740a070ac09adde04d43e852ce4c320564a292f26521c46b78e0641564969e"
- 可以看到,此时的版本正是需要的,接下来执行
brew安装命令进行安装0.9.3版本:
# 这里直接指定了 rb 文件,自己尝试了下,发现果然 OK
brew install ./Formula/thrift.rb
- 大功告成!


