Linux企业级——使用Playbook自动安装部署Zabbix
Linux企业级——使用Playbook自动安装部署Zabbix
实验环境:
| 虚拟机名称 | ip | 版本 | 角色 |
|---|---|---|---|
| server1 | 172.25.66.1 | 7.5 | ansible、zabbix-server、zabbix-agent |
| server2 | 172.25.66.2 | 7.5 | 远程主机hosts、db数据库 |
| server3 | 172.25.66.3 | 7.5 | 远程主机hosts、web前端 |
1.进行部署
1.1 编辑hosts文件:
[server]
172.25.66.2

[db]
172.25.66.1

[web]
172.25.66.3

[agent]
172.25.66.2
172.25.66.3

[zabbix:children]
server
web
db
1.2 创建zabbix目录
mkdir zabbix
1.3 添加playbook
vim deploy.yml
---
- hosts: db 	 #对db组的主机进行操作
  tasks:  	 #任务
    - name: install mariadb
      yum:
        name: mariadb-server,MySQL-python  #服务名称
        state: present  #状态:安装

    - name: config mariadb  #配置数据库,安全初始化
      copy:
        src: my.cnf   #数据库安全初始化文件【1】
        dest: /etc/my.cnf
      notify: restart mariadb

    - name: start mariadb  #开启数据库
      service:
        name: '{{ item }}' #引用变量
        state: started
        enabled: yes
      loop:
        - mariadb
        - firewalld

    - name: create database zabbix  #创建数据库zabbix
      mysql_db:
        login_user: root
        login_password: westos
        name: zabbix
        state: present
      notify: import create.sql  #引用触发器

    - name: create user  #创建用户
      mysql_user:
        login_user: root
        login_password: westos
        name: zabbix
        password: zabbix
        host: '%'  #%是匹配所有host的主机,即接收所有主机访问【2】
        priv: 'zabbix.*:ALL'
        state: present

    - name: copy create.sql
      copy:
        src: create.sql.gz   #zabbix-server服务提供的数据库初始化包【3】
        dest: /tmp/create.sql.gz


    - name: config firewalld  #配置防火墙
      firewalld:
        service: mysql  #允许数据库服务的访问
        permanent: yes  #服务永久生效
        immediate: yes
        state: enabled  #防火墙状态enable

  handlers:  #触发器
    - name: restart mariadb   #名称必须与上面一致
      service:
        name: mariadb
        state: restarted

    - name: import create.sql  #将zabbix数据库初始化包导入数据库
      mysql_db:
        login_user: root
        login_password: westos
        name: zabbix
        state: import
        target: /tmp/create.sql.gz

- hosts: server
  tasks:
    - name: add zabbix repo #配置yum源
      yum_repository:
        name: zabbix
        description: zabbix 4.0
        baseurl: https://mirrors.aliyun.com/zabbix/zabbix/4.0/rhel/7/x86_64/
        gpgcheck: no

    - name: add update repo #添加版本较新的yum源,满足zabbix版本安装需求
      yum_repository:
        name: update
        description: non-supported
        baseurl: https://mirrors.aliyun.com/zabbix/non-supported/rhel/7/x86_64/
        gpgcheck: no

    - name: install zabbix-server
      yum:
        name: zabbix-server-mysql,zabbix-agent
        state: present

    - name: config zabbix-server
      copy:
        src: zabbix_server.conf #将现有目录的zabbix_server.conf配置文件复制到安装zabbix服务的主机上/etc/zabbix/zabbix_server.conf 【4】
        dest: /etc/zabbix/zabbix_server.conf
        owner: root
        group: zabbix
        mode: 640
      notify: restart zabbix-server  #触发器

    - name: start zabbix-server #开启服务
      service:
        name: "{{ item }}"
        state: started
      loop:
        - zabbix-server
        - zabbix-agent
        - firewalld

    - name: config firewalld #配置防火墙
      firewalld:
        port: 10051/tcp  #添加zabbix服务端口
        permanent: yes
        immediate: yes
        state: enabled

  handlers: #触发器
    - name: restart zabbix-server		#重启服务
      service:
        name: zabbix-server
        state: restarted

- hosts: web  #配置web主机
  tasks:  #配置yum源,满足高版本php安装包要求,否则在安装时会报错
    - name: add zabbix repo		#配置zabbix的yum源
      yum_repository:
        name: zabbix
        description: zabbix 4.0
        baseurl: https://mirrors.aliyun.com/zabbix/zabbix/4.0/rhel/7/x86_64/
        gpgcheck: no

    - name: add update repo		#配置更新yum源
      yum_repository:
        name: update
        description: non-supported
        baseurl: https://mirrors.aliyun.com/zabbix/non-supported/rhel/7/x86_64/
        gpgcheck: no

    - name: add centos repo		#添加centos的yum源
      yum_repository:
        name: centos
        description: centos 7
        baseurl: https://mirrors.aliyun.com/centos/7/os/x86_64/
        gpgcheck: no

    - name: install zabbix-web 		#安装zabbix前端界面
      yum:
        name: zabbix-web-mysql  # Zabbix的web端会通过数据库的数据来展示绘图
        state: present

    - name: config zabbix-web		#配置zabbix前端界面
      copy:
        src: zabbix.conf  #【5】
        dest: /etc/httpd/conf.d/zabbix.conf
      notify: restart httpd			#触发器

    - name: start httpd				#开启httpd服务
      service:
        name: "{{ item }}"
        state: started
      loop:
        - httpd
        - firewalld

    - name: config firewalld		#配置防火墙,添加http服务
      firewalld:
        service: http
        permanent: yes
        immediate: yes
        state: enabled


  handlers:					#触发器,重启httpd服务
    - name: restart httpd
      service:
        name: httpd
        state: restarted


- hosts: server  #配置zabbix-agent
  tasks:
    - name: add zabbix repo				#配置zabbix的yum源
      yum_repository:
        name: zabbix
        description: zabbix 4.0
        baseurl: https://mirrors.aliyun.com/zabbix/zabbix/4.0/rhel/7/x86_64/
        gpgcheck: no

    - name: install zabbix-agent		#安装agent端
      yum:
        name: zabbix-agent
        state: present

    - name: config zabbix-agent			#配置agent端
      template:
        src: zabbix_agentd.conf.j2   #【6】
        dest: /etc/zabbix/zabbix_agentd.conf
        owner: root
        group: root
        mode: 644
      notify: restart zabbix-agent		#触发器

    - name: start zabbix-agent			#启动agent端
      service:
        name: "{{ item }}"
        state: started
      loop:
        - zabbix-agent
        - firewalld

    - name: config firewalld			#配置防火墙,添加端口
      firewalld:
        port: 10050/tcp
        permanent: yes
        immediate: yes
        state: enabled

  handlers:						#触发器,重启agent端
    - name: restart zabbix-agent
      service:
        name: zabbix-agent
        state: restarted
在playbook中的相关文件:
【1】数据库安全初始化文件 my.cnf
在server1:
安装数据库mariadb-server,并进行安全初始化。再将my.cnf拷贝到/home/devops/ansible/zabbix/目录下。
sudo cp /eth/my.cnf .
【3】数据库初始化包
在server1:
提前在安装zabbix-server-mysql,生成配置文件 /usr/share/doc/zabbix-server-mysql-4.0.14/create.sql.gz,将其拷贝到zabbix目录下。
cp /usr/share/doc/zabbix-server-mysql-4.0.14/create.sql.gz zabbix/
【4】zabbix_server.conf
在server1:
提前在server1上安装zabbix-server,生成配置文件/etc/zabbix/zabbix_server.conf,复制到zabbix目录下。编辑zabbix_server.conf。
sudo chown devops.devops zabbix_server.conf  #修改所有人和所有组,直接复制过了所有人和所有组是root
vim zabbix_server.conf
91 BHost=172.25.66.1
116 DBUser=zabbix
124 DBPassword=zabbix
139 DBPort=3306
【5】zabbix.conf
在server3:
提前安装zabbix-web和httpd后生成zabbix.conf文件,将其复制到zabbix目录下,并修改时区
sudo scp 172.25.1.3:/etc/httpd/conf.d/zabbix.conf zabbix/
vim zabbix.conf
	php_value date.timezone Asia/Shanghai
【6】zabbix_agentd.conf.j2
在server1:
提前安装zabbix-agent
cp /etc/zabbix/zabbix_agentd.conf zabbix/ .
mv zabbix/zabbix_agentd.conf zabbix/zabbix_agentd.conf.j2
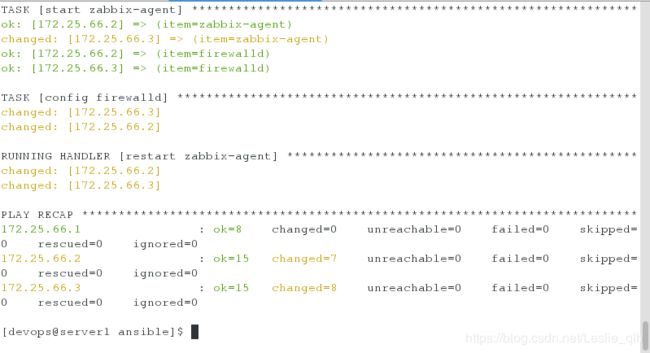
1.4 执行deploy.yml
ansible-playbook zabbix/deploy.yml


