SpringCloud踩坑笔记 | 注册和发现
SpringCloud踩坑笔记是一个学习过程,其中会存在不准确或者理论缺失,如果需要完善自己的理论和知识库可以在网络上继续学习,这里仅供大家学习和参考。
一、微服务核心问题
以往的项目都是将多服务整合再一个Jar或一个war中,而微服务则又往往是分布式的多服务系统,服务架构主要是解决以下四个问题,我觉得说的非常有道理:
- 1.服务很多,客户如何与访问服务?
- 2.服务之间如何通信?
- 3.服务之间如何治理?
- 4.服务器挂了怎么办?
解决方法
- 1.SpringCloud NetFlix
- 2.Apache Dubbo
- 3.SpringCloud Alibaba
学习要点
- 1.API
- 2.HTTP,RPC
- 3.注册和发现
- 4.熔断机制
解决以上4个基本上你就学会了微服务
Dubbo和SpringCloud的区别
Dubbo使用的是RPC通信,而SpringCloud是HTTP通信,虽然牺牲了通信性能但是使用起来方便,学习成本低,Dubbo相当于组装机,而SpringCloud相当于品牌机。
SpringCloud的相关网站
中文网:[https://www.springcloud.cc/]
中文社区:[http://www.springcloud.cn/]
官网:[https://spring.io/projects/spring-cloud]
二、注册和发现
Spring Cloud Eureka是Spring Cloud Netflix项目下的服务治理模块。而Spring Cloud Netflix项目是Spring Cloud的子项目之一,主要内容是对Netflix公司一系列开源产品的包装,它为Spring Boot应用提供了自配置的Netflix OSS整合。通过一些简单的注解,开发者就可以快速的在应用中配置一下常用模块并构建庞大的分布式系统。它主要提供的模块包括:服务发现(Eureka),断路器(Hystrix),智能路由(Zuul),客户端负载均衡(Ribbon)等。
构建步骤:
- 搭建注册中心Eureka Server
- 搭建服务提供者Eureka Client
尤其注意springcloud的版本和SpringBoot版本对应问题,这里使用的是Finchley.RELEASE和SpringBoot2.0.3.RELEASE版本
1、创建注册中心
创建一个工程导入依赖
    org.springframework.boot
    spring-boot-starter-parent
    2.0.3.RELEASE


        org.springframework.boot
        spring-boot-starter


        org.springframework.boot
        spring-boot-starter-web


        org.springframework.cloud
        spring-cloud-starter-eureka-server
        1.4.6.RELEASE


            org.springframework.cloud
            spring-cloud-dependencies
            Finchley.RELEASE
            pom
            import
application.properties
spring.application.name=eureka-server
server.port=7001

eureka.instance.hostname=localhost
#fetch-registry如果为false, 则表示自己为注册中心
eureka.client.fetch-registry=false
#表示是否向eureka注册中心注册自己
eureka.client.register-with-eureka=false
启动类
//开启服务,可以接受别人注册进来
@EnableEurekaServer
@SpringBootApplication
public class Sc01 {
    public static void main(String[] args) {
        SpringApplication.run(Sc01.class,args);
    }
}
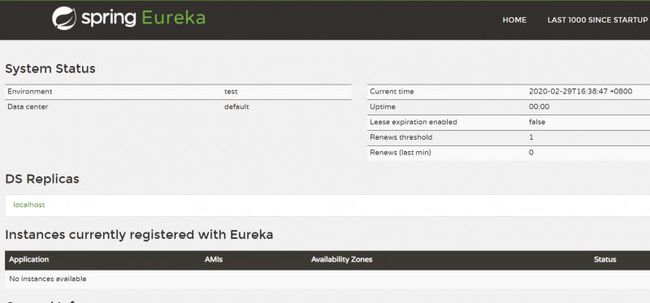
启动后浏览器输入http://localhost:7001/就可以看到如下界面,说明服务注册中心创建成功
2、服务提供者
创建一个工程导入依赖
    org.springframework.boot
    spring-boot-starter-parent
    2.0.3.RELEASE


        org.springframework.cloud
        spring-cloud-starter-eureka
        1.3.1.RELEASE


        org.springframework.boot
        spring-boot-starter-web


            org.springframework.cloud
            spring-cloud-dependencies
            Finchley.RELEASE
            pom
            import
application.properties
spring.application.name=eureka-client
server.port=8001
#eureka.client.serviceUrl.defaultZone属性对应服务注册中心的配置内容,指定服务注册中心的位置
eureka.client.serviceUrl.defaultZone=http://localhost:7001/eureka/
创建测试类
import org.springframework.beans.factory.annotation.Autowired;
import org.springframework.cloud.client.discovery.DiscoveryClient;
import org.springframework.web.bind.annotation.GetMapping;
import org.springframework.web.bind.annotation.RestController;

@RestController
public class DcController {


    @Autowired
    DiscoveryClient discoveryClient;

    @GetMapping("/getServices")
    public String dc() {
        String services = "Services:" + discoveryClient.getServices();
        System.out.println(services);
        return services;
    }

}
启动类
//启动类
@SpringBootApplication
@EnableDiscoveryClient  //服务发现
public class ScClient {
    public static void main(String[] args) {
        SpringApplication.run(ScClient.class, args);
    }
}
启动运行之后看到服务提供者控制台输出:
Getting all instance registry info from the eureka server
The response status is 200
这个时候就注册成功了,此时浏览器输入http://localhost:8001/getServices 就可以看到如下:
Services:[eureka-client]
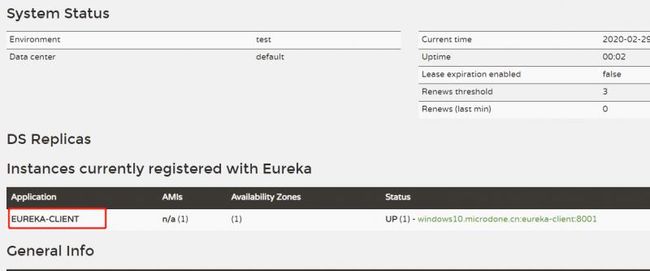
此时浏览器输入http://localhost:7001/可以看到如下界面:
此时你看到了左面有个EUREKA-CLIENT,这个就是配置文件中的项目名称;
右边有个windows10.microdone.cn:eureka-client:8001
点击它会跳到一个会出错的地址http://windows10.microdone.cn:8001/actuator/info
那么如何改变这个值以及他的跳转?
修改服务提供方的application.properties文件:
spring.application.name=eureka-client
server.port=8001
eureka.client.serviceUrl.defaultZone=http://localhost:7001/eureka/

eureka.instance.instance-id=springcloud-client
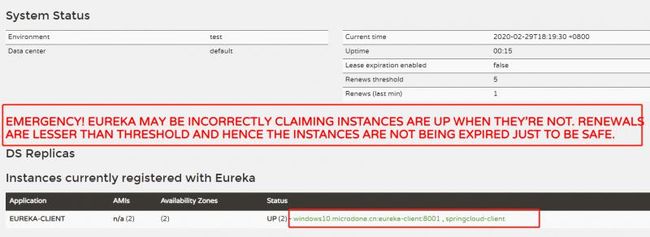
重启之后,浏览器中输入http://localhost:7001/
你会看到一个爆红,这个是eureka的自我保护机制。如果服务提供者宕机了,eureka不会立马清理,eureka会存储连接信息,当服务提供者恢复时会自动连接上,可通过eureka.server.enable-self-preservation=false配置关闭保护机制
修改完status的值,再来就该跳转
给服务提供者添加以下依赖:
    org.springframework.boot
    spring-boot-starter-actuator
修改服务提供者的application.properties文件:
#修改Application的值,也就是服务名称(即左边的那个值)
eureka.instance.appname=iFillDream
#修改status的值(即右边的值)
eureka.instance.instance-id=springcloud-client
#自定义信息
info.compay.name=iFillDream
info.auth.name=RickSun
此时重启运行,在点击右方的status地址,则可以看到以下提示,方便程序查看服务的作用
{"compay":{"name":"iFillDream"},"auth":{"name":"RickSun"}}
在getServices方法中加入以下代码:
//获取实例,serviceId为服务提供者的spring.application.name值
List instanceList = discoveryClient.getInstances("springcloud-client");
for (ServiceInstance instance : instanceList) {
		System.out.println(
						instance.getHost()+"\t"+
										instance.getPort()+"\t"+
										instance.getUri()+"\t"+
										instance.getServiceId()
		);
}
再在浏览器中调用该方法http://localhost:8001/getServices此时服务提供者的控制台输出:
http://windows10.microdone.cn:8001 IFILLDREAM


