JDBC使用
渣渣用惯了框架回头来学习JDBC了,毕竟还是要知其然知其所以然。
本文目录
- JDBC介绍
- 配置Mysql-connector的Jar包
- 1)下载Jar包
- 2)集成到IDEA
- JDBC运用
- 1. 数据库连接,statement语句和prepared
- resultset结果集的使用
- batch批处理
- 事务
- CLOB文本大对象使用
- 封装JDBC
JDBC介绍
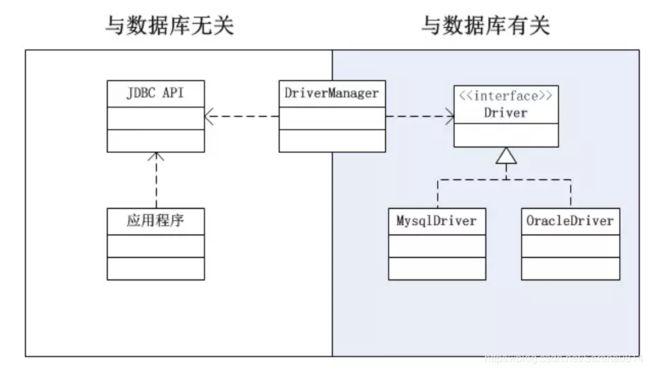
JDBC是以统一方式访问数据库的API,无论实际使用的是Mysql数据库还是Oracle数据库,加入的数据库Jar包后,用户只需操作统一的JDBC即可。
配置Mysql-connector的Jar包
1)下载Jar包
先在网址https://dev.mysql.com/downloads/connector/j/下载Mysql的Jar包。由于我的mysql数据库是8.0版本的,所以驱动也下载8.0版本的,旧版本的数据库最好对应下载旧版本的驱动。
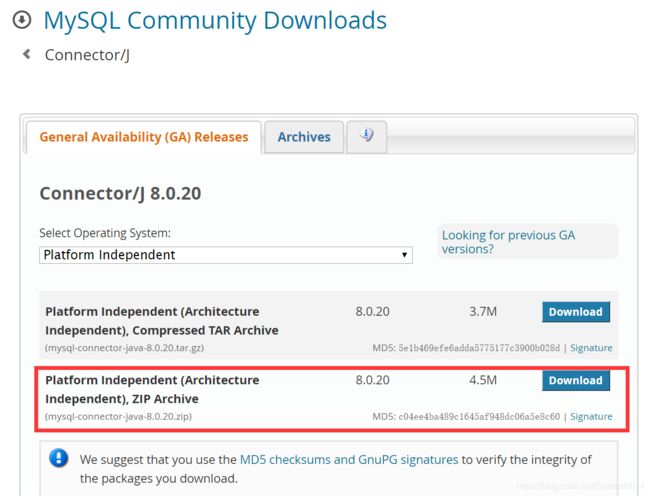
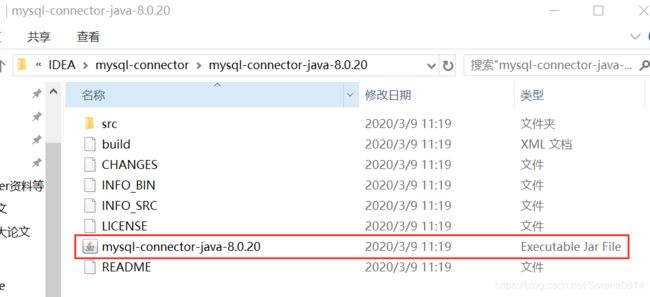
将下载下来的zip压缩包解压,可发现压缩包中有mysql-connector-java-8.0.20.jar包。
2)集成到IDEA
在idea项目中选择File——ProjectStruct——Modules——Dependencies,选择+号,选择Jars or directors。

选择解压路径下的jar包
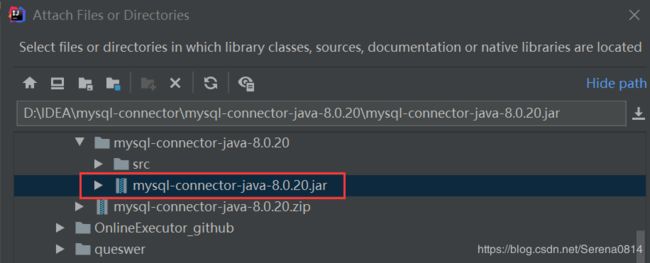
于是Jar包添加成功,在External Libraries中可看见

JDBC运用
1. 数据库连接,statement语句和prepared
(1)先创建一个名叫jdbc_test的数据库,再建立一张名为t_user的表,在其中设三个字段:id,username,lasttime。

(2)编写Java程序,一定要注意此处的url,不要写错
public class Demo {
    public static void main(String[] args) throws ClassNotFoundException, SQLException {
        // 加载相应的驱动
        Class.forName("com.mysql.cj.jdbc.Driver");

        String url = "jdbc:mysql://localhost:3306/jdbc_test?useUnicode=true&characterEncoding=utf-8&useSSL=false&serverTimezone=Asia/Shanghai;
        String username = "root";
        String password = "root";
        // 建立数据库连接,远程连接中包含socket对象,比较耗时,实际开发中常用连接池
        Connection  connection = DriverManager.getConnection(url,username,password);

        // statement语句容易发生sql注入危险,不建议使用
        Statement statement = connection.createStatement();
        String sql = "insert into t_user values(1,'zd',now())";
        statement.execute(sql);

		// 后开的先关
        statement.close();
        connection.close();
    }
}
public class Demo {
    public static void main(String[] args) throws ClassNotFoundException, SQLException {
        // 加载相应的驱动
        Class.forName("com.mysql.cj.jdbc.Driver");

        String url = "jdbc:mysql://localhost:3306/jdbc_test?useUnicode=true&characterEncoding=utf-8&useSSL=false&serverTimezone=Asia/Shanghai";
        String username = "root";
        String password = "root";
        // 建立数据库连接,远程连接中包含socket对象,比较耗时,实际开发中常用连接池
        Connection  connection = DriverManager.getConnection(url,username,password);

        // statement语句容易发生sql注入危险,不建议使用
        Statement statement = connection.createStatement();

        String id = "1 or 1=1";
        String sql = "delete from t_user where id=" + id;
        statement.execute(sql);

        statement.close();
        connection.close();
    }
}
由于id通常是外部传进来的,此时运行这个sql语句相当于直接删库了,非常不安全。
(4)预编译preparestatement语句的使用
public class Demo {
    public static void main(String[] args) throws ClassNotFoundException, SQLException {
        // 加载相应的驱动
        Class.forName("com.mysql.cj.jdbc.Driver");

        String url = "jdbc:mysql://localhost:3306/jdbc_test?useUnicode=true&characterEncoding=utf-8&useSSL=false&serverTimezone=Asia/Shanghai";
        String username = "root";
        String password = "root";
        Connection  connection = DriverManager.getConnection(url,username,password);

        // 采用?占位符
        String sql = "insert into t_user values(?,?,?)";
        PreparedStatement preparedStatement = connection.prepareStatement(sql);
        // 设置参数,从1开始,不是从0开始,每个参数设置有对应的类型
        preparedStatement.setInt(1,1);
        preparedStatement.setString(2,"wy");
        preparedStatement.setTimestamp(3,new Timestamp(System.currentTimeMillis()));

        preparedStatement.execute();

        preparedStatement.close();
        connection.close();
    }
}
resultset结果集的使用
假设数据库有多条记录:

使用ResultSet来保存查询得到的记录:
public class Demo {
    public static void main(String[] args) throws ClassNotFoundException, SQLException {

        Class.forName("com.mysql.cj.jdbc.Driver");

        String url = "jdbc:mysql://localhost:3306/jdbc_test?useUnicode=true&characterEncoding=utf-8&useSSL=false&serverTimezone=Asia/Shanghai";
        String username = "root";
        String password = "root";
        Connection  connection = DriverManager.getConnection(url,username,password);

        String sql = "select * from t_user where id > ?";
        PreparedStatement preparedStatement = connection.prepareStatement(sql);
        preparedStatement.setInt(1,2);
        ResultSet resultSet = preparedStatement.executeQuery();

        while (resultSet.next()) {
            System.out.println("id=" + resultSet.getInt(1) + ",username=" + resultSet.getString(2)
                + "," + resultSet.getTimestamp(3));
        }

        resultSet.close();
        preparedStatement.close();
        connection.close();
    }
}
batch批处理
先将数据库清空(不清也可以),然后插入1000条数据。此时把数据库的自动提交改为手动提交。采用statement的方式更快速。
public class Demo {
    public static void main(String[] args) throws ClassNotFoundException, SQLException {
        // 加载相应的驱动
        Class.forName("com.mysql.cj.jdbc.Driver");

        String url = "jdbc:mysql://localhost:3306/jdbc_test?useUnicode=true&characterEncoding=utf-8&useSSL=false&serverTimezone=Asia/Shanghai";
        String username = "root";
        String password = "root";
        Connection  connection = DriverManager.getConnection(url,username,password);

        // 改为手动提交
        connection.setAutoCommit(false);
        Statement statement = connection.createStatement();
        long start = System.currentTimeMillis();

        for (int i = 0;i < 1000; ++i) {
            statement.addBatch("insert into t_user(username,lasttime) values('a" + i + "',now())");
        }
        statement.executeBatch();
        connection.commit();
        long end = System.currentTimeMillis();
        System.out.println("插入1000条数据使用的时间为:" + (end - start) + "ms");

        statement.close();
        connection.close();
    }
}
事务
事务开始于:
(1)连接到数据库上,并执行一条DML语句(插入,删除,更新);
(2)前一个事务结束后又输入另一条DML语句。
事务结束于:
(1)执行commit或rollback语句;
(2)执行一条DDL语句,如CREATE TABLE,此时会自动执行commit语句;
(3)执行一条DCL语句,如GRANT。此时会自动执行commit语句;
(4)断开与数据库的连接;
(5)执行一条DML语句,但该语句失败了,此时会为这个失败的DML语句执行rollback语句。
例1:不设置事务,先后向数据库中插入记录(1,‘aa’,now()),(1,‘bb’,now())。
public class Demo {
    public static void main(String[] args) throws ClassNotFoundException, SQLException {
        // 加载相应的驱动
        Class.forName("com.mysql.cj.jdbc.Driver");

        String url = "jdbc:mysql://localhost:3306/jdbc_test?useUnicode=true&characterEncoding=utf-8&useSSL=false&serverTimezone=Asia/Shanghai";
        String username = "root";
        String password = "root";
        Connection  connection = DriverManager.getConnection(url,username,password);

        PreparedStatement preparedStatement = connection.prepareStatement("insert into t_user values(?,?,?)");
        preparedStatement.setInt(1,1);
        preparedStatement.setString(2,"aa");
        preparedStatement.setTimestamp(3,new Timestamp(System.currentTimeMillis()));
        preparedStatement.executeUpdate();

        PreparedStatement preparedStatement2 = connection.prepareStatement("insert into t_user values(?,?,?)");
        preparedStatement2.setInt(1,1);
        preparedStatement2.setString(2,"bb");
        preparedStatement2.setTimestamp(3,new Timestamp(System.currentTimeMillis()));
        preparedStatement2.executeUpdate();

        preparedStatement.close();
        preparedStatement2.close();
        connection.close();
    }
}
运行结果是数据库中只成功插入一条记录(1,‘aa’,now()),因为id是主键,第二条记录插入时抛异常了,第二条记录回滚没有影响第一条记录的插入。
例2:采用事务插入这两条数据。
public class Demo {
    public static void main(String[] args) throws ClassNotFoundException, SQLException {
        // 加载相应的驱动
        Class.forName("com.mysql.cj.jdbc.Driver");

        String url = "jdbc:mysql://localhost:3306/jdbc_test?useUnicode=true&characterEncoding=utf-8&useSSL=false&serverTimezone=Asia/Shanghai";
        String username = "root";
        String password = "root";
        Connection  connection = DriverManager.getConnection(url,username,password);

        // 改为手动提交
        connection.setAutoCommit(false);

        PreparedStatement preparedStatement = connection.prepareStatement("insert into t_user values(?,?,?)");
        preparedStatement.setInt(1,1);
        preparedStatement.setString(2,"aa");
        preparedStatement.setTimestamp(3,new Timestamp(System.currentTimeMillis()));
        preparedStatement.executeUpdate();

        PreparedStatement preparedStatement2 = connection.prepareStatement("insert into t_user values(?,?,?)");
        preparedStatement2.setInt(1,1);
        preparedStatement2.setString(2,"bb");
        preparedStatement2.setTimestamp(3,new Timestamp(System.currentTimeMillis()));
        preparedStatement2.executeUpdate();

        connection.commit();

        preparedStatement.close();
        preparedStatement2.close();
        connection.close();
    }
}
这次由于第二条记录出错,整个事务回滚,导致两条记录都没能插入到数据库中。
CLOB文本大对象使用
Mysql中的文本对象有:
(1)TINYTEST:最大255字符(2^8-1)
(2)TEST:最大65535字符(2^16-1)
(3)MEDIUMTEST:最大16777215字符(2^24-1)
(4)LONGTEST:最大4GB字符(2^32-1)
现在表中增加一个字段info,设置为TEXT格式。CLOB的操作必须通过流的方式,一下采用两种方式向表中插入数据。同时取出数据也需要通过流的方式。
public class Demo {
    public static void main(String[] args) throws ClassNotFoundException, SQLException, IOException {
        // 加载相应的驱动
        Class.forName("com.mysql.cj.jdbc.Driver");

        String url = "jdbc:mysql://localhost:3306/jdbc_test?useUnicode=true&characterEncoding=utf-8&useSSL=false&serverTimezone=Asia/Shanghai";
        String username = "root";
        String password = "root";
        Connection  connection = DriverManager.getConnection(url,username,password);

        // 第一种方式通过文件流写入到数据库中
        PreparedStatement preparedStatement = connection.prepareStatement("insert into t_user values(?,?,?,?)");
        preparedStatement.setInt(1,1);
        preparedStatement.setString(2,"aa");
        preparedStatement.setTimestamp(3,new Timestamp(System.currentTimeMillis()));
        preparedStatement.setClob(4,new FileReader("C:\\Users\\whatsoooever\\Desktop\\a.txt"));
        preparedStatement.executeUpdate();

        // 第二种直接写字符串,但也要通过流
        PreparedStatement preparedStatement2 = connection.prepareStatement("insert into t_user values(?,?,?,?)");
        preparedStatement2.setInt(1,2);
        preparedStatement2.setString(2,"bb");
        preparedStatement2.setTimestamp(3,new Timestamp(System.currentTimeMillis()));
        preparedStatement2.setClob(4,new InputStreamReader(new ByteArrayInputStream("world,hello!".getBytes())));
        preparedStatement2.executeUpdate();

        // 通过流来读取大文本
        PreparedStatement preparedStatement3 = connection.prepareStatement("select * from t_user");
        ResultSet resultSet = preparedStatement3.executeQuery();
        Reader reader = null;
        while (resultSet.next()) {
            Clob clob = resultSet.getClob(4);
            reader = clob.getCharacterStream();
            int temp = 0;
            StringBuilder sb = new StringBuilder();
            while ((temp = reader.read()) != -1) {
                sb.append((char)temp);
            }
            System.out.println(resultSet.getString(2) + ":" + sb);
        }

        reader.close();
        preparedStatement3.close();
        preparedStatement2.close();
        preparedStatement.close();
        connection.close();
    }
}
封装JDBC
总体思路是先依照数据库中的表写个javabean用来封装返回值;然后写个properties文件,里面配置了mysql的一些信息;再编写JDBCUtil类把常用工具封装在里面。
(1)数据库jdbc_test中的表t_user目前的字段和数据情况:
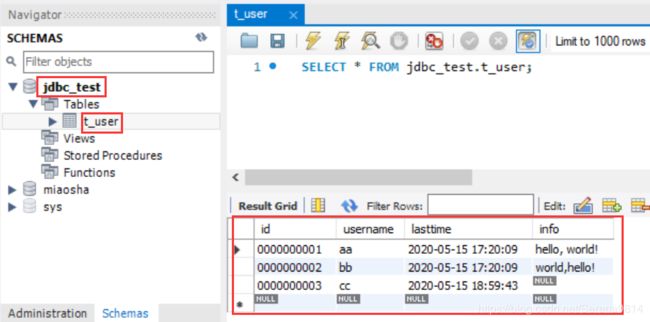
(2)根据表来定义User类,类的属性与数据库保持一致:
public class User {
    int id;
    String username;
    Timestamp lasttime;
    String info;

    public User(int id, String username, Timestamp lasttime, String info) {
        this.id = id;
        this.username = username;
        this.lasttime = lasttime;
        this.info = info;
    }

    public int getId() {
        return id;
    }

    public void setId(int id) {
        this.id = id;
    }

    public String getUsername() {
        return username;
    }

    public void setUsername(String username) {
        this.username = username;
    }

    public Timestamp getLasttime() {
        return lasttime;
    }

    public void setLasttime(Timestamp lasttime) {
        this.lasttime = lasttime;
    }

    public String getInfo() {
        return info;
    }

    public void setInfo(String info) {
        this.info = info;
    }
}
(3)IDEA中建立一个Resources文件夹,然后在文件夹里新建一个properties文件用来配置数据库的信息:

新建Resource Bundle 为Properties文件:

编辑新建的db.properties,写下如下配置:
mysqlDriver=com.mysql.cj.jdbc.Driver
mysqlURL=jdbc:mysql://localhost:3306/jdbc_test?useUnicode=true&characterEncoding=utf-8&useSSL=false&serverTimezone=Asia/Shanghai
username=root
password=root
然后将Resource文件夹设置为资源文件夹,具体是File——Project Structure——Modules

接着编写工具类JDBCUtil,封装初始化配置类、连接和释放连接的方法:
public class JDBCUtil {

    private static Properties properties = null;

    /**
     * 加载配置只需初始化时执行一次,用静态代码块实现
     */
    static {
        properties = new Properties();
        try {
            properties.load(Thread.currentThread().getContextClassLoader().getResourceAsStream("db.properties"));
        } catch (IOException e) {
            e.printStackTrace();
        }
    }

    public static Connection getConnection() {
        try {
            Class.forName(properties.getProperty("mysqlDriver"));
            return DriverManager.getConnection(properties.getProperty("mysqlURL"),
                    properties.getProperty("username"),properties.getProperty("password"));
        } catch (Exception e) {
            e.printStackTrace();
            return null;
        }
    }

    public static void close(Connection connection) {
        try {
            if (connection != null) {
                connection.close();
            }
        } catch (SQLException e) {
            e.printStackTrace();
        }
    }

    public static void close(PreparedStatement pst, Connection connection) {
        try {
            if (pst != null) {
                pst.close();
            }
        } catch (SQLException e) {
            e.printStackTrace();
        }
        close(connection);
    }

    public static void close(ResultSet rs, PreparedStatement pst, Connection connection) {
        try {
            if (rs != null) {
                rs.close();
            }
        } catch (SQLException e) {
            e.printStackTrace();
        }
        close(pst,connection);
    }
}
最后编写Demo类测试:
public class Demo {
    public static void main(String[] args) {

        Connection connection = null;
        PreparedStatement preparedStatement = null;
        ResultSet resultSet = null;
        List<User> list = new ArrayList<>();
        try {
            connection = JDBCUtil.getConnection();
            preparedStatement = connection.prepareStatement("select * from t_user");
            resultSet = preparedStatement.executeQuery();

            while (resultSet.next()) {
                User user = new User(resultSet.getInt(1),resultSet.getString(2),
                        resultSet.getTimestamp(3),resultSet.getString(4));
                list.add(user);
            }

        } catch (SQLException e) {
            e.printStackTrace();
        } finally {
            JDBCUtil.close(resultSet,preparedStatement,connection);
        }

        for (User u : list) {
            System.out.println(u.id + "," + u.username + "," + u.lasttime + "," + u.info);
        }
    }
}


