Android音频开发
这篇博客 转载自 https://www.jianshu.com/p/c0222de2faed
这里涉及到ndk的一些知识,对于.mk文件不太熟悉的同学要自己去 官网 或者搜索一些博客了解基本知识。
Android音频开发
- 1. 音频基础知识
- 音频基础知识
- 常用音频格式
- 音频开发的主要应用
- 音频开发的具体内容
- 2. 使用AudioRecord录制pcm格式音频
- AudioRecord类的介绍
- 实现
- 其他
- 3. 使用AudioRecord实现录音的暂停和恢复
- 解决办法
- 实现
- 其他
- 4. PCM转WAV格式音频
- wav 和 pcm
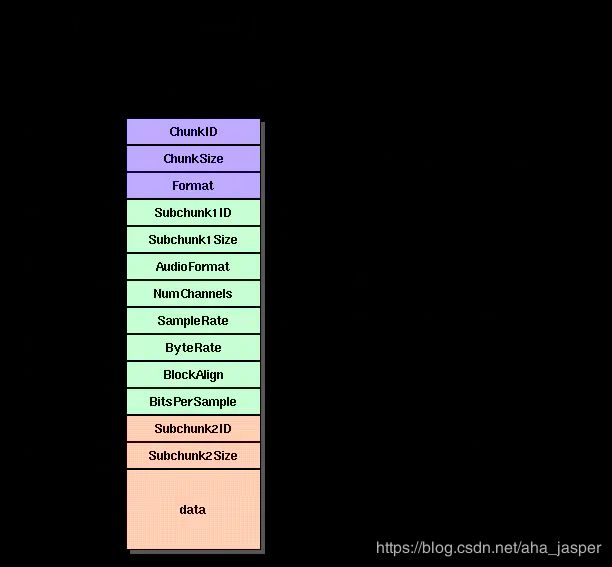
- WAV头文件
- java 生成头文件
- PCM转Wav
- 参考链接:
- 5. Mp3的录制 - 编译Lame源码
- 编译 so包
- 编译
- 6. Mp3的录制 - 使用Lame实时录制MP3格式音频
- 前言
- 代码实现
- 使用
- 7. 音乐可视化-FFT频谱图
- 实现
- 准备工作
- 开始播放
- 使用可视化类Visualizer获取当前音频数据
- 编写自定义控件,展示数据
1. 音频基础知识
音频基础知识
采样和采样频率:
现在是数字时代,在音频处理时要先把音频的模拟信号变成数字信号,这叫A/D转换。要把音频的模拟信号变成数字信号,就需要采样。一秒钟内采样的次数称为采样频率
采样频率越高,越接近原始信号,但是也加大了运算处理的复杂度。16000Hz和44.1kHZ(1)
采样位数/位宽:
数字信号是用0和1来表示的。采样位数就是采样值用多少位0和1来表示,也叫采样精度,用的位数越多就越接近真实声音。如用8位表示,采样值取值范围就是-128 ~ 127,如用16位表示,采样值取值范围就是-32768 ~ 32767。
声道(channel):
通常语音只用一个声道。而对于音乐来说,既可以是单声道(mono),也可以是双声道(即左声道右声道,叫立体声stereo),还可以是多声道,叫环绕立体声。
编解码 :
通常把音频采样过程也叫做脉冲编码调制编码,即PCM(Pulse Code Modulation)编码,采样值也叫PCM值。 如果把采样值直接保存或者发送,会占用很大的存储空间。以16kHz采样率16位采样位数单声道为例,一秒钟就有16/8*16000 = 32000字节。为了节省保存空间或者发送流量,会对PCM值压缩。
目前主要有三大技术标准组织制定压缩标准:
- ITU,主要制定有线语音的压缩标准(g系列),有g711/g722/g726/g729等。
- 3GPP,主要制定无线语音的压缩标准(amr系列等),有amr-nb/amr-wb。后来ITU吸纳了amr-wb,形成了g722.2。
- MPEG,主要制定音乐的压缩标准,有11172-3,13818-3/7,14496-3等。
一些大公司或者组织也制定压缩标准,比如iLBC,OPUS。
编码过程:模拟信号->抽样->量化->编码->数字信号
压缩:
对于自然界中的音频信号,如果转换成数字信号,进行音频编码,那么只能无限接近,不可能百分百还原。所以说实际上任何信号转换成数字信号都会“有损”。但是在计算机应用中,能够达到最高保真水平的就是PCM编码。因此,PCM约定俗成了无损编码。我们而习惯性的把MP3列入有损音频编码范畴,是相对PCM编码的。强调编码的相对性的有损和无损
码率:
码率 = 采样频率 * 采样位数 * 声道个数; 例:采样频率44.1KHz,量化位数16bit,立体声(双声道),未压缩时的码率 = 44.1KHz * 16 * 2 = 1411.2Kbps = 176.4KBps,即每秒要录制的资源大小,理论上码率和质量成正比。
800 bps – 能够分辨的语音所需最低码率(需使用专用的FS-1015语音编解码器)
8 kbps —电话质量(使用语音编码)
8-500 kbps --Ogg Vorbis和MPEG1 Player1/2/3中使用的有损音频模式
500 kbps–1.4 Mbps —44.1KHz的无损音频,解码器为FLAC Audio,WavPack或Monkey's Audio
1411.2 - 2822.4 Kbps —脉冲编码调制(PCM)声音格式CD光碟的数字音频
5644.8 kbps —SACD使用的Direct Stream Digital格式
常用音频格式
WAV 格式:音质高 无损格式 体积较大
AAC(Advanced Audio Coding) 格式:相对于 mp3,AAC 格式的音质更佳,文件更小,有损压缩,一般苹果或者Android SDK4.1.2(API 16)及以上版本支持播放,性价比高
AMR 格式:压缩比比较大,但相对其他的压缩格式质量比较差,多用于人声,通话录音
AMR分类:
AMR(AMR-NB): 语音带宽范围:300-3400Hz,8KHz抽样
mp3 格式:特点 使用广泛, 有损压缩,牺牲了12KHz到16KHz高音频的音质
音频开发的主要应用
- 音频播放器
- 录音机
- 语音电话
- 音视频监控应用
- 音视频直播应用
- 音频编辑/处理软件(ktv音效、变声, 铃声转换)
- 蓝牙耳机/音箱
音频开发的具体内容
- 音频采集/播放
- 音频算法处理(去噪、静音检测、回声消除、音效处理、功放/增强、混音/分离,等等)
- 音频的编解码和格式转换
- 音频传输协议的开发(SIP,A2DP、AVRCP,等等)
2. 使用AudioRecord录制pcm格式音频
AudioRecord类的介绍
1. AudioRecord构造函数:
 /**
 * @param audioSource :录音源
 * 这里选择使用麦克风:MediaRecorder.AudioSource.MIC
 * @param sampleRateInHz: 采样率
 * @param channelConfig:声道数
 * @param audioFormat: 采样位数.
 *   See {@link AudioFormat#ENCODING_PCM_8BIT}, {@link AudioFormat#ENCODING_PCM_16BIT},
 *   and {@link AudioFormat#ENCODING_PCM_FLOAT}.
 * @param bufferSizeInBytes: 音频录制的缓冲区大小
 *   See {@link #getMinBufferSize(int, int, int)}
 */
public AudioRecord(int audioSource, int sampleRateInHz, int channelConfig, int audioFormat,
        int bufferSizeInBytes)
2. getMinBufferSize()
/**
* 获取AudioRecord所需的最小缓冲区大小
* @param sampleRateInHz: 采样率
* @param channelConfig:声道数
* @param audioFormat: 采样位数.
*/
public static int getMinBufferSize (int sampleRateInHz,
            int channelConfig,
            int audioFormat)
3. getRecordingState()
/**
* 获取AudioRecord当前的录音状态
*   @see AudioRecord#RECORDSTATE_STOPPED
*   @see AudioRecord#RECORDSTATE_RECORDING
*/
public int getRecordingState()
4. startRecording()
 /**
 * 开始录制
 */
 public int startRecording()
5. stop()
 /**
 * 停止录制
 */
 public int stop()
6. read()
/**
 * 从录音设备中读取音频数据
 * @param audioData 音频数据写入的byte[]缓冲区
 * @param offsetInBytes 偏移量
 * @param sizeInBytes 读取大小
 * @return 返回负数则表示读取失败
 *      see {@link #ERROR_INVALID_OPERATION} -3 : 初始化错误
        {@link #ERROR_BAD_VALUE}  -3: 参数错误
        {@link #ERROR_DEAD_OBJECT} -6:
        {@link #ERROR}
 */
public int read(@NonNull byte[] audioData, int offsetInBytes, int sizeInBytes)
实现
实现过程就是调用上面的API的方法,构造AudioRecord实例后再调用startRecording(),开始录音,并通过read()方法不断获取录音数据记录下来,生成PCM文件。涉及耗时操作,所以最好在子线程中进行。
public class RecordHelper {
    //0.此状态用于控制线程中的循环操作,应用volatile修饰,保持数据的一致性
    private volatile RecordState state = RecordState.IDLE;
    private AudioRecordThread audioRecordThread;
    private File tmpFile = null;

    public void start(String filePath, RecordConfig config) {
        if (state != RecordState.IDLE) {
            Logger.e(TAG, "状态异常当前状态: %s", state.name());
            return;
        }
        recordFile = new File(filePath);
        String tempFilePath = getTempFilePath();
        Logger.i(TAG, "tmpPCM File: %s", tempFilePath);
        tmpFile = new File(tempFilePath);
        //1.开启录音线程并准备录音
        audioRecordThread = new AudioRecordThread();
        audioRecordThread.start();
    }

    public void stop() {
        if (state == RecordState.IDLE) {
            Logger.e(TAG, "状态异常当前状态: %s", state.name());
            return;
        }

        state = RecordState.STOP;
    }

    private class AudioRecordThread extends Thread {
        private AudioRecord audioRecord;
        private int bufferSize;

        AudioRecordThread() {
            //2.根据录音参数构造AudioRecord实体对象
            bufferSize = AudioRecord.getMinBufferSize(currentConfig.getFrequency(),
                    currentConfig.getChannel(), currentConfig.getEncoding()) * RECORD_AUDIO_BUFFER_TIMES;
            audioRecord = new AudioRecord(MediaRecorder.AudioSource.MIC, currentConfig.getFrequency(),
                    currentConfig.getChannel(), currentConfig.getEncoding(), bufferSize);
        }

        @Override
        public void run() {
            super.run();
            state = RecordState.RECORDING;
            Logger.d(TAG, "开始录制");
            FileOutputStream fos = null;
            try {
                fos = new FileOutputStream(tmpFile);
                audioRecord.startRecording();
                byte[] byteBuffer = new byte[bufferSize];

                while (state == RecordState.RECORDING) {
                    //3.不断读取录音数据并保存至文件中
                    int end = audioRecord.read(byteBuffer, 0, byteBuffer.length);
                    fos.write(byteBuffer, 0, end);
                    fos.flush();
                }
                //4.当执行stop()方法后state != RecordState.RECORDING,终止循环,停止录音
                audioRecord.stop();
            } catch (Exception e) {
                Logger.e(e, TAG, e.getMessage());
            } finally {
                try {
                    if (fos != null) {
                        fos.close();
                    }
                } catch (IOException e) {
                    Logger.e(e, TAG, e.getMessage());
                }
            }
            state = RecordState.IDLE;
            Logger.d(TAG, "录音结束");
        }
    }
}
其他
- 这里实现了PCM音频的录制,AudioRecord
API中只有开始和停止的方法,在实际开发中可能还需要暂停/恢复的操作,以及PCM转WAV的功能,下一篇再继续完善。 - 需要录音及文件处理的动态权限
3. 使用AudioRecord实现录音的暂停和恢复
上一部分主要写了AudioRecord实现音频录制的开始和停止,AudioRecord并没有暂停和恢复播放功能的API,所以需要手动实现。
解决办法
思路很简单,现在可以实现音频的文件录制和停止,并生成pcm文件,那么暂停时将这次文件先保存下来,恢复播放后开始新一轮的录制,那么最后会生成多个pcm音频,再将这些pcm文件进行合并,这样就实现了暂停/恢复的功能了。
实现
- 实现的重点在于如何控制录音的状态
public class RecordHelper {
    private volatile RecordState state = RecordState.IDLE;
    private AudioRecordThread audioRecordThread;

    private File recordFile = null;
    private File tmpFile = null;
    private List<File> files = new ArrayList<>();

    public void start(String filePath, RecordConfig config) {
        this.currentConfig = config;
        if (state != RecordState.IDLE) {
            Logger.e(TAG, "状态异常当前状态: %s", state.name());
            return;
        }
        recordFile = new File(filePath);
        String tempFilePath = getTempFilePath();
        Logger.i(TAG, "tmpPCM File: %s", tempFilePath);
        tmpFile = new File(tempFilePath);
        audioRecordThread = new AudioRecordThread();
        audioRecordThread.start();
    }

    public void stop() {
        if (state == RecordState.IDLE) {
            Logger.e(TAG, "状态异常当前状态: %s", state.name());
            return;
        }

        //若在暂停中直接停止,则直接合并文件即可
        if (state == RecordState.PAUSE) {
            makeFile();
            state = RecordState.IDLE;
        } else {
            state = RecordState.STOP;
        }
    }

    public void pause() {
        if (state != RecordState.RECORDING) {
            Logger.e(TAG, "状态异常当前状态: %s", state.name());
            return;
        }
        state = RecordState.PAUSE;
    }

    public void resume() {
        if (state != RecordState.PAUSE) {
            Logger.e(TAG, "状态异常当前状态: %s", state.name());
            return;
        }
        String tempFilePath = getTempFilePath();
        Logger.i(TAG, "tmpPCM File: %s", tempFilePath);
        tmpFile = new File(tempFilePath);
        audioRecordThread = new AudioRecordThread();
        audioRecordThread.start();
    }

    private class AudioRecordThread extends Thread {
        private AudioRecord audioRecord;
        private int bufferSize;

        AudioRecordThread() {
            bufferSize = AudioRecord.getMinBufferSize(currentConfig.getFrequency(),
                    currentConfig.getChannel(), currentConfig.getEncoding()) * RECORD_AUDIO_BUFFER_TIMES;
            audioRecord = new AudioRecord(MediaRecorder.AudioSource.MIC, currentConfig.getFrequency(),
                    currentConfig.getChannel(), currentConfig.getEncoding(), bufferSize);
        }

        @Override
        public void run() {
            super.run();
            state = RecordState.RECORDING;
            notifyState();
            Logger.d(TAG, "开始录制");
            FileOutputStream fos = null;
            try {
                fos = new FileOutputStream(tmpFile);
                audioRecord.startRecording();
                byte[] byteBuffer = new byte[bufferSize];

                while (state == RecordState.RECORDING) {
                        int end = audioRecord.read(byteBuffer, 0, byteBuffer.length);
                    fos.write(byteBuffer, 0, end);
                    fos.flush();
                }
                audioRecord.stop();
                //1. 将本次录音的文件暂存下来,用于合并
                files.add(tmpFile);
                //2. 再此判断终止循环的状态是暂停还是停止,并做相应处理
                if (state == RecordState.STOP) {
                    makeFile();
                } else {
                    Logger.i(TAG, "暂停!");
                }
            } catch (Exception e) {
                Logger.e(e, TAG, e.getMessage());
            } finally {
                try {
                    if (fos != null) {
                        fos.close();
                    }
                } catch (IOException e) {
                    Logger.e(e, TAG, e.getMessage());
                }
            }
            if (state != RecordState.PAUSE) {
                state = RecordState.IDLE;
                notifyState();
                Logger.d(TAG, "录音结束");
            }
        }
    }

    private void makeFile() {
        //合并文件
        boolean mergeSuccess = mergePcmFiles(recordFile, files);

        //TODO:转换wav
        Logger.i(TAG, "录音完成! path: %s ; 大小:%s", recordFile.getAbsoluteFile(), recordFile.length());
    }

    /**
     * 合并Pcm文件
     *
     * @param recordFile 输出文件
     * @param files      多个文件源
     * @return 是否成功
     */
    private boolean mergePcmFiles(File recordFile, List<File> files) {
        if (recordFile == null || files == null || files.size() <= 0) {
            return false;
        }

        FileOutputStream fos = null;
        BufferedOutputStream outputStream = null;
        byte[] buffer = new byte[1024];
        try {
            fos = new FileOutputStream(recordFile);
            outputStream = new BufferedOutputStream(fos);

            for (int i = 0; i < files.size(); i++) {
                BufferedInputStream inputStream = new BufferedInputStream(new FileInputStream(files.get(i)));
                int readCount;
                while ((readCount = inputStream.read(buffer)) > 0) {
                    outputStream.write(buffer, 0, readCount);
                }
                inputStream.close();
            }
        } catch (Exception e) {
            Logger.e(e, TAG, e.getMessage());
            return false;
        } finally {
            try {
                if (fos != null) {
                    fos.close();
                }
                if (outputStream != null) {
                    outputStream.close();
                }
            } catch (IOException e) {
                e.printStackTrace();
            }
        }
        //3. 合并后记得删除缓存文件并清除list
        for (int i = 0; i < files.size(); i++) {
            files.get(i).delete();
        }
        files.clear();
        return true;
    }

}
其他
在此后如若需要添加录音状态回调,记得使用Handler做好线程切换。
4. PCM转WAV格式音频
前面几部分已经介绍了PCM音频文件的录制,这一部分主要介绍下pcm转wav。
wav 和 pcm
一般通过麦克风采集的录音数据都是PCM格式的,即不包含头部信息,播放器无法知道音频采样率、位宽等参数,导致无法播放,显然是非常不方便的。pcm转换成wav,我们只需要在pcm的文件起始位置加上至少44个字节的WAV头信息即可。
RIFF
- WAVE文件是以RIFF(Resource Interchange File Format, “资源交互文件格式”)格式来组织内部结构的。
RIFF文件结构可以看作是树状结构,其基本构成是称为"块"(Chunk)的单元. - WAVE文件是由若干个Chunk组成的。按照在文件中的出现位置包括:RIFF WAVE Chunk, Format Chunk, Fact Chunk(可选), Data Chunk。
Fact Chunk 在压缩后或在非PCM编码时存在
WAV头文件
所有的WAV都有一个文件头,这个文件头记录着音频流的编码参数。数据块的记录方式是little-endian字节顺序。

| 偏移地址 | 命名 | 内容 |
|---|---|---|
| 00-03 | ChunkId | “RIFF” |
| 04-07 | ChunkSize | 下个地址开始到文件尾的总字节数(此Chunk的数据大小) |
| 08-11 | fccType | “WAVE” |
| 12-15 | SubChunkId1 | "fmt ",最后一位空格。 |
| 16-19 | SubChunkSize1 | 一般为16,表示fmt Chunk的数据块大小为16字节,即20-35 |
| 20-21 | FormatTag | 1:表示是PCM 编码 |
| 22-23 | Channels | 声道数,单声道为1,双声道为2 |
| 24-27 | SamplesPerSec | 采样率 |
| 28-31 | BytesPerSec | 码率 :采样率 * 采样位数 * 声道个数,bytePerSecond = sampleRate * (bitsPerSample / 8) * channels |
| 32-33 | BlockAlign | 每次采样的大小:位宽*声道数/8 |
| 34-35 | BitsPerSample | 位宽 |
| 36-39 | SubChunkId2 | “data” |
| 40-43 | SubChunkSize2 | 音频数据的长度 |
| 44-… | data | 音频数据 |
java 生成头文件
WavHeader.class
public static class WavHeader {
    /**
     * RIFF数据块
     */
    final String riffChunkId = "RIFF";
    int riffChunkSize;
    final String riffType = "WAVE";

    /**
     * FORMAT 数据块
     */
    final String formatChunkId = "fmt ";
    final int formatChunkSize = 16;
    final short audioFormat = 1;
    short channels;
    int sampleRate;
    int byteRate;
    short blockAlign;
    short sampleBits;

    /**
     * FORMAT 数据块
     */
    final String dataChunkId = "data";
    int dataChunkSize;

    WavHeader(int totalAudioLen, int sampleRate, short channels, short sampleBits) {
        this.riffChunkSize = totalAudioLen;
        this.channels = channels;
        this.sampleRate = sampleRate;
        this.byteRate = sampleRate * sampleBits / 8 * channels;
        this.blockAlign = (short) (channels * sampleBits / 8);
        this.sampleBits = sampleBits;
        this.dataChunkSize = totalAudioLen - 44;
    }

    public byte[] getHeader() {
        byte[] result;
        result = ByteUtils.merger(ByteUtils.toBytes(riffChunkId), ByteUtils.toBytes(riffChunkSize));
        result = ByteUtils.merger(result, ByteUtils.toBytes(riffType));
        result = ByteUtils.merger(result, ByteUtils.toBytes(formatChunkId));
        result = ByteUtils.merger(result, ByteUtils.toBytes(formatChunkSize));
        result = ByteUtils.merger(result, ByteUtils.toBytes(audioFormat));
        result = ByteUtils.merger(result, ByteUtils.toBytes(channels));
        result = ByteUtils.merger(result, ByteUtils.toBytes(sampleRate));
        result = ByteUtils.merger(result, ByteUtils.toBytes(byteRate));
        result = ByteUtils.merger(result, ByteUtils.toBytes(blockAlign));
        result = ByteUtils.merger(result, ByteUtils.toBytes(sampleBits));
        result = ByteUtils.merger(result, ByteUtils.toBytes(dataChunkId));
        result = ByteUtils.merger(result, ByteUtils.toBytes(dataChunkSize));
        return result;
    }
}
ByteUtils: https://github.com/zhaolewei/ZlwAudioRecorder/blob/master/recorderlib/src/main/java/com/zlw/main/recorderlib/utils/ByteUtils.java
PCM转Wav
WavUtils.java
public class WavUtils {
    private static final String TAG = WavUtils.class.getSimpleName();
        /**
         * 生成wav格式的Header
         * wave是RIFF文件结构,每一部分为一个chunk,其中有RIFF WAVE chunk,
         * FMT Chunk,Fact chunk(可选),Data chunk
         *
         * @param totalAudioLen 不包括header的音频数据总长度
         * @param sampleRate    采样率,也就是录制时使用的频率
         * @param channels      audioRecord的频道数量
         * @param sampleBits    位宽
         */
        public static byte[] generateWavFileHeader(int totalAudioLen, int sampleRate, int channels, int sampleBits) {
            WavHeader wavHeader = new WavHeader(totalAudioLen, sampleRate, (short) channels, (short) sampleBits);
            return wavHeader.getHeader();
        }
    }

    /**
     * 将header写入到pcm文件中 不修改文件名
     *
     * @param file   写入的pcm文件
     * @param header wav头数据
     */
    public static void writeHeader(File file, byte[] header) {
        if (!FileUtils.isFile(file)) {
            return;
        }

        RandomAccessFile wavRaf = null;
        try {
            wavRaf = new RandomAccessFile(file, "rw");
            wavRaf.seek(0);
            wavRaf.write(header);
            wavRaf.close();
        } catch (Exception e) {
            Logger.e(e, TAG, e.getMessage());
        } finally {
            try {
                if (wavRaf != null) {
                    wavRaf.close();
                }
            } catch (IOException e) {
                Logger.e(e, TAG, e.getMessage());
            }
        }
RecordHelper.java
private void makeFile() {
    mergePcmFiles(recordFile, files);

    //这里实现上一篇未完成的工作
    byte[] header = WavUtils.generateWavFileHeader((int) resultFile.length(), currentConfig.getSampleRate(), currentConfig.getChannelCount(), currentConfig.getEncoding());
    WavUtils.writeHeader(resultFile, header);

    Logger.i(TAG, "录音完成! path: %s ; 大小:%s", recordFile.getAbsoluteFile(), recordFile.length());
    }
参考链接:
http://soundfile.sapp.org/doc/WaveFormat/
5. Mp3的录制 - 编译Lame源码
编译 so包
1.下载lame
官网(科学上网): http://lame.sourceforge.net/download.php
lame-3.100:https://pan.baidu.com/s/1U77GAq1nn3bVXFMEhRyo8g
2.使用ndk-build编译源码
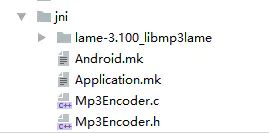
2.1 在任意位置创建如下的目录结构:

文件夹名称随意,与.mk 文件中路径一致即可
2.2 解压下载好的lame源码
解压后将其/lame-3.100/libmp3lame/目录中.c和.h文件和/lame-3.100//include/中的 lame.h拷贝到/jni/lame-3.100_libmp3lame中
3.100版本 有42个文件
2.3 修改部分文件
- 删除fft.c文件的47行的
#include "vector/lame_intrin.h" - 删除set_get.h文件的24行的
#include - 将util.h文件的570行的
extern ieee754_float32_t fast_log2(ieee754_float32_t x);替换为extern float fast_log2(float x);
2.4 编写Mp3Encoder.c和Mp3Encoder.h对接java代码
2.4.1 Mp3Encoder.c
注意修改包名
#include "lame-3.100_libmp3lame/lame.h"
#include "Mp3Encoder.h"

static lame_global_flags *glf = NULL;
//TODO这里包名要与java中对接文件的路径一致(这里是路径是com.zlw.main.recorderlib.recorder.mp3,java文件: Mp3Encoder.java),下同
JNIEXPORT void JNICALL Java_com_zlw_main_recorderlib_recorder_mp3_Mp3Encoder_init(
        JNIEnv *env, jclass cls, jint inSamplerate, jint outChannel,
        jint outSamplerate, jint outBitrate, jint quality) {
    if (glf != NULL) {
        lame_close(glf);
        glf = NULL;
    }
    glf = lame_init();
    lame_set_in_samplerate(glf, inSamplerate);
    lame_set_num_channels(glf, outChannel);
    lame_set_out_samplerate(glf, outSamplerate);
    lame_set_brate(glf, outBitrate);
    lame_set_quality(glf, quality);
    lame_init_params(glf);
}

JNIEXPORT jint JNICALL Java_com_zlw_main_recorderlib_recorder_mp3_Mp3Encoder_encode(
        JNIEnv *env, jclass cls, jshortArray buffer_l, jshortArray buffer_r,
        jint samples, jbyteArray mp3buf) {
    jshort* j_buffer_l = (*env)->GetShortArrayElements(env, buffer_l, NULL);

    jshort* j_buffer_r = (*env)->GetShortArrayElements(env, buffer_r, NULL);

    const jsize mp3buf_size = (*env)->GetArrayLength(env, mp3buf);
    jbyte* j_mp3buf = (*env)->GetByteArrayElements(env, mp3buf, NULL);

    int result = lame_encode_buffer(glf, j_buffer_l, j_buffer_r,
            samples, j_mp3buf, mp3buf_size);

    (*env)->ReleaseShortArrayElements(env, buffer_l, j_buffer_l, 0);
    (*env)->ReleaseShortArrayElements(env, buffer_r, j_buffer_r, 0);
    (*env)->ReleaseByteArrayElements(env, mp3buf, j_mp3buf, 0);

    return result;
}

JNIEXPORT jint JNICALL Java_com_zlw_main_recorderlib_recorder_mp3_Mp3Encoder_flush(
        JNIEnv *env, jclass cls, jbyteArray mp3buf) {
    const jsize mp3buf_size = (*env)->GetArrayLength(env, mp3buf);
    jbyte* j_mp3buf = (*env)->GetByteArrayElements(env, mp3buf, NULL);

    int result = lame_encode_flush(glf, j_mp3buf, mp3buf_size);

    (*env)->ReleaseByteArrayElements(env, mp3buf, j_mp3buf, 0);

    return result;
}

JNIEXPORT void JNICALL Java_com_zlw_main_recorderlib_recorder_mp3_Mp3Encoder_close(
        JNIEnv *env, jclass cls) {
    lame_close(glf);
    glf = NULL;
}
2.4.2 Mp3Encoder.h
注意修改包名
/* DO NOT EDIT THIS FILE - it is machine generated */
#include <jni.h>

#ifndef _Included_Mp3Encoder
#define _Included_Mp3Encoder
#ifdef __cplusplus
extern "C" {
#endif
/*
 * Class:     com.zlw.main.recorderlib.recorder.mp3.Mp3Encoder
 * Method:    init
 */
JNIEXPORT void JNICALL Java_com_zlw_main_recorderlib_recorder_mp3_Mp3Encoder_init
  (JNIEnv *, jclass, jint, jint, jint, jint, jint);

JNIEXPORT jint JNICALL Java_com_zlw_main_recorderlib_recorder_mp3_Mp3Encoder_encode
  (JNIEnv *, jclass, jshortArray, jshortArray, jint, jbyteArray);

JNIEXPORT jint JNICALL Java_com_zlw_main_recorderlib_recorder_mp3_Mp3Encoder_flush
  (JNIEnv *, jclass, jbyteArray);

JNIEXPORT void JNICALL Java_com_zlw_main_recorderlib_recorder_mp3_Mp3Encoder_close
  (JNIEnv *, jclass);

#ifdef __cplusplus
}
#endif
#endif
2.5 编写Android.mk 和Application.mk
路径与创建的目录应当一致
2.5.1 Android.mk
LOCAL_PATH := $(call my-dir)

include $(CLEAR_VARS)

LAME_LIBMP3_DIR := lame-3.100_libmp3lame

LOCAL_MODULE    := mp3lame

LOCAL_SRC_FILES :=\
$(LAME_LIBMP3_DIR)/bitstream.c \
$(LAME_LIBMP3_DIR)/fft.c \
$(LAME_LIBMP3_DIR)/id3tag.c \
$(LAME_LIBMP3_DIR)/mpglib_interface.c \
$(LAME_LIBMP3_DIR)/presets.c \
$(LAME_LIBMP3_DIR)/quantize.c \
$(LAME_LIBMP3_DIR)/reservoir.c \
$(LAME_LIBMP3_DIR)/tables.c  \
$(LAME_LIBMP3_DIR)/util.c \
$(LAME_LIBMP3_DIR)/VbrTag.c \
$(LAME_LIBMP3_DIR)/encoder.c \
$(LAME_LIBMP3_DIR)/gain_analysis.c \
$(LAME_LIBMP3_DIR)/lame.c \
$(LAME_LIBMP3_DIR)/newmdct.c \
$(LAME_LIBMP3_DIR)/psymodel.c \
$(LAME_LIBMP3_DIR)/quantize_pvt.c \
$(LAME_LIBMP3_DIR)/set_get.c \
$(LAME_LIBMP3_DIR)/takehiro.c \
$(LAME_LIBMP3_DIR)/vbrquantize.c \
$(LAME_LIBMP3_DIR)/version.c \
MP3Encoder.c

include $(BUILD_SHARED_LIBRARY)
2.5.2 Application.mk
若只需要编译armeabi的so包可将其他删除
APP_ABI := armeabi  armeabi-v7a  arm64-v8a  x86  x86_64  mips  mips64
APP_MODULES := mp3lame
APP_CFLAGS += -DSTDC_HEADERS
APP_PLATFORM := android-21
编译
到达这一步,所有的文件都已经准备好了
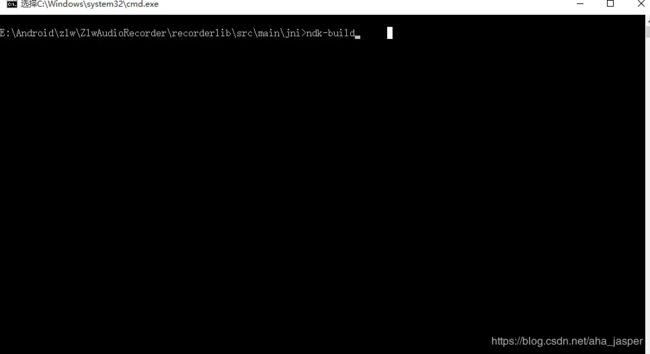
在命令行中切换到jni目录中,执行ndk-build开始编译

如果不能识别ndk-build命令 需要配置下环境变量
6. Mp3的录制 - 使用Lame实时录制MP3格式音频
前言
上一篇介绍了如何去编译so文件,这一篇主要介绍下如何实时将pcm数据转换为MP3数据。
实现过程:
AudioRecorder在开启录音后,通过read方法不断获取pcm的采样数据,每次获取到数据后交给lame去处理,处理完成后存入文件中。
这一篇相对之前代码,增加了两个类:Mp3Encoder.java 和 Mp3EncoderThread.java
- Mp3Encoder: 通过Jni调用so文件的c代码,将pcm转换成mp3格式数据
- Mp3EncodeThread: 将pcm转换成mp3时需要开启子线程进行统一管理,以及全部转码完成的回调
代码实现
Mp3Encoder.java
public class Mp3Encoder {

    static {
        System.loadLibrary("mp3lame");
    }

    public native static void close();

    public native static int encode(short[] buffer_l, short[] buffer_r, int samples, byte[] mp3buf);

    public native static int flush(byte[] mp3buf);

    public native static void init(int inSampleRate, int outChannel, int outSampleRate, int outBitrate, int quality);

    public static void init(int inSampleRate, int outChannel, int outSampleRate, int outBitrate) {
        init(inSampleRate, outChannel, outSampleRate, outBitrate, 7);
    }
}
Mp3EncodeThread.java
每次有新的pcm数据后将数据打包成ChangeBuffer 类型,通过addChangeBuffer()存放到线程队列当中,线程开启后会不断轮询队列内容,当有内容后开始转码,无内容时进入阻塞,直到数据全部处理完成后,关闭轮询。
public class Mp3EncodeThread extends Thread {
    private static final String TAG = Mp3EncodeThread.class.getSimpleName();

    /**
     * mp3文件的码率 32kbit/s = 4kb/s
     */
    private static final int OUT_BITRATE = 32;

    private List<ChangeBuffer> cacheBufferList = Collections.synchronizedList(new LinkedList<ChangeBuffer>());
    private File file;
    private FileOutputStream os;
    private byte[] mp3Buffer;
    private EncordFinishListener encordFinishListener;

    /**
     * 是否已停止录音
     */
    private volatile boolean isOver = false;

    /**
     * 是否继续轮询数据队列
     */
    private volatile boolean start = true;

    public Mp3EncodeThread(File file, int bufferSize) {
        this.file = file;
        mp3Buffer = new byte[(int) (7200 + (bufferSize * 2 * 1.25))];
        RecordConfig currentConfig = RecordService.getCurrentConfig();
        int sampleRate = currentConfig.getSampleRate();
        Mp3Encoder.init(sampleRate, currentConfig.getChannelCount(), sampleRate, OUT_BITRATE);
    }

    @Override
    public void run() {
        try {
            this.os = new FileOutputStream(file);
        } catch (FileNotFoundException e) {
            Logger.e(e, TAG, e.getMessage());
            return;
        }

        while (start) {
            ChangeBuffer next = next();
            Logger.v(TAG, "处理数据:%s", next == null ? "null" : next.getReadSize());
            lameData(next);
        }
    }

    public void addChangeBuffer(ChangeBuffer changeBuffer) {
        if (changeBuffer != null) {
            cacheBufferList.add(changeBuffer);
            synchronized (this) {
                notify();
            }
        }
    }

    public void stopSafe(EncordFinishListener encordFinishListener) {
        this.encordFinishListener = encordFinishListener;
        isOver = true;
        synchronized (this) {
            notify();
        }
    }

    private ChangeBuffer next() {
        for (; ; ) {
            if (cacheBufferList == null || cacheBufferList.size() == 0) {
                try {
                    if (isOver) {
                        finish();
                    }
                    synchronized (this) {
                        wait();
                    }
                } catch (Exception e) {
                    Logger.e(e, TAG, e.getMessage());
                }
            } else {
                return cacheBufferList.remove(0);
            }
        }
    }

    private void lameData(ChangeBuffer changeBuffer) {
        if (changeBuffer == null) {
            return;
        }
        short[] buffer = changeBuffer.getData();
        int readSize = changeBuffer.getReadSize();
        if (readSize > 0) {
            int encodedSize = Mp3Encoder.encode(buffer, buffer, readSize, mp3Buffer);
            if (encodedSize < 0) {
                Logger.e(TAG, "Lame encoded size: " + encodedSize);
            }
            try {
                os.write(mp3Buffer, 0, encodedSize);
            } catch (IOException e) {
                Logger.e(e, TAG, "Unable to write to file");
            }
        }
    }

    private void finish() {
        start = false;
        final int flushResult = Mp3Encoder.flush(mp3Buffer);
        if (flushResult > 0) {
            try {
                os.write(mp3Buffer, 0, flushResult);
                os.close();
            } catch (final IOException e) {
                Logger.e(TAG, e.getMessage());
            }
        }
        Logger.d(TAG, "转换结束 :%s", file.length());
        if (encordFinishListener != null) {
            encordFinishListener.onFinish();
        }
    }

    public static class ChangeBuffer {
        private short[] rawData;
        private int readSize;

        public ChangeBuffer(short[] rawData, int readSize) {
            this.rawData = rawData.clone();
            this.readSize = readSize;
        }

        short[] getData() {
            return rawData;
        }

        int getReadSize() {
            return readSize;
        }
    }

    public interface EncordFinishListener {
        /**
         * 格式转换完毕
         */
        void onFinish();
    }
}
使用
 private class AudioRecordThread extends Thread {
        private AudioRecord audioRecord;
        private int bufferSize;

        AudioRecordThread() {
            bufferSize = AudioRecord.getMinBufferSize(currentConfig.getSampleRate(),
                    currentConfig.getChannelConfig(), currentConfig.getEncodingConfig()) * RECORD_AUDIO_BUFFER_TIMES;
            audioRecord = new AudioRecord(MediaRecorder.AudioSource.MIC, currentConfig.getSampleRate(),
                    currentConfig.getChannelConfig(), currentConfig.getEncodingConfig(), bufferSize);
            if (currentConfig.getFormat() == RecordConfig.RecordFormat.MP3 && mp3EncodeThread == null) {
                initMp3EncoderThread(bufferSize);
            }
        }

        @Override
        public void run() {
            super.run();
            startMp3Recorder();
        }

         private void initMp3EncoderThread(int bufferSize) {
            try {
                mp3EncodeThread = new Mp3EncodeThread(resultFile, bufferSize);
                mp3EncodeThread.start();
            } catch (Exception e) {
                Logger.e(e, TAG, e.getMessage());
            }
         }

        private void startMp3Recorder() {
            state = RecordState.RECORDING;
            notifyState();

            try {
                audioRecord.startRecording();
                short[] byteBuffer = new short[bufferSize];

                while (state == RecordState.RECORDING) {
                    int end = audioRecord.read(byteBuffer, 0, byteBuffer.length);
                    if (mp3EncodeThread != null) {
                        mp3EncodeThread.addChangeBuffer(new Mp3EncodeThread.ChangeBuffer(byteBuffer, end));
                    }
                    notifyData(ByteUtils.toBytes(byteBuffer));
                }
                audioRecord.stop();
            } catch (Exception e) {
                Logger.e(e, TAG, e.getMessage());
                notifyError("录音失败");
            }
            if (state != RecordState.PAUSE) {
                state = RecordState.IDLE;
                notifyState();
                if (mp3EncodeThread != null) {
                    mp3EncodeThread.stopSafe(new Mp3EncodeThread.EncordFinishListener() {
                        @Override
                        public void onFinish() {
                            notifyFinish();
                        }
                    });
                } else {
                    notifyFinish();
                }
            } else {
                Logger.d(TAG, "暂停");
            }
        }
    }
}
7. 音乐可视化-FFT频谱图
项目地址:https://github.com/zhaolewei/MusicVisualizer
视频演示地址:https://www.bilibili.com/video/av30388154/
实现
实现流程:
- 使用MediaPlayer播放传入的音乐,并拿到mediaPlayerId
- 使用Visualizer类拿到拿到MediaPlayer播放中的音频数据(wave/fft)
- 将数据用自定义控件展现出来
准备工作
使用Visualizer需要录音的动态权限, 如果播放sd卡音频需要STORAGE权限。
 private static final String[] PERMISSIONS = new String[]{
        Manifest.permission.RECORD_AUDIO,
        Manifest.permission.MODIFY_AUDIO_SETTINGS
  };

  ActivityCompat.requestPermissions(MainActivity.this, PERMISSIONS, 1);
<uses-permission android:name="android.permission.RECORD_AUDIO" />
<uses-permission android:name="android.permission.MODIFY_AUDIO_SETTINGS" />
<uses-permission android:name="android.permission.WRITE_EXTERNAL_STORAGE" />
<uses-permission android:name="android.permission.READ_EXTERNAL_STORAGE" />
开始播放
private MediaPlayer.OnPreparedListener preparedListener = new
    /**
     * 播放音频
     *
     * @param raw 资源文件id
     */
    private  void doPlay(final int raw) {
        try {
            mediaPlayer = MediaPlayer.create(MyApp.getInstance(), raw);
            if (mediaPlayer == null) {
                Logger.e(TAG, "mediaPlayer is null");
                return;
            }

            mediaPlayer.setOnErrorListener(errorListener);
            mediaPlayer.setOnPreparedListener(preparedListener);
        } catch (Exception e) {
            Logger.e(e, TAG, e.getMessage());
        }
    }

    /**
    * 获取MediaPlayerId
    * 可视化类Visualizer需要此参数
    * @return  MediaPlayerId
    */
    public int getMediaPlayerId() {
        return mediaPlayer.getAudioSessionId();
    }
使用可视化类Visualizer获取当前音频数据
Visualizer 有两个比较重要的参数
- 设置可视化数据的数据大小 范围[Visualizer.getCaptureSizeRange()[0]~Visualizer.getCaptureSizeRange()[1]]
- 设置可视化数据的采集频率 范围[0~Visualizer.getMaxCaptureRate()]
OnDataCaptureListener 有2个回调,一个用于显示FFT数据,展示不同频率的振幅,另一个用于显示声音的波形图。
private Visualizer.OnDataCaptureListener dataCaptureListener = new Visualizer.OnDataCaptureListener() {
        @Override
        public void onWaveFormDataCapture(Visualizer visualizer, final byte[] waveform, int samplingRate) {
            audioView.post(new Runnable() {
                @Override
                public void run() {
                    audioView.setWaveData(waveform);
                }
            });
        }

        @Override
        public void onFftDataCapture(Visualizer visualizer, final byte[] fft, int samplingRate) {
            audioView2.post(new Runnable() {
                @Override
                public void run() {
                    audioView2.setWaveData(fft);
                }
            });
        }
    };

private void initVisualizer() {
    try {
        int mediaPlayerId = mediaPlayer.getMediaPlayerId();
        if (visualizer != null) {
            visualizer.release();
        }
        visualizer = new Visualizer(mediaPlayerId);

        /**
         *可视化数据的大小: getCaptureSizeRange()[0]为最小值,getCaptureSizeRange()[1]为最大值
         */
        int captureSize = Visualizer.getCaptureSizeRange()[1];
        int captureRate = Visualizer.getMaxCaptureRate() * 3 / 4;

        visualizer.setCaptureSize(captureSize);
        visualizer.setDataCaptureListener(dataCaptureListener, captureRate, true, true);
        visualizer.setScalingMode(Visualizer.SCALING_MODE_NORMALIZED);
        visualizer.setEnabled(true);
    } catch (Exception e) {
        Logger.e(TAG, "请检查录音权限");
    }
}
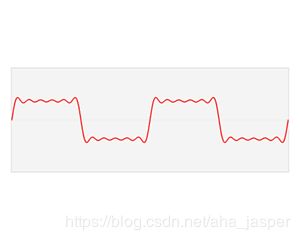
波形数据和傅里叶数据的关系如图:

快速傅里叶转换(FFT)详细分析: https://zhuanlan.zhihu.com/p/19763358
编写自定义控件,展示数据
1.处理数据: visualizer 回调中的数据中是存在负数的,需要转换一下,用于显示
当byte 为 -128时Math.abs(fft[i]) 计算出来的值会越界,需要手动处理一下
byte 的范围: -128~127
  /**
     * 预处理数据
     *
     * @return
     */
    private static byte[] readyData(byte[] fft) {
        byte[] newData = new byte[LUMP_COUNT];
        byte abs;
        for (int i = 0; i < LUMP_COUNT; i++) {
            abs = (byte) Math.abs(fft[i]);
            //描述:Math.abs -128时越界
            newData[i] = abs < 0 ? 127 : abs;
        }
        return newData;
    }
2. 紧接着就是根据数据去绘制图形
  @Override
    protected void onDraw(Canvas canvas) {
        super.onDraw(canvas);
        wavePath.reset();

        for (int i = 0; i < LUMP_COUNT; i++) {
            if (waveData == null) {
                canvas.drawRect((LUMP_WIDTH + LUMP_SPACE) * i,
                        LUMP_MAX_HEIGHT - LUMP_MIN_HEIGHT,
                        (LUMP_WIDTH + LUMP_SPACE) * i + LUMP_WIDTH,
                        LUMP_MAX_HEIGHT,
                        lumpPaint);
                continue;
            }

            switch (upShowStyle) {
                case STYLE_HOLLOW_LUMP:
                    drawLump(canvas, i, false);
                    break;
                case STYLE_WAVE:
                    drawWave(canvas, i, false);
                    break;
                default:
                    break;
            }

            switch (downShowStyle) {
                case STYLE_HOLLOW_LUMP:
                    drawLump(canvas, i, true);
                    break;
                case STYLE_WAVE:
                    drawWave(canvas, i, true);
                    break;
                default:
                    break;
            }
        }
    }

    /**
     * 绘制矩形条
     */
    private void drawLump(Canvas canvas, int i, boolean reversal) {
        int minus = reversal ? -1 : 1;

        if (waveData[i] < 0) {
            Logger.w("waveData", "waveData[i] < 0 data: %s", waveData[i]);
        }
        float top = (LUMP_MAX_HEIGHT - (LUMP_MIN_HEIGHT + waveData[i] * SCALE) * minus);

        canvas.drawRect(LUMP_SIZE * i,
                top,
                LUMP_SIZE * i + LUMP_WIDTH,
                LUMP_MAX_HEIGHT,
                lumpPaint);
    }

    /**
     * 绘制曲线
     * 这里使用贝塞尔曲线来绘制
     */
    private void drawWave(Canvas canvas, int i, boolean reversal) {
        if (pointList == null || pointList.size() < 2) {
            return;
        }
        float ratio = SCALE * (reversal ? -1 : 1);
        if (i < pointList.size() - 2) {
            Point point = pointList.get(i);
            Point nextPoint = pointList.get(i + 1);
            int midX = (point.x + nextPoint.x) >> 1;
            if (i == 0) {
                wavePath.moveTo(point.x, LUMP_MAX_HEIGHT - point.y * ratio);
            }
            wavePath.cubicTo(midX, LUMP_MAX_HEIGHT - point.y * ratio,
                    midX, LUMP_MAX_HEIGHT - nextPoint.y * ratio,
                    nextPoint.x, LUMP_MAX_HEIGHT - nextPoint.y * ratio);

            canvas.drawPath(wavePath, lumpPaint);
        }
    }