Go语言备忘——在Ubuntu 18.04下的安装、环境配置与VS Code插件安装
1. 通过snap安装。
如果还未安装snap,请使用以下命令安装
sudo apt install snap
安装好snap后,使用以下命令安装go。
sudo snap install go --classic
之所以使用snap,是为了安装最新版的Go。目前(2020年6月1日),安装后的版本是1.14.3。版本查询命令如下:
go version
查看go的环境配置的命令如下:
go env
2. 配置
编辑主目录下的.profile文件:
gedit ~/.profile
添加以下内容:
# GOPATH
export GOPATH=$HOME/tree/lakeside/go
export PATH=$PATH:$GOPATH/bin
export PATH=$PATH:$GOPATH/bin:/snap/go/current/bin
export GOPROXY=https://goproxy.cn,direct
GOPATH是工作路径,默认安装后是在~/go目录,这里我修改成自己想要的目录。
/snap/go/current/bin目录是通过snap安装后的默认安装目录,即GOROOT。其中的current是一个链接,指向的是实际安装目录,我这里是/snap/go/5759/。
GOPROXY设置对我们后面安装各种工具插件很重要,默认的GOPROXY基本上是安装不了的。注意direct与逗号之间没有空格。
编辑好.profile文件并保存后,执行以下命令让设置生效:
source ./profile
可以再用go env命令查看环境是否改变。
3. 安装Visual Studio Code插件
使用vs code编辑某个xxx.go文件时,会自动提示安装各种插件。如果不想一个一个的安装,就点“install all”安装所有。
4. 一个Web服务器小例子
hello world这样的例子实在无聊,我们举一个稍微复杂点的例子。
4.1 编写main.go程序
随便在一个目录下创建文件夹WebServer,不用非在GOPATH目录下。编写文件main.go,代码如下:
// CSDN陆巍的博客
package main

import (
	"bufio"
	"fmt"
	"log"
	"net/http"
	"os"
	"time"

	"github.com/gorilla/mux"
)

func ReadWebpageFile(filename string) string {
	file, err := os.Open(filename)
	if err != nil {
		fmt.Println("Error: ", err.Error())
		return ""
	}
	defer file.Close()

	stats, statsErr := file.Stat()
	if statsErr != nil {
		fmt.Println("Error: ", statsErr.Error())
		return ""
	}

	var size int64 = stats.Size()
	codes := make([]byte, size)
	bufr := bufio.NewReader(file)
	_, err = bufr.Read(codes)
	return string(codes)
}

func home(w http.ResponseWriter, r *http.Request) {
	pageCode := ReadWebpageFile("static/index.html")
	w.Write([]byte(pageCode))
}

func main() {
	fmt.Println("Server start...")
	r := mux.NewRouter().StrictSlash(false) // 不会严格匹配斜杠

	// 页面响应
	r.HandleFunc("/", home).Methods("GET")

	// 映射图片目录。第一个参数的目录名一定要在两边加上斜杠
	r.PathPrefix("/img/").Handler(http.StripPrefix("/img/",
		http.FileServer(http.Dir("static/img/"))))
	r.PathPrefix("/css/").Handler(http.StripPrefix("/css/",
		http.FileServer(http.Dir("static/css/"))))
	r.PathPrefix("/js/").Handler(http.StripPrefix("/js/",
		http.FileServer(http.Dir("static/js/"))))

	// 定义服务器
	svr := http.Server{
		Addr:         ":8000",
		ReadTimeout:  3 * time.Second,
		WriteTimeout: 3 * time.Second,
		Handler:      r,
	}

	log.Fatal(svr.ListenAndServe())
}
注意事项:
1、代码里面设置的端口是8000,所以访问这个服务器的时候,地址是:http://localhost:8000
2、代码里面默认调用当前目录下static文件夹里面的index.html文件。
4.2 创建mod
在WebServer目录下,执行命令:
go mod init WebServer
执行后会创建go.mod文件。
4.3 编译
go build main.go
在main.go代码中,调用了第三方库,编译时会自动下载添加。编译好后,就可以找一些网页代码来测试了。
4.4 加入一个简单的网站代码
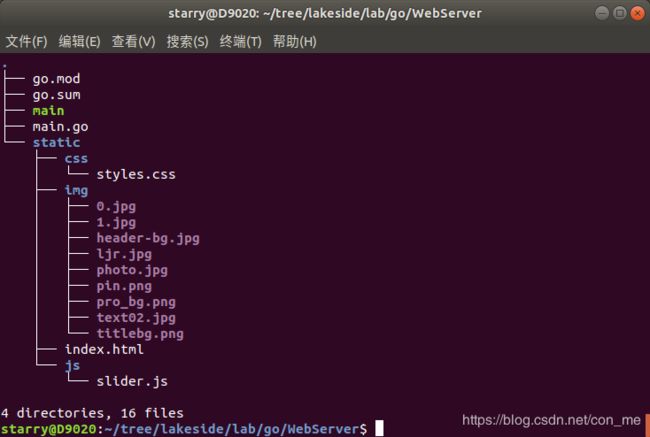
WebServer目录结构如下:

如果大家懒得去找测试用的网站代码,就去我的百度网盘下载吧,这个示范代码来自http://www.lmlblog.com/网站,我减了很多内容。下载地址(包含go代码,文件名WebServer.zip):https://pan.baidu.com/s/1ui1uyPzW60zPRKvgyv2R1Q,提取码:apk3。
加好网站代码后,执行命令:
./main
然后打开浏览器,输入地址:http://localhost:8000
下面第一张图是从台式机上浏览的效果,第二张是从手机上浏览的效果:

附带介绍snap的一些命令
a. 查询snap内软件列表
snap find
snap find mailspring
snap find后面如果不带软件名称的话,显示出来的是推荐列表。上面的第二个命令是查询mailspring方面的软件列表。
b. 查询snap上相关软件可用版本信息
snap info ...
示例,查询go与mailspring的信息:
snap info go
snap info mailspring
c. 查询本机通过snap安装的软件列表
snap list
d. 更新命令
sudo snap refresh