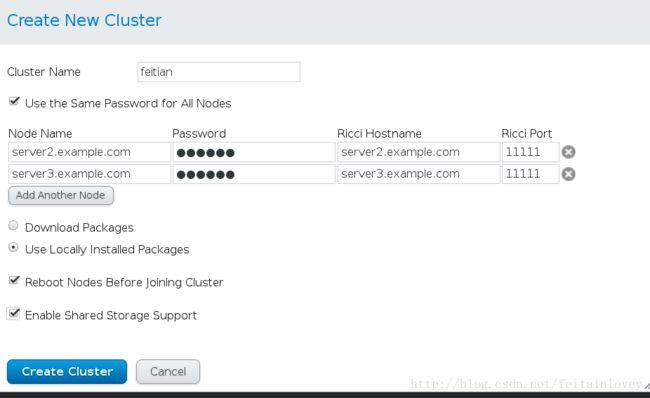
RHCS的套件RICCI和LUCL
软件安装
将6.5的yum源配置完成之后,直接用yum 安装即可,ricci每个节点必须都安装,而luci是控制各个节点,也就是只用在其中一台上面安装
配置本地解析文件
192.168.122.11 server1.example.com
192.168.122.22 server2.example.com
192.168.122.33 server3.example.com
安装luci
[root@server1 ~]# yum install luci -y
[root@server1 ~]# /etc/init.d/luci start
当你启动完毕之后他会提示你用浏览器访问server1的ip但不是默认的80端口而是8084,而且是https(https://server1.example.com:8084)这时你会进入如下界面:

这是你安装luci的软件的用户和密码,最好使用root登陆,因为如果使用普通用户可能权限不够在作后面的实验。
安装ricci
ricci在你的server1和server2上都需要安装
[root@server1 ~]# yum install ricci -y
[root@server1 ~]# echo westos|passwd –stdin ricci
[root@server1 ~]# /etc/init.d/ricci start
[root@server2 ~]# yum install ricci -y
[root@server2 ~]# echo westos|passwd –stdin ricci
[root@server3 ~]# /etc/init.d/ricci start
所有的操作都是写到/etc/cluster/cluster.conf 这个文件中
启动ricci之前要修改ricci的密码
注意:这个passwd是你刚才给ricci设置的密码,他会自动给你安装软件,你可以使用ps -ef 查看。在安装完成之后会自动重启。
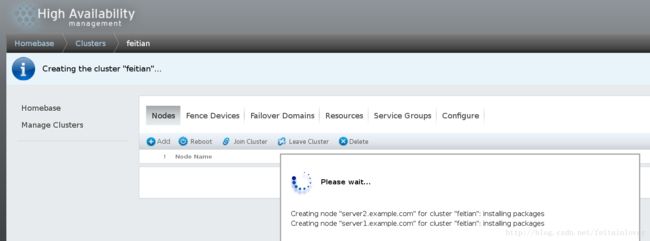
用命令查看节点状态
[root@server1 ~]# clustat
Cluster Status for feitian @ Mon Sep 25 20:14:36 2017
Member Status: Quorate

 Member Name                                                     ID   Status
 ------ ----                                                     ---- ------
 server1.example.com                                                 1 Online, Local
 server2.example.com                                                 2 Online
这时我们的ricci平台就搭建好了
为节点增加fence
fence的一些基本概念
在HA集群坏境中,备份服务器B通过心跳线来发送数据包来看服务器A是否还活着,主服务器A接收了大量的客户端访问请求,服务器A的CPU负载达到 100%响应不过来了,资源已经耗尽,没有办法回复服务器B数据包(回复数据包会延迟),这时服务器B认为服务器A已经挂了,于是备份服务器B把资源夺过 来,自己做主服务器,过了一段时间服务器A响应过来了,服务器A觉得自己是老大,服务器B觉得自己也是老大,他们两个就挣着抢夺资源,集群资源被多个节点 占有,两个服务器同时向资源写数据,破坏了资源的安全性和一致性,这种情况的发生叫做“脑裂”。服务器A负载过重,响应不过来了,有了Fence机 制,Fence会自动的把服务器A给Fence掉,阻止了“脑裂”的发生。
安装fence软件
安装fence卡,你只需要安装fence-virtd-libvirt.x86_64和fence-virtd-multicast.x86_64这两个软件就可以了。
因为我们使用的是虚拟机,所以就要在真机安装fence的管理软件,而且需要在浏览器中点击Fence Deveice–>ADD添加。
[root@foundation /]# yum install fence-virtd-libvirt.x86_64 -y
因为我们生成默认的fence文件和我们的不同,要将其删除重新生成新的fence设备
[root@foundation /]# rm -rf /etc/fence_virt.conf
[root@foundation /]# systemctl start libvirtd
#对fence服务的配置文件/etc/fence_virt.conf做配置策略:

[root@desktop24 cluster]# fence_virtd   -c

Module search path[/usr/lib64/fence-virt]:

//模块搜索路径,回车使用默认的,可看到默认的安装路径就在他下面。
//[root@foundation ~]# rpm -ql  fence-virtd-libvirt-0.3.2-5.el7.x86_64
//usr/lib64/fence-virt/libvirt.so
Available backends:
   libvirt 0.1
Available listeners:
   multicast 1.1
Listener modules are responsible foraccepting requests from fencing clients.
Listener module [multicast]:
//监听组播模块,回车选择默认
The multicast listener module is designedfor use environments where the guests and hosts may communicateover a network using multicast.
The multicast address is the address that aclient will use to send fencing requests to fence_virtd.
Multicast IP Address[225.0.0.12]:
//组播IP地址选择,回车选择默认的225.0.0.12
Using ipv4 as family.
Multicast IP Port [1229]:
//组播IP端口选择,回车选择默认的1229
Setting a preferred interface causes fence_virtdto listen only on that interface.  Normally, it listens on all interfaces.
In environments where the virtual machinesare using the host machine as a gateway, this *must* be set(typically to virbr0).
Set to 'none' for no interface.
Interface [none]: br0
//Fence卡使用那个接口来和集群网络来通讯(fence卡的专用接口和集群网络在同一网段)
The key file is the shared key informationwhich is used to authenticate fencing requests.  The contents of this file must be distributed to each physical host andvirtual machine within a cluster.
Key File[/etc/cluster/fence_xvm.key]:
//是否是对/etc/cluster/fence_xvm.key这个文件做策略,回车选择默认的
Backend modules are responsible for routingrequests to the appropriate hypervisor or managementlayer
Backend module [checkpoint]:libvirt
//模块基于那个协议,填写libvirt
The libvirt backend module is designed forsingle desktops or servers. Do not use in environments where virtual machines may be migrated between hosts.
Libvirt URI [qemu:///system]:
Configuration complete.
这里只要按照步骤填写就重新生成了fence_virt.conf 文件
生成密钥文件,如果没有这个目录直接创建
[root@foundation /]# dd if=/dev/urandom of=/etc/cluster/fence_xvm.key bs=128 count=1
#创建fence卡的key文件,让节点服务器和Fence卡相互认识
#random:为随机数字生成器,生成的东西是唯一的
#fence_xvm.key:Fence卡的key文件,名字别改,fence_xvm是fence卡的一种类型

[root@foundation /]# systemctl restart fence_virtd.service

#将钥匙分发给你的节点1和节点2
[root@foundation /]#scp fence_xvm.key  [email protected]:/etc/cluster/
[root@foundation /]#scp fence_xvm.key  [email protected]:/etc/cluster/
这时你需要在你的浏览器中点击Nodes–>点击server1.example.com进入节点添加fence(在下面),–>Add Fence Method 起个名字之后,然后点击Add Fence install
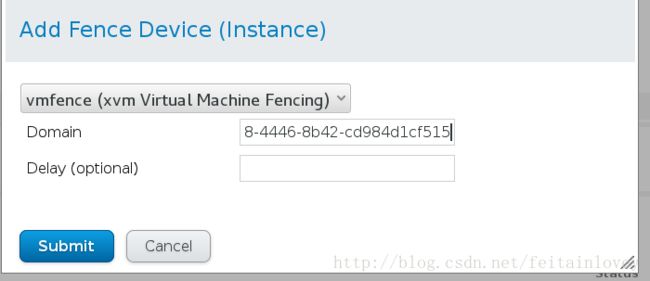
Domain这是server1和server2的UUID,Delay不用填。
这时在你的主机上可以查看虚拟机的状态
[root@foundation cluster]# virsh list
 Id    Name                           State
  ----------------------------------------------------
 1     server1                        running
 2     server2                        running
 3     server3                        running

#如果在你的server1上用下面命令,出现success则表示成功
[root@server1 cluster]# fence_node server2.example.com
fence server2.example.com success

为节点添加一个web站点的资源
下来点击Faliover Domains
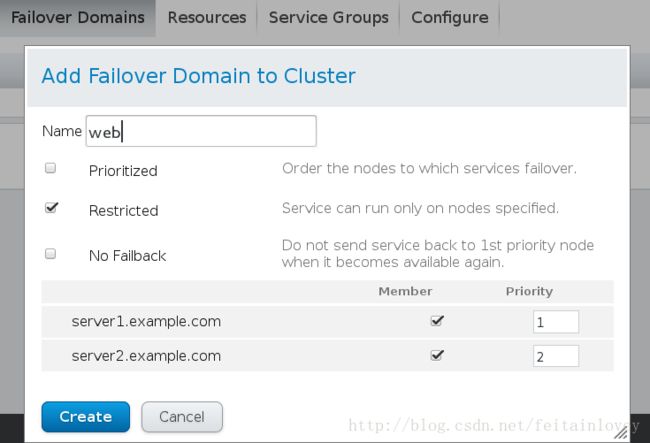
注意:这里第一个Prioritized 是可以在节点上跑任何程序;第二个Restricter是只能跑指定的软件;第三个No Failback,不回切,也就是节点坏了之后,修好之后他不会重新将资源切回到server1,也就是下面Priority这里的优先级高的节点。
在添加web之前我们先为其添加一个虚拟IP,和server1和server2在同一个网段。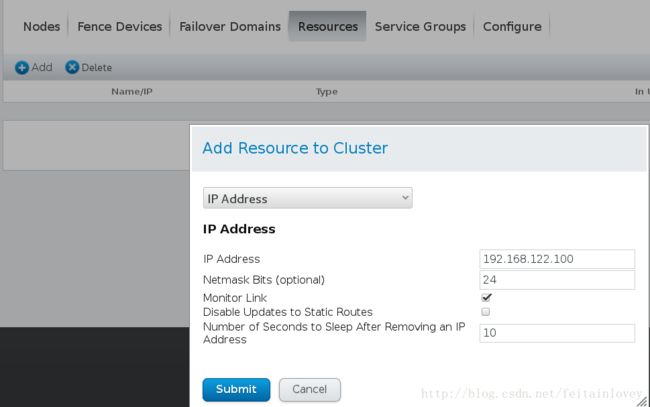
这里我们直接添加脚本比较方便,点击Add,在里面添加apache的脚本
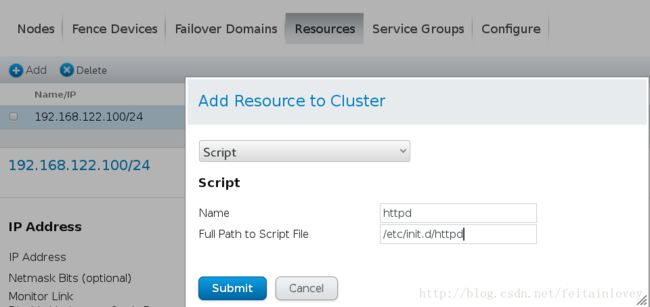
这时应该点击Server Groups添加资源,然后点击Add Resource,添加刚才的两个虚拟IP和脚本。然后点击start ,运行。这时你会发现,你的server1上多了一个虚拟IP192.168.122.100,当你curl 192.168.122.100时,你会发现访问到server1的站点目录.

Service Name:服务名称
Automatically Start This Service:服务是否自动启动
Failover Domain:选择故障转移域
Recovery Policy:故障转移策略,包括Relocate,Restart,Restart-Disable,Disable


当你将server1的httpd时,这时你会发现server2上多了虚拟IP,在访问192.168.122.100时,就会到server2的站点目录
除此之外你可以使用命令转移资源web11是你的server名称
[root@server2 cluster]# clusvcadm -r web11 -m server1.example.com
Trying to relocate service:web11 to server1.example.com…Success
service:web11 is now running on server1.example.com
我们为其添加共享磁盘
为此,我们在多来一台服务器,server3
在server3上安装软件
[root@server3 ~]# yum install scsi-*
[root@server3 ~]# vim /etc/tgt/targets.conf
 38 .2017-09.com.example:server.target1>
 39     backing-store /dev/vdb
 40     initiator-address 192.168.122.22
 41     initiator-address 192.168.122.11
 42
[root@server3 ~]# /etc/init.d/tgtd start
Starting SCSI target daemon:                               [  OK  ]
[root@server3 ~]# tgt-admin  -s
#可以查看你共享的IP
在server1和server2的安装iscsi 客户端,并且执行以下命令(server2一样)
[root@server1 ~]# yum install -y iscsi-* -y
[root@server1 ~]# iscsiadm  -m discovery  -t st -p 192.168.122.33
Starting iscsid:                                           [  OK  ]
192.168.122.33:3260,1 iqn.2008-09.com.example:server.target1
[root@server1 ~]# iscsiadm  -m node -l
Logging in to [iface: default, target: iqn.2008-09.com.example:server.target1, portal: 192.168.122.33,3260] (multiple)
Login to [iface: default, target: iqn.2008-09.com.example:server.target1, portal: 192.168.122.33,3260] successful.
注:如果出现错误可以使用下面命令删除节点上的共享存储
iscsiadm -m node -T iqn.2008-09.com.example:server.target1 --logout

这时你的server1和server2上就有多出来的一块硬盘/dev/sda,我们将他分区,类型为lvm。
注意:在分区的过程中,你要做到节点一致,也就是说在server1分完区之后要在server2上执行cat /proc/partitions ,他里面并没有你的/dev/sda1,需要执行partprobe

[root@server2 ~]# partprobe
Warning: WARNING: the kernel failed to re-read the partition table on /dev/vda (Device or resource busy).  As a result, it may not reflect all of your changes until after reboot.
注:格式化只用格式化一次,在server1或者server2上
[root@server1 ~]# mkfs.ext4 /dev/sda1
[root@server1 ~]# mount  /dev/sda1 /mnt
[root@server1 ~]# ls /mnt
lost+found
[root@server1 ~]# cp /etc/passwd /mnt
在server2上
[root@server2 ~]# ll /mnt
[root@server2 ~]# ll /mnt
total 16
drwx------ 2 root root 16384 Sep 26 16:11 lost+found
-rw-r--r-- 1 root root     0 Sep 26 16:13 passwd
#注意他不是同步的文件系统。
[root@server2 ~]# lvmconf  --enable-cluster
[root@server1 ~]# pvcreate /dev/sda1
  dev_is_mpath: failed to get device for 8:1
  Physical volume "/dev/sda1" successfully created
在server2上要执行pvs刷新分区,不然会出现错误。
[root@server1 ~]# vgcreate clustervg /dev/sda1
  Clustered volume group "clustervg" successfully created
同样也需要在server2上执行vgs来刷新权限。
[root@server1 ~]# lvcreate -L 2G -n demo clustervg
  Logical volume "demo" created
在server2上同步这里的分区一样的使用lvs,任然后格式化
[root@server1 ~]# mkfs.ext4 /dev/sda1
[root@server1 ~]# blkid
/dev/vda1: UUID="404e2516-ae57-4bde-b331-dc1c813d833a" TYPE="ext4"
/dev/vda2: UUID="DME0le-Whf5-q0Jv-VgFK-3tOn-uMPV-oY9Ifi" TYPE="LVM2_member"
/dev/mapper/VolGroup-lv_root: UUID="bc24a79d-0a44-43c6-954f-fbac01064666" TYPE="ext4"
/dev/mapper/VolGroup-lv_swap: UUID="8d8f08ac-8f24-4314-9b0e-c12da0aa483d" TYPE="swap"
/dev/sda1: UUID="e2AQcW-kFg2-Ce9l-d0L9-Ft2i-BDMg-N571gQ" TYPE="LVM2_member"
/dev/mapper/clustervg-demo: UUID="8611f951-f0e2-432e-a3c6-6e97c6b994d9" TYPE="ext4"
停止web11这个套件,然后添加资源硬盘的,前面说过也就是Resources
[root@server1 ~]# clusvcadm  -d web11
然后点击Service Groups添加资源,前面说过这里就不再说了,重新运行套件
[root@server1 ~]# clusvcadm -e web11
Local machine trying to enable service:web11…Success
service:web11 is now running on server1.example.com

你会发现他自动挂在到apache的站点目录。这时你关闭server1的apache他会自动切换到server2,也就是第二个节点
[root@server1 ~]# /etc/init.d/httpd stop
Stopping httpd: [ OK ]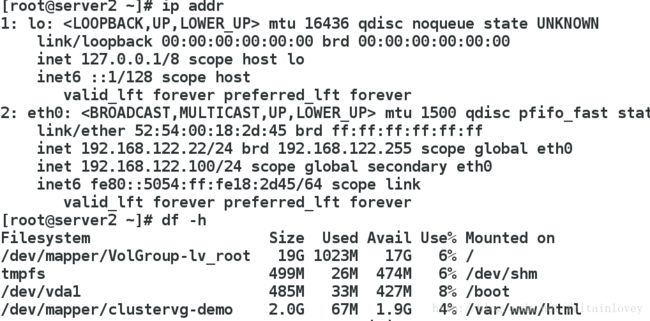
卸载集群
[root@server1 cluster]# clusvcadm  -d web11
#登出所有 target
[root@server1 ~]# iscsiadm -m node -u
Logging out of session [sid: 1, target: iqn.2017-09.com.example:server.target1, portal: 192.168.122.33,3260]
Logout of [sid: 1, target: iqn.2017-09.com.example:server.target1, portal: 192.168.122.33,3260] successful.
[root@server1 ~]# iscsiadm -m node -o delete
#在server2上也执行同样的操作
[root@server2 ~]# iscsiadm -m node -u
Logging out of session [sid: 1, target: iqn.2017-09.com.example:server.target1, portal: 192.168.122.33,3260]
Logout of [sid: 1, target: iqn.2017-09.com.example:server.target1, portal: 192.168.122.33,3260] successful.
[root@server2 ~]# iscsiadm  -m node -o delete