spring-boot整合elastic-job
本文基于elasticjob官方文档,如有疑问,请阅读官方文档url:elasticjob.io 废话不多说;
- 准备工作:
1. zookeeper,单机或者集群事情况而定;
2. 数据库,用于存放console的日志信息 和 批处理的数据源
3. 下载 elastic-job-lite-console 控制台,具体使用下面讲解。URL: https://github.com/elasticjob/elastic-job-lite
4. 数据库分区
- pom依赖:根据需要自行删减增加,核心依赖必须有。
            org.springframework.boot
            spring-boot-starter


            org.springframework.boot
            spring-boot-starter-test
            test


            com.dangdang
            elastic-job-lite-spring
            2.1.5


            org.projectlombok
            lombok


            org.springframework.boot
            spring-boot-starter-data-jpa


            mysql
            mysql-connector-java


            com.zaxxer
            HikariCP


            com.alibaba
            druid
            1.1.10


            org.mybatis.spring.boot
            mybatis-spring-boot-starter
            1.3.0
- application.yml
regCenter:
  # zookeeper 集群配置,单个就写单个,多个就用逗号分隔
  serverlists: localhost:2181,localhost:2182
  # zookeeper 命名空间,用于区分不同的服务
  namespace: boot-job

spring:
  datasource:
    url: jdbc:mysql://localhost:3306/mytest?characterEncoding=utf-8&verifyServerCertificate=false&useSSL=false&requireSSL=false
    driver-class-name: com.mysql.jdbc.Driver
    username: root
    password: root

#mybatis:
#  mapper-locations: classpath:org.boot.elasticjob.mapper/*.xml  #注意:一定要对应mapper映射xml文件的所在路径
#  type-aliases-package: org.boot.elasticjob.entity  # 注意:对应实体类的路径

mybatis:
  mapperLocations: classpath*:mapper/*.xml

# 具体的job配置,也可配置在代码中,根据个人需要,多个job需要多个配置,如 stockJob1:
# 更多参数详见elasticjob官方文档配置
stockJob:
  # cron  为定时任务的cron表达式;
  cron: 0/5 * * * * ?
  # shardingTotalCount  为任务的分数量(即同时同时开几个定时任务);
  shardingTotalCount: 5
  # shardingItemParameters  为任务分片携带的参数;
  shardingItemParameters: 0=红,1=绿,2=蓝,3=黑,4=紫


stockJob1:
  # cron  为定时任务的cron表达式;
  cron: 0/5 * * * * ?
  # shardingTotalCount  为任务的分数量(即同时同时开几个定时任务);
  shardingTotalCount: 3
  # shardingItemParameters  为任务分片携带的参数;
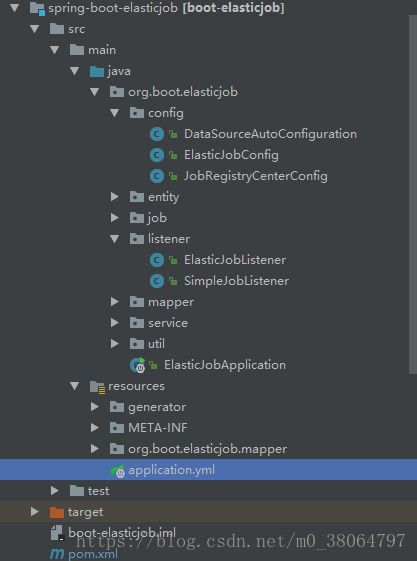
shardingItemParameters: 0=张三,1=李四,2=王五- 目录结构,最重要的为 config 和 listener
config:数据源配置、job配置、注册中心zookeeper集群配置
listener: 分布式监听器(只有一个节点(该分片节点)执行)、简单监听器(每个节点均执行),根据需要自行选择。
详解:
package org.boot.elasticjob.config;

import com.alibaba.druid.pool.DruidDataSource;
import org.springframework.boot.autoconfigure.AutoConfigureBefore;
import org.springframework.boot.autoconfigure.jdbc.DataSourceProperties;
import org.springframework.boot.context.properties.EnableConfigurationProperties;
import org.springframework.context.annotation.Bean;
import org.springframework.context.annotation.Configuration;

import javax.annotation.Resource;
import javax.sql.DataSource;

/**
 * Created by hp on 2018/8/23.
 * 自定义数据源配置,一般只需要在application.yml文件中配置即可
 */
@Configuration
@AutoConfigureBefore(org.springframework.boot.autoconfigure.jdbc.DataSourceAutoConfiguration.class)
@EnableConfigurationProperties(DataSourceProperties.class)
public class DataSourceAutoConfiguration {

    @Resource
    DataSourceProperties properties;

    @Bean
    public DataSource dataSource() {
        DruidDataSource dataSource = new DruidDataSource();
        dataSource.setUrl(properties.getUrl());
        dataSource.setUsername(properties.getUsername());
        dataSource.setPassword(properties.getPassword());
        dataSource.setDriverClassName(properties.getDriverClassName());
        return dataSource;
    }

}
package org.boot.elasticjob.config;

import com.alibaba.druid.pool.DruidDataSource;
import com.dangdang.ddframe.job.api.simple.SimpleJob;
import com.dangdang.ddframe.job.config.JobCoreConfiguration;
import com.dangdang.ddframe.job.config.simple.SimpleJobConfiguration;
import com.dangdang.ddframe.job.event.JobEventConfiguration;
import com.dangdang.ddframe.job.event.rdb.JobEventRdbConfiguration;
import com.dangdang.ddframe.job.lite.api.JobScheduler;
import com.dangdang.ddframe.job.lite.config.LiteJobConfiguration;
import com.dangdang.ddframe.job.lite.spring.api.SpringJobScheduler;
import com.dangdang.ddframe.job.reg.zookeeper.ZookeeperRegistryCenter;
import org.boot.elasticjob.job.MyElasticJob;
import org.boot.elasticjob.job.MyElasticJob1;
import org.boot.elasticjob.listener.ElasticJobListener;
import org.springframework.beans.factory.annotation.Autowired;
import org.springframework.beans.factory.annotation.Value;
import org.springframework.context.annotation.Bean;
import org.springframework.context.annotation.Configuration;

import javax.annotation.Resource;

/**
 * job配置管理类
 **/
@Configuration
public class ElasticJobConfig {

    @Autowired
    private ZookeeperRegistryCenter regCenter;

    @Resource
    MyElasticJob myElasticJob;

    @Resource
    MyElasticJob1 myElasticJob1;

    @Resource
    private DruidDataSource dataSource;


    /**
     * 初始化job,如有多个job,就另外初始化多个Bean
     * @param cron
     * @param shardingTotalCount
     * @param shardingItemParameters
     * @return
     */
    @Bean(initMethod = "init")
    public JobScheduler simpleJobScheduler( @Value("${stockJob.cron}") final String cron, @Value("${stockJob.shardingTotalCount}") final int shardingTotalCount, @Value("${stockJob.shardingItemParameters}") final String shardingItemParameters) {
        return new SpringJobScheduler(myElasticJob, regCenter, getLiteJobConfiguration(myElasticJob.getClass(), cron, shardingTotalCount, shardingItemParameters),jobEventConfiguration(),elasticJobListener());
    }

//    @Bean(initMethod = "init")
//    public JobScheduler simpleJobScheduler1( @Value("${stockJob1.cron}") final String cron, @Value("${stockJob1.shardingTotalCount}") final int shardingTotalCount, @Value("${stockJob1.shardingItemParameters}") final String shardingItemParameters) {
//        return new SpringJobScheduler(myElasticJob1, regCenter, getLiteJobConfiguration(myElasticJob1.getClass(), cron, shardingTotalCount, shardingItemParameters));
//    }

    /**
     * 将作业运行的痕迹(日志信息)进行持久化到DB,可在console控制台中查看
     *
     * @return
     */
    @Bean
    public JobEventConfiguration jobEventConfiguration() {
        return new JobEventRdbConfiguration(dataSource);
    }

    /**
     * 初始化监听器,用于监听job的结束和开始
     * @return
     */
    @Bean
    public ElasticJobListener elasticJobListener() {
        return new ElasticJobListener(5000L, 10000L);
//        return new SimpleJobListener();
    }


    /**
     *@Description  任务配置类
     * 如有详细配置,可使用JobCoreConfiguration另外的构造器,这里选取了必要的配置
     */
    private LiteJobConfiguration getLiteJobConfiguration(final Class jobClass,
                                                         final String cron,
                                                         final int shardingTotalCount,
                                                         final String shardingItemParameters){


        return LiteJobConfiguration
                .newBuilder(
                        new SimpleJobConfiguration(
                                JobCoreConfiguration.newBuilder(
                                        jobClass.getName(),cron,shardingTotalCount)
                                        .shardingItemParameters(shardingItemParameters)
                                        .build()
                                ,jobClass.getCanonicalName()
                        )
                )
                .overwrite(true)
                .build();

    }
}
package org.boot.elasticjob.config;

import com.dangdang.ddframe.job.reg.zookeeper.ZookeeperConfiguration;
import com.dangdang.ddframe.job.reg.zookeeper.ZookeeperRegistryCenter;
import org.springframework.beans.factory.annotation.Value;
import org.springframework.boot.autoconfigure.condition.ConditionalOnExpression;
import org.springframework.context.annotation.Bean;
import org.springframework.context.annotation.Configuration;


/**
 * Zookeeper 配置管理类
 * Created by hp on 2018/8/13.
 */
@Configuration
@ConditionalOnExpression("'${regCenter.serverlists}'.length() > 0")
public class JobRegistryCenterConfig {

    @Bean(initMethod = "init")
    public ZookeeperRegistryCenter regCenter(@Value("${regCenter.serverlists}") final String serverList, @Value("${regCenter.namespace}") final String namespace) {
        return new ZookeeperRegistryCenter(new ZookeeperConfiguration(serverList, namespace));
    }

}
以上为配置信息,下面说一下具体的job如何实现,这里一SimpleJob为例;
package org.boot.elasticjob.job;

import com.dangdang.ddframe.job.api.ShardingContext;
import com.dangdang.ddframe.job.api.simple.SimpleJob;
import org.boot.elasticjob.entity.User;
import org.boot.elasticjob.service.UserService;
import org.springframework.beans.factory.annotation.Autowired;
import org.springframework.stereotype.Service;

import java.util.List;

/**
 * 继承SimpleJob重写execute方法,可在该方法中调用具体的业务逻辑执行批处理任务;
 * ShardingContext参数中包含局的分片信息,具体含义在打印信息中可见,也可参考官方文档;
 * shardingContext.getShardingItem()参数可结合数据库的分区来是实现分区操作;
 */
@Service
public class MyElasticJob implements SimpleJob {

    @Autowired
    UserService userService;

    @Override
    public void execute(ShardingContext shardingContext) {
        List users = userService.selectAll();
        System.out.println("---------------------------------------"+users.size());
        System.out.println(String.format("------数据插入完成,Thread ID: %s, 任务总片数: %s, " +
                        "当前分片项: %s.当前参数: %s,"+
                        "当前任务名称: %s.当前任务参数: %s"
                ,
                Thread.currentThread().getId(),
                shardingContext.getShardingTotalCount(),
                shardingContext.getShardingItem(),
                shardingContext.getShardingParameter(),
                shardingContext.getJobName(),
                shardingContext.getJobParameter()

        ));
    }
}
监听器用于在job开始或者结束时执行一些操作,如删除数据。具体代码可从github中下载,URL:https://github.com/gyxhp/spring-cloud-example.git
demo中使用的mybaties操作数据库,具体集成方式不多赘述,看官可自行询问度娘;
数据库分区
这里使用mysql数据库的分区,分区语句如下;
数据库 t_user 表分5个区,分区方法为HASH,分区依据为user_id主键,必须为int或者bigint型;
ALTER TABLE t_user PARTITION BY HASH (user_id) PARTITIONS 5;
查询分区状态信息
SELECT
PARTITION_NAME,
PARTITION_METHOD,
PARTITION_EXPRESSION,
PARTITION_DESCRIPTION,
TABLE_ROWS,
SUBPARTITION_NAME,
SUBPARTITION_METHOD,
SUBPARTITION_EXPRESSION
FROM
information_schema. PARTITIONS
WHERE
TABLE_SCHEMA = SCHEMA ()
AND TABLE_NAME = 't_user';
查询分区为p0的所有数据
SELECT * FROM t_user PARTITION (p0);
最重要的是
Elastic-Job-Console 控制台
介绍如下:
主页面如下图所示,不是很重要,不多说;
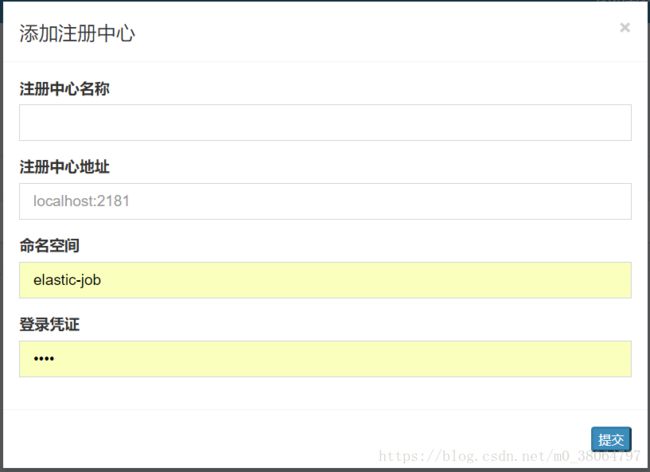
注册中心配置点击添加,注意命名空间要与配置文件application.yml中的空间一致,登录凭证可不填。点击保存后可在左侧菜单栏显示出作业操作的具体信息(如上图的19和3)表示连接成功;
事件追踪数据源配置,配置你的job日志信息,可在保存后在console中查看日志信息。数据库表信息在官方文档中可查看。
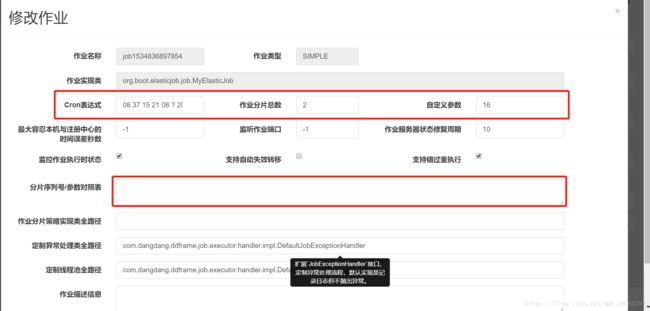
console中只有这两块的配置信息,具体的配置按照名称对应填写就行,没有特别之处,不多做解释。另外要说的是job的修改,这里只修改了运行时的参数,但是实际参数并未修改,因此再次发布的是时候回到原来的配置信息,所以需要有一个控制配置信息的地方,可以选择Apollo,也可以用数据库进行管理。
需要修改的地方为红色方框中信息,cron表达式为定时信息,作业分片数也可以动态修改,但是同时分片数和参数对照表也需要修改;自定义参数根据需要自行设置格式(如 json),可在后台获取 shardingContext.getShardingItem() 并使用;
以上就是console的几个关键点,重点是两个连接,只要连接上,可以自行摸索,没有难点;分片策略我们使用的是默认的,所以为做修改,异常处理和定制线程池可根据需要自行添加。
代码下载地址:https://github.com/gyxhp/spring-cloud-example.git
源码可在elasticjob.io的github链接下载
--------------------------------------------------------------------------------------完---------------------------------------------------------------------------------------


