canal 实现mysql 数据实时同步
https://github.com/alibaba/canal
文章目录
- 一、工作原理:
- 二、准备工作:
- 三、启动canal server(以docker为例)
- 四、创建client
- 1、client adapter
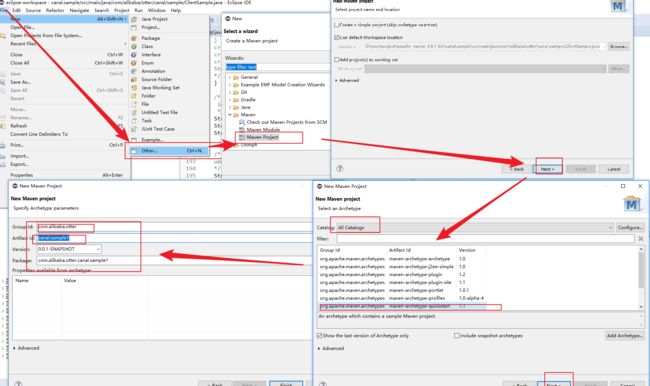
- 2、利用eclipse 创建client
- 五、监控
canal是基于数据库增量日志解析,提供增量数据订阅和消费。
一、工作原理:
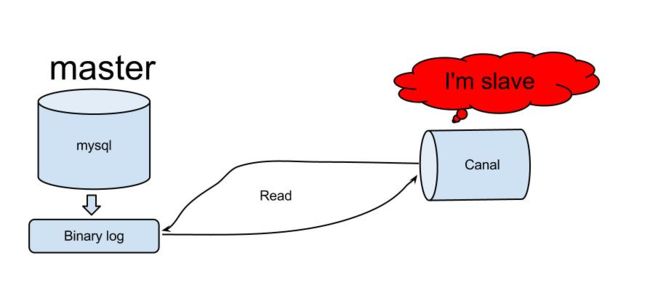
需要了解mysql主从复制原理
- canal 模拟mysql slave 的交互协议,伪装自己为mysql slave,向mysql master 发送dump 协议。
- mysql master 收到dump请求,开始推送binary log给canal (slave)
- canal解析binary log对象(原始为byte流)
二、准备工作:
- 自建mysql需要开启binlog,binlog-format为row模式
- server_id 不要和canal的slaveId相同
- 创建mysql的slave权限的账号
CREATE USER canal IDENTIFIED BY 'canal';
GRANT SELECT, REPLICATION SLAVE, REPLICATION CLIENT ON *.* TO 'canal'@'%';
-- GRANT ALL PRIVILEGES ON *.* TO 'canal'@'%' ;
FLUSH PRIVILEGES;
三、启动canal server(以docker为例)
- 安装docker
1、 访问docker hub获取最新的版本
访问:https://hub.docker.com/r/canal/canal-server/tags/
2、下载最新版本
#docker pull canal/canal-server:latest
3、本地编译
#git clone https://github.com/alibaba/canal.git
#cd canal/docker
4、启动docker
#ls
base  build.sh  data  Dockerfile  image  run.sh

#sh run.sh
Usage:
  run.sh [CONFIG]
example:
  run.sh -e canal.instance.master.address=127.0.0.1:3306 \
         -e canal.instance.dbUsername=canal \
         -e canal.instance.dbPassword=canal \
         -e canal.instance.connectionCharset=UTF-8 \
         -e canal.instance.tsdb.enable=true \
         -e canal.instance.gtidon=false \
         -e canal.instance.filter.regex=.*\\\..*
实际运行的例子:
#sh run.sh -e canal.auto.scan=false \
		  -e canal.destinations=test \
		  -e canal.instance.master.address=127.0.0.1:3306  \
		  -e canal.instance.defaultDatabaseName=test  \
		  -e canal.instance.dbUsername=canal  \
		  -e canal.instance.dbPassword=canal  \
		  -e canal.instance.connectionCharset=UTF-8 \
		  -e canal.instance.tsdb.enable=true \
		  -e canal.instance.gtidon=false  \
		  -e canal.instance.master.journal.name=mysql-bin.000020 \
		  -e canal.instance.master.position=248020621 \
		  -e canal.instance.connectionCharset=UTF-8 \
注:
canal.instance.master.journal.name=mysql-bin.000020 #binlog日志
canal.instance.master.position=248020621 #日志的偏移量
canal.instance.connectionCharset=UTF-8 #指定编码集
更多参数:https://github.com/alibaba/canal/wiki/AdminGuide
注意:docker模式下,单docker实例只能运行一个instance,主要为配置问题。如果需要运行多instance时,可以自行制作一份docker镜像即可
5、启动成功
#docker logs 61d5a7421fac

DOCKER_DEPLOY_TYPE=VM
==> INIT /alidata/init/02init-sshd.sh
==> EXIT CODE: 0
==> INIT /alidata/init/fix-hosts.py
==> EXIT CODE: 0
==> INIT DEFAULT
Generating SSH1 RSA host key:                              [  OK  ]
Starting sshd:                                             [  OK  ]
Starting crond:                                            [  OK  ]
==> INIT DONE
==> RUN /home/admin/app.sh
==> START ...
start canal ...
start canal successful
==> START SUCCESSFUL ...
四、创建client
创建客户端有两种方法:
- client adapter(适配器)
- 手动编写java实现
1、client adapter
以rdb适配器 mysql的同步mysql(支持任意关系型及非关系型数据库)为例
下载需要的版本:https://github.com/alibaba/canal/releases
#wget https://github.com/alibaba/canal/releases/download/canal-1.1.3/canal.adapter-1.1.3.tar.gz
1.1、 修改启动器配置:application.ym
cd canal.adapter
#vim conf/application.yml
server:
  port: 8081 #端口号,验证是否与现有端口冲突
spring:
  jackson:
    date-format: yyyy-MM-dd HH:mm:ss
    time-zone: GMT+8
    default-property-inclusion: non_null

canal.conf:
  mode: tcp # kafka rocketMQ
  canalServerHost: 127.0.0.1:11111  #canalserver 的ip地址及端口号
#  zookeeperHosts: slave1:2181
  mqServers: 127.0.0.1:9092 #or rocketmq
  flatMessage: true
  batchSize: 500
  syncBatchSize: 1000
  retries: 0
  timeout:
  accessKey:
  secretKey:
  srcDataSources:  #源库
    defaultDS:
      url: jdbc:mysql://10.1.10.63:3306/test?useUnicode=true #访问源库的jdbc配置
      username: canal  #用户名
      password: canal  ¥密码
  canalAdapters:
  - instance: test # canal instance Name or mq topic name
    groups:
    - groupId: g1
      outerAdapters:
      - name: logger
      - name: rdb  #指定为rdb类型同步
        key: mysql1  #指定adapter的唯一key, 与表映射配置中outerAdapterKey对应
        properties:
          jdbc.driverClassName: com.mysql.jdbc.Driver #jdbc驱动名, 部分jdbc的jar包需要自行放致lib目录下
          jdbc.url: jdbc:mysql://10.1.10.64:3306/test_0001?useUnicode=true #目标库的jdbc配置
          jdbc.username: test #用户名
          jdbc.password: test ¥密码
注意:
- 其中 outAdapter 的配置: name统一为rdb, key为对应的数据源的唯一标识需和下面的表映射文件中的outerAdapterKey对应, properties为目标库jdb的相关参数
- adapter将会自动加载 conf/rdb 下的所有.yml结尾的表映射配置文件。一表yml文件对应一个表的映射关系,多个表可以创建多个yml文件。
1.2、rdb表映射文件
修改conf/rdb/mytest_user.yml
#vim conf/rdb/mytest_user.yml
dataSourceKey: defaultDS  #源数据源的key, 对应上面配置的srcDataSources中的值
destination: test  #和application.yml文件中的instance 值保持一致
groupId: g1
outerAdapterKey: mysql1 # adapter key, 对应上面配置outAdapters中的ke
concurrent: true
dbMapping:
  database: test
  table: ClassesRecords
  targetTable: test_0001.ClassesRecords
  targetPk:
    id: id  #如果是复合主键可以换行映射多个
  #mapAll: true # 是否整表映射, 要求源表和目标表字段名一模一样 (如果targetColumns也配置了映射,则以targetColumns配置为准)
#  targetColumns:  # 字段映射, 格式: 目标表字段: 源表字段, 如果字段名一样源表字段名可不填
   id:id
   name:id
一个yml文件指定一个表的映射关系,多个表需要创建多个yml文件即可
1.3、启动canal-adapter启动器
#bin/startup.sh
2、利用eclipse 创建client
2.1、下载eclipse
2.2、下载jre配置环境变量
2.3、下载 maven 配置环境变量
或者使用mvn创建项目工程
#mvn archetype:generate -DgroupId=com.alibaba.otter -DartifactId=canal.sample
2.5、修改依赖配置:pom.xml
在标签中添加:


    com.alibaba.otter
    canal.client
    1.1.3
2.6 示例ClientSample.java
package com.alibaba.otter.canal.sample;

import java.math.BigInteger;
import java.net.InetSocketAddress;
import java.util.ArrayList;
import java.util.List;
import org.slf4j.Logger;
import org.slf4j.LoggerFactory;


import com.alibaba.otter.canal.client.CanalConnectors;
import com.alibaba.otter.canal.client.CanalConnector;
import com.alibaba.otter.canal.common.utils.AddressUtils;
import com.alibaba.otter.canal.protocol.Message;
import com.alibaba.otter.canal.protocol.CanalEntry.Column;
import com.alibaba.otter.canal.protocol.CanalEntry.Entry;
import com.alibaba.otter.canal.protocol.CanalEntry.EntryType;
import com.alibaba.otter.canal.protocol.CanalEntry.EventType;
import com.alibaba.otter.canal.protocol.CanalEntry.RowChange;
import com.alibaba.otter.canal.protocol.CanalEntry.RowData;

import com.alibaba.otter.canal.sample.ConnMysql;
import com.alibaba.otter.canal.sample.ClassesRecords;

public class ClientSample {

public static void main(String args[]) {
    // 创建链接
    CanalConnector connector = CanalConnectors.newSingleConnector(new InetSocketAddress("10.1.10.63",
                                                                                      11111), "test", "", "");

    int batchSize = 1000;
    int emptyCount = 0;
    try {
        connector.connect();
        connector.subscribe(".*\\..*");
        connector.rollback();
        int totalEmptyCount = 120;
        while (emptyCount < totalEmptyCount) {
            Message message = connector.getWithoutAck(batchSize); // 获取指定数量的数据
            long batchId = message.getId();
            int size = message.getEntries().size();
            if (batchId == -1 || size == 0) {
                emptyCount++;
                System.out.println("empty count : " + emptyCount);
                try {
                    Thread.sleep(1000);
                } catch (InterruptedException e) {
                }
            } else {
                emptyCount = 0;
                // System.out.printf("message[batchId=%s,size=%s] \n", batchId, size);
                printEntry(message.getEntries());
            }

            connector.ack(batchId); // 提交确认
            // connector.rollback(batchId); // 处理失败, 回滚数据
        }

        System.out.println("empty too many times, exit");
    } finally {
        connector.disconnect();
    }
}

private static void printEntry(List entrys) {

	//循环每行binlog
    for (Entry entry : entrys) {
        if (entry.getEntryType() == EntryType.TRANSACTIONBEGIN || entry.getEntryType() == EntryType.TRANSACTIONEND) {
            continue;
        }

        RowChange rowChage = null;
        try {
            rowChage = RowChange.parseFrom(entry.getStoreValue());
            rowChage = RowChange.parseFrom(entry.getStoreValue());

        } catch (Exception e) {
            throw new RuntimeException("ERROR ## parser of eromanga-event has an error , data:" + entry.toString(),
                                       e);
        }
        //单条 binlog sql
        EventType eventType = rowChage.getEventType();
        System.out.println(String.format("================> binlog[%s:%s] , name[%s,%s] , eventType : %s",
                                         entry.getHeader().getLogfileName(), entry.getHeader().getLogfileOffset(),
                                         entry.getHeader().getSchemaName(), entry.getHeader().getTableName(),
                                         eventType));

        for (RowData rowData : rowChage.getRowDatasList()) {
            if (eventType == EventType.DELETE) {
                printColumn(rowData.getBeforeColumnsList(),entry.getHeader().getTableName(),eventType);
            } else if (eventType == EventType.INSERT) {
//                printColumn(rowData.getAfterColumnsList(),entry.getHeader().getTableName(),eventType);
            	System.out.println(rowData.getAfterColumnsList());
            } else {
                System.out.println("-------> before");
                printColumn(rowData.getBeforeColumnsList(),entry.getHeader().getTableName(),eventType);
                System.out.println("-------> after");
                printColumn(rowData.getAfterColumnsList(),entry.getHeader().getTableName(),eventType);
//                System.out.println(rowData.getAfterColumnsList());
            }
        }
    }
}

private static void printColumn(List columns,String tableName,EventType eventType ) {
	List insert_fileds_list=new ArrayList();
	List insert_value_list=new ArrayList();

	List update_fields_list=new ArrayList();
	List update_where_list=new ArrayList();

	ClassesRecords cr = new ClassesRecords();


    for (Column column : columns) {
    	String  value= column.getValue();
//        System.out.println(column.getName() + " : " + column.getValue() + "    update=" + column.getUpdated());
    	System.out.println("index:" + column.getIndex()+"    "+ column.getName()+ " : " + column.getValue() + "  类型:" + column.getMysqlType() + "    update=" + column.getUpdated());

    	//
    	if (column.getIsNull()) {
    		System.out.print("\n");
    	}else if(column.getUpdated() == false) {
    		System.out.print("\n");
    	}else {
    		insert_fileds_list.add(column.getName());
        	insert_value_list.add(String.format("\"%s\"",value));
    	}


    	//update 操作
    	if(column.getUpdated() == true && column.getIsKey() == true) {
    		update_where_list.add(column.getName() + "=" + "\"" +column.getValue() + "\"" );
    	}else if (column.getUpdated() == true && eventType.toString().equals("UPDATE")) {
    		System.out.print("++++++++++++++++++++++++++++++++++++++++++++++++++++++++++++");
    		update_fields_list.add(column.getName() + "=" + "\"" + column.getValue() + "\"");
    	}

    }

    /*
     insert 语句
     */
    String insert_fields = insert_fileds_list.toString().replace("[", "(").replace("]", ")");
    String insert_value = insert_value_list.toString().replace("[", "(").replace("]", ")");
    String insert_sql = "insert into "+ tableName + insert_fields + "  value" + insert_value;


    /*
    update 语句
    */
    String update_value = update_fields_list.toString().replace("[", " ").replace("]", " ");
    String update_where_value = update_where_list.toString().replace("[", " ").replace("]", " ");
    String update_sql = "update "+ tableName + " set " +  update_value + " where " + update_where_value;


	if (eventType.toString().equals("UPDATE")) {
	    System.out.print("sql:" + update_sql);
//	    ConnMysql.RunSql(sql);
	}else if (eventType.toString().equals("INSERT")) {
		   System.out.print("sql:" + update_value);
//		    ConnMysql.RunSql(sql);
	}
   }
}
2.7、运行ClientSample

