Mybatis3.x 源码阅读-02解析mybatis-config.xml
1. 前言
上一篇,完成了源码的检出与导入,并通过测试案例,测试了数据的插入,这一篇文章,我们来分析下xml的解析流程。
2. 正文
2.1 案例代码
@Test
    public void test(){
        SqlSessionFactory sqlSessionFactory = SqlSessionFactoryUtil.getSqlSessionFactory();
        SqlSession sqlSession = sqlSessionFactory.openSession();
        PersonDao personDao =  sqlSession.getMapper(PersonDao.class);
        Person p = new Person();
        p.setAddress("广东省");
        p.setAge(12);
        p.setEmail("[email protected]");
        p.setName("chen");
        p.setPhone("15345634565");
        personDao.insert(p);
        System.out.println(p.toString());
        sqlSession.commit();
        sqlSession.close();
    }
public class SqlSessionFactoryUtil {

    public static SqlSessionFactory getSqlSessionFactory(){
        String path = "mybatis-config.xml";
        SqlSessionFactory sqlSessionFactory = null;
        try {
            Reader reader = Resources.getResourceAsReader(path);
            sqlSessionFactory = new SqlSessionFactoryBuilder().build(reader);
        } catch (IOException e) {
            System.out.println("获取配置文件失败");
            e.printStackTrace();
        }

        return sqlSessionFactory;
    }
}
SqlSessionFactoryUtil是自己写的,读取了我们指定位置的mybatis-config.xml文件,并且通过SqlSessionFactoryBuilder().build 返回了我们需要的sqlSessionFactory,有了这个,就可以直接获取到SqlSession了。
2.2 时序图
先来看下时序图,时序图我是网上找的。
下图来自:https://www.cnblogs.com/dongying/p/4142476.html

2.3 开始分析
SqlSessionFactoryUtil#getSqlSessionFactory
public static SqlSessionFactory getSqlSessionFactory(){
        String path = "mybatis-config.xml";
        SqlSessionFactory sqlSessionFactory = null;
        try {
            Reader reader = Resources.getResourceAsReader(path);@1
            sqlSessionFactory = new SqlSessionFactoryBuilder().build(reader);@2
        } catch (IOException e) {
            System.out.println("获取配置文件失败");
            e.printStackTrace();
        }

        return sqlSessionFactory;
    }
@1 读取指定的mybatis-config.xml文件,获取到reader
@2 通过new 创建了SqlSessionFactoryBuilder对象,并调用build,获取一个sqlSessionFactory对象。下面进入build看看。
2.4 SqlSessionFactoryBuilder#build
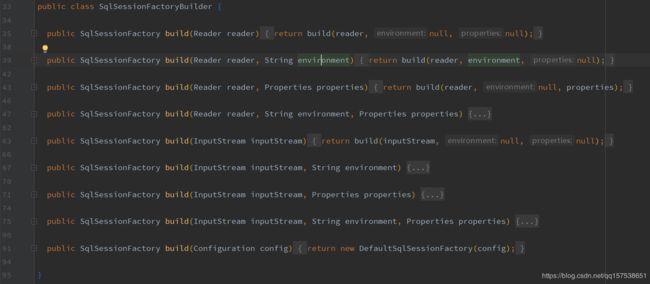
build方法,里面提供了很多根据不同参数来构建SqlSessionFactory

所有的build最终调用的都是下面这个方法
 public SqlSessionFactory build(Reader reader, String environment, Properties properties) {
    try {
      XMLConfigBuilder parser = new XMLConfigBuilder(reader, environment, properties);@1
      return build(parser.parse());@2
    } catch (Exception e) {
      throw ExceptionFactory.wrapException("Error building SqlSession.", e);
    } finally {
      ErrorContext.instance().reset();
      try {
        reader.close();
      } catch (IOException e) {
        // Intentionally ignore. Prefer previous error.
      }
    }
  }
@1 构建一个xml解析对象,用来解析我们的mybatis.xml
@2 开始解析,下一步进入到parse
2.5 XMLConfigBuilder#parse
XMLConfigBuilder#parse
 public Configuration parse() {
  if (parsed) {@1
    throw new BuilderException("Each XMLConfigBuilder can only be used once.");
  }
  parsed = true;
  parseConfiguration(parser.evalNode("/configuration"));@2
  return configuration;
}
@1 mybatis-config.xml 只解析一次,如果多次加载解析,将抛出BuilderException异常
@2 mybatis-config.xml 的节点是最外面是configuration,所以从configuration节点开始解析, evalNode是返回一个指定名称的节点。
下面进入到具体的parseConfiguration
2.6 XMLConfigBuilder#parseConfiguration
这个方法需要特别关注,因为这里解析了mybatis-config.xml 中所有的配置信息。
XMLConfigBuilder#parseConfiguration
private void parseConfiguration(XNode root) {
    try {
      //issue #117 read properties first
      propertiesElement(root.evalNode("properties"));@1
      Properties settings = settingsAsProperties(root.evalNode("settings"));@2
      loadCustomVfs(settings);@3
      loadCustomLogImpl(settings);@4
      typeAliasesElement(root.evalNode("typeAliases"));@5
      pluginElement(root.evalNode("plugins"));@6
      objectFactoryElement(root.evalNode("objectFactory"));@7
      objectWrapperFactoryElement(root.evalNode("objectWrapperFactory"));@8
      reflectorFactoryElement(root.evalNode("reflectorFactory"));@9
      settingsElement(settings);
      // read it after objectFactory and objectWrapperFactory issue #631
      environmentsElement(root.evalNode("environments")); @10
      databaseIdProviderElement(root.evalNode("databaseIdProvider"));@11
      typeHandlerElement(root.evalNode("typeHandlers"));@12
      mapperElement(root.evalNode("mappers"));@13
    } catch (Exception e) {
      throw new BuilderException("Error parsing SQL Mapper Configuration. Cause: " + e, e);
    }
  }
@1 解析properties 元素,加载properties文件,然后替换成mybatis-config.xml中的值,比如我可以读取jdbc.properties 文件,然后mybatis-config.xml的username、url、password等就可以通过这样取值的形式读取到properties中的值。
@2 settings就是mybatis 框架的熟悉配置,比如你可以通过配置cacheEnabled=true|false,配置是否开区全局缓存,lazyLoadingEnabled(延迟加载的全局开关。当开启时,所有关联对象都会延迟加载。 特定关联关系中可通过设置fetchType属性来覆盖该项的开关状态。)更多的介绍参考官方文档:http://www.mybatis.org/mybatis-3/zh/configuration.html#settings
@3 加载 指定VFS的实现
@4 指定 MyBatis 所用日志的具体实现,未指定时将自动查找
@5 typeAliases 加载别名
@6 加载插件, 许你在已映射语句执行过程中的某一点进行拦截调用
@7objectFactory mybatis自己有提供对象工厂,如果想覆盖对象工厂的默认行为,则可以通过创建自己的对象工厂来实现。
@8 对象工厂的包装,自己也可以定义。默认是DefaultObjectWrapperFactory
@9 reflectorFactory 接口主要实现了对Reflector对象的创建和缓存
@10 加载不同环境的配置
@11 MyBatis 可以根据不同的数据库厂商执行不同的语句,这种多厂商的支持是基于映射语句中的 databaseId 属性。 MyBatis 会加载不带 databaseId 属性和带有匹配当前数据库 databaseId 属性的所有语句。 如果同时找到带有 databaseId 和不带 databaseId 的相同语句,则后者会被舍弃。 为支持多厂商特性只要像下面这样在 mybatis-config.xml 文件中加入 databaseIdProvider 即可:
@12 从结果集里面获取值,都需要转换成相应的java对象, 这里就是只读java的默认的数据类型处理器
@13 加载我们写在xml中的SQL语句
这里挑选几个方法,进入看看,下面看下environmentsElement方法
2.7 XMLConfigBuilder#environmentsElement
XMLConfigBuilder#environmentsElement
private void environmentsElement(XNode context) throws Exception {
  if (context != null) {
    if (environment == null) {
      environment = context.getStringAttribute("default");  @1
    }
    for (XNode child : context.getChildren()) {
      String id = child.getStringAttribute("id");
      if (isSpecifiedEnvironment(id)) {@2
        TransactionFactory txFactory = transactionManagerElement(child.evalNode("transactionManager"));   @3
        DataSourceFactory dsFactory = dataSourceElement(child.evalNode("dataSource"));  @4
        DataSource dataSource = dsFactory.getDataSource();
        Environment.Builder environmentBuilder = new Environment.Builder(id)  @5
            .transactionFactory(txFactory)
            .dataSource(dataSource);
        configuration.setEnvironment(environmentBuilder.build());  @6
      }
    }
  }
}
@1 判断传入的environment是否为空,为空,则去默认的,因为environments 配置了default的环境,这样就确定了当前采用哪个环境的数据源。
@2获取所有的environment 节点, 获取其id,验证id是否等于当然环境default指定的环境,如果environments 为空,或者id为空,都抛异常。这里是加载指定的环境的数据源。
@3 获取事务管理器工厂,我这里是JDBC ,这里有2中,后面详细介绍。
@4 获取数据源工厂,然后根据工厂,获取数据源
@5 根据前面的环境、数据源、事务管理器工厂构建Environment.Builder ,Builder是Environment的静态内部类。
@6 所有的信息都封装在了configuration中
 public static class Builder {
   private String id;
   private TransactionFactory transactionFactory;
   private DataSource dataSource;
   public Builder(String id) {
     this.id = id;
   }
   public Builder transactionFactory(TransactionFactory transactionFactory) {
     this.transactionFactory = transactionFactory;
     return this;
   }
   public Builder dataSource(DataSource dataSource) {
     this.dataSource = dataSource;
     return this;
   }
   public String id() {
     return this.id;
   }
   public Environment build() {
     return new Environment(this.id, this.transactionFactory, this.dataSource);
   }
 }
2.8 XMLConfigBuilder#mapperElement
进入XMLConfigBuilder#mapperElement
private void mapperElement(XNode parent) throws Exception {
    if (parent != null) {
      for (XNode child : parent.getChildren()) {
        if ("package".equals(child.getName())) {
          String mapperPackage = child.getStringAttribute("name");
          configuration.addMappers(mapperPackage);
        } else {
          String resource = child.getStringAttribute("resource");
          String url = child.getStringAttribute("url");
          String mapperClass = child.getStringAttribute("class");
          if (resource != null && url == null && mapperClass == null) {@1
            ErrorContext.instance().resource(resource);
            InputStream inputStream = Resources.getResourceAsStream(resource);
            XMLMapperBuilder mapperParser = new XMLMapperBuilder(inputStream, configuration, resource, configuration.getSqlFragments());
            mapperParser.parse();
          } else if (resource == null && url != null && mapperClass == null) {
            ErrorContext.instance().resource(url);
            InputStream inputStream = Resources.getUrlAsStream(url);
            XMLMapperBuilder mapperParser = new XMLMapperBuilder(inputStream, configuration, url, configuration.getSqlFragments());
            mapperParser.parse();
          } else if (resource == null && url == null && mapperClass != null) {
            Class mapperInterface = Resources.classForName(mapperClass);
            configuration.addMapper(mapperInterface);
          } else {
            throw new BuilderException("A mapper element may only specify a url, resource or class, but not more than one.");
          }
        }
      }
    }
  }
这里支持2个种方式,一种是mapper,还有一种是package来装载
@1 这里只配置了resouce,走第一个if,构建一个XMLMapperBuilder 对象,进行解析,和上面解析xml一样,进入到XMLMapperBuilder#parse 方法。
2.9 XMLMapperBuilder#parse
XMLMapperBuilder#parse
private void bindMapperForNamespace() {
    String namespace = builderAssistant.getCurrentNamespace();@1
    if (namespace != null) {
      Class boundType = null;
      try {
        boundType = Resources.classForName(namespace);@2
      } catch (ClassNotFoundException e) {
        //ignore, bound type is not required
      }
      if (boundType != null) {
        if (!configuration.hasMapper(boundType)) {
          // Spring may not know the real resource name so we set a flag
          // to prevent loading again this resource from the mapper interface
          // look at MapperAnnotationBuilder#loadXmlResource
          configuration.addLoadedResource("namespace:" + namespace);@3
          configuration.addMapper(boundType);@4
        }
      }
    }
  }
@1 获取xml的命名空间
@2 获取根据Resources.classForName,里面通过类加载器,获取到该xml对应的接口。
@3 configuration 的mapperRegistry是否包含了此mapper,没有包含,就将此命名空间新增到loadedResources中,loadedResources是一个set集合。
@4 mapper 最终新增到mapperRegistry 中。
2.10 XMLMapperBuilder#parse
继续回到XMLMapperBuilder#parse方法,刚刚只是解析了xml命名空间等信息。继续往下看
//解析在configurationElement函数中处理resultMap时其extends属性指向的父对象还没被处理的节点
 parsePendingResultMaps();
 //解析在configurationElement函数中处理cache-ref时其指向的对象不存在的节点(如果cache-ref先于其指向的cache节点加载就会出现这种情况)
 parsePendingChacheRefs();
 //同上,如果cache没加载的话处理statement时也会抛出异常
 parsePendingStatements();
private void parsePendingResultMaps() {
    Collection incompleteResultMaps = configuration.getIncompleteResultMaps();@1
    synchronized (incompleteResultMaps) {
      Iterator iter = incompleteResultMaps.iterator();
      while (iter.hasNext()) {
        try {
          iter.next().resolve();
          iter.remove();
        } catch (IncompleteElementException e) {
          // ResultMap is still missing a resource...
        }
      }
    }
  }
这里需要详细讲下:
举个例子,我定义了2个resultMap ,test引用了userResultMap,再解析加载的时候,是按顺序解析,先解析userResultMap,再解析test,这没有问题。@1 incompleteResultMaps 为空。但是另外一种情况:把2者的顺序颠倒下,下面列出了2种情况,
颠倒后:
在解析test时候,因为test继承了 userResultMap,但userResultMap还没加载过,导致加载
下面来看下Configuration类,来重点关注里面的一些方法和属性test解析失败(或者叫转换失败),
test 就被加入到incompleteResultMaps中,所以在执行parsePendingResultMaps的时候,会重新解析转换。 此时,因为第一次解析转换已经把userResultMap加载完了,再解析test,就没有问题了。
到这里,基本就完成了所有xml的解析了。解析的结果都放到了configuration,在新建SqlSessionFactory对象的时候,传入了configuration对象,返回了DefaultSqlSessionFactory


2.11 Configuration
下面来看看Configuration类,里面的对象、方法比较多,我下面列出了部分
//当前的环境
protected Environment environment;
//业务系统中,所有的map都是注册到这里
protected final MapperRegistry mapperRegistry = new MapperRegistry(this);
//配置的拦截器链
protected final InterceptorChain interceptorChain = new InterceptorChain();
//handle
protected final TypeHandlerRegistry typeHandlerRegistry = new TypeHandlerRegistry();
//vo 别名
protected final TypeAliasRegistry typeAliasRegistry = new TypeAliasRegistry();
//这里就是保存每个mapper里面的insert、update、delete、select 方法
protected final Map mappedStatements = new StrictMap("Mapped Statements collection")
     .conflictMessageProducer((savedValue, targetValue) ->
         ". please check " + savedValue.getResource() + " and " + targetValue.getResource());
 protected final Map caches = new StrictMap<>("Caches collection");
 protected final Map resultMaps = new StrictMap<>("Result Maps collection");
 protected final Map parameterMaps = new StrictMap<>("Parameter Maps collection");
 protected final Map keyGenerators = new StrictMap<>("Key Generators collection");
 //所有业务xml的集合
 protected final Set loadedResources = new HashSet<>();

 protected final Collection incompleteStatements = new LinkedList<>();
 protected final Collection incompleteCacheRefs = new LinkedList<>();
 protected final Collection incompleteResultMaps = new LinkedList<>();
 protected final Collection incompleteMethods = new LinkedList<>();
StrictMap是Mybatis里面继承HashMap,对HashMap的get put都进行了重写。
解析完后:

3. 总结
3.1 最终的目的通过DefaultSqlSessionFactory 获取到 DefaultSqlSession,拿到session之后,就可以调用CRUD方法了。
3.2 注意在解析的过程中,有很多xml节点,比如加载typeHandlers、typeAliases、plugins、objectFactory、objectWrapperFactory、reflectorFactory、settings、properties、environments、databaseIdProvider等等,我只挑选了2个来看具体的实现,其它的有兴趣的朋友,可以自己去看。
3.3 结合官方文档来阅读源码,能更好的理解代码的逻辑和作者设计思路。
3.4 有什么错误,希望大家可以指出来,我会积极改进。谢谢!
4. 参考
[1] https://www.cnblogs.com/dongying/p/4142476.html