SpringMVC源码解析七(初始化过程解析)
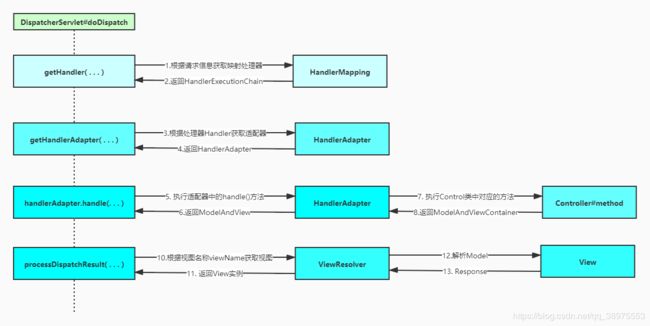
在SpringMVC中处理请求的核心类是DispatcherServlet; SpringMVC在DispatcherServlet类的doDispatch()中维护着请求处理流程的主要逻辑
DispatcherServlet的继承关系图:

SpringMVC初始化的触发点:
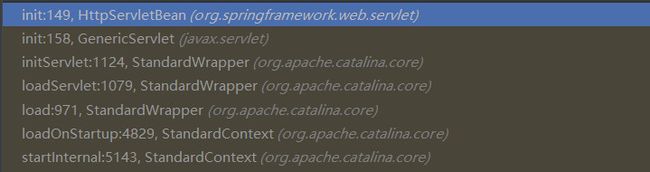
SpringMVC的初始化是从HttpServletBean#init()开始的;Tomcat在启动时最终会调用GenericServlet#init(javax.servlet.ServletConfig), 在该方法中又调用了GenericServlet#init()方法; 由于HttpServletBean继承了GenericServlet并重写了init()方法, 所以此时调用的是HttpServletBean#init(), 从这里便开始了SpringMVC的初始化历程
GenericServlet#init(javax.servlet.ServletConfig)方法实现:
@Override
public void init(ServletConfig config) throws ServletException {
    this.config = config;
    this.init();
}GenericServlet#init()方法实现(实际上执行的是HttpServletBean#init()方法):
public void init() throws ServletException {
    // NOOP by default
}
HttpServletBean#init()方法实现:
@Override
public final void init() throws ServletException {
   if (logger.isDebugEnabled()) {
      logger.debug("Initializing servlet '" + getServletName() + "'");
   }

   //PropertyValues: 获取Web.xml里面的servlet的init-param(web.xml)
   PropertyValues pvs = new ServletConfigPropertyValues(getServletConfig(), this.requiredProperties);
   if (!pvs.isEmpty()) {
      try {
         //BeanWrapper: 封装了bean的行为,提供了设置和获取属性值,它有对应的BeanWrapperImpl
         BeanWrapper bw = PropertyAccessorFactory.forBeanPropertyAccess(this);
         //ResourceLoader: 可以根据一个资源地址加载文件资源。classpath:这种方式指定SpringMVC框架bean配置文件的来源
         ResourceLoader resourceLoader = new ServletContextResourceLoader(getServletContext());
         bw.registerCustomEditor(Resource.class, new ResourceEditor(resourceLoader, getEnvironment()));
         initBeanWrapper(bw);
         bw.setPropertyValues(pvs, true);
      }
      catch (BeansException ex) {
         if (logger.isErrorEnabled()) {
            logger.error("Failed to set bean properties on servlet '" + getServletName() + "'", ex);
         }
         throw ex;
      }
   }

   /**
    * 由子类实现, 进行子类的初始化
    * {@link FrameworkServlet#initServletBean()}
    */
   initServletBean();

   if (logger.isDebugEnabled()) {
      logger.debug("Servlet '" + getServletName() + "' configured successfully");
   }
}
Tomcat部分讲解:
Tomcat在启动后会逐步加载各个组件, 最终会加载到Wrapper容器, 因此会调用StandardWrapper#load()方法; 在此之前的启动逻辑感兴趣的可以看这篇博客:Tomcat源码解析五(容器的启动过程解析)
StandardWrapper#load()方法实现:
@Override
public synchronized void load() throws ServletException {
    /**
     * 加载Servlet
     */
    instance = loadServlet();

    if (!instanceInitialized) {
        initServlet(instance);
    }

    if (isJspServlet) {
        StringBuilder oname = new StringBuilder(getDomain());

        oname.append(":type=JspMonitor");

        oname.append(getWebModuleKeyProperties());

        oname.append(",name=");
        oname.append(getName());

        oname.append(getJ2EEKeyProperties());

        try {
            jspMonitorON = new ObjectName(oname.toString());
            Registry.getRegistry(null, null).registerComponent(instance, jspMonitorON, null);
        } catch (Exception ex) {
            log.warn("Error registering JSP monitoring with jmx " + instance);
        }
    }
}
StandardWrapper#loadServlet()方法实现:
public synchronized Servlet loadServlet() throws ServletException {
    // 如果我们已经有实例或实例池,则无需执行任何操作
    if (!singleThreadModel && (instance != null))
        return instance;
    PrintStream out = System.out;
    if (swallowOutput) {
        SystemLogHandler.startCapture();
    }
    Servlet servlet;
    try {
        long t1=System.currentTimeMillis();
        // Complain if no servlet class has been specified
        if (servletClass == null) {
            unavailable(null);
            throw new ServletException
                (sm.getString("standardWrapper.notClass", getName()));
        }

        InstanceManager instanceManager = ((StandardContext)getParent()).getInstanceManager();
        try {
            /**
             * 实例化Servlet
             */
            servlet = (Servlet) instanceManager.newInstance(servletClass);
        } catch (ClassCastException e) {
           . . . . . .
        }

        if (multipartConfigElement == null) {
            MultipartConfig annotation =
                    servlet.getClass().getAnnotation(MultipartConfig.class);
            if (annotation != null) {
                multipartConfigElement =
                        new MultipartConfigElement(annotation);
            }
        }

        if (servlet instanceof ContainerServlet) {
            ((ContainerServlet) servlet).setWrapper(this);
        }

        classLoadTime=(int) (System.currentTimeMillis() -t1);

        if (servlet instanceof SingleThreadModel) {
            if (instancePool == null) {
                instancePool = new Stack<>();
            }
            singleThreadModel = true;
        }
        /**
         * 初始化Servlet
         */
        initServlet(servlet);
        fireContainerEvent("load", this);
        loadTime=System.currentTimeMillis() -t1;
    } finally {
      . . . . . .
    }
    return servlet;
}
分析:
- 通过反射实例化Servlet (Servlet ==> DispatcherServlet)
- 初始化Servlet
(1) Tomcat是如何获取到SpringMVC的核心类DispatcherServlet然后进行初始化的呢?
在web.xml中有这样的一个配置:
   spring-mvc
   org.springframework.web.servlet.DispatcherServlet
   1


   spring-mvc
   /
Tomcat中在Context容器启动时会发送消息通知各个观察者, 其中有一个观察者就是WebConfig, WebConfig在监听到消息之后,开始解析web.xml, 并对其中配置的Servlet逐个进行实例化, 其中就包括我们配置的DispatcherServlet路径信息; 所以Tomcat就可以通过反射去实例化该类;
解析web.xml配置信息以及实例化DispatcherServlet可以看org.apache.catalina.startup.ContextConfig#webConfig() == > org.apache.catalina.startup.ContextConfig#configureContext(WebXml webxml) 相关逻辑
调用链如下:

org.apache.catalina.core.StandardWrapper#setServletClass(String servletClass)方法是将DispatcherServlet类信息维护到StandardWrapper实例中(每一个StandardWrapper对应一个Servlet)
(2) 初始化Servlet
StandardWrapper#initServlet(Servlet servlet)方法实现: (Servlet => DispatcherServlet)
private synchronized void initServlet(Servlet servlet) throws ServletException {
    if (instanceInitialized && !singleThreadModel) return;
    // 调用此Servlet的初始化方法
    try {
        if( Globals.IS_SECURITY_ENABLED) {
            boolean success = false;
            try {
                Object[] args = new Object[] { facade };
                /**
                 * 通过反射执行该Servlet的init()方法
                 */
                SecurityUtil.doAsPrivilege("init", servlet, classType, args);
                success = true;
            } finally {
                if (!success) {
                    // destroy() will not be called, thus clear the reference now
                    SecurityUtil.remove(servlet);
                }
            }
        } else {
            servlet.init(facade);
        }

        instanceInitialized = true;
    } catch (UnavailableException f) {
      . . . . . .
    }
}
GenericServlet#init(javax.servlet.ServletConfig)方法实现:
@Override
public void init(ServletConfig config) throws ServletException {
    this.config = config;
    this.init();
}
HttpServletBean#init()方法实现:
@Override
public final void init() throws ServletException {
   if (logger.isDebugEnabled()) {
      logger.debug("Initializing servlet '" + getServletName() + "'");
   }

   //PropertyValues: 获取Web.xml里面的servlet的init-param(web.xml)
   PropertyValues pvs = new ServletConfigPropertyValues(getServletConfig(), this.requiredProperties);
   if (!pvs.isEmpty()) {
      try {
         //BeanWrapper: 封装了bean的行为,提供了设置和获取属性值,它有对应的BeanWrapperImpl
         BeanWrapper bw = PropertyAccessorFactory.forBeanPropertyAccess(this);
         //ResourceLoader: 可以根据一个资源地址加载文件资源。classpath:这种方式指定SpringMVC框架bean配置文件的来源
         ResourceLoader resourceLoader = new ServletContextResourceLoader(getServletContext());
         bw.registerCustomEditor(Resource.class, new ResourceEditor(resourceLoader, getEnvironment()));
         initBeanWrapper(bw);
         bw.setPropertyValues(pvs, true);
      }
      catch (BeansException ex) {
         if (logger.isErrorEnabled()) {
            logger.error("Failed to set bean properties on servlet '" + getServletName() + "'", ex);
         }
         throw ex;
      }
   }

   /**
    * 由子类实现, 进行子类的初始化
    * {@link FrameworkServlet#initServletBean()}
    */
   initServletBean();

   if (logger.isDebugEnabled()) {
      logger.debug("Servlet '" + getServletName() + "' configured successfully");
   }
}
调用链如下:
FrameworkServlet#initServletBean()方法实现: (注意: FrameworkServlet是HttpServletBean的子类)
@Override
protected final void initServletBean() throws ServletException {
   getServletContext().log("Initializing Spring FrameworkServlet '" + getServletName() + "'");
   if (logger.isInfoEnabled()) {
      logger.info("FrameworkServlet '" + getServletName() + "': initialization started");
   }
   long startTime = System.currentTimeMillis();

   try {
      /**
       * 初始化应用上下文
       */
      this.webApplicationContext = initWebApplicationContext();
      //初始化FrameworkServlet
      initFrameworkServlet();
   }
   catch (ServletException | RuntimeException ex) {
      logger.error("Context initialization failed", ex);
      throw ex;
   }

   if (logger.isInfoEnabled()) {
      long elapsedTime = System.currentTimeMillis() - startTime;
      logger.info("FrameworkServlet '" + getServletName() + "': initialization completed in " +
            elapsedTime + " ms");
   }
}
分析:
- 初始化应用上下文
- 初始化FrameworkServlet(为空方法)
FrameworkServlet#initWebApplicationContext()方法实现:
protected WebApplicationContext initWebApplicationContext() {
   //获取根节点上下文,通过ContextLoaderListener加载,服务器启动便加载
   WebApplicationContext rootContext =
         WebApplicationContextUtils.getWebApplicationContext(getServletContext());
   WebApplicationContext wac = null;

   if (this.webApplicationContext != null) {
      wac = this.webApplicationContext;
      if (wac instanceof ConfigurableWebApplicationContext) {
         ConfigurableWebApplicationContext cwac = (ConfigurableWebApplicationContext) wac;
         if (!cwac.isActive()) {
            if (cwac.getParent() == null) {
               //设置根节点上下文为父上下文
               cwac.setParent(rootContext);
            }
            //设置id等等
            configureAndRefreshWebApplicationContext(cwac);
         }
      }
   }
   if (wac == null) {
      /**
       * 查找servletContext中已有的WebApplicationContext作为上下文
       */
      wac = findWebApplicationContext();
   }
   if (wac == null) {
      /**
       * 尝试获取本地已有上下文失败, 创建一个本地上下文
       */
      wac = createWebApplicationContext(rootContext);
   }

   if (!this.refreshEventReceived) {
      synchronized (this.onRefreshMonitor) {
         onRefresh(wac);
      }
   }

   if (this.publishContext) {
      // 将DispatcherServlet的上下文放入servlet上下文中
      String attrName = getServletContextAttributeName();
      getServletContext().setAttribute(attrName, wac);
      if (this.logger.isDebugEnabled()) {
         this.logger.debug("Published WebApplicationContext of servlet '" + getServletName() +
               "' as ServletContext attribute with name [" + attrName + "]");
      }
   }
   return wac;
}
分析:
- 尝试从ServletContext中获取已有的WebApplicationContext作为上下文
- 尝试获取本地已有上下文失败, 创建一个本地上下文
FrameworkServlet#createWebApplicationContext(org.springframework.context.ApplicationContext)方法实现:
protected WebApplicationContext createWebApplicationContext(@Nullable ApplicationContext parent) {
   Class contextClass = getContextClass();
   . . .
   //通过反射创建mvc容器
   ConfigurableWebApplicationContext wac =
         (ConfigurableWebApplicationContext) BeanUtils.instantiateClass(contextClass);
   //设置环境
   wac.setEnvironment(getEnvironment());
   //设置根上下文为父上下文
   wac.setParent(parent);
   //设置springmvc.xml的路径
   String configLocation = getContextConfigLocation();
   if (configLocation != null) {
      wac.setConfigLocation(configLocation);
   }
   /**
    * 初始化springmvc容器
    */
   configureAndRefreshWebApplicationContext(wac);
   return wac;
}
分析: 利用反射创建一个WebApplicationContext实例, 并进行相关配置设置, 最后调用初始化方法, 开始SpringMVC容器的初始化
FrameworkServlet#configureAndRefreshWebApplicationContext()方法实现:
protected void configureAndRefreshWebApplicationContext(ConfigurableWebApplicationContext wac) {
   if (ObjectUtils.identityToString(wac).equals(wac.getId())) {
      if (this.contextId != null) {
         wac.setId(this.contextId);
      }
      else {
         wac.setId(ConfigurableWebApplicationContext.APPLICATION_CONTEXT_ID_PREFIX +
               ObjectUtils.getDisplayString(getServletContext().getContextPath()) + '/' + getServletName());
      }
   }
   wac.setServletContext(getServletContext());
   wac.setServletConfig(getServletConfig());
   wac.setNamespace(getNamespace());
  /**
    * 向容器中添加监听器, 监听容器初始化结束事件(事件对象:ContextRefreshListener)   <=== 重点
    * ContextRefreshListener为FrameworkServlet的内部类
    */
   wac.addApplicationListener(new SourceFilteringListener(wac, new ContextRefreshListener()));
   ConfigurableEnvironment env = wac.getEnvironment();
   if (env instanceof ConfigurableWebEnvironment) {
      ((ConfigurableWebEnvironment) env).initPropertySources(getServletContext(), getServletConfig());
   }
   postProcessWebApplicationContext(wac);
   applyInitializers(wac);
   /**
    * 调用Spring中的refresh()方法, 刷新应用环境
    * {@link AbstractApplicationContext#refresh()}
    */
   wac.refresh();
}
分析:
- 注册监听器, 用于监听Spring中IOC容器初始化结束事件, 监听到事件后, 从容器中获取相关组件Bean, 注册到SpringMVC上下文中
- 对ConfigurableWebApplicationContext进行相关配置, 然后调用AbstractApplicationContext#refresh()开始SpringMVC相关配置文件的解析(注:WebApplicationContext与AbstractApplicationContext都继承于ApplicationContext); Spring在refresh()方法执行结束, 也就是容器加载完成, 发送结束事件, 由SimpleApplicationEventMulticaster激活监听器SourceFilteringListener的相关方法, 最终会触发DispatcherServlet的initStrategies(ApplicationContext context)方法, 开始各个组件的注册
_1. FrameworkServlet的内部监听器类ContextRefreshListener实现:
private class ContextRefreshListener implements ApplicationListener {
   @Override
   public void onApplicationEvent(ContextRefreshedEvent event) {
      FrameworkServlet.this.onApplicationEvent(event);
   }
}
分析: 当监听者获取到事件后调用FrameworkServlet#onApplicationEvent方法进行处理;
_2.AbstractApplicationContext#finishRefresh实现(refresh()方法实现已省略, 需要看该方法内相关逻辑的可以看Spring源码解析专栏):
protected void finishRefresh() {
   //清除上下文级别的资源缓存(例如来自扫描的ASM元数据)
   clearResourceCaches();

   //为此上下文初始化生命周期处理器
   initLifecycleProcessor();

   //首先将刷新传播到生命周期处理器
   getLifecycleProcessor().onRefresh();

   /**
    * 发布结束事件(事件对象:ContextRefreshedEvent)
    */
   publishEvent(new ContextRefreshedEvent(this));

   // Participate in LiveBeansView MBean, if active.
   LiveBeansView.registerApplicationContext(this);
}
AbstractApplicationContext#publishEvent(org.springframework.context.ApplicationEvent)
==> AbstractApplicationContext#publishEvent(java.lang.Object, org.springframework.core.ResolvableType)
==> SimpleApplicationEventMulticaster#multicastEvent
==> SimpleApplicationEventMulticaster#invokeListener
==> SimpleApplicationEventMulticaster#doInvokeListener
==> SourceFilteringListener#onApplicationEvent
==> SourceFilteringListener#onApplicationEventInternal实现:
protected void onApplicationEventInternal(ApplicationEvent event) {
   if (this.delegate == null) {
      throw new IllegalStateException(
            "Must specify a delegate object or override the onApplicationEventInternal method");
   }
   /**
    * 通过监听适配器调用对应监听器的onApplicationEvent()方法
    */
   this.delegate.onApplicationEvent(event);
}
GenericApplicationListenerAdapter#onApplicationEvent实现:
@Override
public void onApplicationEvent(ApplicationEvent event) {
   /**
    * GenericApplicationListenerAdapter适配器中维护着真正的监听器
    */
   this.delegate.onApplicationEvent(event);
}
FrameworkServlet#onApplicationEvent实现:
public void onApplicationEvent(ContextRefreshedEvent event) {
   this.refreshEventReceived = true;
   synchronized (this.onRefreshMonitor) {
      onRefresh(event.getApplicationContext());
   }
}
DispatcherServlet#onRefresh实现:
@Override
protected void onRefresh(ApplicationContext context) {
   initStrategies(context);
}
DispatcherServlet#initStrategies实现:
protected void initStrategies(ApplicationContext context) {
   initMultipartResolver(context);
   initLocaleResolver(context);
   initThemeResolver(context);
   initHandlerMappings(context);
   initHandlerAdapters(context);
   initHandlerExceptionResolvers(context);
   initRequestToViewNameTranslator(context);
   initViewResolvers(context);
   initFlashMapManager(context);
}
分析: 在这个方法中完成了SpringMVC各个组件的注册, 注意参数是应用上下文ApplicationContext, SpringMVC便可以通过ApplicationContext从容器中获取到自己的组件对象, 然后进行注册; 关于各个组件的初始化就比较简单了, 这里不再进行解析;
调用链如下:

问题: 为什么要这么做呢?
答: 因为IOC, Spring的控制反转, SpringMVC将对象初始化相关操作交由Spring容器去管理, 等容器初始化完成后, 直接从容器中获取需要的组件对象, 再注册到SpringMVC的中容器中即可
SpringMVC宏观启动过程如下:
Tomcat ==> SpringMVC ==> Spring ==> SpringMVC
流程图(Tomcat启动流程+SpringMVC启动流程):
至此, SpringMVC初始化过程解析完成;
相关文章:
SpringMVC源码解析一(在Spring源码项目中搭建SpringMVC源码模块)
SpringMVC源码解析二(请求过程解析)
SpringMVC源码解析三(处理映射器HandlerMapping的解析)
SpringMVC源码解析四(处理适配器HandlerAdapter的解析)
SpringMVC源码解析五(HandlerMethod执行过程解析)
SpringMVC源码解析六(ModelAndView解析)
SpringMVC源码解析七(初始化过程解析)