Spring-Boot快速集成ActiveMQ(Topic和Queue两种模式共存,代码可以复用)
关于ActiveMQ
Apache ActiveMQ是Apache软件基金会所研发的开放源代码消息中间件;由于ActiveMQ是一个纯Java程序,因此只需要操作系统支持Java虚拟机,ActiveMQ便可执行。
虽然ActiveMQ的响应速度和体量比不上其他中间件,但是它体量小,易安装,易使用。毕竟是老东家Apache出品,所以其他平台和模块对他支持也很友好。
如果用传统的spring框架去集成ActiveMQ可能需要通过XML配置很多的bean,包括连接对象JMSConnectionFactory、Topic主题、Queue队列、Producer生产者、Consumer消费者。
虽然这方式有助于去理解JMS的流程和类关系。
Spring-Boot集成ActiveMQ
在Spring-Boot有更简单的集成方式。可以通过config类去配置,也可以通过yml配置。当然我推荐将连接信息配置在application.yml 或 application.properties来去配置,便于调整中间件的连接。
1.准备ActiveMQ 的服务
如果本地测试话,可以开一台linux虚拟机,安装ActiveMQ 的服务。安装ActiveMQ 之前先要安装和配置jdk的环境。然后才可以部署ActiveMQ 的服务。
ActiveMQ 5.14版的tar包下载地址
https://archive.apache.org/dist/activemq/5.14.0/apache-activemq-5.14.0-bin.tar.gz
wget https://archive.apache.org/dist/activemq/5.14.0/apache-activemq-5.14.0-bin.tar.gz
下载成功后解压
tar -zxvf apache-activemq-5.14.0-bin.tar.gz
进入解压后的目录,在进入bin/ 目录下,执行
./activemq start
看到进程号了证明启动成功了
pidfile created : '/opt/ActiveMQ/apache-activemq-5.14.0//data/activemq.pid' (pid '2867')
也可以使用
netstat -tnlp
查看一下端口开放情况
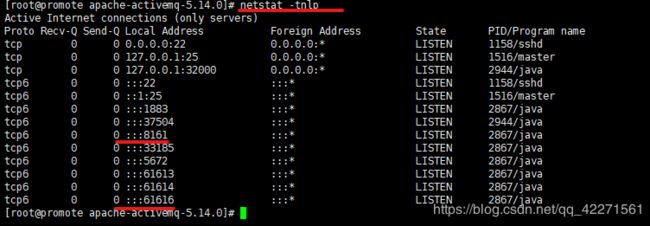
此时ActiveMQ 的服务已经启动成功,记得添加虚拟机的端口映射。然后访问ActiveMQ 的管理画面
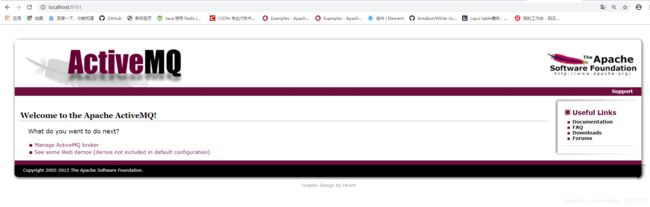
admin画面的端口是8161
tcp协议端口是 61616
初始账号 : admin
初始密码: admin
2.Spring-Boot必要依赖
可以新建一个工程spring-boot工程天机ActiveMq的依赖和JMS的依赖,不建议直接使用
spring-boot-starter-activemq
这样,他会把mq服务集成到项目中,且只会开放61616端口,没有管理画面。
<project xmlns="http://maven.apache.org/POM/4.0.0" xmlns:xsi="http://www.w3.org/2001/XMLSchema-instance"
         xsi:schemaLocation="http://maven.apache.org/POM/4.0.0 https://maven.apache.org/xsd/maven-4.0.0.xsd">
    <modelVersion>4.0.0modelVersion>
    <parent>
        <groupId>org.springframework.bootgroupId>
        <artifactId>spring-boot-starter-parentartifactId>
        <version>2.2.6.RELEASEversion>
        <relativePath/>
    parent>
    <groupId>com.dl.demogroupId>
    <artifactId>demoartifactId>
    <version>0.0.1-SNAPSHOTversion>
    <name>demoname>
    <description>Demo project for Spring Bootdescription>

    <properties>
        <java.version>1.8java.version>
    properties>

    <dependencies>
        <dependency>
            <groupId>org.springframework.bootgroupId>
            <artifactId>spring-boot-starter-jdbcartifactId>
        dependency>
        <dependency>
            <groupId>org.springframework.bootgroupId>
            <artifactId>spring-boot-starter-webartifactId>
        dependency>
        <dependency>
            <groupId>org.mybatis.spring.bootgroupId>
            <artifactId>mybatis-spring-boot-starterartifactId>
            <version>2.1.2version>
        dependency>

        <dependency>
            <groupId>mysqlgroupId>
            <artifactId>mysql-connector-javaartifactId>
            <scope>runtimescope>
        dependency>
        <dependency>
            <groupId>org.springframework.bootgroupId>
            <artifactId>spring-boot-starter-testartifactId>
            <scope>testscope>
            <exclusions>
                <exclusion>
                    <groupId>org.junit.vintagegroupId>
                    <artifactId>junit-vintage-engineartifactId>
                exclusion>
            exclusions>
        dependency>


        <dependency>
            <groupId>org.springframeworkgroupId>
            <artifactId>spring-jmsartifactId>
        dependency>
        <dependency>
            <groupId>org.apache.activemqgroupId>
            <artifactId>activemq-clientartifactId>
        dependency>
        <dependency>
            <groupId>org.apache.activemqgroupId>
            <artifactId>activemq-brokerartifactId>
        dependency>

        <dependency>
            <groupId>javax.jmsgroupId>
            <artifactId>javax.jms-apiartifactId>
            <version>2.0.1version>
        dependency>
        <dependency>
            <groupId>org.slf4jgroupId>
            <artifactId>slf4j-log4j12artifactId>
            <version>1.7.25version>
        dependency>
    dependencies>

    <build>
        <plugins>
            <plugin>
                <groupId>org.springframework.bootgroupId>
                <artifactId>spring-boot-maven-pluginartifactId>
            plugin>
        plugins>
    build>

project>
切记JMS的包不能少,不会启动报错,连接不上mq服务。
3.Spring-Boot 中ActiveMQ连接配置
我使用的yml文件配置
# activemq config
spring.activemq:
   broker-url: tcp://localhost:61616?wireFormat.maxInactivityDuration=0
   user: admin
   password: admin
   in-memory: false
   pool.enabled: false
为了演示,我只加入了最基本的配置
4.代码实装
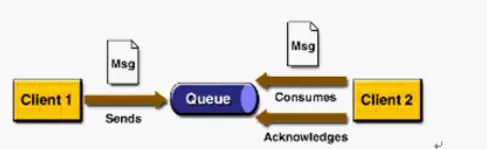
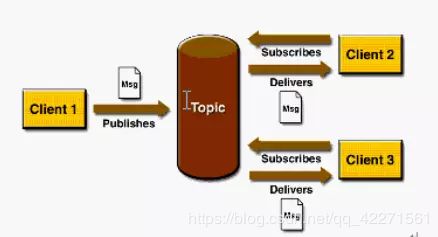
实装代码前要明确中间件中一些专业名词
发布者订阅者模式
Topic 主题 (一对多)
Queue 队列 (点对点)
生产者消费者模式
Queue 模式(点对点)
Topic模式 (一对多)
第一步需要使用 @EnableJms 开启spring-boot对JMS的支持
第二步为了方便后续对Topic和Queue的操作,定义了初始的队列和主题
第三步为了实现Topic和Queue共存,需要定义两个消息容器 JmsListenerContainerFactory
package com.dl.demo.actvicemq;

import org.apache.activemq.command.ActiveMQQueue;
import org.apache.activemq.command.ActiveMQTopic;
import org.springframework.beans.factory.annotation.Autowired;
import org.springframework.context.annotation.Bean;
import org.springframework.context.annotation.Configuration;
import org.springframework.jms.annotation.EnableJms;
import org.springframework.jms.config.DefaultJmsListenerContainerFactory;
import org.springframework.jms.config.JmsListenerContainerFactory;

import javax.jms.ConnectionFactory;
import javax.jms.Queue;
import javax.jms.Topic;

/**
 * ActiveMQ配置类
 */
@Configuration
@EnableJms
public class ActiveMqConfig {

    /**
     * mq连接对象
     */
    @Autowired
    private ConnectionFactory connectionFactory;

    /**
     * 初始化队列配置
     *
     * @return
     */
    @Bean
    public Queue floatQueue() {
        return new ActiveMQQueue(DestinationConstant.FLOAT_01_QUEUE);
    }

    /**
     * 初始化主题配置
     *
     * @return
     */
    @Bean
    public Topic startTopic() {
        return new ActiveMQTopic(DestinationConstant.SERVER_START_TOPIC);
    }

    /**
     * 主题消息容器配置
     *
     * @return
     */
    @Bean
    public JmsListenerContainerFactory<?> topicListenerContainerFactory() {
        DefaultJmsListenerContainerFactory factory = new DefaultJmsListenerContainerFactory();
        factory.setPubSubDomain(true);
        factory.setConnectionFactory(connectionFactory);
        return factory;
    }

    /**
     * 队列消息容器配置
     *
     * @return
     */
    @Bean
    public DefaultJmsListenerContainerFactory queueListenerContainerFactory() {
        DefaultJmsListenerContainerFactory factory = new DefaultJmsListenerContainerFactory();
        // 设置为queue方式目标
        factory.setPubSubDomain(false);
        factory.setConnectionFactory(connectionFactory);
        return factory;
    }
}
一切准备就绪开始定义生产者和消费者
生产者定义
package com.dl.demo.actvicemq;

import org.apache.activemq.command.ActiveMQQueue;
import org.apache.activemq.command.ActiveMQTopic;
import org.slf4j.Logger;
import org.slf4j.LoggerFactory;
import org.springframework.beans.factory.annotation.Autowired;
import org.springframework.boot.CommandLineRunner;
import org.springframework.jms.core.JmsMessagingTemplate;
import org.springframework.stereotype.Component;

import javax.jms.Queue;
import javax.jms.Topic;

/**
 * ActiveMQ消费者
 */
@Component
public class ActiveMqProducer implements CommandLineRunner {

    /**
     * log
     */
    private static final Logger logger = LoggerFactory.getLogger(ActiveMqProducer.class);

    /**
     * 队列
     */
    @Autowired
    private Queue queue;

    /**
     * 主题
     */
    @Autowired
    private Topic topic;

    /**
     * JMS发送模板
     */
    @Autowired
    private JmsMessagingTemplate jmsMessagingTemplate;

    /**
     * 启动声明
     *
     * @param args
     * @throws Exception
     */
    @Override
    public void run(String... args) throws Exception {
        logger.info(this.getClass().getName() + " is running.");
    }

    /**
     * 通过主题发送mq
     *
     * @param topicName
     * @param message
     */
    public void sendMessageByTopic(String topicName, String message) {
        logger.info("sendMessageByTopic-- topic:"+topicName+", message:"+message);
        this.setTopic(topicName);
        jmsMessagingTemplate.convertAndSend(topic, message);
    }

    /**
     * 通过对列发送mq
     *
     * @param queueName
     * @param message
     */
    public void sendMessageByQueue(String queueName, String message) {
        logger.info("sendMessageByTopic-- queue:"+queueName+", message:"+message);
        this.setQueue(queueName);
        jmsMessagingTemplate.convertAndSend(queue, message);
    }

    /**
     * 主题设定
     *
     * @param topicName
     */
    private void setTopic(String topicName) {
        this.topic = new ActiveMQTopic(topicName);
    }

    /**
     * 主题设定
     *
     * @param queueName
     */
    private void setQueue(String queueName) {
        this.queue = new ActiveMQQueue(queueName);
    }

}
我特地将这个类实现了CommandLineRunne接口,便于在实例化的时候能看到启动信息。
注意这里发送mq的核心对象 JmsMessagingTemplate ,直接注入就可以使用。
在这个类中定义两个外部可以调用的方法,sendMessageByTopic、sendMessageByQueue
只需要传入主题名或者队列名和message。
定义消费者
package com.dl.demo.actvicemq;

import org.slf4j.Logger;
import org.slf4j.LoggerFactory;
import org.springframework.boot.CommandLineRunner;
import org.springframework.jms.annotation.JmsListener;
import org.springframework.stereotype.Component;

/**
 * ActiveMQ消费者
 */
@Component
public class ActiveMqConsumer implements CommandLineRunner {

    private static final Logger logger = LoggerFactory.getLogger(ActiveMqConsumer.class);

    /**
     * 流程01 float_01 队列消息监听
     *
     * @param message 消息
     */
    @JmsListener(destination = DestinationConstant.FLOAT_01_QUEUE,
            containerFactory = "queueListenerContainerFactory")
    public void receiveQueueFloat01(String message) {
        logger.info("receiveQueueFloat01-- " + DestinationConstant.FLOAT_01_QUEUE +
                "  receive queue msg:" + message);
    }

    /**
     * 服务启动主题 server_start 主题消息监听
     *
     * @param message
     */
    @JmsListener(destination = DestinationConstant.SERVER_START_TOPIC,
            containerFactory = "topicListenerContainerFactory")
    public void receiveTopicServerStart(String message) {
        logger.info("receiveTopicServerStart-- " + DestinationConstant.SERVER_START_TOPIC +
                "  receive topic msg:" + message);
    }

    /**
     * 启动声明
     *
     * @param args
     * @throws Exception
     */
    @Override
    public void run(String... args) throws Exception {
        logger.info(this.getClass().getName() + " is running. ");

    }
}
@JmsListener 接口注解中属性destination表示监听的主题或队列名
因为IOC容器里面我注入两个个消息容器,在使用@JmsListener需要注意使用containerFactory 属性标注消息容器的对象名。否则默认配置,可能回到队列或主题的消息收不到。
4.代码测试
我对外提供了一个api接口
package com.dl.demo.controller;


import com.dl.demo.actvicemq.ActiveMqProducer;
import com.dl.demo.common.BaseResponse;
import com.dl.demo.controller.entity.MqSendRequest;
import com.dl.demo.service.MqOperationService;
import org.springframework.beans.factory.annotation.Autowired;
import org.springframework.validation.BindingResult;
import org.springframework.web.bind.annotation.PostMapping;
import org.springframework.web.bind.annotation.RequestBody;
import org.springframework.web.bind.annotation.RequestMapping;
import org.springframework.web.bind.annotation.RestController;

import javax.servlet.http.HttpServletResponse;
import javax.validation.Valid;

@RestController
public class MqSendController {

    @Autowired
    private MqOperationService mqOperationService;


    @PostMapping("/sendmq")
    public BaseResponse sendMq(@Valid  @RequestBody MqSendRequest request, BindingResult result, HttpServletResponse httpResponse){
        BaseResponse response = new BaseResponse();
        if(!result.hasErrors()){
            try {
                mqOperationService.sendMq(request);
                response.setHttpStatus("200");
                response.setMessage("request is ok");
            } catch (Exception e){
                httpResponse.setStatus(500);
                response.setHttpStatus("500");
                response.setMessage("mq send failed");
            }
        } else {
            httpResponse.setStatus(401);
            response.setHttpStatus("401");
            response.setMessage("request formatter is wrong");
        }
        return  response;
    }

}
service实现
package com.dl.demo.service;

import com.dl.demo.actvicemq.ActiveMqProducer;
import com.dl.demo.controller.entity.MqSendRequest;
import org.springframework.beans.factory.annotation.Autowired;
import org.springframework.stereotype.Service;

/**
 *  mq操作用serviceImpl
 */
@Service
public class MqOperationServiceImpl implements MqOperationService {

    @Autowired
    private ActiveMqProducer producer;

    @Override
    public void sendMq(MqSendRequest request) throws Exception {
        if(request.getMqType().equals("topic")||request.getMqType().equals("Topic")){
            producer.sendMessageByTopic(request.getToName(),request.getMessage());
        } else if(request.getMqType().equals("queue")||request.getMqType().equals("Queue")) {
            producer.sendMessageByQueue(request.getToName(),request.getMessage());
        } else {
            throw new Exception("mq Type is wrong");
        }
    }
}
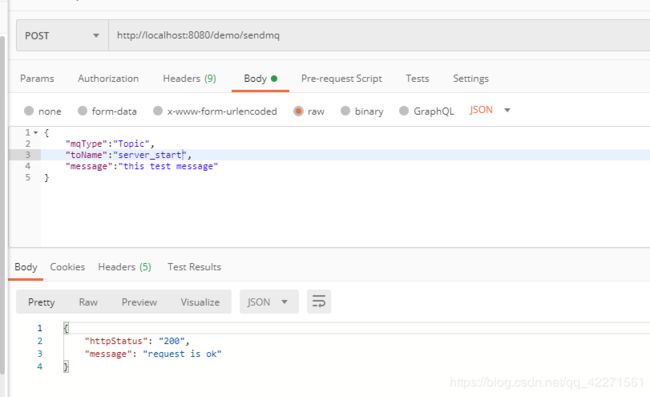
api测试 topic模式
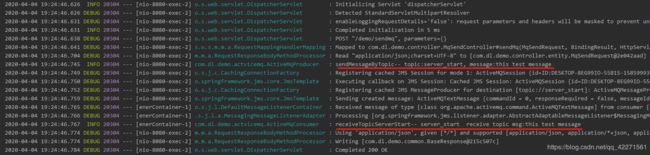
后台log确认
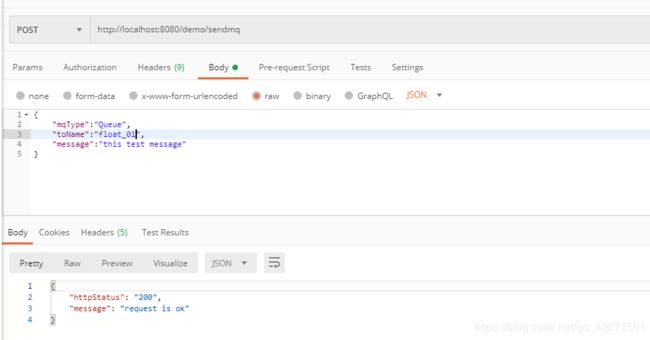
api测试 queue模式
后台log确认
完成了,nice!!!!!