搭建VueJS2.9+ElementUI单页面网站,编写导航页,导航栏跳转、切换
对于一个单页面应用来说,导航页是至关重要的一个页面,所有的组件都会在这个页面里进行显示。先看效果图,文章最下边有我的模板源代码下载路径。接下来我们就开始进行导航页的开发。

1、安装vue-router
搭建vue环境时装过的忽略此步骤。在终端中cd 进入项目路径
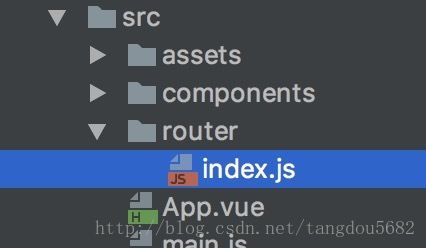
npm install vue-router --save安装完成后,我们在src目录下创建一个新目录,名字为router,然后在router文件夹下建立一个javascript文件,名字为index.js,创建完毕后现在的目录结构为

2、创建导航页组件
在src目录下新建一个文件夹,名为components,我的页面文件都放在这个文件夹中了。然后在components目录下新建一个Home.vue,下面是我建好的目录一个home+3个子页面,如下图所示:

3、修改main.js
在src文件夹下的main.js ,引用home+修改页面入口,改完如下
import Vue from 'vue'
import home from './components/Home.vue'
import router from './router'   //安装完router后引用,没安装的参考步骤1
import Element from 'element-ui'
import 'element-ui/lib/theme-chalk/index.css'

Vue.config.productionTip = false

Vue.use(router)
Vue.use(Element)

new Vue({
  router,
  render: h => h(home)
}).$mount('#app')
可以看到render函数的参数由之前的App变为新创建的home组件。从此我们的程序入口中显示的就是这个home.vue里面的内容了。之前默认生成的App.vue文件已经没用,可以删掉它。
3、对导航页进行简单的布局
下边是我home文件中的布局代码 (介于文章长度css没贴)
<template>
<div id="app">
  <el-container class="con_section">
    <el-header class="blueheader">
      <h2 class="headlogo">我的公司logoh2>
      <el-col :span="3" class="userinfo">
        <el-dropdown>
          <i class="el-icon-setting" style="margin-right: 15px">i>
          <el-dropdown-menu slot="dropdown">
            <el-dropdown-item>查看el-dropdown-item>
            <el-dropdown-item>新增el-dropdown-item>
            <el-dropdown-item>删除el-dropdown-item>
          el-dropdown-menu>
        el-dropdown>
        <span>王小虎span>
      el-col>
    el-header>
    <el-container>
      <el-aside style="flex: 0 0 230px;width: 230px;background:#eef1f6">
        <el-menu default-active="1" class="el-menu-vertical-demo">
          <el-submenu index="1">
            <template slot="title"><i class="el-icon-message">i>管理系统template>
            <el-menu-item index="1">列表管理el-menu-item>
            <el-menu-item index="2">表单管理el-menu-item>
          el-submenu>
        el-menu>
      el-aside>
      <el-main class="home_main">

      el-main>
    el-container>
  el-container>
div>
template>

<script>
  export default {
    data(){
      return {
        searchCriteria: '',
      }
    },
    methods:{
      handleIconClick(ev) {
        console.log(ev);
      },
    },
  }
script>
这里面主要参考container布局容器实例,和其他一些ElementUI的组件。都可以在ElementUI的官方网站中找到。
4、创建子页面
在配置路由信息之前,我们先把需要跳转到的页面创建出来。我的三个子页面之前都画好了(product,forms,strategy,下边截图以这为准)。新手可以在components目录下创建三个简单的:page1、page2和page3,分别在里面加入一行字,例如page1
<template>
    <div>
        这是第一个页面
    div>
template>
<script type="text/ecmascript-6">
    export default {
        data(){
            return {}
        }
    }
script>
page2,page3类似。
5、配置路由信息,即子栏的地址
创建好了首页导航栏之后,我们需要对路由信息进行配置,/src/router/index.js是vuejs单页面应用的关键(安装完router后才有,没安装的参考步骤1)。
这里边存的就是对跳转路径的配置。我们在这个文件中加入如下代码:
import Vue from 'vue'
import Router from 'vue-router'
import home from '@/components/Home'    //需要几个页面,引几个
import product from '@/components/product'
import forms from '@/components/forms'

Vue.use(Router)

const router = new Router({
  routes:[
    {
      path: '/',
      name: '管理系统',
      component: home,
      children: [
        { path: '/product', component: product, name: '列表管理' },
        { path: '/forms', component: forms, name: '表单管理' },
        // { path: '/strategy', component: strategy, name: '瞎画的' },
      ]
    }
  ]
});
export default router;
6、修改home.vue
修改后代码如下,改动的地方我加注释了
<template>
<div id="app">
  <el-container class="con_section">
    <el-header class="blueheader">
      <h2 class="headlogo">我的公司logoh2>
      <el-col :span="3" class="userinfo">
        <el-dropdown>
          <i class="el-icon-setting" style="margin-right: 15px">i>
          <el-dropdown-menu slot="dropdown">
            <el-dropdown-item>查看el-dropdown-item>
            <el-dropdown-item>新增el-dropdown-item>
            <el-dropdown-item>删除el-dropdown-item>
          el-dropdown-menu>
        el-dropdown>
        <span>王小虎span>
      el-col>
    el-header>
    <el-container>
      <el-aside style="flex: 0 0 230px;width: 230px;background:#eef1f6">
        <el-menu default-active="1" class="el-menu-vertical-demo" @select="handleSelect">
          <el-submenu index="1">
            <template slot="title"><i class="el-icon-message">i>管理系统template>
            <el-menu-item index="1">列表管理el-menu-item>
            <el-menu-item index="2">表单管理el-menu-item>
          el-submenu>
        el-menu>
      el-aside>
      <el-main class="home_main">
        <el-col :span="24" class="breadcrumb-container">
          <strong class="title">{{$route.name}}strong>
          <el-breadcrumb separator="/" class="breadcrumb-inner">
            <el-breadcrumb-item v-for="item in $route.matched" :key="item.path">
              {{ item.name }}
            el-breadcrumb-item>
          el-breadcrumb>
        el-col>
        <el-col :span="24">
          <div style="margin-top:10px">
            <router-view>router-view>
          div>
        el-col>
      el-main>
    el-container>
  el-container>
div>
template>

<script>
  export default {
    data(){
      return {
        searchCriteria: '',
      }
    },
    methods:{
      handleIconClick(ev) {
        console.log(ev);
      },
      //我们给左侧的菜单栏添加了一个响应,在响应函数中作出了路由跳转的处理。this.$router.push('/Page1');这句话的意思就是将当前要跳转的页面push到router的数组中。这里使用push而不是直接给数组赋值的原因是希望用户点击浏览器中的后退和前进按钮时可以回到之前操作的页面。
      handleSelect(key, keyPath){
        switch(key){
          case '1':
            this.$router.push('/product');
            break;
          case '2':
            this.$router.push('/forms');
            break;
        }
      },
    },
  }
script>
7、测试,完成
修改完成后我们可以看一下效果,注意浏览器地址栏的变化:


8、源代码
1、整个vue项目地址见这:https://github.com/webDxx/my-vue-project.git
运行该项目需要安装环境,nodejs,vue-cli,webpack,router,
然后npm install ,npm run dev
ps:我vue小白,第一次装环境装了3天,各种报错。祝各位君好运,嘿嘿嘿……^^。
2、页面代码+json文件:
http://download.csdn.net/download/tangdou5682/10113479