【MyBatis】MyBatis+SpringMVC+EasyUI整合分页
一、介绍
环境:MyBatis 3.0.x+Spring 3.0.x+EasyUI
采用SpringMVC+MyBatis框架整合的分页Demo,用的是首页这个:http://www.jeasyui.com/demo/main/index.php
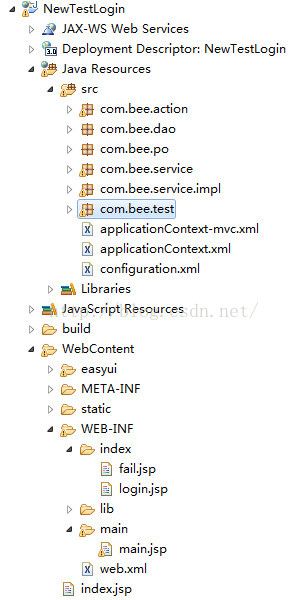
Demo结构如下:
再看一下效果:
二、项目详解:
前提是首先把所有的jar包导入进入,不管是用Maven或者手动都可以。
1、首先建立javabean,User.java:
package com.bee.po;

public class User {
	private int id;
	private String name;
	private String password;
	private String sex;
	private int age;
	private String address;

	@Override
	public String toString() {
		return "User [id=" + id + ", name=" + name + ", password=" + password
				+ ", sex=" + sex + ", age=" + age + ", address=" + address
				+ "]";
	}
	//省略setter和getter方法
}
2、然后建立dao层接口类,UserMapper以及UserMapper.xml(因为MyBatis是接口编程,只需要实现mapper而不用实现dao接口)
UserMapper.java:
package com.bee.dao;
import java.util.List;
import com.bee.po.User;

public interface UserMapper {
	/**
	 * 通过姓名查找用户
	 * @param name 用户名
	 * @return 返回用户对象
	 */
	public User findUserByName(String name);

	/**
	 * 查询所有用户,显示列表
	 */
	public List findUsersList();
	/**
	 * 根据页数和记录数,返回记录
	 */
	public List findUsersListByPage(int start,int end);
	/**
	 * 添加用户
	 */
	public void addUser(User user);
	/**
	 * 修改用户
	 */
	public void updateUser(User user);
	/**
	 * 根据ID删除用户
	 */
	public void deleteUser(int id);
	/**
	 * 插入学生自动生成主键
	 */
	public 	String createStudentAutoKey(User user);

}
根据UserMapper接口,我们可以写出映射文件UserMapper.xml(直接写在Dao层了,这样写不是太好):
insert into user(name,password,sex,age,address)
values(#{name},#{password},#{sex},#{age},#{address})
update user set
name=#{name},
password=#{password},
sex=#{sex},
age=#{age},
address=#{address}
where id=#{id}
delete from user where id=#{id}
select user
insert into user(id,name,password,sex,age,address)
values(#{id},#{name},#{password},#{sex},#{age},#{address})
下边就是要把所有的资源添加到Spring容器中,在src根下配置applicationContext.xml文件:
ClassPathXmlApplicationContext applicationContext = new ClassPathXmlApplicationContext("applicationContext.xml");
		UserService userService = (UserService) applicationContext.getBean("userService");

		User user = userService.findUserByName("admin");
		System.out.println(user.getAddress());
  NewTestLogin

    index.jsp


    contextConfigLocation
    classpath:applicationContext.xml


    org.springframework.web.context.ContextLoaderListener


  	springDispatcherServlet
    org.springframework.web.servlet.DispatcherServlet

      	contextConfigLocation
      	classpath:applicationContext-mvc.xml


    springDispatcherServlet
    *.html


  		Set Character Encoding
  		org.springframework.web.filter.CharacterEncodingFilter

  			encoding
  			utf8


  		Set Character Encoding
  		/*
package com.bee.action;

import java.io.IOException;
import java.io.UnsupportedEncodingException;
import java.util.List;

import javax.servlet.http.HttpServletRequest;
import javax.servlet.http.HttpServletResponse;
import javax.servlet.http.HttpSession;

import org.springframework.beans.factory.annotation.Autowired;
import org.springframework.stereotype.Controller;
import org.springframework.ui.Model;
import org.springframework.web.bind.annotation.RequestMapping;

import com.bee.dao.UserMapper;
import com.bee.po.User;

@Controller
@RequestMapping("/user")
public class UserLoginAction extends BaseAction{
	@Autowired
	private UserMapper userMapper;
	/**
	 * 登录模块
	 * @param request
	 * @param model
	 * @return
	 */
	@RequestMapping("/login")
	public String userLogin(HttpServletRequest request,Model model){
		//获得前台传入数据
		String name = request.getParameter("username");
		String password = request.getParameter("password");
		String securityCode = request.getParameter("securityCode");

		System.out.println("得到登录信息:"+name+" "+password);
		//获得图片验证码
		HttpSession session = request.getSession();
		String value = session.getAttribute("ValidateCode").toString();

		//根据用户名获得用户对象,通过判断密码、验证码是否正确返回相应视图
		User user = userMapper.findUserByName(name);
		if(user != null && user.getPassword().equals(password) && securityCode.equals(value)){
			return "main/main";
		}
		return "index/fail";
	}
	/**
	 * 用户列表,根据当前页和记录数
	 * @param page 当前页
	 * @param rows 页面记录数
	 * @param response
	 * @param model
	 * @throws IOException
	 */
	@RequestMapping("/userList")
	public  void userList(int page,int rows,HttpServletResponse response,Model model) throws IOException{
		response.setContentType("application/json; charset=utf-8");
		//求得开始记录与结束记录
		int start = (page-1)*rows;
		int end = page * rows;
		//把总记录和当前记录写到前台
		int total = userMapper.findUsersList().size();
		List uList = userMapper.findUsersListByPage(start, end);
		this.toBeJson(uList, total, response);
	}
	/**
	 * 新建用户
	 */
	@RequestMapping("/zengjiaUser")
	public void addUser(HttpServletRequest request,User user){
		System.out.println(user.getAddress());
		userMapper.addUser(user);
	}
	/**
	 * 删除用户
	 */
	@RequestMapping("/deleteUser")
	public void deleteUser(HttpServletRequest request){
		String id = request.getParameter("id");
		userMapper.deleteUser(Integer.parseInt(id));
	}
	/**
	 * 编辑用户
	 * @throws UnsupportedEncodingException
	 */
	@RequestMapping("/updateUser")
	public void updateUser(HttpServletRequest request,User user) throws UnsupportedEncodingException{
		userMapper.updateUser(user);
	}
}
<%@ page language="java" contentType="text/html; charset=UTF-8"
pageEncoding="UTF-8"%>
用户信息列表
用户信息列表
You can add User,or Edit_User、Delete_User if you selected an user
用户ID
姓名
性别
年龄
家庭住址
用户信息
源代码地址:
http://download.csdn.net/download/u010800530/8961287

