JMeter配置文件jmeter.properties解析
背景:下载JMeter解压部署后%JMETER_HOME%/bin目录下,发现有多个配置文件:jmeter.properties\system.properties\update.properties\user.properties,本篇稍微分析一下他们的作用:
1、jmete.properties是jmeter-GUI运行的配置说明,随机选几项配置进行说明:not_in_menu (本篇以JMeter4.0版本为例):
#Components to not display in JMeter GUI (GUI class name or static label)
# These elements are deprecated and will be removed in next version:
# MongoDB Script, MongoDB Source Config, Monitor Results
# BSF Elements
# 这是默认的,下面这些元件不会在gui菜单出现,
#not_in_menu=org.apache.jmeter.protocol.mongodb.sampler.MongoScriptSampler,org.apache.jmeter.protocol.mongodb.config.MongoSourceElement,\org.apache.jmeter.timers.BSFTimer,org.apache.jmeter.modifiers.BSFPreProcessor,org.apache.jmeter.extractor.BSFPostProcessor,org.apache.jmeter.assertions.BSFAssertion,\org.apache.jmeter.visualizers.BSFListener,org.apache.jmeter.protocol.java.sampler.BSFSampler,\org.apache.jmeter.protocol.http.control.gui.SoapSamplerGui

#我们开放前面两个MongoDB相关的元件,重启jmeter界面,将会在sampler看到MongoDB的请求元件,但是deprecated标识,说明没开放的原因是功能不健全或不能投入使用。

not_in_menu=org.apache.jmeter.timers.BSFTimer,org.apache.jmeter.modifiers.BSFPreProcessor,org.apache.jmeter.extractor.BSFPostProcessor,org.apache.jmeter.assertions.BSFAssertion,\    org.apache.jmeter.visualizers.BSFListener,org.apache.jmeter.protocol.java.sampler.BSFSampler,\org.apache.jmeter.protocol.http.control.gui.SoapSamplerGui
修改配置后的效果是,是不是可以看见这个被开放的MongoDB元件:
2、 在使用jmeter做性能测试时,当前负载环境不满足需求时,就会采用分布式压测,配置多台负载机,就配置多台服务器:
#---------------------------------------------------------------------------
# Remote hosts and RMI configuration
#---------------------------------------------------------------------------

# Remote Hosts - comma delimited
# 远程负载机的ip地址
remote_hosts=127.0.0.1,192.168.0.101
#remote_hosts=localhost:1099,localhost:2010

# RMI port to be used by the server (must start rmiregistry with same port)
# 上面设置负载机的ip地址带端口,需要一致
# server_port=1099
增加上面的配置效果展示如下,执行远程负载机时多了新增的配置选项: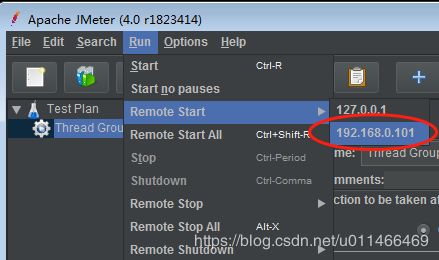
3、Results file configuration结果文件配置,就是listener保存结果的参数,这个一般在与ant构建生成报告时进行配置,建议在user.properties进行自定义配置,再有就是JMeter搭建自动化测试框架的N种方式介绍的配置项:jmeter.save.saveservice.xml_pi
#---------------------------------------------------------------------------
# Results file configuration
#---------------------------------------------------------------------------

# This section helps determine how result data will be saved.
# The commented out values are the defaults.

# legitimate values: xml, csv, db.  Only xml and csv are currently supported.
# jmeter.save.saveservice.output_format=xml

# The below properties are true when field should be saved; false otherwise
#
# assertion_results_failure_message only affects CSV output
#jmeter.save.saveservice.assertion_results_failure_message=true
#
# legitimate values: none, first, all
#jmeter.save.saveservice.assertion_results=none
#
#jmeter.save.saveservice.data_type=true
#jmeter.save.saveservice.label=true
#jmeter.save.saveservice.response_code=true
# response_data is not currently supported for CSV output
#jmeter.save.saveservice.response_data=false
# Save ResponseData for failed samples
#jmeter.save.saveservice.response_data.on_error=false
#jmeter.save.saveservice.response_message=true
#jmeter.save.saveservice.successful=true
#jmeter.save.saveservice.thread_name=true
#jmeter.save.saveservice.time=true
#jmeter.save.saveservice.subresults=true
#jmeter.save.saveservice.assertions=true
#jmeter.save.saveservice.latency=true
# Only available with HttpClient4
#jmeter.save.saveservice.connect_time=true
#jmeter.save.saveservice.samplerData=false
#jmeter.save.saveservice.responseHeaders=false
#jmeter.save.saveservice.requestHeaders=false
#jmeter.save.saveservice.encoding=false
#jmeter.save.saveservice.bytes=true
# Only available with HttpClient4
#jmeter.save.saveservice.sent_bytes=true
#jmeter.save.saveservice.url=false
#jmeter.save.saveservice.filename=false
#jmeter.save.saveservice.hostname=false
#jmeter.save.saveservice.thread_counts=true
#jmeter.save.saveservice.sample_count=false
#jmeter.save.saveservice.idle_time=true

# Timestamp format - this only affects CSV output files
# legitimate values: none, ms, or a format suitable for SimpleDateFormat
#jmeter.save.saveservice.timestamp_format=ms
#jmeter.save.saveservice.timestamp_format=yyyy/MM/dd HH:mm:ss.SSS

# For use with Comma-separated value (CSV) files or other formats
# where the fields' values are separated by specified delimiters.
# Default:
#jmeter.save.saveservice.default_delimiter=,
# For TAB, one can use:
#jmeter.save.saveservice.default_delimiter=\t

# Only applies to CSV format files:
# Print field names as first line in CSV
#jmeter.save.saveservice.print_field_names=true

# Optional list of JMeter variable names whose values are to be saved in the result data files.
# Use commas to separate the names. For example:
#sample_variables=SESSION_ID,REFERENCE
# N.B. The current implementation saves the values in XML as attributes,
# so the names must be valid XML names.
# By default JMeter sends the variable to all servers
# to ensure that the correct data is available at the client.

# Optional xml processing instruction for line 2 of the file:
# Example:
#jmeter.save.saveservice.xml_pi=
# Default value:
jmeter.save.saveservice.xml_pi=
4、JMeter代理服务器配置JMeter Test Script recorder configuration,就是我们常用来录制jmeter脚本的元件,所以要熟读配置文件,在录制脚本时,需要设置过滤录制一些不需要的文件或是格式,这里都有介绍匹配规则如何写,所以没必要老是百度啊、问别人啊...
#---------------------------------------------------------------------------
# JMeter Test Script recorder configuration
#
# N.B. The element was originally called the Proxy recorder, which is why the
# properties have the prefix "proxy".
#---------------------------------------------------------------------------

# If the recorder detects a gap of at least 5s (default) between HTTP requests,
# it assumes that the user has clicked a new URL
#proxy.pause=5000

# Add numeric prefix to Sampler names (default true)
#proxy.number.requests=true

# List of URL patterns that will be added to URL Patterns to exclude
# Separate multiple lines with ;
#proxy.excludes.suggested=.*\\.(bmp|css|js|gif|ico|jpe?g|png|swf|woff|woff2)

# Change the default HTTP Sampler (currently HttpClient4)
# Java:
#jmeter.httpsampler=HTTPSampler
#or
#jmeter.httpsampler=Java
#
# HttpClient4.x
#jmeter.httpsampler=HttpClient4

# By default JMeter tries to be more lenient with RFC2616 redirects and allows
# relative paths.
# If you want to test strict conformance, set this value to true
# When the property is true, JMeter follows http://tools.ietf.org/html/rfc3986#section-5.2
#jmeter.httpclient.strict_rfc2616=false

# Default content-type include filter to use
#proxy.content_type_include=text/html|text/plain|text/xml
# Default content-type exclude filter to use
#proxy.content_type_exclude=image/.*|text/css|application/.*
5、JMeter的jdbc request配置,看我们元件可以选择jdbc的驱动,这里就是已经配置好的,程序来读取就好;
#---------------------------------------------------------------------------
# JDBC Request configuration
#---------------------------------------------------------------------------

# String used to indicate a null value
#jdbcsampler.nullmarker=]NULL[
#
# Max size of BLOBs and CLOBs to store in JDBC sampler. Result will be cut off
#jdbcsampler.max_retain_result_size=65536

# Database validation query
# based in https://stackoverflow.com/questions/10684244/dbcp-validationquery-for-different-databases list
jdbc.config.check.query=select 1 from INFORMATION_SCHEMA.SYSTEM_USERS|select 1 from dual|select 1 from sysibm.sysdummy1|select 1|select 1 from rdb$database
jdbc.config.jdbc.driver.class=com.mysql.jdbc.Driver|org.postgresql.Driver|oracle.jdbc.OracleDriver|com.ingres.jdbc.IngresDriver|com.microsoft.sqlserver.jdbc.SQLServerDriver|com.microsoft.jdbc.sqlserver.SQLServerDriver|org.apache.derby.jdbc.ClientDriver|org.hsqldb.jdbc.JDBCDriver|com.ibm.db2.jcc.DB2Driver|org.apache.derby.jdbc.ClientDriver|org.h2.Driver|org.firebirdsql.jdbc.FBDrivery|org.mariadb.jdbc.Driver|org.sqlite.JDBC|net.sourceforge.jtds.jdbc.Driver
6、listener监听器,报告的默认显示,你想设置%百分之多少的用户响应时间就自己设置,不一定是90-95-99;
#---------------------------------------------------------------------------
# Aggregate Report and Aggregate Graph - configuration
#---------------------------------------------------------------------------
#
# Percentiles to display in reports
# Can be float value between 0 and 100
# First percentile to display, defaults to 90%
#aggregate_rpt_pct1=90
# Second percentile to display, defaults to 95%
#aggregate_rpt_pct2=95
# Second percentile to display, defaults to 99%
#aggregate_rpt_pct3=99
7、函数功能_time(),什么,你不会怎么写时间格式?请来这里看
#---------------------------------------------------------------------------
# __time() function configuration
#
# The properties below can be used to redefine the default formats
#---------------------------------------------------------------------------
#time.YMD=yyyyMMdd
#time.HMS=HHmmss
#time.YMDHMS=yyyyMMdd-HHmmss
#time.USER1=
#time.USER2=
8、所以刚才怎么说的,用户自定义的配置建议放在user.properties,为什么?一好管理,二不用担心加载不到:
#---------------------------------------------------------------------------
# Additional property files to load
#---------------------------------------------------------------------------

# Should JMeter automatically load additional JMeter properties?
# File name to look for (comment to disable)
user.properties=user.properties

# Should JMeter automatically load additional system properties?
# File name to look for (comment to disable)
system.properties=system.properties

# Comma separated list of files that contain reference to templates and their description
# Path must be relative to JMeter root folder
#template.files=/bin/templates/templates.xml
9、system.properties\upgrade.properties 不建议去动,user.properties则可以自定义相关的配置选项。
10、JMeter的配置文件就介绍到这,记得配置文件是程序一运行就会load的,所以要多读书,会少走很多弯路。