CSS3 3D案例的总结
如果要说是3D的基础概念,首先我就来说一说rotateX()、rotateY()、rotateZ()这几个属性
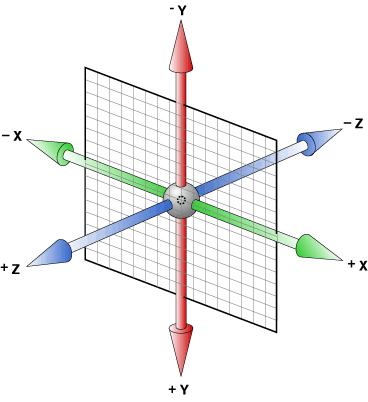
rotateX():对应的是3D模型中的X轴上的旋转,传入的参数如:rotateX(45deg)表示的是页面绕X轴顺时针旋转45度
rotateY():对应的是3D模型中的Y轴上的旋转,传入的参数如:rotateY(45deg)表示的是页面绕Y轴顺时针旋转45度
rotateZ():对应的是3D模型中的Z轴上的旋转,传入的参数如:rotateZ(45deg)表示的是页面绕Z轴顺时针旋转45度(必须提到的是Z轴是相对自己的正面)
请看下图:
这就是对3D的基础,明白这三点做起来会很简单。
perspective
根据我个人对这个属性的理解,这个属性的功能就有点像把平行光设置为聚焦光一样,我们可以知道这个属性相当于将默认的平行光置换成焦点光,如果是像perspective:500px,这个我们可以认为是光源离物体的距离是500px,这个数值如果是越大的话,那么等一下的物体呈现就会越小,反之越大。
下面给大家呈现几个示例。
1.反转
效果展示:
HTML:

css:
body{
  background: rgb(88, 71, 71);
  transform-style: preserve-3d;
  perspective: 800px;
}
/*添加3D效果和视距*/
#cont{
  width: 300px;
  height: 300px;
  transform-style: preserve-3d;
  margin: 100px auto;
  transform: rotateY(0deg);
  transition: all 2s;
}
/*设置3D,让他在2秒内执行完*/
#cont:hover{
  transform: rotateY(180deg);
}
/*设置hover时间*/
#box{
  width: 300px;
  height: 300px;
  line-height: 300px;
  background: url(../images/lunbo3.jpg)no-repeat;
  background-size:100% 100%;
  margin: 0 auto;
  font-size: 150px;
  text-align: center;
  color: #fff;
  position: absolute;
  backface-visibility: hidden;
}
/*这个是正面*/
#box1{
  width: 300px;
  line-height: 300px;
  transform: rotateY(-180deg);
}
/*这个是反面*/
#box1 img{
  width: 100%;
  height: 300px;
}
这就是旋转,是沿着Y轴旋转了180度。接下来就结合一下上面所提到的一个坐标轴的相对位置问题来接一个例子。
2.正方体
效果展示:
HTML:


CSS:
body{
    background: rgb(125, 102, 119);
}
#box{
  transform-style: preserve-3d;
  perspective: 800px;
}
/*添加3D效果和视距*/
.cont{
  width: 200px;
  height: 200px;
  margin: 150px auto;
  position: relative;
  transform-style: preserve-3d;/*添加3D*/
  transform: rotateX(10deg) rotateY(10deg);
  animation:ziz 10s infinite;/*绑定事件,让他在10秒内执行完*/
}
@keyframes ziz{
    0%{
        transform:rotate(0deg);
    }
    50%{
        transform:rotateX(180deg);
    }
    70%{
      transform: rotateY(180deg);
    }
    100%{
        transform:rotateX(0deg);
    }
}
/*事件*/
.cont img{
  width: 200px;
  height: 200px;
}
.mian{
  width: 200px;
  height: 200px;
  position: absolute;
}
/*下面设置的6个面,让它们以不同的角度选择拼接*/
.mian:nth-child(1){
  background: blue;
  transform: rotateX(90deg) translateZ(100px);
}
.mian:nth-child(2){
  background: rgb(32, 193, 40);
  transform: rotateX(-90deg) translateZ(100px);
}
.mian:nth-child(3){
  background: red;
  transform: rotateY(-90deg) translateZ(100px);
}
.mian:nth-child(4){
  background: yellow;
  transform: rotateY(90deg) translateZ(100px);
}
.mian:nth-child(5){
  background: #3ce8af;
  transform:translateZ(100px);
}
.mian:nth-child(6){
  background: #e476a3;
  transform:translateZ(-100px) rotateY(180deg);
}
首先我给它们都设置了 3D 空间,perspective这个是所谓的视距,接下来我给正方形 设置了6个面,各让它们沿着 rotateX rotateY translateZ 进行调整,然后组成一个现在所看到的3D 正方体。
3.旋转
效果展示:
HTML:


CSS:
body{
  background: rgb(123, 235, 238);
}
.cont{
  transform-style: preserve-3d;
  perspective: 800px;
}
/*添加3D和视距*/
.box{
  width: 200px;
  height: 200px;
  margin: 100px auto;
  position: relative;
  transform-style: preserve-3d;/*添加3D*/
  transform: rotateX(-10deg) rotateY(0deg) translateZ(-300px);
  transform-origin: center center -300px; /*设置眼睛的位置*/
  line-height: 200px;
  transition:all 1s;/*在1秒内执行完*/
}
.box img{
  width: 100%;
  height: 100%;
}
.mian{
  width:200px;
  height: 200px;
  position: absolute;
  background-color: black;
  font-size: 100px;
  color: #fff;
  text-align: center;

}
/*下面是9个div让它们rotateY的角度拼接成一个多边形*/
.mian:nth-child(1){
  transform: rotateY(0deg) translateZ(275px);
}
.mian:nth-child(2){
  transform: rotateY(40deg) translateZ(275px);
}
.mian:nth-child(3){
  transform: rotateY(80deg) translateZ(275px);
}
.mian:nth-child(4){
  transform: rotateY(120deg) translateZ(275px);
}
.mian:nth-child(5){
  transform: rotateY(160deg) translateZ(275px);
}
.mian:nth-child(6){
  transform: rotateY(200deg) translateZ(275px);
}
.mian:nth-child(7){
  transform: rotateY(240deg) translateZ(275px);
}
.mian:nth-child(8){
  transform: rotateY(280deg) translateZ(275px);
}
.mian:nth-child(9){
  transform: rotateY(320deg) translateZ(275px);
}
这个是根据上面的排版一样也是调整了他们的 rotateX rotateY translateZ 。然后加入了JS里面的鼠标点击事件,让它们沿着X轴旋转。
4.卡片翻阅
效果展示:
HTML:


CSS:
body{
  background: rgb(197, 231, 143);
}
#box{
  transform-style: preserve-3d;
  perspective: 800px;
}
/*添加3D和视距*/
#box1{
  width: 300px;
  height: 300px;
  margin: 100px auto;
  position: relative;
  text-align: center;
  line-height: 300px;
  font: 150px/2 Microsot Yahei;
  color: #fff;
  transform-style: preserve-3d;/*添加3D*/
}
#box1 img{
  width: 100%;
  height: 100%;
}
.hz{
  width: 100%;
  height: 100%;
  background: red;
  position: absolute;
  transform-origin: bottom;/*设置的眼睛在下面*/
  transform: rotateX(0deg);
  transition: all 2s;/*设置时间*/
  backface-visibility: hidden;/*隐藏背面*/
}
首先让它rotateX(-90deg)以后,貌似是隐藏了,实际上是和人的视觉平行了,比方说一个很扁的物品,当和人的视觉平行以后,很难看到存在的东西。
5.魔方
效果展示:
HTML:
var box=document.getElementById('box');
var geshu=6;//渲染的个数
var xr='';
var str='';
for (var i = 0; i < geshu; i++) {
  str+=xr;
}
box.innerHTML=str;
//渲染完毕
var wutai=box.getElementsByClassName('box1');
console.log(wutai);
var cishu=0;
box.onclick=function() {
  cishu++;
  var jiaodu=cishu*90;
  for (var i = 0; i < geshu; i++) {
    wutai[i].style="transition:transform 1s "+100*i+"ms;transform:rotateX("+jiaodu+"deg)";
  }
}
CSS:
body{
  background: rgb(164, 239, 241);
}
#box{
  width: 600px;
  height: 250px;
  margin: 150px auto;
  perspective: 800px;
  perspective-origin: 500px;
}
.box1{
  width: 100px;
  height: 100%;
  float: left;
  position: relative;
  transform-style: preserve-3d;
  margin-left: -1px;
}
/*这几个是让背景图片拼接,以它们的宽来定义的,background-position这个属性可以移动背景图片的位置*/
.box1:nth-child(2)>.mian{
  background-position: -100px 0;
}
.box1:nth-child(3)>.mian{
  background-position: -200px 0;
}
.box1:nth-child(4)>.mian{
  background-position: -300px 0;
}
.box1:nth-child(5)>.mian{
  background-position: -400px 0;
}
.box1:nth-child(6)>.mian{
  background-position: -500px 0;
}
.mian{
  width: 100%;
  height: 100%;
  position: absolute;
}
/*下面是设置的6个div给它们加了背景图片*/
.mian:nth-child(1){
  transform: translateZ(125px);
  background: url(../images/lunbo1.jpg) no-repeat;
  background-size: 600px 100%;
}
.mian:nth-child(2){
  transform: translateZ(-125px);
  background: url(../images/lunbo2.jpg) no-repeat;
  background-size: 600px 100%;
}
.mian:nth-child(3){
  width: 250px;
  transform: rotateY(-90deg) translateZ(125px);
  background-color: black;

}
.mian:nth-child(4){
  width: 250px;
  transform: rotateY(90deg) translateZ(-25px);
  background-color: black;

}
.mian:nth-child(5){
  transform: rotateX(90deg) translateZ(125px);
  background: url(../images/lunbo3.jpg) no-repeat;
  background-size: 600px 100%;
}
.mian:nth-child(6){
  transform: rotateX(-90deg) translateZ(125px);
  background: url(../images/lunbo4.jpg) no-repeat;
  background-size: 600px 100%;
}
看起来很炫是不是,这个其实的制作原理就是按照我在上面提到的这些属性去制作的,首先我们分析一下,在创建这个的时候,第一步我们要加入视距,然后是添加一个3D的舞台,接着是把这些风景的图片边缘相接,最后在这些图片的每个舞台定义一个动画,就是在鼠标点击的时候触发的动作,这样这个就制作完成了,在这个例子中图片的尺寸最好要相同。
总结:
在学习的这段时间里,我对css3 有了更深刻的理解,对于transform的这个属性来说,它是根据你的想法去改变的。但是必须提到的一点是对于3D空间的理解,他可以让你看到你想要的结果,总而言之我们要实打实的学好每一个属性。
