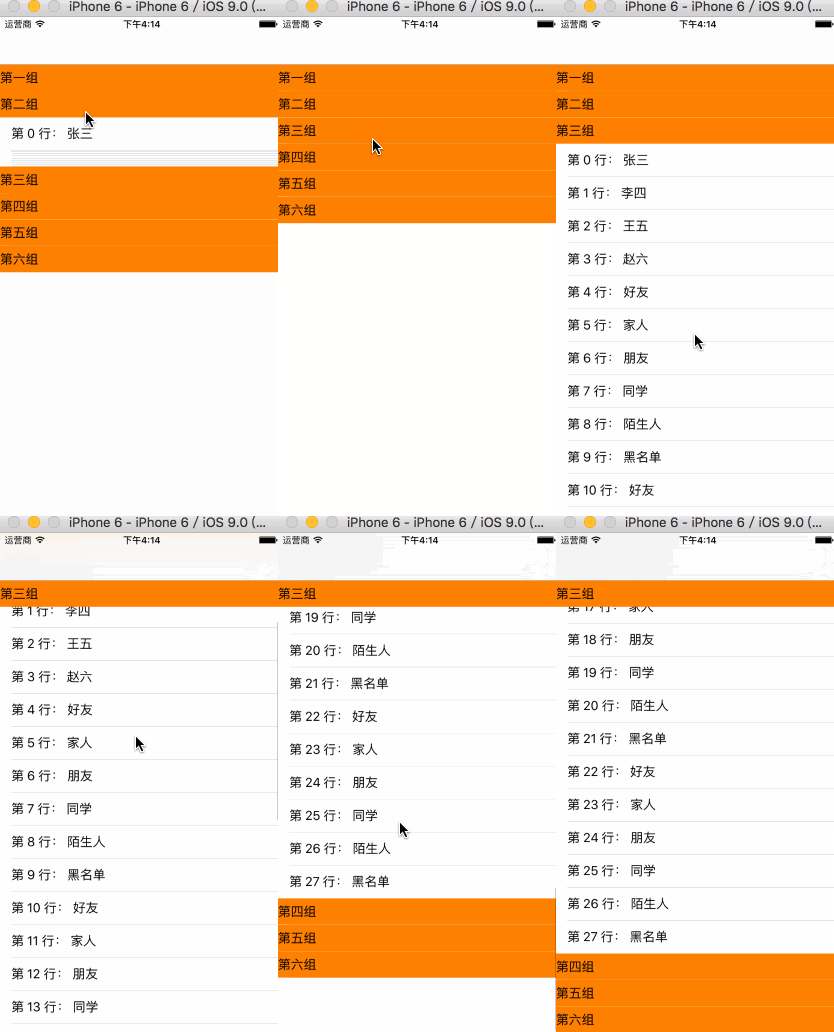
- 仿写一个类似QQ分组的展开效果,分析下该效果的结构.根据点击了组的头部视图,判断是否要展开该组.可以理解为点击了每组的头部视图后,动态的改变了每个cell的高度.
- 本代码这是为了实习小功能的Demo,并未对其进行很好的封装,只为举个例子.下面贴出代码进行分析
/** 组数据 */
@property (nonatomic ,strong) NSArray *sectionArray;;
/** 行数据 */
@property (nonatomic ,strong) NSArray *rowArray;

@property (nonatomic ,weak)   UITableView *tableView;
/** 判断cell是否展开 */
@property (nonatomic ,strong) NSMutableDictionary *showDic;

@property (nonatomic ,weak) UILabel *header;

- (void)viewDidLoad {
    [super viewDidLoad];

    [self loadDataSource];

    [self setupTableView];
}
- (void)loadDataSource
{
    self.sectionArray = @[@"第一组",@"第二组",@"第三组",@"第四组",@"第五组",@"第六组"];

    self.rowArray = @[@"张三",@"李四",@"王五",@"赵六",@"好友",@"家人",@"朋友",@"同学",@"陌生人",@"黑名单",@"好友",@"家人",@"朋友",@"同学",@"陌生人",@"黑名单",@"好友",@"家人",@"朋友",@"同学",@"陌生人",@"黑名单",@"好友",@"家人",@"朋友",@"同学",@"陌生人",@"黑名单"];
}
-(void)setupTableView
{
    UITableView *tableView = [[UITableView alloc]initWithFrame:self.view.bounds style:UITableViewStylePlain];
    self.tableView = tableView;
    self.tableView.delegate = self;
    self.tableView.dataSource = self;

    [self.tableView registerClass:[UITableViewCell class] forCellReuseIdentifier:cellID];
    [self.view addSubview:self.tableView];
    self.tableView.tableFooterView = [[UIView alloc]init];
}
-(NSInteger)numberOfSectionsInTableView:(UITableView *)tableView
{
    return  self.sectionArray.count;
}
-(NSInteger)tableView:(UITableView *)tableView numberOfRowsInSection:(NSInteger)section
{
    return self.rowArray.count;
}
-(UITableViewCell *)tableView:(UITableView *)tableView cellForRowAtIndexPath:(NSIndexPath *)indexPath
{
    UITableViewCell *cell=[tableView dequeueReusableCellWithIdentifier:cellID];
    // 剪掉超出部分
    cell.clipsToBounds = YES;

    cell.textLabel.text = [NSString stringWithFormat:@"第 %ld 行: %@",indexPath.row,self.rowArray[indexPath.row]];

    return cell;
}
- 上面的代码初始化了一些基本数据,下面将为组头部视图,添加监听
-(UIView*)tableView:(UITableView *)tableView viewForHeaderInSection:(NSInteger)section{
    UILabel *header = [[UILabel alloc]init];
    self.header = header;

    header.userInteractionEnabled = YES;
    header.text = self.sectionArray[section];
    header.userInteractionEnabled = YES;
    header.backgroundColor = [UIColor orangeColor];
    header.tag = section;

    UITapGestureRecognizer *singleRecognizer = [[UITapGestureRecognizer alloc] initWithTarget:self action:@selector(SingleTap:)];
    [header addGestureRecognizer:singleRecognizer];

    return header;
}
-(void)SingleTap:(UITapGestureRecognizer*)recognizer{

    // 拿到当前的label
    NSInteger didSection = recognizer.view.tag;

    if (!self.showDic) { // 展开字典创建
        self.showDic = [[NSMutableDictionary alloc]init] ;
    }
    // 拿lable的tag作为字典的key
    NSString *key = [NSString stringWithFormat:@"%ld",recognizer.view.tag];
    if (![self.showDic objectForKey:key]) {  //如果当前字典没有对应的值
        [self.showDic setObject:@"isOn" forKey:key]; // 就把当前的key对应的值存起来
        }else{ // 如果展开了
        [self.showDic removeObjectForKey:key];
    }
    [self.tableView reloadSections:[NSIndexSet indexSetWithIndex:didSection] withRowAnimation:UITableViewRowAnimationNone];
}
- 上述代码实现了,组头部视图正常现实和监听组头部视图的点击,添加了点击手势,只剩下最后一步了,就是动态设置cell的高度
- (CGFloat)tableView:(UITableView *)tableView heightForRowAtIndexPath:(NSIndexPath *)indexPath{
    if ([self.showDic objectForKey:[NSString stringWithFormat:@"%ld",indexPath.section]]) {
        return 44;
    }
    return 0.01;
}

- (CGFloat)tableView:(UITableView *)tableView heightForHeaderInSection:(NSInteger)section{
    return 35;
}
- 上面的代码就是这个效果的核心了,为了现实分割线的效果特地设置Cell不展开时候的高度为0.01,就可以看出明显的分割线了
- 注意点:
- cell.clipsToBounds = YES; 这行代码包装了cell高度为0.01时,文字堆在一期的难看效果.
- UITableViewRowAnimationNone 是默认的没有动画的参数,可以设置其他的动画参数,是刷新列表时候的动画
typedef NS_ENUM(NSInteger, UITableViewRowAnimation) {
UITableViewRowAnimationFade,   //淡入淡出
UITableViewRowAnimationRight,  //从右滑入         // slide in from right (or out to right)
UITableViewRowAnimationLeft,   //从左滑入
UITableViewRowAnimationTop,     //从上滑入
UITableViewRowAnimationBottom,  //从下滑入
UITableViewRowAnimationNone,            // available in iOS 3.0
UITableViewRowAnimationMiddle,          // available in iOS 3.2.  attempts to keep cell centered in the space it will/did occupy
UITableViewRowAnimationAutomatic = 100  // available in iOS 5.0.  chooses an appropriate animation style for you
};
