Mac上使用VSCode编辑Latex+Skim跳转预览
最近希望用latex写毕业论文,花了些时间配置环境和调试模版。
在Mac平台上,用到以下几个工具:
- MacTeX
- 编辑器:Visual Studio Code
- 预览器:Skim
MacTeX
下载: https://tug.org/mactex/ ,后续操作略。
我下载的是mactex-20180417.pkg,3.42G
安装后会有一堆小程序附送,但这里用不到。
VScode
- 下载安装
- 插件:LaTeX Workshop
- code>首选项>搜索: latex,在用户设置setting.json中添加代码,实现基本编译功能等
- 编译:左边栏 TeX->Build LaTeX project->Recipe:xelatexb(xelatex*2+biblatex+xelatex)或者直接快捷键cmd+opt+b使用xelatex*2编译
setting.json:
ps.如果需要保存时默认的编译链设置为xelatexb,则把该配置代码放到recipes下的首位
    "latex-workshop.latex.recipes": [
        {
            "name": "xelatexb",
            "tools": [
              "xelatex",
              "bibtex",
              "xelatex",
              "xelatex"
            ]
          },
           {
            "name": "xelatex",
            "tools": [
              "xelatex",
              "xelatex"
            ]
          },
        {
          "name": "latexmk",
          "tools": [
            "latexmk"
          ]
        },
        {
          "name": "pdflatex -> bibtex -> pdflatex*2",
          "tools": [
            "pdflatex",
            "bibtex",
            "pdflatex",
            "pdflatex"
          ]
        }
      ],
      "latex-workshop.latex.tools": [
        {
            "name": "xelatex",
            "command": "xelatex",
            "args": [
                "-synctex=1",
                "-interaction=nonstopmode",
                "-file-line-error",
                "%DOC%"
            ]
        },
        {
          "name": "latexmk",
          "command": "latexmk",
          "args": [
            "-synctex=1",
            "-interaction=nonstopmode",
            "-file-line-error",
            "-pdf",
            "%DOC%"
          ]
        },
        {
          "name": "pdflatex",
          "command": "pdflatex",
          "args": [
            "-synctex=1",
            "-interaction=nonstopmode",
            "-file-line-error",
            "%DOC%"
          ]
        },
        {
          "name": "bibtex",
          "command": "bibtex",
          "args": [
            "%DOCFILE%"
          ]
        }
      ],
        "editor.wordWrap": "on",
    "workbench.startupEditor": "newUntitledFile",
    "latex-workshop.latex.clean.fileTypes": [
        "*.aux",
        "*.bbl",
        "*.blg",
        "*.idx",
        "*.ind",
        "*.lof",
        "*.lot",
        "*.out",
        "*.toc",
        "*.acn",
        "*.acr",
        "*.alg",
        "*.glg",
        "*.glo",
        "*.gls",
        "*.ist",
        "*.fls",
        "*.log",
        "*.fdb_latexmk",
        "*.gz"
    ]
安装Skim
通过brew下载:
brew cask install skim
VS Code 与Skim 相互跳转
通过光标位置跳转同步。
配置如下:
1. Vscode->Skim
快捷键:command+option+j
在vscode的 setting.json中增加如下代码:
- 使能从 VS Code 中直接打开 Skim
 "latex-workshop.view.pdf.external.command": {
     "command": "/usr/local/bin/displayline",
     "args": [
         "0",
         "%PDF%"
     ]
   },
- 使能从VS Code跳转到skim里相应位置
  "latex-workshop.view.pdf.viewer": "external",
    "latex-workshop.view.pdf.external.synctex": {
      "command": "/usr/local/bin/displayline",
      "args": [
          "-r",
          "%LINE%",
          "%PDF%",
          "%TEX%"
      ]
  },
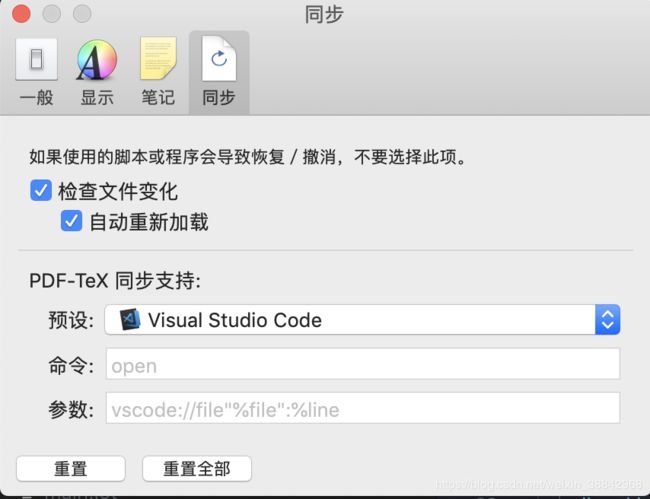
2. Skim-> VS Code
skim-选项-同步-预设vscode
从PDF文件可以直接跳转到TeX源码对应的位置,
快捷键: cnd+shift+鼠标左击

完成配置。
- 编辑的时候就把skim和vscode并排放在一个桌面
- 从vscode跳转的时候会在skim中出现一个红点表示定位