CentOS8使用ansible-playbook部署集中化管理服务器(演示批量部署LNMP)
大家好,我是SuieKa。
在这里仅演示centos8服务器管理自身和centos7-被管理服务器,也可集中化管理多台服务器。
目录
- Ansible介绍和Ansible运行机制
- 1、Ansible介绍
- 2、Ansible运行机制
- Playbook剧本及常用文件夹
- 一、安装Ansible并配置ansible管理两个节点
- 二、Ansible常见模块高级使用方法
- 三、使用Playbook批量部署==LAMP==环境
- 四、使用Playbook批量部署==LNMP==环境
- 五、提供的ansible-ppt图
Ansible介绍和Ansible运行机制
1、Ansible介绍
官方网站:Ansible

Ansible是一款为类Unix系统开发的自由开源的配置和自动化工具。它用Python写成,类似于saltstack和Puppet,但是有一个不同和优点是我们不需要在节点中安装任何客户端。它使用SSH来和节点进行通信。Ansible基于 Python paramiko 开发,分布式,无需客户端,轻量级,配置语法使用 YMAL 及 Jinja2模板语言,更强的远程命令执行操作。
ansiblle具有如下特点:
1、部署简单,只需在主控端部署Ansible环境,被控端无需做任何操作;
2、默认使用SSH协议对设备进行管理;
3、主从集中化管理;
4、配置简单、功能强大、扩展性强;
5、支持API及自定义模块,可通过Python轻松扩展;
6、通过Playbooks来定制强大的配置、状态管理;
7、对云计算平台、大数据都有很好的支持。
2、Ansible运行机制
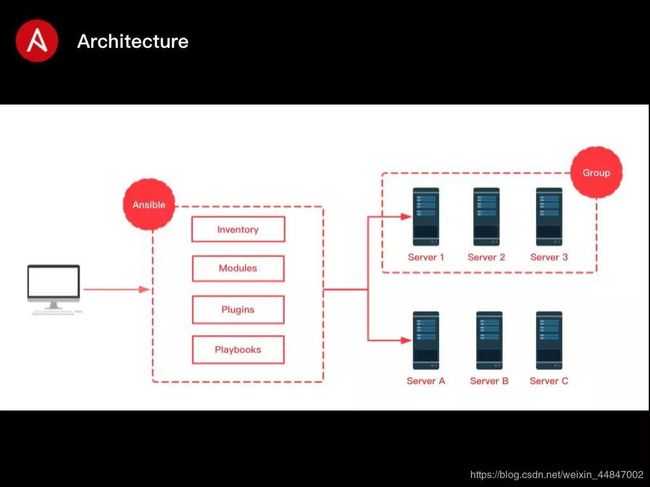
Ansible 在管理节点将 Ansible 模块通过 SSH 协议推送到被管理端执行,执行完之后自动删除,可以使用SVN (git)等来管理自定义模块及编排。
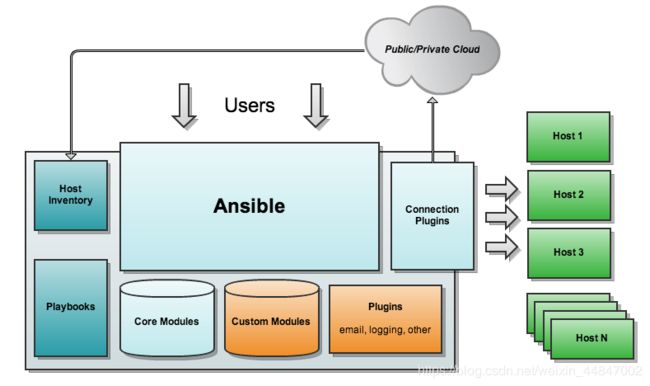
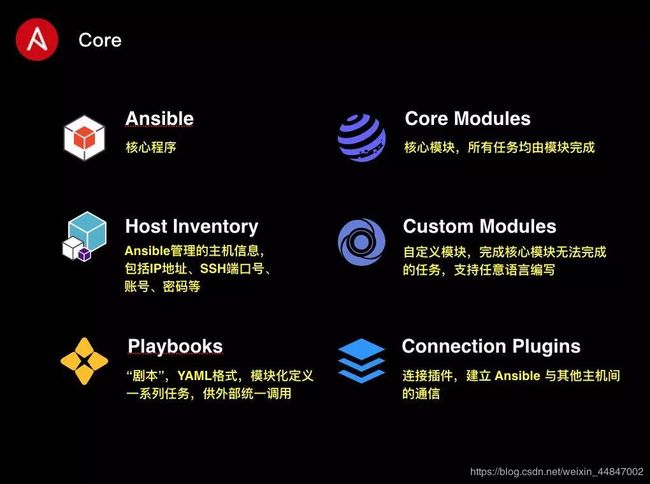
Ansible 由 5 个部分组成:
Ansible : ansible核心
Modules : 包括 Ansible 自带的核心模块及自定义模块
Plugins : 完成模块功能的补充,包括连接插件、邮件插件等
Playbooks : 剧本;定义 Ansible 多任务配置文件,由Ansible 自动执行
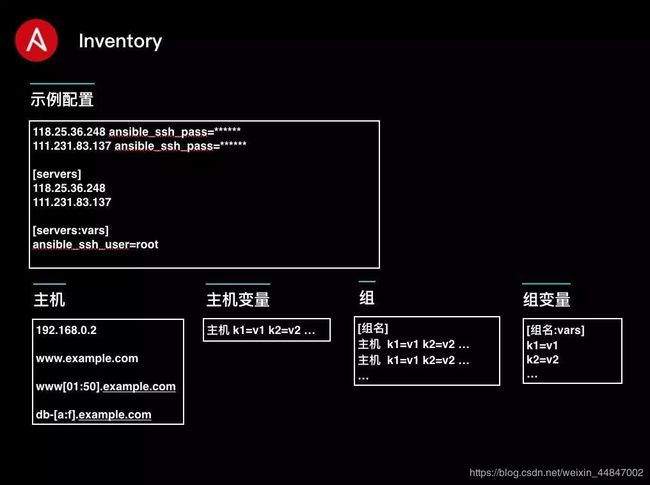
Inventory : 定义 Ansible 管理主机的清单 [ˈɪnvəntri] 清单
Playbook剧本及常用文件夹
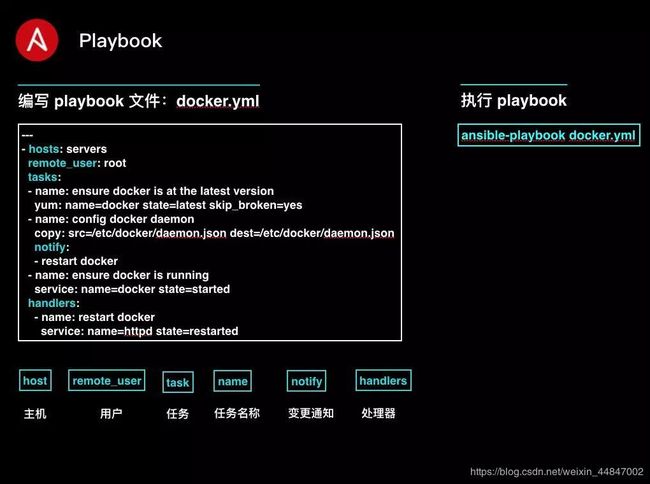
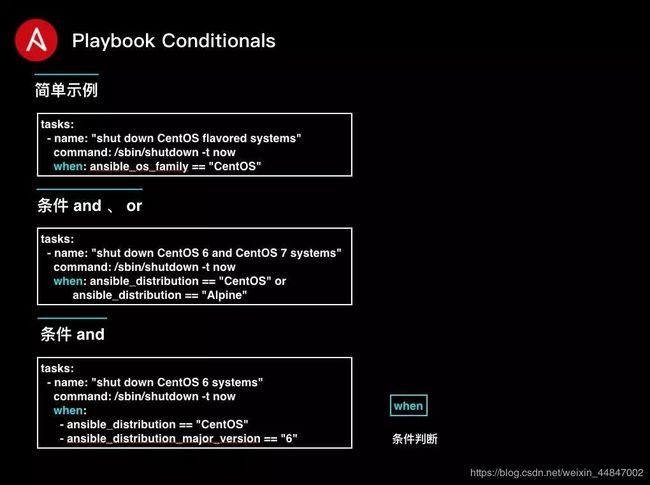
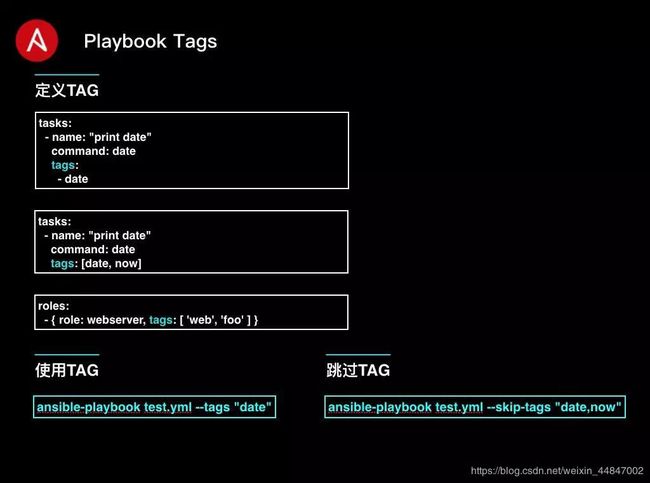
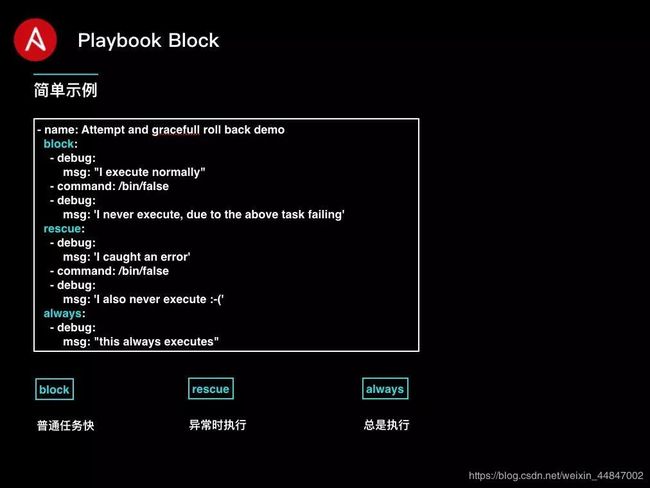
playbooks是 一个不同于使用Ansible命令行执行方式的模式,其功能更强大灵活。简单来说,playbook是一个非常简单的配置管理和多主机部署系统,不同于任何已经存在的模式,可作为一个适合部署复杂应用程序的基础。Playbook可以定制配置,可以按照指定的操作步骤有序执行,支持同步和异步方式。值得注意的是playbook是通过YAML格式来进行描述定义的。
(ansible先读主机清单,在读取playbooks)
核心元素(常用文件夹):
files:存放需要同步到异地服务器的源码文件及配置文件;
handlers:当服务的配置文件发生变化时需要进行的操作,比如:重启服务,重新加载配置文件; ['hændləz] 处理程序
meta:角色定义,可留空; ['metə] 元
tasks:需要进行的执行的任务; #任务
templates:用于执行lamp安装的模板文件,一般为脚本; ['templɪts] 模板
vars:本次安装定义的变量。
一、安装Ansible并配置ansible管理两个节点
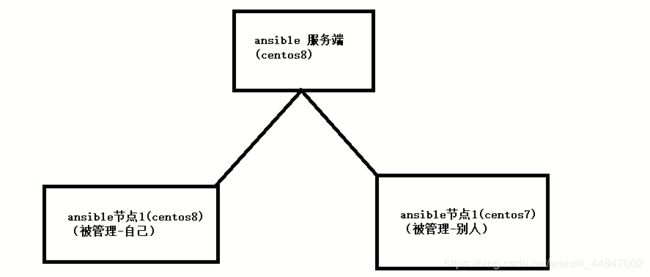
1、Ansible管理服务器环境:
仅主机模式
ansible 服务端 (centos8) :ansible-server100
ansible节点1(centos8): :ansible-server100
ansible节点1(centos7): :ansible-client101
两台主机之间互联互通
概图:(被管理-别人可多台)
[00:01:14 root@ansible-server100 ~]#cat /etc/redhat-release
CentOS Linux release 8.1.1911 (Core)
[00:01:22 root@ansible-client101 ~]#cat /etc/redhat-release
CentOS Linux release 7.5.1804 (Core)
2、安装Ansible(只在服务端安装)
Ansible 包不在 CentOS 8 默认的软件包仓库中。因此,我们需要设置EPEL仓库
[16:59:24 root@ansible-server100 ~]#dnf -y install https://dl.fedoraproject.org/pub/epel/epel-release-latest-8.noarch.rpm
运行事务
  准备中  :                                                                            1/1
  安装    : epel-release-8-8.el8.noarch                                                1/1
  运行脚本: epel-release-8-8.el8.noarch                                                1/1
  验证    : epel-release-8-8.el8.noarch                                                1/1
已安装:
  epel-release-8-8.el8.noarch
完毕!
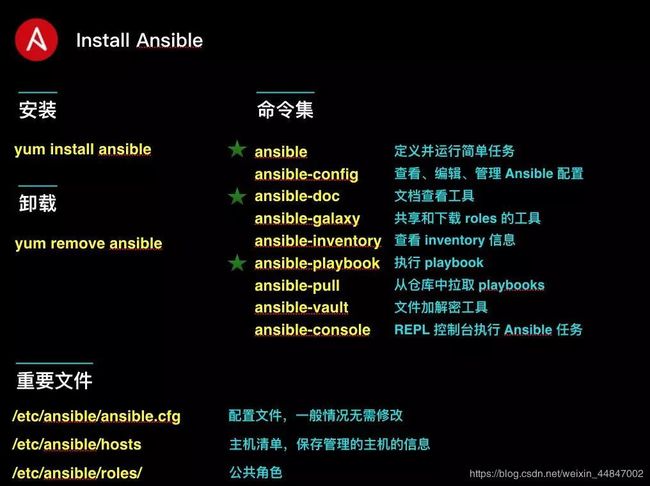
使用yum安装Ansible
[17:05:38 root@ansible-server100 ~]#dnf -y  install ansible
已安装:
  ansible-2.9.9-1.el8.noarch                  python3-paramiko-2.4.3-1.el8.noarch
  python3-babel-2.5.1-5.el8.noarch            python3-jinja2-2.10.1-2.el8_0.noarch
  python3-jmespath-0.9.0-11.el8.noarch        python3-markupsafe-0.23-19.el8.x86_64
  python3-pyasn1-0.3.7-6.el8.noarch           libsodium-1.0.18-2.el8.x86_64
  python3-bcrypt-3.1.6-2.el8.1.x86_64         python3-pynacl-1.3.0-5.el8.x86_64
  sshpass-1.06-9.el8.x86_64
完毕!

会安装很多关于python3的包
[17:01:49 root@ansible-server100 ~]#python3 -V
Python 3.6.8
版本:
[17:06:33 root@ansible-server100 ~]#ansible --version
ansible 2.9.9
  config file = /etc/ansible/ansible.cfg
  configured module search path = ['/root/.ansible/plugins/modules', '/usr/share/ansible/plugins/modules']
  ansible python module location = /usr/lib/python3.6/site-packages/ansible
  executable location = /usr/bin/ansible
  python version = 3.6.8 (default, Nov 21 2019, 19:31:34) [GCC 8.3.1 20190507 (Red Hat 8.3.1-4)]
ansible不需要启动服务,下载就好了
主要配置文件地:
[17:06:41 root@ansible-server100 ~]#cd /etc/ansible/
[17:14:56 root@ansible-server100 ansible]#ls
ansible.cfg  hosts  roles
3、 ansible命令参数
语法:
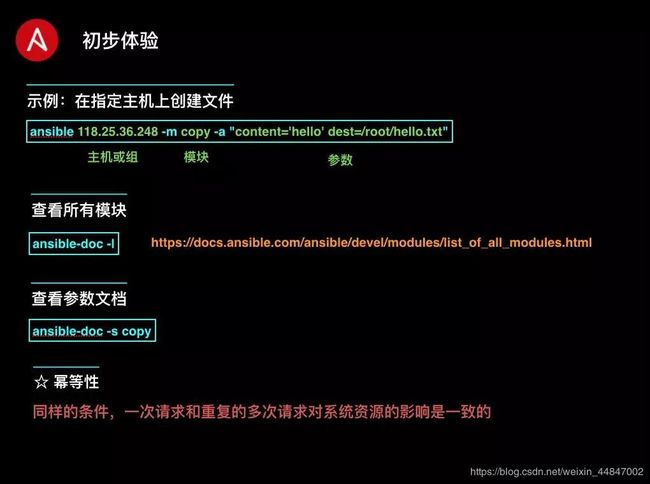
ansible [-i 主机清单文件] [-f 批次] [组名] [-m 模块名称] [-a 模块参数]
 -v,–verbose   					###详细模式,如果命令执行成功,输出详细的结果 (-vv –vvv -vvvv)
 -i PATH, -inventory=PATH       ###指定 host 文件的路径,默认是在 /etc/ansible/hosts
									inventory  [ˈɪnvəntri]  库存
 -f NUM,-forks=NUM     			###NUM 是指定一个整数,默认是 5 ,指定 fork 开启同步进程的个数。
 -m NAME,-module-name=NAME    	###指定使用的 module 名称,默认使用 command模块
 -a,MODULE_ARGS   				###指定 module 模块的参数
 -k,-ask-pass           		###提示输入 ssh 的密码,而不是使用基于 ssh 的密钥认证
 -sudo         					###指定使用 sudo 获得 root 权限
 -K,-ask-sudo-pass              ###提示输入 sudo 密码,与 -sudo 一起使用
 -u USERNAME,-user=USERNAME     ###指定移动端的执行用户
 -C,–check             			###测试此命令执行会改变什么内容,不会真正的去执行
自定义主机清单
ansible基于ssh连接-i (inventory)参数后指定的远程主机时,也可以写端口,用户,密码。
格式:ansible_ssh_port:指定ssh端口
ansible_ssh_user:指定 ssh 用户
ansible_ssh_pass:指定 ssh 用户登录是认证密码(明文密码不安全)
ansible_sudo_pass:指明 sudo 时候的密码
(指定主机)在最后添加
[17:18:24 root@ansible-server100 ansible]#vi /etc/ansible/hosts
## db-[99:101]-node.example.com

[web-server]		##名字可任意写,但要记住喽
192.168.0.101 ansible_ssh_port=22 ansible_ssh_user=root  ansible_ssh_pass=password
测试两台的连通性:
报错
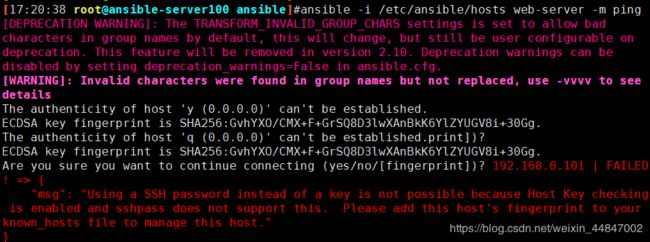
手动连接一下/etc/ansible/hosts主机清单中的主机,这样就可以在ansible服务器上保存目标主机的fingerprint指纹。后期可以正常连接了。

测试:
[17:26:27 root@ansible-server100 ansible]#ansible -i hosts web-server -m ping

4、基于ssh密钥来访问定义主机清单
在Ansible服务端生成密钥,并且复制公钥到节点中。
[17:29:24 root@ansible-server100 ~]#ssh-keygen	#一路回车
[17:29:33 root@ansible-server100 ~]#ssh-copy-id [email protected]
####################复制到本身
/usr/bin/ssh-copy-id: INFO: Source of key(s) to be installed: "/root/.ssh/id_rsa.pub"
The authenticity of host '192.168.0.100 (192.168.0.100)' can't be established.
ECDSA key fingerprint is SHA256:GvhYXO/CMX+F+GrSQ8D3lwXAnBkK6YlZYUGV8i+30Gg.
Are you sure you want to continue connecting (yes/no/[fingerprint])? yes
/usr/bin/ssh-copy-id: INFO: attempting to log in with the new key(s), to filter out any that are already installed
/usr/bin/ssh-copy-id: INFO: 1 key(s) remain to be installed -- if you are prompted now it is to install the new keys
[email protected]'s password:

Number of key(s) added: 1

Now try logging into the machine, with:   "ssh '[email protected]'"
and check to make sure that only the key(s) you wanted were added.

[17:30:01 root@ansible-server100 ~]#ssh-copy-id [email protected]
#################复制到主机
/usr/bin/ssh-copy-id: INFO: Source of key(s) to be installed: "/root/.ssh/id_rsa.pub"
/usr/bin/ssh-copy-id: INFO: attempting to log in with the new key(s), to filter out any that are already installed
/usr/bin/ssh-copy-id: INFO: 1 key(s) remain to be installed -- if you are prompted now it is to install the new keys
root@192.168.0.101's password:

Number of key(s) added: 1

Now try logging into the machine, with:   "ssh 'root@192.168.0.101'"
and check to make sure that only the key(s) you wanted were added.

[17:30:09 root@ansible-server100 ~]#ssh 192.168.0.101
##############实现无密码登录
Last login: Sat Jun  6 17:26:36 2020 from 192.168.0.100
[17:30:23 root@ansible-cliebt101 ~]#
修改hosts文件
注释掉,修改成如下,若有多台也可依次写
[17:33:35 root@ansible-server100 ~]#vim /etc/ansible/hosts
## db-[99:101]-node.example.com

[web-server]
#192.168.0.101 ansible_ssh_port=22 ansible_ssh_user=root  ansible_ssh_pass=password
192.168.0.100
192.168.0.101
测试,配置成功
[17:35:10 root@ansible-server100 ~]#ansible -i /etc/ansible/hosts web-server -m ping
[DEPRECATION WARNING]: The TRANSFORM_INVALID_GROUP_CHARS settings is set to allow bad
characters in group names by default, this will change, but still be user configurable on
deprecation. This feature will be removed in version 2.10. Deprecation warnings can be
disabled by setting deprecation_warnings=False in ansible.cfg.
[WARNING]: Invalid characters were found in group names but not replaced, use -vvvv to see
details
192.168.0.101 | SUCCESS => {
    "ansible_facts": {
        "discovered_interpreter_python": "/usr/bin/python"
    },
    "changed": false,
    "ping": "pong"
}
192.168.0.100 | SUCCESS => {
    "ansible_facts": {
        "discovered_interpreter_python": "/usr/libexec/platform-python"
    },
    "changed": false,
    "ping": "pong"
}
二、Ansible常见模块高级使用方法
ansible常用模块
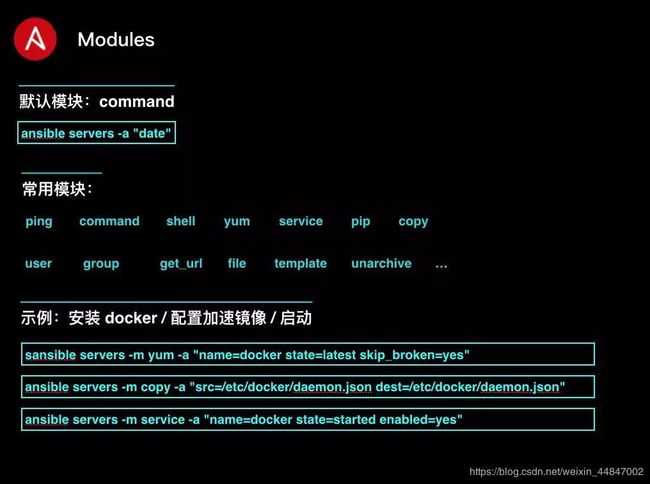
1、command模块(为ansible默认模块)
不指定-m参数时,使用的就是command模块; comand模块比较简单,常见的命令都可以使用,但其命令的执行不是通过shell执行的,所以,像这些 “<”, “>”, “|”, and "&"操作都不可以,当然,也就不支持管道; 缺点:不支持管道,没法批量执行命令
例:[17:37:14 root@ansible-server100 ~]#ansible -m command -a "touch /tmp/abc.txt" web-server
192.168.0.101 | CHANGED | rc=0 >>
192.168.0.100 | CHANGED | rc=0 >>

[16:56:19 root@ansible-cliebt101 ~]#ll /tmp/
总用量 1224
-rw-r--r-- 1 root root      0 6月   6 17:51 abc.txt
2、shell模块
使用shell模块,在远程命令通过/bin/sh来执行;所以,我们在终端输入的各种命令方式,都可以使用。
例:[17:51:59 root@ansible-server100 ~]#ansible -i /etc/ansible/hosts  web-server -m shell -a "free -m"
192.168.0.101 | CHANGED | rc=0 >>
              total        used        free      shared  buff/cache   available
Mem:           3773         873        1128          15        1771        2579
Swap:          3968           0        3968
192.168.0.100 | CHANGED | rc=0 >>
              total        used        free      shared  buff/cache   available
Mem:           3757        1425        1305          17        1026        2055
Swap:          4045           0        4045
3、scripts模块
使用scripts模块可以在本地写一个脚本,在远程服务器上执行。
例:[17:56:33 root@ansible-server100 ~]#ansible -i /etc/ansible/hosts  web-server -m script -a "/data/for_9x9.sh"
##两台同时运行9x9.sh脚本
4、copy模块
实现主控端向目标主机拷贝文件,类似scp功能。
例:[17:56:38 root@ansible-server100 ~]#ansible -i /etc/ansible/hosts web-server -m copy -a "src=/etc/hosts dest=/tmp/ owner=root group=root mode=0755"
##拷贝同时可附加用户及组
5、file模块
设置文件属性。
例:[17:58:26 root@ansible-server100 ~]#ansible -i /etc/ansible/hosts web-server -m file -a "path=/tmp/hosts mode=0777"
##为/tmp/hosts文件设置属性
6、stat模块
获取远程文件信息。
例:[18:00:21 root@ansible-server100 ~]#ansible -i /etc/ansible/hosts web-server -m stat -a "path=/tmp/hosts"
7、get_url模块
实现远程主机下载指定url到本地,支持sha256sum文件校验。
例:[18:01:51 root@ansible-server100 ~]#ansible -i /etc/ansible/hosts web-server -m get_url -a "url=https://dl.fedoraproject.org/pub/epel/epel-release-latest-7.noarch.rpm  dest=/tmp/ mode=0440 force=yes"
##下载epel-release-latest-7.noarch.rpm到主机清单中的/tmp/目录下
8、yum模块
linux平台软件包管理。
yum模块可以提供的status状态: latest ,present,installed
这3个代表安装;removed, absent 是卸载
例:[18:06:31 root@ansible-server100 ~]#ansible -i /etc/ansible/hosts web-server -m yum -a "name=wget  state=latest"
##在两台上安装wget软件
9、user模块
远程主机用户管理。
例:[18:09:24 root@ansible-server100 ~]#ansible -i /etc/ansible/hosts web-server -m user -a "name=jiang state=present"
##在两台上创建jiang用户
10、sysctl模块
远程主机sysctl配置。
例:[18:10:05 root@ansible-server100 ~]#ansible -i /etc/ansible/hosts web-server -m sysctl -a "name=net.ipv4.ip_forward value=1 reload=yes"
##两台开启路由转发功能
三、使用Playbook批量部署LAMP环境
1、先在服务端安装好lamp,以备拷贝文件到主机上
安装httpd
[18:11:41 root@ansible-server100 ~]#yum -y install httpd
安装mariadb
[18:26:54 root@ansible-server100 ~]#dnf -y install mariadb mariadb-server
[18:27:23 root@ansible-server100 ~]# chown -R mysql:mysql /var/lib/mysql/
[18:27:35 root@ansible-server100 ~]#systemctl start mariadb
安装PHP和php-mysql
[18:30:39 root@ansible-server100 ~]#dnf -y install php php-mysqlnd
[18:30:56 root@ansible-server100 ~]#echo "" > /var/www/html/index.php
[20:02:35 root@ansible-server100 ~]# mkdir -pv /etc/ansible/lamp/roles/{prepare,httpd,mysql,php}/{tasks,files,templates,vars,meta,default,handlers}
[20:06:19 root@ansible-server100 ansible]#ls
ansible.cfg  hosts  lamp  roles
将上面搭建成功的LAMP环境的httpd和MySQL的配置文件拷贝到对应目录下
[20:06:20 root@ansible-server100 ansible]#cp /etc/httpd/conf/httpd.conf lamp/roles/httpd/files/
[20:07:07 root@ansible-server100 ansible]#cp /etc/my.cnf lamp/roles/mysql/files/
关闭防火墙
3、构建httpd的任务(注意格式)
[20:07:20 root@ansible-server100 ansible]#cd /etc/ansible/lamp/roles/
[20:08:48 root@ansible-server100 roles]#mv /var/www/html/index.php httpd/files/
[20:09:02 root@ansible-server100 roles]#vi httpd/tasks/main.yml

####vi httpd/tasks/main.yml
- name: 安装web server
  yum: name=httpd state=present
#安装httpd服务
- name: provide test page
#提供测试页
  copy: src=index.php dest=/var/www/html
#提供测试页,会去默认目录找index.php
- name: 删除 apache config
  shell: rm -rf  /etc/httpd/conf/httpd.conf
#删除原有的apache配置文件,如果不删除,下面的copy任务是不会执行的,因为当源文件httpd.conf和目标文件一样时,copy命令是不执行的。如果copy命令不执行,那么notify将不调用handler。
- name: provide configuration file
  copy: src=httpd.conf dest=/etc/httpd/conf/httpd.conf
#提供httpd的配置文件
  notify: restart httpd
4、构建httpd的handlers
[20:11:32 root@ansible-server100 roles]#vi httpd/handlers/main.yml

####vi httpd/handlers/main.yml
- name: 重启 httpd
  service: name=httpd enabled=yes state=restarted
5、部署mariadb数据库
需要安装MySQL服务,改变属主信息,启动
  [20:18:48 root@ansible-server100 roles]#vi mysql/tasks/main.yml

####vi mysql/tasks/main.yml
- name: 安装 mysql
  yum: name=mariadb-server state=present
#安装mysql服务
- name: provide configration file
  copy: src=my.cnf dest=/etc/my.cnf
#提供mysql的配置文件
- name: chage the owner
  shell: chown -R mysql:mysql /var/lib/mysql
#更改属主和属组(可以自定义挂载点目录)
- name: 启动 mariadb
  service: name=mariadb enabled=yes state=started
#启动mysql服务
6、构建PHP的任务
[20:19:22 root@ansible-server100 roles]#vi php/tasks/main.yml

####vi php/tasks/main.yml
- name: 安装 php
  yum: name=php state=present
#安装php
- name: 安装 php-mysql*
    #由于服务端使用centos8,与客户端下载的mysql不一致
  yum: name=php-mysql* state=present
#安装php与mysql交互的插件
7、定义整个的任务
[20:21:53 root@ansible-server100 roles]#vi all.yml

####vi all.yml
- name: 构建 LAMP
  remote_user: root
  hosts: web-server
  roles:
    - prepare
    - mysql
    - php
    - httpd
####注意格式,所有yml的配置文件中,空格必须严格对齐
目录树:
[21:02:18 root@ansible-server100 roles]#tree
.
├── all.yml
├── httpd
│   ├── default
│   ├── files
│   │   ├── httpd.conf
│   │   └── index.php
│   ├── handlers
│   │   └── main.yml
│   ├── meta
│   ├── tasks
│   │   └── main.yml
│   ├── templates
│   └── vars
├── lnmp
├── mysql
│   ├── default
│   ├── files
│   │   └── my.cnf
│   ├── handlers
│   ├── meta
│   ├── tasks
│   │   └── main.yml
│   ├── templates
│   └── vars
├── php
│   ├── default
│   ├── files
│   ├── handlers
│   ├── meta
│   ├── tasks
│   │   └── main.yml
│   ├── templates
│   └── vars
├── prepare
│   ├── default
│   ├── files
│   ├── handlers
│   ├── meta
│   ├── tasks
│   ├── templates
│   └── vars
└── site.yml

33 directories, 9 files
开始构建(只要没有报红色就ok)
[20:51:55 root@ansible-server100 roles]# ansible-playbook -i /etc/ansible/hosts /etc/ansible/lamp/roles/all.yml
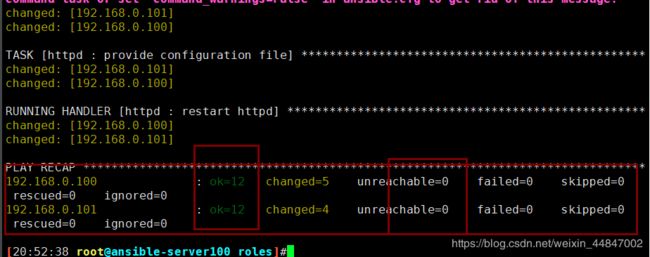
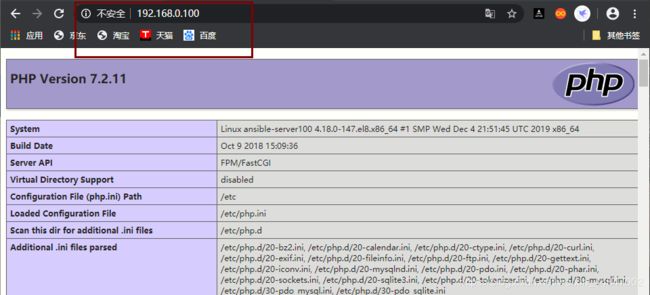
浏览器访问(由于系统不一致,php版本就不一致)
http://192.168.0.100
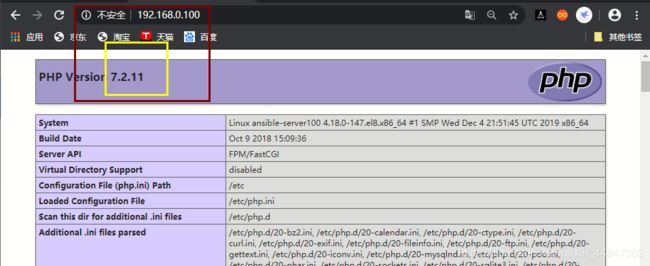
http://192.168.0.101
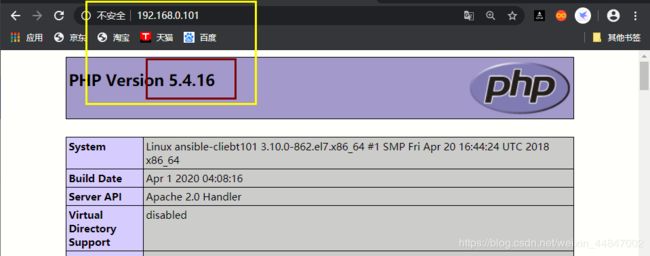
成功,若在构建过程中遇到什么问题,请留言哈,或者私聊哈
四、使用Playbook批量部署LNMP环境
1、创建相关目录及将相关源码包上传至相应目录
mysql下载地:MYSQL
php下载地:PHP
nginx下载地:NGINX
可使用其他版本
将下面的包上传至服务端各个files目录
源码包需要:
mysql-5.7.28-linux-glibc2.12-x86_64.tar.gz
nginx-1.17.9.tar.gz
libmcrypt-2.5.8.tar.bz2
php-7.4.4.tar.xz
另外,由于系统不一致,另需要单独安装软件,比如centos8安装oniguruma-devel和bison-devel,安装脚本也配置在其中。
推荐使用在线下载,我在这里直接上传所有源码包
[21:01:24 root@ansible-server100 ansible]#mkdir -p lnmp/roles/{alone_install7,alone_install8,mysql_install,nginx_install,php_install}/{files,handlers,meta,tasks,templates,vars}
[21:01:27 root@ansible-server100 ansible]#ls
ansible.cfg  hosts   lnmp  roles
[13:46:21 root@ansible-server100 ansible]#cd lnmp/
批量部署前修改文件/etc/ansible/hosts
[00:32:59 root@ansible-server100 ~]#vi /etc/ansible/hosts
添加centos8和centos7主机清单

目录树:
[00:08:44 root@ansible-server100 lnmp]#tree
.
├── alone_7.yml
├── alone_8.yml
├── lnmp.yml
├── mysql.yml
├── nginx.yml
├── php.yml
└── roles
    ├── alone_install7
    │   ├── files
    │   ├── handlers
    │   ├── meta
    │   ├── tasks
    │   │   ├── copy.yml
    │   │   ├── install.yml
    │   │   └── main.yml
    │   ├── templates
    │   │   └── alone_7.sh
    │   └── vars
    ├── alone_install8
    │   ├── files
    │   ├── handlers
    │   ├── meta
    │   ├── tasks
    │   │   ├── install.yml
    │   │   └── main.yml
    │   ├── templates
    │   │   └── alone_8.sh
    │   └── vars
    ├── mysql_install
    │   ├── files
    │   │   └── mysql-5.7.28-linux-glibc2.12-x86_64.tar.gz
    │   ├── handlers
    │   ├── meta
    │   ├── tasks
    │   │   ├── copy.yml
    │   │   ├── install.yml
    │   │   ├── main.yml
    │   │   └── prepare.yml
    │   ├── templates
    │   │   ├── my.cnf
    │   │   ├── mysqld.service
    │   │   └── password.sh
    │   └── vars
    │       └── main.yml
    ├── nginx_install
    │   ├── files
    │   │   └── nginx-1.17.9.tar.gz
    │   ├── handlers
    │   ├── meta
    │   ├── tasks
    │   │   ├── copy.yml
    │   │   ├── install.yml
    │   │   └── main.yml
    │   ├── templates
    │   │   ├── fastcgi_params
    │   │   ├── nginx.conf
    │   │   ├── nginx.service
    │   │   └── server.conf
    │   └── vars
    │       └── main.yml
    └── php_install
        ├── files
        │   ├── libmcrypt-2.5.8.tar.bz2
        │   └── php-7.4.4.tar.xz
        ├── handlers
        ├── meta
        ├── tasks
        │   ├── copy.yml
        │   ├── install.yml
        │   └── main.yml
        ├── templates
        │   └── php-fpm.conf
        └── vars
            └── main.yml

36 directories, 38 files
为CentOS8单独安装软件,解决依赖
编写alone_8.yml文件,调用alone_install8
[00:18:02 root@ansible-server100 lnmp]#cat alone_8.yml
- hosts: centos8
  remote_user: root
  gather_facts: True

  roles:
    - alone_install8
创建安装依赖脚本
[00:21:09 root@ansible-server100 lnmp]#cat roles/alone_install8/templates/alone_8.sh
#!/bin/bash
####centos8安装其他依赖
###安装oniguruma-devel
cd /tmp
wget http://mirror.centos.org/centos/8/PowerTools/x86_64/os/Packages/oniguruma-devel-6.8.2-1.el8.x86_64.rpm
rpm -ivh oniguruma-devel-6.8.2-1.el8.x86_64.rpm
###安装bison-devel
dnf --enablerepo=PowerTools install bison-devel -y
执行脚本文件
[00:20:39 root@ansible-server100 lnmp]#cat roles/alone_install8/tasks/install.yml
- name: centos8安装依赖
  shell: "bash /etc/ansible/lnmp/roles/alone_install8/templates/alone_8.sh"
引用文件
[00:19:30 root@ansible-server100 lnmp]#cat roles/alone_install8/tasks/main.yml
- include: install.yml
为CentOS7单独安装软件,解决依赖
编写alone_7.yml文件,调用alone_install7
[00:13:36 root@ansible-server100 lnmp]#cat alone_7.yml
- hosts: centos7
  remote_user: root
  gather_facts: True

  roles:
    - alone_install7
引用文件
[00:08:48 root@ansible-server100 lnmp]#vi roles/alone_install7/tasks/main.yml
- include: copy.yml
- include: install.yml
创建安装依赖脚本
[00:13:45 root@ansible-server100 lnmp]#vi roles/alone_install7/templates/alone_7.sh
#!/bin/bash
####centos7安装其他依赖工具
yum -y install oniguruma-devel bison-devel
执行脚本文件
[00:14:52 root@ansible-server100 lnmp]#cvi roles/alone_install7/tasks/install.yml
- name: 安装centos7依赖
  shell: "bash /tmp/alone_7.sh"
创建copy.yml文件
[00:15:59 root@ansible-server100 lnmp]#vi roles/alone_install7/tasks/copy.yml
- name: 拷贝alone_7.sh到主机
  copy: src=/etc/ansible/lnmp/roles/alone_install7/templates/alone_7.sh dest=/tmp/ owner=root group=root mode=0755
2、MySQL部署
编写mysql文件,调用mysql_install
[13:39:20 root@ansible-server100 lnmp]#vi mysql.yml
- hosts: web-server
  remote_user: root
  gather_facts: True

  roles:
    - mysql_install
创建mysql变量
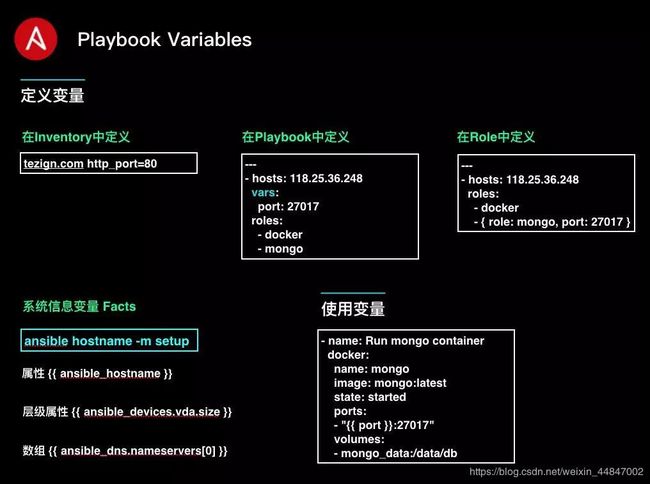
[13:47:31 root@ansible-server100 lnmp]#vi roles/mysql_install/vars/main.yml
MYSQL_VER: 5.7.28
MYSQL_VER_MAIN: "{{ MYSQL_VER.split('.')[0] }}.{{ MYSQL_VER.split('.')[1] }}"

DOWNLOAD_URL: https://mirrors.tuna.tsinghua.edu.cn/mysql/downloads/MySQL-{{ MYSQL_VER_MAIN }}/mysql-{{ MYSQL_VER }}-linux-glibc2.12-x86_64.tar.gz
MYSQL_USER: mysql
MYSQL_PORT: 3306
MYSQL_PASSWD: 123456
SOURCE_DIR: /software
BASE_DIR: /usr/local/mysql
DATA_DIR: /data/mysql
创建模板配置文件
[13:49:48 root@ansible-server100 lnmp]#vi roles/mysql_install/templates/my.cnf
[client]
port    = {{ MYSQL_PORT }}
socket = {{ BASE_DIR }}/tmp/mysql.sock

[mysql]
default-character-set=utf8

[mysqld]
default-storage-engine=INNODB
character_set_server=utf8
explicit_defaults_for_timestamp
basedir={{ BASE_DIR }}
datadir={{ DATA_DIR }}
socket={{ BASE_DIR }}/tmp/mysql.sock
log_error = {{ BASE_DIR }}/log/error.log

sql_mode=STRICT_TRANS_TABLES,NO_ZERO_IN_DATE,NO_ZERO_DATE,ERROR_FOR_DIVISION_BY_ZERO,NO_AUTO_CREATE_USER,NO_ENGINE_SUBSTITUTION
创建mysql服务文件
[13:51:48 root@ansible-server100 lnmp]#vi roles/mysql_install/templates/mysqld.service
[Unit]
Description=MySQL Server
After=network.target
After=syslog.target

[Install]
WantedBy=multi-user.target

[Service]
User=mysql
Group=mysql
ExecStart={{ BASE_DIR }}/bin/mysqld --defaults-file=/etc/my.cnf

#连接数限制
LimitNOFILE=65535
LimitNPROC=65535

PrivateTmp=false
创建更改数据库root密码脚本
[13:54:19 root@ansible-server100 lnmp]#vi roles/mysql_install/templates/password.sh
#!/bin/bash
#
#*****************************************************************
#Author:                        wangzhike
#QQ:                            2358468640
#Date:                          2020-06-07
#FileName:                      roles/mysql_install/templates/password.sh
#Copyright(C):                  2020 All rights reserved
#*****************************************************************
passwd={{ MYSQL_PASSWD }}
n=`grep "{{ BASE_DIR }}/bin" /etc/profile |wc -l`

if [ $n -eq 0 ]
then
        echo "export PATH=$PATH:{{ BASE_DIR }}/bin" >> /etc/profile
        source /etc/profile
else
        source /etc/profile
fi

{{ BASE_DIR }}/bin/mysql -uroot -D mysql -e "UPDATE user SET authentication_string=PASSWORD("$passwd") WHERE user='root';"

{{ BASE_DIR }}/bin/mysql -uroot -e "FLUSH PRIVILEGES;"

{{ BASE_DIR }}/bin/mysql -uroot -p$passwd -e "grant all privileges on *.* to root@'%'  identified by '$passwd';"
环境准备prepare.yml文件
[13:57:00 root@ansible-server100 lnmp]#vi roles/mysql_install/tasks/prepare.yml
- name: 关闭firewalld
  service: name=firewalld state=stopped enabled=no

- name: 永久关闭 selinux
  lineinfile:
    dest: /etc/selinux/config
    regexp: "^SELINUX="
    line: "SELINUX=disabled"

- name: 添加EPEL仓库
  yum: name=epel-release state=latest

- name: 安装常用软件包
  yum:
    name:
      - vim
      - lrzsz
      - net-tools
      - wget
      - curl
      - curl-devel
      - bash-completion
      - rsync
      - gcc
      - gcc-c++
      - unzip
      - git
      - perl-Data-Dumper
      - libaio-devel
      - autoconf
      - automake
      - cmake
      - openssl
      - openssl-devel
      - pcre
      - pcre-devel
      - zlib
      - zlib-devel
      - gd-devel
      - libxml2
      - libxml2-devel
      - libjpeg
      - libjpeg-devel
      - libpng
      - libpng-devel
      - freetype
      - freetype-devel
      - libxslt
      - libxslt-devel
      - bzip2
      - bzip2-devel
      - sqlite-devel
      - oniguruma
      - gnutls-devel
      - ncurses-devel
      - bison
      - openldap
      - openldap-devel
      - libcurl-devel
      - libevent
      - libevent-devel
      - expat-devel
      - numactl
      - libicu-devel
      - gettext-devel
      - autoconf
      - perl-ExtUtils-CBuilder
      - perl-ExtUtils-MakeMaker
      - libtool
    state: latest
编写文件拷贝copy.yml
[14:01:22 root@ansible-server100 lnmp]#vi roles/mysql_install/tasks/copy.yml
- name: 创建mysql用户组
  group: name={{ MYSQL_USER }}  state=present

- name: 创建mysql用户
  user: name={{ MYSQL_USER }}  group={{ MYSQL_USER }}  state=present create_home=False shell=/sbin/nologin

- name: 创建所需目录
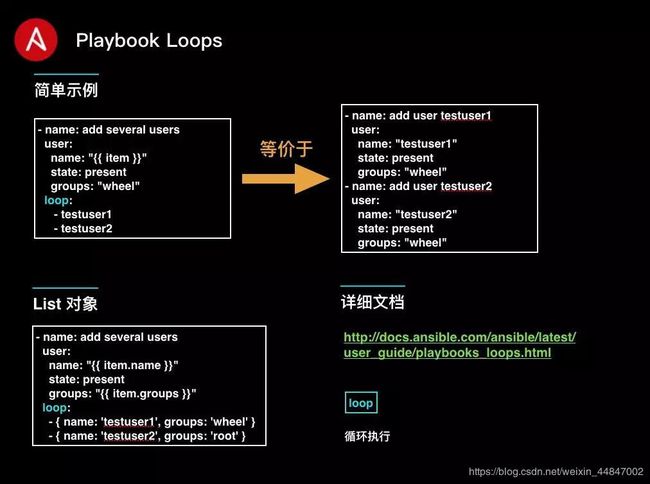
  file: name={{ item }} state=directory mode=0755 recurse=yes
  with_items:
  - "{{ SOURCE_DIR }}"
  - "{{ DATA_DIR }}"

- name: 更改目录属主属组
  file: name={{ DATA_DIR }} owner={{ MYSQL_USER }} group={{ MYSQL_USER }}

- name: 拷贝现有mysql包到所有主机
  copy: src=mysql-{{ MYSQL_VER }}-linux-glibc2.12-x86_64.tar.gz dest={{ SOURCE_DIR }} owner={{ MYSQL_USER }} group={{ MYSQL_USER }}

- name: 解压mysql包
  unarchive: src={{ SOURCE_DIR }}/mysql-{{ MYSQL_VER }}-linux-glibc2.12-x86_64.tar.gz dest=/usr/local owner={{ MYSQL_USER }} group={{ MYSQL_USER }}

- name: 目录重命名
  shell: "mv /usr/local/mysql-{{ MYSQL_VER }}-linux-glibc2.12-x86_64 {{ BASE_DIR }} && chown -R {{ MYSQL_USER }}:{{ MYSQL_USER }} {{ BASE_DIR }}"

- name: 拷贝mysql配置文件
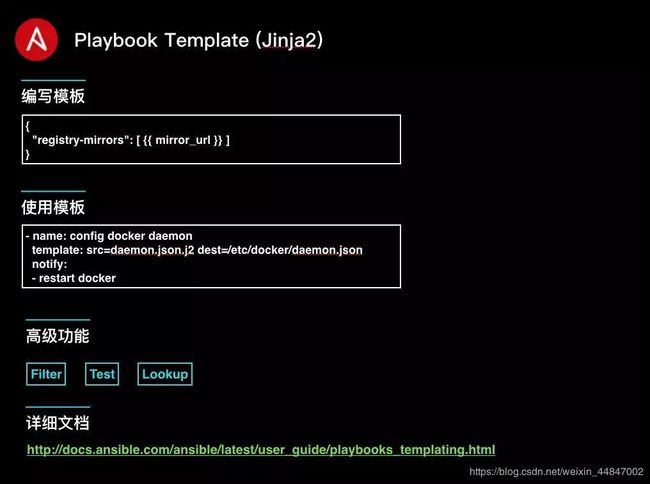
  template: src=my.cnf dest=/etc/my.cnf owner=root group=root

- name: 拷贝mysql服务文件
  template: src=mysqld.service dest=/usr/lib/systemd/system/mysqld.service owner=root group=root

- name: 拷贝更改密码脚本
  template: src=password.sh dest={{ SOURCE_DIR }} owner=root group=root

- name: 创建日志目录
  file: name={{ item }} state=directory owner={{ MYSQL_USER }} group={{ MYSQL_USER }} mode=0755 recurse=yes
  with_items:
  - "/var/log/mysql"
  - "/var/run/mysqld"
  - "{{ BASE_DIR }}/tmp"
  - "{{ BASE_DIR }}/log"

- name: 创建错误日志文件
  file: dest={{ BASE_DIR }}/log/error.log state=touch owner={{ MYSQL_USER }} group={{ MYSQL_USER }}
编写mysql初始化install.yml文件
[14:07:39 root@ansible-server100 lnmp]#vi roles/mysql_install/tasks/install.yml
- name: mysql初始化
  shell: "{{ BASE_DIR }}/bin/mysqld --initialize-insecure --user={{ MYSQL_USER }} --basedir={{ BASE_DIR }}  --datadir={{ DATA_DIR }}"

- name: 拷贝启动脚本到/etc下
  copy: src={{ BASE_DIR }}/support-files/mysql.server dest=/etc/init.d/mysql

- name: 修改启动脚本_1
  lineinfile:
    dest: /etc/init.d/mysql
    regexp: "^basedir="
    insertbefore: "^# Default value, in seconds, afterwhich the script should timeout waiting"
    line: "basedir={{ BASE_DIR }}"

- name: 修改启动脚本_2
  lineinfile:
    dest: /etc/init.d/mysql
    regexp: "^datadir="
    insertbefore: "^# Default value, in seconds, afterwhich the script should timeout waiting"
    line: "datadir={{ DATA_DIR }}"

- name: 修改启动脚本_3
  file: dest=/etc/init.d/mysql state=file mode=0755

- name: 配置环境变量
  shell: " if [ `grep {{ BASE_DIR }}/bin /etc/profile |wc -l` -eq 0 ]; then echo export PATH=$PATH:{{ BASE_DIR }}/bin >> /etc/profile && source /etc/profile; else source /etc/profile; fi"

- name: 启动mysql并开机启动
  shell: "service mysql start"

- name: 设置数据库root密码
  shell: "bash {{ SOURCE_DIR }}/password.sh"
mysql引用文件main.yml
[14:11:01 root@ansible-server100 lnmp]#vi roles/mysql_install/tasks/main.yml
- include: prepare.yml
- include: copy.yml
- include: install.yml
3、NGINX部署
编写nginx文件,调用nginx_install
[14:35:48 root@ansible-server100 lnmp]#vi nginx.yml
- hosts: web-server
  remote_user: root
  gather_facts: True

  roles:
    - nginx_install
创建变量
[14:37:41 root@ansible-server100 lnmp]#vi roles/nginx_install/vars/main.yml
NGINX_VER: 1.17.9
DOWNLOAD_URL: http://nginx.org/download/nginx-{{ NGINX_VER }}.tar.gz
NGINX_USER: nginx
NGINX_PORT: 80
SOURCE_DIR: /software
NGINX_DIR: /usr/local/nginx
DATA_DIR: /data/nginx
编写nginx主配置文件nginx.conf
[14:39:26 root@ansible-server100 lnmp]#vi roles/nginx_install/templates/nginx.conf
user nobody nobody;
worker_processes  1;
error_log {{ DATA_DIR }}/log/error.log crit;
pid /run/nginx.pid;
worker_rlimit_nofile 51200;
events {
    worker_connections  1024;
}
http {
    include       mime.types;
    log_format  main  '$remote_addr - $remote_user [$time_local] "\$request" '
                      '$status $body_bytes_sent "$http_referer" '
                      '"$http_user_agent" "$http_x_forwarded_for"';

    access_log  {{ DATA_DIR }}/log/access.log  main;

    server_tokens       off;
    sendfile        	on;
    send_timeout        3m;
    tcp_nopush          on;
    tcp_nodelay         on;
    keepalive_timeout   65;
    types_hash_max_size 2048;

    client_header_timeout 3m;
    client_body_timeout 3m;
    connection_pool_size 256;
    client_header_buffer_size 1k;
    large_client_header_buffers 8 4k;
    request_pool_size 4k;
    output_buffers 4 32k;
    postpone_output 1460;
    client_max_body_size 10m;
    client_body_buffer_size 256k;
    client_body_temp_path {{ NGINX_DIR }}/client_body_temp;
    proxy_temp_path {{ NGINX_DIR }}/proxy_temp;
    fastcgi_temp_path {{ NGINX_DIR }}/fastcgi_temp;
    fastcgi_intercept_errors on;

    gzip on;
    gzip_min_length 1k;
    gzip_buffers 4 8k;
    gzip_comp_level 5;
    gzip_http_version 1.1;
    gzip_types text/plain application/x-javascript text/css text/htm
    application/xml;

    default_type  application/octet-stream;
    include  {{ NGINX_DIR }}/conf/vhost/*.conf;
}
编写nginx服务文件nginx.service
[14:41:12 root@ansible-server100 lnmp]#vi roles/nginx_install/templates/nginx.service
[Unit]
Description=The nginx HTTP and reverse proxy server
After=network.target remote-fs.target nss-lookup.target

[Service]
Type=forking
PIDFile=/run/nginx.pid
ExecStartPre=/usr/bin/rm -f /run/nginx.pid
ExecStartPre={{ NGINX_DIR }}/sbin/nginx -t
ExecStart={{ NGINX_DIR }}/sbin/nginx
ExecReload=/bin/kill -s HUP $MAINPID
KillSignal=SIGQUIT
TimeoutStopSec=5
KillMode=process
PrivateTmp=true

[Install]
WantedBy=multi-user.target
nginx vhost配置文件server.conf
[14:44:49 root@ansible-server100 lnmp]#vi roles/nginx_install/templates/server.conf
server {
    listen       80;
    server_name  localhost;
    location / {
        root   {{ NGINX_DIR }}/html;
        index  index.php index.html index.htm;
    }

    error_page   500 502 503 504  /50x.html;
        location = /50x.html {
            root   html;
        }

    location ~ \.php$ {
    root   {{ NGINX_DIR }}/html;
    fastcgi_pass   127.0.0.1:9000;
    fastcgi_index  index.php;
    fastcgi_param  SCRIPT_FILENAME  $document_root$fastcgi_script_name;
    include        fastcgi_params;
    }
}
文件拷贝copy.yml
[14:46:38 root@ansible-server100 lnmp]#vi roles/nginx_install/tasks/copy.yml
- name: 创建nginx用户组
  group: name={{ NGINX_USER }}  state=present

- name: 创建nginx用户
  user: name={{ NGINX_USER }}  group={{ NGINX_USER }}  state=present create_home=False shell=/sbin/nologin

- name: 创建日志目录
  file: name={{ item }} state=directory owner={{ NGINX_USER }} group={{ NGINX_USER }} mode=0755 recurse=yes
  with_items:
  - "{{ DATA_DIR }}"
  - "{{ DATA_DIR }}/log"

- name: 创建日志文件
  file: name={{ item }} state=touch owner={{ NGINX_USER }} group={{ NGINX_USER }} mode=0644
  with_items:
  - "{{ DATA_DIR }}/log/access.log"
  - "{{ DATA_DIR }}/log/error.log"

#- name: 下载nginx包
#  get_url: url={{ DOWNLOAD_URL }} dest={{ SOURCE_DIR }} owner={{ NGINX_USER }} group={{ NGINX_USER }}

- name: 拷贝现有nginx包到所有主机
  copy: src=nginx-{{ NGINX_VER }}.tar.gz dest={{ SOURCE_DIR }} owner={{ NGINX_USER }} group={{ NGINX_USER }}

- name: 解压nginx包
  unarchive: src={{ SOURCE_DIR }}/nginx-{{ NGINX_VER }}.tar.gz dest={{ SOURCE_DIR }} owner={{ NGINX_USER }} group={{ NGINX_USER }}

- name: 拷贝nginx服务文件
  template: src=nginx.service dest=/usr/lib/systemd/system/nginx.service owner=root group=root
nginx额外配置文件fastcgi_params
[15:42:11 root@ansible-server100 lnmp]#vi roles/nginx_install/templates/fastcgi_params
fastcgi_param  GATEWAY_INTERFACE  CGI/1.1;
fastcgi_param  SERVER_SOFTWARE    nginx;
fastcgi_param  QUERY_STRING       $query_string;
fastcgi_param  REQUEST_METHOD     $request_method;
fastcgi_param  CONTENT_TYPE       $content_type;
fastcgi_param  CONTENT_LENGTH     $content_length;
fastcgi_param  SCRIPT_FILENAME    $document_root$fastcgi_script_name;
fastcgi_param  SCRIPT_NAME        $fastcgi_script_name;
fastcgi_param  REQUEST_URI        $request_uri;
fastcgi_param  DOCUMENT_URI       $document_uri;
fastcgi_param  DOCUMENT_ROOT      $document_root;
fastcgi_param  SERVER_PROTOCOL    $server_protocol;
fastcgi_param  REMOTE_ADDR        $remote_addr;
fastcgi_param  REMOTE_PORT        $remote_port;
fastcgi_param  SERVER_ADDR        $server_addr;
fastcgi_param  SERVER_PORT        $server_port;
fastcgi_param  SERVER_NAME        $server_name;
编写安装nginx文件
[14:49:13 root@ansible-server100 lnmp]#vi roles/nginx_install/tasks/install.yml
- name: 编译nginx
  shell: "cd {{ SOURCE_DIR }}/nginx-{{ NGINX_VER }} && ./configure --prefix={{ NGINX_DIR }} --user={{ NGINX_USER }} --group={{ NGINX_USER }} --http-log-path={{ DATA_DIR }}/log/access.log --error-log-path={{ DATA_DIR }}/log/error.log --with-http_ssl_module --with-http_v2_module --with-http_realip_module --with-http_flv_module --with-http_mp4_module --with-http_gunzip_module --with-http_gzip_static_module --with-http_image_filter_module --with-http_stub_status_module"

- name: 安装nginx
  shell: "cd {{ SOURCE_DIR }}/nginx-{{ NGINX_VER }} && make && make install"

- name: 拷贝nginx主配置文件
  template: src=nginx.conf dest={{ NGINX_DIR }}/conf/nginx.conf owner={{ NGINX_USER }} group={{ NGINX_USER }}

- name: 创建vhost配置文件目录
  file: name={{ NGINX_DIR }}/conf/vhost state=directory owner={{ NGINX_USER }} group={{ NGINX_USER }} mode=0755 recurse=yes

- name: 拷贝nginx vhost配置文件
  template: src=server.conf dest={{ NGINX_DIR }}/conf/vhost/server.conf owner={{ NGINX_USER }} group={{ NGINX_USER }} mode=0644

- name: 拷贝nginx额外配置文件
  template: src=fastcgi_params dest={{ NGINX_DIR }}/conf/fastcgi_params owner={{ NGINX_USER }} group={{ NGINX_USER }} mode=0644

- name: 配置环境变量
  shell: " if [ `grep {{ NGINX_DIR }}/sbin /etc/profile |wc -l` -eq 0 ]; then echo export PATH=$PATH:{{ NGINX_DIR }}/sbin >> /etc/profile && source /etc/profile; else source /etc/profile; fi"

- name: 启动nginx并开机启动
  shell: "systemctl daemon-reload && systemctl enable nginx && systemctl start nginx"

- name: 添加php测试页index.php
  shell: " echo '' >> {{ NGINX_DIR }}/html/index.php"
引用文件main.yml
[14:52:52 root@ansible-server100 lnmp]#vi roles/nginx_install/tasks/main.yml
- include: copy.yml
- include: install.yml
4、PHP部署
编写php文件,调用php_install
[14:13:34 root@ansible-server100 lnmp]#vi php.yml
- hosts: web-server
  remote_user: root
  gather_facts: True

  roles:
    - php_install
创建变量
[14:16:20 root@ansible-server100 lnmp]#vi roles/php_install/vars/main.yml
PHP_VER: 7.4.4
DOWNLOAD_URL: http://mirrors.sohu.com/php/php-{{ PHP_VER }}.tar.xz
PHP_USER: php-fpm
PHP_PORT: 9000
SOURCE_DIR: /software
PHP_DIR: /usr/local/php
MYSQL_DIR: /usr/local/mysql
编写php主配置文件php-fpm.conf
[14:18:23 root@ansible-server100 lnmp]#vi roles/php_install/templates/php-fpm.conf
[global]
pid = {{ PHP_DIR }}/var/run/php-fpm.pid
error_log = {{ PHP_DIR }}/var/log/php-fpm.log
[www]
listen = 127.0.0.1:{{ PHP_PORT }}
listen.mode = 666
listen.owner = nobody
listen.group = nobody
user = {{ PHP_USER }}
group = {{ PHP_USER }}
pm = dynamic
pm.max_children = 50
pm.start_servers = 20
pm.min_spare_servers = 5
pm.max_spare_servers = 35
pm.max_requests = 500
rlimit_files = 1024
编写文件拷贝copy.yml
[14:23:12 root@ansible-server100 lnmp]#vi roles/php_install/tasks/copy.yml
- name: 创建php用户组
  group: name={{ PHP_USER }}  state=present

- name: 创建php用户
  user: name={{ PHP_USER }}  group={{ PHP_USER }}  state=present create_home=False shell=/sbin/nologin

- name: 创建software目录
  file: name={{ SOURCE_DIR }} state=directory mode=0755 recurse=yes

#- name: 下载依赖包libmcrypt
#  get_url: url=http://nchc.dl.sourceforge.net/project/mcrypt/Libmcrypt/2.5.8/libmcrypt-2.5.8.tar.bz2 dest={{ SOURCE_DIR }}

- name: 拷贝现有libmcrypt依赖包到所有主机
  copy: src=libmcrypt-2.5.8.tar.bz2 dest={{ SOURCE_DIR }}

#- name: 下载php包
#  get_url: url={{ DOWNLOAD_URL }} dest={{ SOURCE_DIR }} owner={{ PHP_USER }} group={{ PHP_USER }}

- name: 拷贝现有php包到所有主机
  copy: src=php-{{ PHP_VER }}.tar.xz dest={{ SOURCE_DIR }} owner={{ PHP_USER }} group={{ PHP_USER }}

- name: 解压依赖包libmcrypt
  unarchive: src={{ SOURCE_DIR }}/libmcrypt-2.5.8.tar.bz2 dest={{ SOURCE_DIR }}

- name: 编译安装libmcrypt
  shell: "cd {{ SOURCE_DIR }}/libmcrypt-2.5.8 && ./configure && make && make install"

- name: 解压php包
  unarchive: src={{ SOURCE_DIR }}/php-{{ PHP_VER }}.tar.xz dest={{ SOURCE_DIR }} owner={{ PHP_USER }} group={{ PHP_USER }}
编写安装install.yml
[14:26:31 root@ansible-server100 lnmp]#vi roles/php_install/tasks/install.yml
- name: 编译php
  shell: "cd {{ SOURCE_DIR }}/php-{{ PHP_VER }} && ./configure --prefix={{ PHP_DIR }} --with-config-file-path={{ PHP_DIR }}/etc --with-mysqli=mysqlnd --with-pdo-mysql=mysqlnd --with-mysql={{ MYSQL_DIR }} --with-mysql-sock={{ MYSQL_DIR }}/tmp/mysql.sock --with-iconv-dir --with-freetype-dir --with-jpeg-dir --with-png-dir --with-zlib --with-bz2 --with-libxml-dir --with-curl --with-gd --with-openssl --with-mhash  --with-xmlrpc --with-pdo-mysql --with-libmbfl --with-onig --with-pear --enable-xml --enable-bcmath --enable-shmop --enable-sysvsem --enable-inline-optimization --enable-mbregex --enable-fpm --enable-mbstring --enable-pcntl --enable-sockets --enable-zip --enable-soap --enable-opcache --enable-pdo --enable-mysqlnd-compression-support --enable-maintainer-zts  --enable-session --with-fpm-user={{ PHP_USER }} --with-fpm-group={{ PHP_USER }}"

- name: 安装php
  shell: "cd {{ SOURCE_DIR }}/php-{{ PHP_VER }} && make -j 3 && make  install"

- name: 创建php-fpm配置目录
  file: name={{ PHP_DIR }}/etc state=directory owner={{ PHP_USER }} group={{ PHP_USER }} mode=0755 recurse=yes

- name: 修改php-fpm文件-1
  shell: "cd {{ SOURCE_DIR }}/php-{{ PHP_VER }} && cp php.ini-production  {{ PHP_DIR }}/etc/php.ini"

- name: 修改php-fpm文件-2
  lineinfile:
    dest: "{{ PHP_DIR }}/etc/php.ini"
    regexp: "post_max_size = 8M"
    line: "post_max_size = 16M"

- name: 修改php-fpm文件-3
  lineinfile:
    dest: "{{ PHP_DIR }}/etc/php.ini"
    regexp: "max_execution_time = 30"
    line: "max_execution_time = 300"

- name: 修改php-fpm文件-4
  lineinfile:
    dest: "{{ PHP_DIR }}/etc/php.ini"
    regexp: "max_input_time = 60"
    line: "max_input_time = 300"

- name: 修改php-fpm文件-5
  lineinfile:
    dest: "{{ PHP_DIR }}/etc/php.ini"
    regexp: ";date.timezone ="
    line: "date.timezone = Asia/Shanghai"

- name: 拷贝启动配置文件
  shell: "cd {{ SOURCE_DIR }}/php-{{ PHP_VER }} && cp sapi/fpm/init.d.php-fpm  /etc/init.d/php-fpm && chmod +x /etc/init.d/php-fpm"

- name: 拷贝php主配置文件
  template: src=php-fpm.conf dest={{ PHP_DIR }}/etc/php-fpm.conf owner={{ PHP_USER }} group={{ PHP_USER }}

- name: 编译安装ldap模块
  shell: "cd {{ SOURCE_DIR }}/php-{{ PHP_VER }}/ext/ldap && cp -af /usr/lib64/libldap* /usr/lib/ && {{ PHP_DIR }}/bin/phpize && ./configure --with-php-config={{ PHP_DIR }}/bin/php-config && make && make install"

- name: 修改php-fpm文件-6
  lineinfile:
    dest: "{{ PHP_DIR }}/etc/php.ini"
    regexp: ";extension=bz2"
    line: "aextension=ldap.so"

- name: 编译安装gettext模块
  shell: "cd {{ SOURCE_DIR }}/php-{{ PHP_VER }}/ext/gettext && cp -af /usr/lib64/libldap* /usr/lib/ && {{ PHP_DIR }}/bin/phpize && ./configure --with-php-config={{ PHP_DIR }}/bin/php-config && make && make install"

- name: 修改php-fpm文件-7
  lineinfile:
    dest: "{{ PHP_DIR }}/etc/php.ini"
    regexp: ";extension=bz2"
    line: "aextension=gettext.so"

- name: 启动php并开机启动
  shell: "chkconfig --add php-fpm && chkconfig php-fpm on && /etc/init.d/php-fpm start"
php引用文件main.yml
[14:33:26 root@ansible-server100 lnmp]#vi roles/php_install/tasks/main.yml
- include: copy.yml
- include: install.yml
5、编辑lnmp.yml文件,定义整个的任务
[14:58:02 root@ansible-server100 lnmp]#cat lnmp.yml
- hosts: centos8
  remote_user: root
  gather_facts: True

  roles:
    - alone_install8

- hosts: centos7
  remote_user: root
  gather_facts: True

  roles:
    - alone_install7

- hosts: web-server
  remote_user: root
  gather_facts: True

  roles:
    - mysql_install
    - nginx_install
    - php_install
执行批量安装部署
就算在完美的配置,用在其他机器上总会报错一丢丢,我操作的时候报错一丢丢就需要删除做好的文件重新部署,真的很烧脑。但是由于自己很古怪,偏偏使用新系统和旧系统进行部署,也不怎么适用于生产,哈哈,作作吧自己,但是我做成功了还是蛮开心的。
[23:45:30 root@ansible-server100 lnmp]#ansible-playbook lnmp.yml

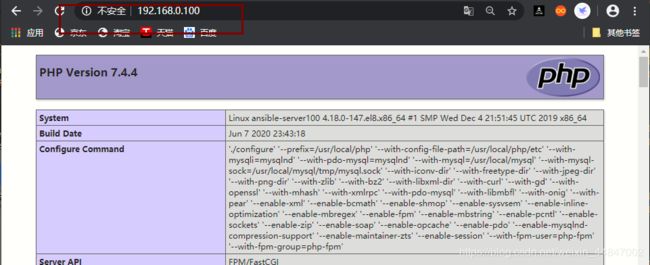
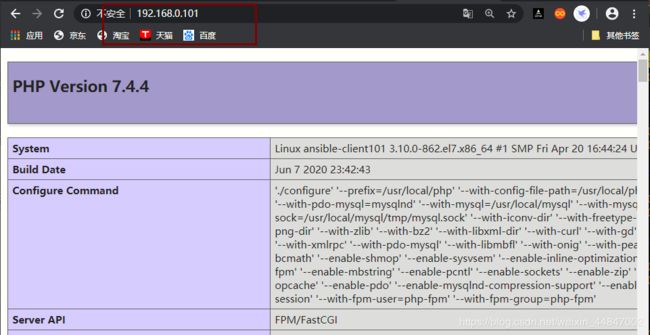
浏览器访问:
centos8:http://192.168.0.100
centos7:http://192.168.0.101
感谢大家的浏览,有问题可以给我评论哈,或者直接私信
