SSM(Spring+SpringMVC+Mybatis)框架简单搭建
SSM(Spring+SpringMVC+Mybatis)框架简单搭建:
一、新建项目
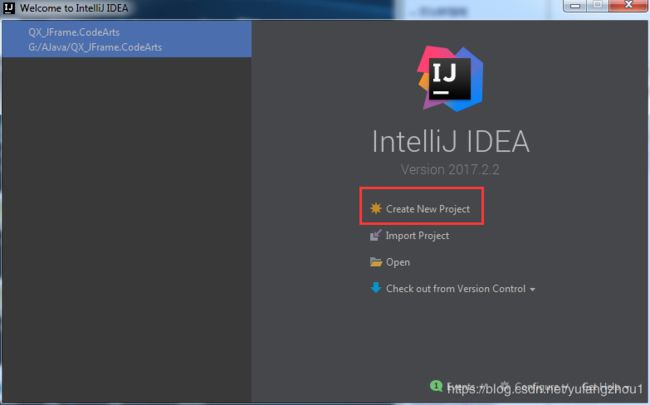
运行IDEA,进入初始化界面,然后我们选择新建项目(进入主界面新建项目也是一样的)
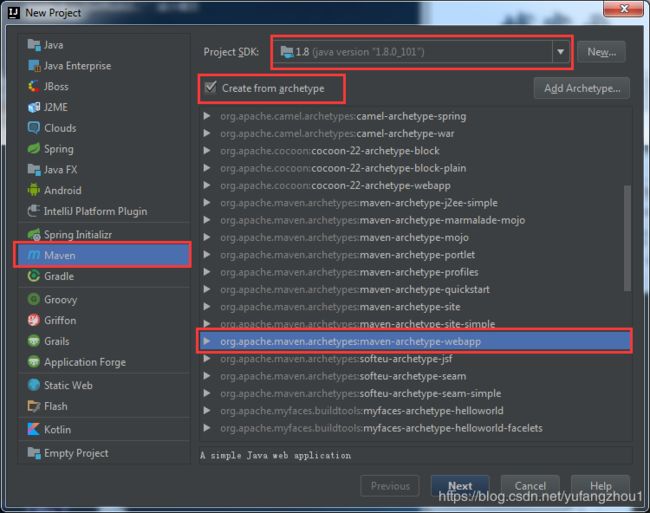
在Maven选项卡里面找到对应的java web选项,然后我们点下一步
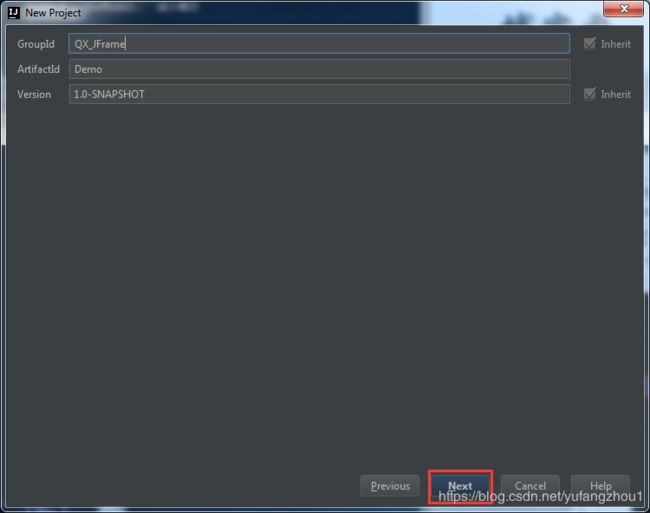
这一步填入组织等信息,这里比较随意,按照自己的需求进行填写,然后下一步
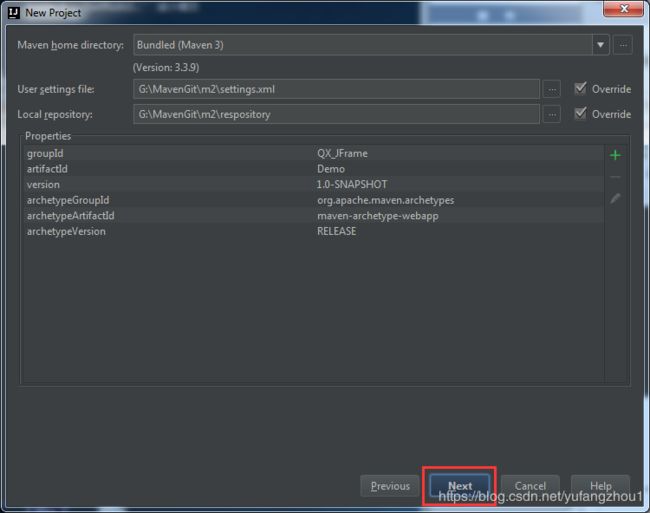
这里我早已配置好本地Maven仓库,因此直接默认即可。如果没进行配置本地默认仓库的话,请网上查找对应的资料进行配置
输入Project name,和需要保存的路径,然后finish
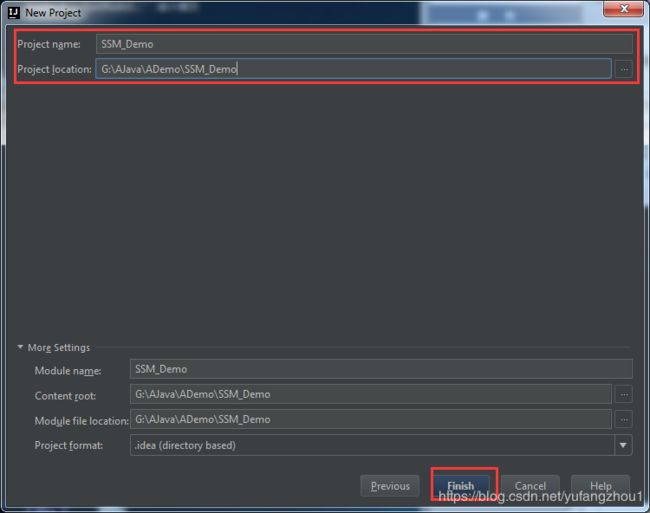
稍等片刻,idea已经为我们自动建好了一切。到这里,我们的第一步,新建项目阶段已经完成,进入下一个阶段。
新建好项目后,我们首先打开MavenProject,修改一下JDK版本。
二、目录结构调整
最终的文件结构如下所示:
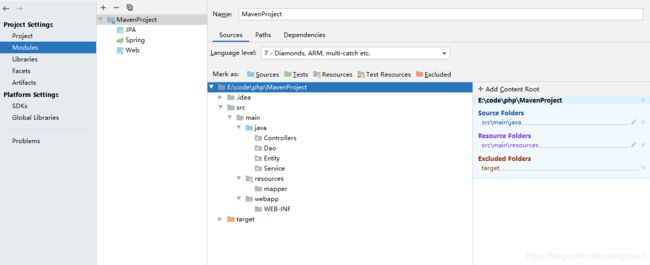
- Java为主Java代码文件夹
- Controllers 控制器文件文件夹
- Dao (数据访问)层文件夹
- Service(业务逻辑)层文件夹
- Entity(实体)层文件夹
- resources资源文件夹
- mapper mybatis sql文件夹
- webapp web页面文件夹
三、Maven包的初始化
Maven是采用配置文件的方式进行jar包的自动导入,因此,我们需要进行对配置文件的修改来进行jar包的导入。
打开pom.xml文件
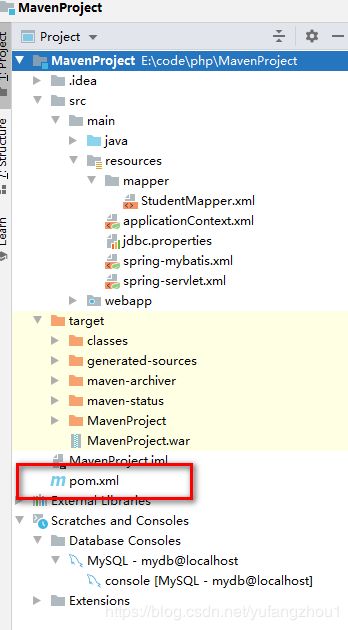
添加我们将会用到的一系列jar包配置(这里将我的配置直接复制过来,作为参考)
4.0.0
org.example
MavenProject
1.0-SNAPSHOT
war

MavenProject Maven Webapp
http://www.example.com


    UTF-8
    1.7
    1.7


        junit
        junit
        4.12


        org.springframework
        spring-core
        4.3.5.RELEASE


        org.springframework
        spring-aop
        4.3.5.RELEASE


        org.springframework
        spring-orm
        4.3.5.RELEASE


        org.springframework
        spring-tx
        4.3.5.RELEASE


        org.springframework
        spring-test
        4.3.5.RELEASE


        org.springframework
        spring-mock
        2.0.1


        org.springframework
        spring-jdbc
        4.3.5.RELEASE


        org.springframework
        spring-context
        4.3.5.RELEASE


        org.springframework
        spring-context-support
        4.3.5.RELEASE


        org.springframework
        spring-expression
        4.3.5.RELEASE


        org.springframework
        spring-web
        4.3.1.RELEASE


        org.springframework
        spring-webmvc
        4.3.1.RELEASE


        com.github.pagehelper
        pagehelper
        3.7.3


        com.github.jsqlparser
        jsqlparser
        0.9.1


        mysql
        mysql-connector-java
        5.1.38


        c3p0
        c3p0
        0.9.1.2


        jstl
        jstl
        1.2


        commons-fileupload
        commons-fileupload
        1.3.1


        commons-io
        commons-io
        2.4


        org.json
        json
        20160212


        net.sf.json-lib
        json-lib
        2.4
        jdk15


        commons-lang
        commons-lang
        2.5


        commons-beanutils
        commons-beanutils
        1.6


        commons-collections
        commons-collections
        3.2.1


        commons-logging
        commons-logging
        1.2


        net.sf.ezmorph
        ezmorph
        1.0.6


        com.alibaba
        fastjson
        1.2.12


        com.google.code.gson
        gson
        2.6.2


        net.iharder
        base64
        2.3.8


        commons-codec
        commons-codec
        1.3


        org.apache.logging.log4j
        log4j-core
        2.13.2


        org.jetbrains
        annotations-java5
        19.0.0


        org.mybatis
        mybatis
        3.3.0


        org.mybatis
        mybatis-spring
        1.3.3


    MavenProject


                maven-clean-plugin
                3.1.0


                maven-resources-plugin
                3.0.2


                maven-compiler-plugin
                3.8.0


                maven-surefire-plugin
                2.22.1


                maven-war-plugin
                3.2.2


                maven-install-plugin
                2.5.2


                maven-deploy-plugin
                2.8.2
对web.xml进行配置,将我们刚才添加的spring-servlet.xml配置进去
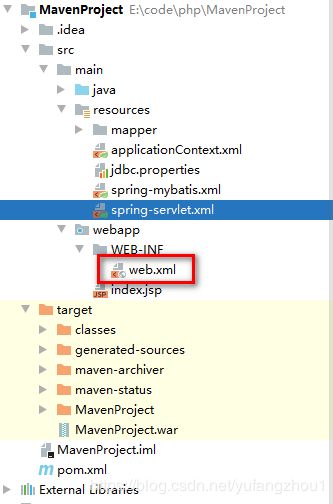
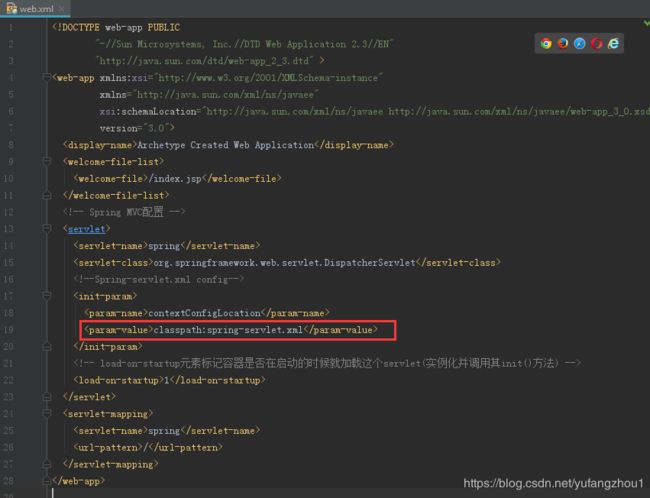
这里的classpath为resources资源目录
这一步配置的web.xml内容如下:
Archetype Created Web Application
/index.jsp
import org.springframework.web.bind.annotation.GetMapping;
import org.springframework.web.bind.annotation.RequestMapping;
import org.springframework.web.bind.annotation.RestController;
@RestController
@RequestMapping(“api/RequestTest”)
public class RequestTestController {
@GetMapping()
public String TestString(){
return “this is a test string. Time:2020-5-18 16:50”;
}
}
这样,我们便可以通过url地址来进行访问我们的接口数据

在右上角的运行服务器配置按钮,打开服务器配置项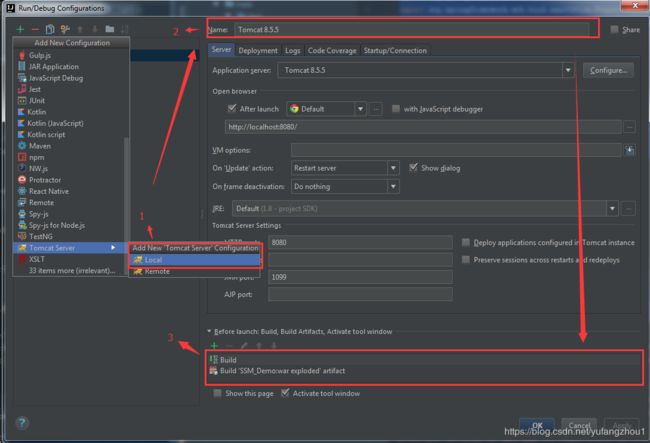
这里如果左侧列表是空的话,我们就需要点击加号进行服务器的添加,选择Tomcat Server下的Local。然后点击刚刚添加的标签,在右侧输入Server Name,下面会自动提示设置编译方式,选一个编译方式,然后点击OK即可(这一步的前提是装好了Tomcat服务器,如果没有安装,则需要先安装Tomcat服务器)。
然后我们点击右上角的运行,如果没有什么问题的话,我们的控制台界面会提示服务启动成功!
等浏览器打开以后,我们输入我们配置的api地址:http://localhost:8080/api/RequestTest

五、Spring和Mybatis的配置
稍歇片刻后,我们继续进行Mybatis和Spring组件的整合…
先添加jdbc.properties(JDBC连接配置文件,当然这个文件里面的内容直接写到mybatis配置文件里面也是可以的)
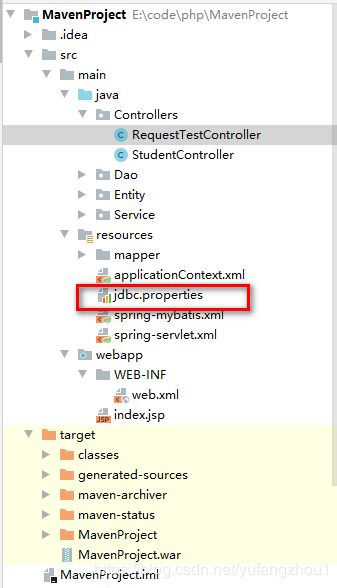
jdbc配置如下:
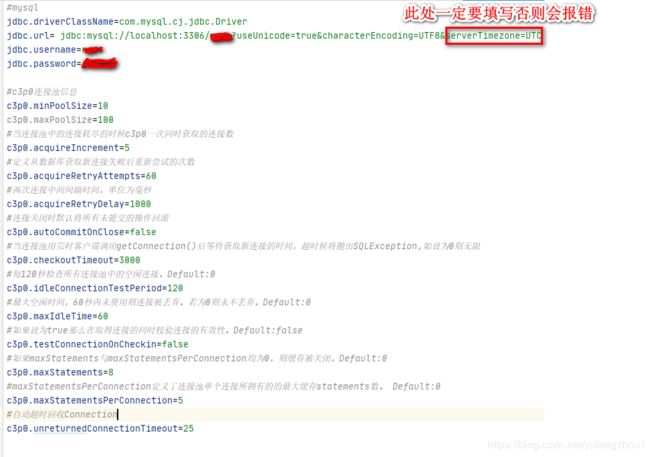
代码如下:
#mysql
jdbc.driverClassName=com.mysql.cj.jdbc.Driver
jdbc.url= jdbc:mysql://localhost:3306/dbTest?useUnicode=true&characterEncoding=UTF8&serverTimezone=UTC
jdbc.username=username
jdbc.password=password
#c3p0连接池信息
c3p0.minPoolSize=10
c3p0.maxPoolSize=100
#当连接池中的连接耗尽的时候c3p0一次同时获取的连接数
c3p0.acquireIncrement=5
#定义从数据库获取新连接失败后重新尝试的次数
c3p0.acquireRetryAttempts=60
#两次连接中间间隔时间,单位为毫秒
c3p0.acquireRetryDelay=1000
#连接关闭时默认将所有未提交的操作回滚
c3p0.autoCommitOnClose=false
#当连接池用完时客户端调用getConnection()后等待获取新连接的时间,超时候将抛出SQLException,如设为0则无限
c3p0.checkoutTimeout=3000
#每120秒检查所有连接池中的空闲连接。Default:0
c3p0.idleConnectionTestPeriod=120
#最大空闲时间,60秒内未使用则连接被丢弃。若为0则永不丢弃。Default:0
c3p0.maxIdleTime=60
#如果设为true那么在取得连接的同时校验连接的有效性。Default:false
c3p0.testConnectionOnCheckin=false
#如果maxStatements与maxStatementsPerConnection均为0,则缓存被关闭。Default:0
c3p0.maxStatements=8
#maxStatementsPerConnection定义了连接池单个连接所拥有的的最大缓存statements数。 Default:0
c3p0.maxStatementsPerConnection=5
#自动超时回收Connection
c3p0.unreturnedConnectionTimeout=25
继续在resources文件夹里面添加mybatis配置文件 spring-mybatis.xml
代码如下:
classpath:jdbc.properties
完成这三个后的文件目录是这样子的:
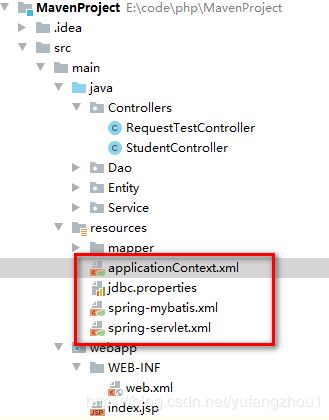
完成这几步后,我们还需要将spring的配置加载到已有的框架中去,打开web.xml文件,进行添加spring配置
在刚才的web-app标签内继续添加spring支持:
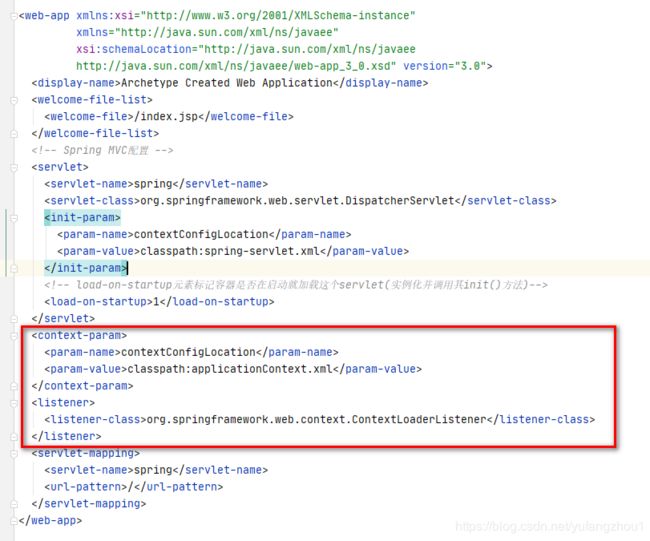
代码内容如下:
contextConfigLocation
classpath:applicationContext.xml
org.springframework.web.context.ContextLoaderListener
此刻完整的web.xml文件内容如下:
Archetype Created Web Application
/index.jsp
– Table structure for studentclass
DROP TABLE IF EXISTS studentclass;
CREATE TABLE studentclass (
ClassId int(3) NOT NULL AUTO_INCREMENT,
ClassName varchar(10) DEFAULT NULL,
PRIMARY KEY (ClassId)
) ENGINE=InnoDB AUTO_INCREMENT=6 DEFAULT CHARSET=utf8;
将数据库建好后,我们进行Entity,Dao,Service层以及mapper文件的的编写。
首先在mapper文件夹新建一个mapper文件:StudentMapper.xml
public Integer getClassid() {
    return classid;
}

public void setClassid(Integer classid) {
    this.classid = classid;
}

public byte[] getUid() {
    return uid;
}

public String getName() {
    return name;
}

public void setName(String name) {
    this.name = name;
}

public Integer getAge() {
    return age;
}

public void setAge(Integer age) {
    this.age = age;
}
}
在Dao层写Mybatis接口(不需要写实现类,mybatis不需要),新建StudentMapper
![]()
package Dao;
import Entity.StudentEntity;
import org.springframework.stereotype.Repository;
import java.util.List;
@Repository
public interface StudentMapper {
int deleteByPrimaryKey(byte[] uid);
int insert(StudentEntity record);

int insertSelective(StudentEntity record);

StudentEntity selectByPrimaryKey(byte[] uid);

List selectByCondition(StudentEntity record);

int updateByPrimaryKeySelective(StudentEntity record);

int updateByPrimaryKey(StudentEntity record);
}
在Service层写对Dao层的访问逻辑,当然Demo没有什么业务处理逻辑,仅作为Demo

IStudentService 接口:
package Service;
import Entity.StudentEntity;
import java.util.List;
public interface IStudentService {
int deleteByPrimaryKey(byte[] uid);
int insert(StudentEntity record);

int insertSelective(StudentEntity record);

StudentEntity selectByPrimaryKey(byte[] uid);

List selectByCondition(StudentEntity record);

int updateByPrimaryKeySelective(StudentEntity record);

int updateByPrimaryKey(StudentEntity record);
}
StudentService 实现了 IStudentService 接口:
package Service;
import Dao.StudentMapper;
import Entity.StudentEntity;
import org.springframework.beans.factory.annotation.Autowired;
import org.springframework.stereotype.Service;
import java.util.List;
/*
*@author:yfz
*@date:2020-5-18 18:37
*description:
**/
@Service
public class StudentService implements IStudentService{
@Autowired
private StudentMapper studentMapper;
@Override
public int deleteByPrimaryKey(byte[] uid) {
return studentMapper.deleteByPrimaryKey(uid);
}
@Override
public int insert(StudentEntity record) {
    return studentMapper.insert(record);
}

@Override
public int insertSelective(StudentEntity record) {
    return studentMapper.insertSelective(record);
}

@Override
public StudentEntity selectByPrimaryKey(byte[] uid) {
    return studentMapper.selectByPrimaryKey(uid);
}

@Override
public List selectByCondition(StudentEntity record) {
    return studentMapper.selectByCondition(record);
}

@Override
public int updateByPrimaryKeySelective(StudentEntity record) {
    return studentMapper.updateByPrimaryKeySelective(record);
}

@Override
public int updateByPrimaryKey(StudentEntity record) {
    return studentMapper.updateByPrimaryKey(record);
}
}
然后我们写一个StudentController用于调用Service

package Controllers;
import Entity.StudentEntity;
import Service.IStudentService;
import org.springframework.beans.factory.annotation.Autowired;
import org.springframework.web.bind.annotation.GetMapping;
import org.springframework.web.bind.annotation.RequestMapping;
import org.springframework.web.bind.annotation.RestController;
import java.util.List;
/*
*@author:yfz
*@date:2020-5-18 18:41
*description:
**/
@RestController
@RequestMapping(“api/Student”)
public class StudentController {
@Autowired
private IStudentService service;
@GetMapping
public String Get(){
List students = service.selectByCondition(new StudentEntity());
String jsonResult = com.alibaba.fastjson.JSON.toJSONString(students);
return jsonResult;
}
}
走到这一步的代码目录结构是这样子的:
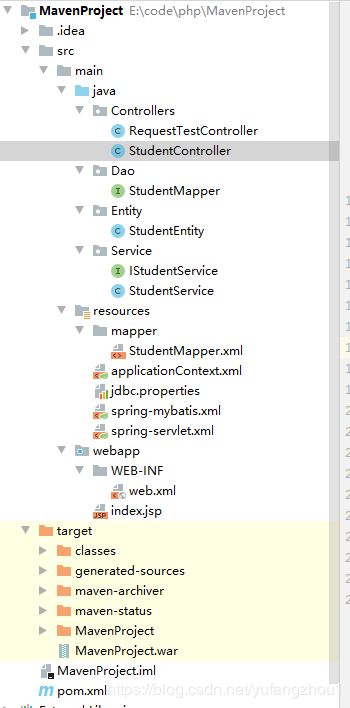
如果进行顺利的话,我们运行我们的Tomacat服务器,并调用我们的新接口:http://localhost:8080/api/Student
运行时候,别忘记了修改jdbc.properties文件里的连接url以及用户名密码!!!

[1]: https://www.cnblogs.com/xiaoL/p/7753130.html