ambari安装配置
本地源yum方式下Ambari的安装与配置
1、 准备工作
1.1注意
接下来的内容默认是在设备的基本配置正确的前提下进行的,具体配置如下:
a) 机器已经正确安装统一的centos系统(最好提前装好jdk、httpd等)
b) 机器正确修改了主机名以及主机名与ip的映射
c) 机器之前配置了ssh免密码登陆
d) 各设备之间网络连接正确并关闭防火墙
e) 需要统一各设备节点上的时间
b,c两条可参考《全分布式Hadoop安装机器环境配置》文档中4.1和4.4两小节,e可
参考《ntp本地服务器搭建》文档
1.2步骤
本地源离线方式下Ambari的安装配置主要分为三大部分:
a)下载所需的三个源文件
ambari-2.2.2.0-centos7.tar.gz
HDP-2.4.2.0-centos7-rpm.tar.gz
HDP-UTILS-1.1.0.20-centos7.tar.gz
yum下载时候的根路径是/var/www/html(这个可以在/etc/httpd/conf/httpd.conf文件中修改配置),我们这次将上述三个源文件解压至/var/www/html/external目录下,yum获取的本地源地址类似于http://dcom-node2/external/........
b)配置相关内容
本地源配置、相关服务启动等等
c)安装ambari和相关组件
在设备上安装ambari和其他组件
2、 本地源的配置
在/etc/yum.repos.d目录下增加 ambary.repo、hdp.repo、hdp-until.repo三个文件、修改
CentOS-Base.repo文件(不修改也备份它,以防yum下载源干扰)。
首先需要启动httpd服务service httpd start
ambari.repo
| [ambari-2.x] name=Ambari 2.x baseurl=http://dcom-node2/external/AMBARI-2.2.2.0/centos7/2.2.2.0-460 gpgcheck=0 gpgkey=http://dcom-node2/external/AMBARI-2.2.2.0/centos7/2.2.2.0-460/RPM-GPG-KEY/RPM-GPG-KEY-Jenkins enabled=1 priority=1
[Updates-ambari-2.2.2.0] name=ambari-2.2.2.0 - Updates baseurl=http://dcom-node2/external/AMBARI-2.2.2.0/centos7/2.2.2.0-460 gpgcheck=0 gpgkey=http://dcom-node2/external/AMBARI-2.2.2.0/centos7/2.2.2.0-460/RPM-GPG-KEY/RPM-GPG-KEY-Jenkins enabled=1 priority=1 |
hdp.repo
| [HDP-2.4.2.0] name=Hortonworks Data Platform Version - HDP-2.4.2.0 -Updates baseurl=http://dcom-node2/external/HDP/centos7/2.x/updates/2.4.2.0/ gpgcheck=1 gpgkey=http://dcom-node2/external/HDP/centos7/2.x/updates/2.4.2.0/RPM-GPG-KEY/RPM-GPG-KEY-Jenkins enabled=1 priority=1 |
hdp-until.repo
| [HDP-UTILS-1.1.0.20] name=Hortonworks Data Platform Version - HDP-UTILS-1.1.0.20 baseurl=http://dcom-node2/external/HDP-UTILS-1.1.0.20/repos/centos7 gpgcheck=1 enabled=1 priority=1 |
注意:
上文方框中的baseurl可以在浏览器中检验是否正确,如下图:
另外安装时需要用到linux的对应镜像,所以我的安装将镜像拷到了本地的
/var/www/html/centos目录下,其他的主机也可以通过mount形式挂载被挂载的主机需要开启nfs服务,另外在/etc/exports文件中指明可被挂载的目录的目的主机ip或者在/etc/httpd/conf/httpd.conf中修改httpd的配置
具体挂载命令:
mount -t nfs -onolock dcom-node2:/var/www/html/centos/ /var/www/html/centos/
上面挂载目录的方式是可选的,本人建议通过修改CentOS-Base.repo:来获取centos镜
像注释掉网上的链接,让yum从本地源去下载centos镜像。
| # CentOS-Base.repo # # The mirror system uses the connecting IP address of the client and the # update status of each mirror to pick mirrors that are updated to and # geographically close to the client. You should use this for CentOS updates # unless you are manually picking other mirrors. # # If the mirrorlist= does not work for you, as a fall back you can try the # remarked out baseurl= line instead. # #
[base] name=CentOS-$releasever - Base #mirrorlist=http://mirrorlist.centos.org/?release=$releasever&arch=$basearch&repo=os&infra=$infra #baseurl=http://mirror.centos.org/centos/$releasever/os/$basearch/ #gpgcheck=1 baseurl=http://dcom-node2/centos/CentOS_6.7_Final gpgcheck=0 gpgkey=file:///etc/pki/rpm-gpg/RPM-GPG-KEY-CentOS-7
#released updates [updates] name=CentOS-$releasever - Updates #mirrorlist=http://mirrorlist.centos.org/?release=$releasever&arch=$basearch&repo=updates&infra=$infra #baseurl=http://mirror.centos.org/centos/$releasever/updates/$basearch/ #gpgcheck=1 baseurl=http://dcom-node2/centos/CentOS_6.7_Final gpgcheck=0 gpgkey=file:///etc/pki/rpm-gpg/RPM-GPG-KEY-CentOS-7
#additional packages that may be useful [extras] name=CentOS-$releasever - Extras #mirrorlist=http://mirrorlist.centos.org/?release=$releasever&arch=$basearch&repo=extras&infra=$infra #baseurl=http://mirror.centos.org/centos/$releasever/extras/$basearch/ #gpgcheck=1 baseurl=http://dcom-node2/centos/CentOS_6.7_Final gpgcheck=0 gpgkey=file:///etc/pki/rpm-gpg/RPM-GPG-KEY-CentOS-7
#additional packages that extend functionality of existing packages [centosplus] name=CentOS-$releasever - Plus #mirrorlist=http://mirrorlist.centos.org/?release=$releasever&arch=$basearch&repo=centosplus&infra=$infra #baseurl=http://mirror.centos.org/centos/$releasever/centosplus/$basearch/ #gpgcheck=1 baseurl=http://dcom-node2/centos/CentOS_6.7_Final gpgcheck=0 enabled=0 gpgkey=file:///etc/pki/rpm-gpg/RPM-GPG-KEY-CentOS-7 |
上述配置完成以后通过scp将这些文件拷贝至集群中的各个节点,拷贝完成后使用yum install ambari-server(服务节点)或者yum install ambari-agent进行安装,安装成功如图:
3、 Mysql的配置
首先说明,这个配置不是必须的,如果决定在环境中安装使用mysql的话,需要参照下面去配置。
网上下载jdbc包,将mysql的jdbc包拷贝至/usr/share/java目录下
mv mysql-connector-java-5.1.39-bin.jar/usr/share/ mysql-connector-java.jar
进入mysql数据库
Mysql –uroot –p123456 具体的root密码可以通过命令去修改,不懂的可以百度
创建一个ambari用户和数据库
| MariaDB [none]>create database ambari; 新建数据库 Query OK, 1 rows affected (0.00 sec)
MariaDB [none]>use ambari; Database changed |
下面的配置需注意,一定要配置这三种:localhost、自身主机名dcom-node2、%通配符所有ip,并通过grant语句配置对应权限,最后flushprivileges保存!
| MariaDB [ambari]>CREATE USER 'ambari'@'%' IDENTIFIED BY '123456'; 123456即密码 grant all privileges on *.* to ambari@'%' identified by '123456'; MariaDB [ambari]>create CREATE USER 'ambari'@'localhost' IDENTIFIED BY '123456'; grant all privileges on *.* to ambari@'localhost' identified by '123456'; MariaDB [ambari]>create CREATE USER 'ambari'@dcom-node2 IDENTIFIED BY '123456'; grant all privileges on *.* to ambari@'dcom-node2' identified by '123456'; flush privileges; |
可通过下面语句来查看数据库中的用户和对应权限,这是为了解决mysql连接不上的问题。
| MariaDB [mysql]> select distinct concat('user: ''',user,'''@''',host,''';') as query from mysql.user;
+------------------------------+ | query | +------------------------------+ | user: 'ambari'@'%'; | | user: 'root'@'%'; | | user: 'ambari'@'127.0.0.1'; | | user: 'root'@'127.0.0.1'; | | user: 'ambari'@'::1'; | | user: 'root'@'::1'; | | user: ''@'dcom-node2'; | | user: 'ambari'@'dcom-node2'; | | user: 'root'@'dcom-node2'; | | user: ''@'localhost'; | | user: 'ambari'@'localhost'; | | user: 'root'@'localhost'; | +------------------------------+ 12 rows in set (0.00 sec)
最后执行 MariaDB [ambari]> source /var/lib/ambari-server/resources/Ambari-DDL-MySQL-CREATE.sql;
执行成功查看: MariaDB [mysql]> show tables; +---------------------------+ | Tables_in_mysql | +---------------------------+ | columns_priv | | db | | event | | func | | general_log | | help_category | | help_keyword | | help_relation | | help_topic | | host | | ndb_binlog_index | | plugin | | proc | | procs_priv | | proxies_priv | | servers | | slow_log | | tables_priv | | time_zone | | time_zone_leap_second | | time_zone_name | | time_zone_transition | | time_zone_transition_type | | user | +---------------------------+ 24 ows in set (0.00 sec) |
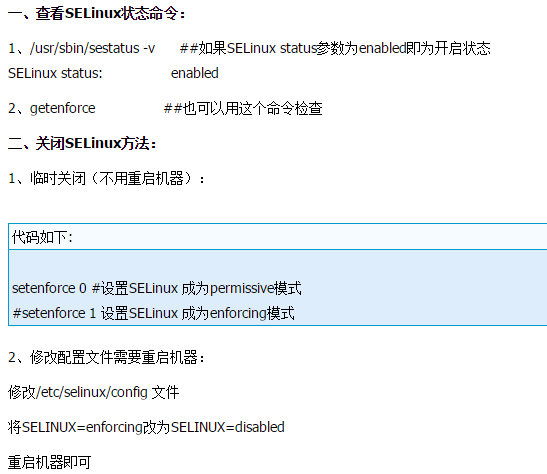
4、 关闭selinux
利用该方法解决yum 安装软件包时出现http error 403 forbidden错误
在ambari-server setup时如果selinux没关会有相应提示:
| [root@node1 ~]# ambari-server setup Using python /usr/bin/python Setup ambari-server Checking SELinux... SELinux status is 'enabled' SELinux mode is 'enforcing' Temporarily disabling SELinux WARNING: SELinux is set to 'permissive' mode and temporarily disabled. |
5、 ambari-server setup 和 ambari-serverstart
执行ambari-serversetup,跟着提示进行相应的输入和回车即可安装完毕提示成功,具体如下:
| [root@node1 ~]# ambari-server setup Using python /usr/bin/python Setup ambari-server Checking SELinux... SELinux status is 'disabled' Customize user account for ambari-server daemon [y/n] (n)? y Enter user account for ambari-server daemon (root): Adjusting ambari-server permissions and ownership... Checking firewall status... Redirecting to /bin/systemctl status iptables.service
Checking JDK... [1] Oracle JDK 1.8 + Java Cryptography Extension (JCE) Policy Files 8 [2] Oracle JDK 1.7 + Java Cryptography Extension (JCE) Policy Files 7 [3] Custom JDK ============================================================================== Enter choice (1): 3 WARNING: JDK must be installed on all hosts and JAVA_HOME must be valid on all hosts. WARNING: JCE Policy files are required for configuring Kerberos security. If you plan to use Kerberos,please make sure JCE Unlimited Strength Jurisdiction Policy Files are valid on all hosts. Path to JAVA_HOME: /usr/lib/jvm/java-1.7.0-openjdk-1.7.0.91-2.6.2.3.el7.x86_64/jre Validating JDK on Ambari Server...done. Completing setup... Configuring database... Enter advanced database configuration [y/n] (n)? y Configuring database... ============================================================================== Choose one of the following options: [1] - PostgreSQL (Embedded) 这里选择内嵌的postgreSQL,无需做过多的配置 [2] - Oracle [3] - MySQL [4] - PostgreSQL [5] - Microsoft SQL Server (Tech Preview) [6] - SQL Anywhere ============================================================================== Enter choice (1): 1 Database name (ambari): Postgres schema (ambari): Username (ambari): Enter Database Password (bigdata): (这里的密码后面安装hive时会用到) Re-enter password: Default properties detected. Using built-in database. Configuring ambari database... Checking PostgreSQL... Running initdb: This may take upto a minute. Initializing database ... OK
About to start PostgreSQL Configuring local database... Connecting to local database...done. Configuring PostgreSQL... Restarting PostgreSQL Extracting system views... ambari-admin-2.2.2.0.460.jar ...... Adjusting ambari-server permissions and ownership... Ambari Server 'setup' completed successfully. |
到此ambary-server setup操作完成,接着执行ambari-server start命令,启动ambari-server 服务,可通过http://20.2.37.200:8080查看服务,用户名和密码都是admin。
进入web安装的话前面根据web页面上给出的提示按步骤依次进行,其中选择服务的时候注意参照具体的设备环境和实际使用情况而定。
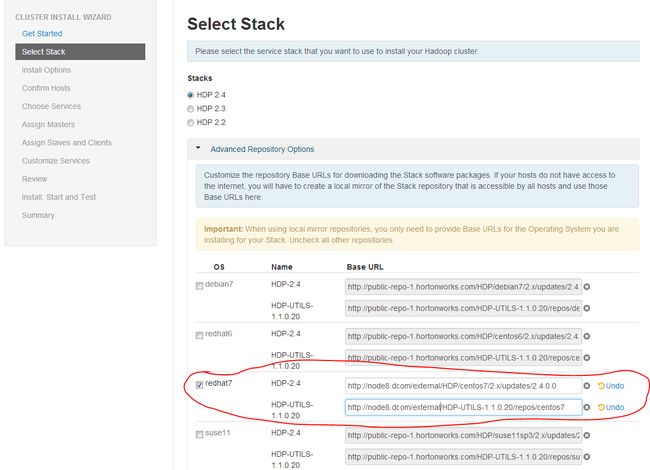
在select stack 这一步时,设置为redhat7以及正确的yum源地址
http://20.2.37.214/external/HDP/centos7/2.x/updates/2.4.2.0http://20.2.37.214/external/HDP-UTILS-1.1.0.20/repos/centos7
就是之前配置的本地源。
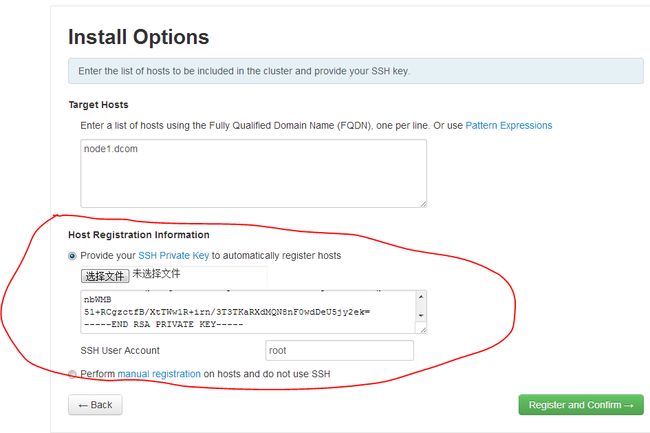
这一步将你主节点的~/.ssh/id_rsa文件内容复制过来即可
后面的都是类似操作,按照提示进行安装配置即可。
6、 注意事项
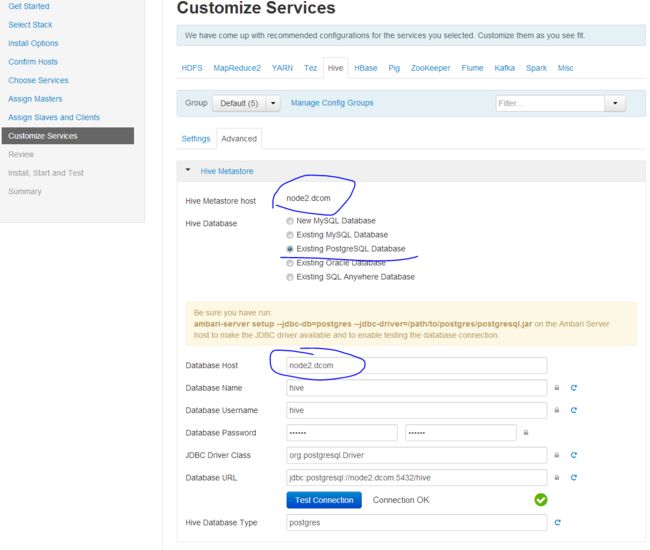
在这一步选择数据库时,请选择postgreSQL,另外注意在之前系统会将不同的服务安装在不同的节点上(如果你没有手动去更改的话)。
这样的话如图所示,我们的ambari-server服务是安装运行在node1.dcom上的因为之前的ambari-serversetup操作时选择数据库的时候在ambari-server上选择和安装了postgreSQL数据库了。而hive和hive对应的postgreSQL是安装在node2.dcom上的,这一点需要注意。
ambari-serversetup --jdbc-db=postgres --jdbc-driver=/usr/share/java/postgresql-jdbc.jar 这条命令在ambari-server所在的节点上运行
上图中的database password就是刚才在ambarisetup时配置的密码
先检查一下node2.dcom上postgresql数据库有没有正确安装和启动
| 切换用户到数据库模式下 [root@node2 yum.repos.d]# su - postgres -bash-4.2$ 初始化数据库(已经正确安装启动的无需这一步) -bash-4.2$ initdb The files belonging to this database system will be owned by user "postgres". This user must also own the server process.
The database cluster will be initialized with locale "en_US.UTF-8". The default database encoding has accordingly been set to "UTF8". The default text search configuration will be set to "english". fixing permissions on existing directory /var/lib/pgsql/data ... ok creating subdirectories ... ok selecting default max_connections ... 100 selecting default shared_buffers ... 32MB creating configuration files ... ok creating template1 database in /var/lib/pgsql/data/base/1 ... ok initializing pg_authid ... ok initializing dependencies ... ok creating system views ... ok loading system objects' descriptions ... ok creating collations ... ok creating conversions ... ok creating dictionaries ... ok setting privileges on built-in objects ... ok creating information schema ... ok loading PL/pgSQL server-side language ... ok vacuuming database template1 ... ok copying template1 to template0 ... ok copying template1 to postgres ... ok
WARNING: enabling "trust" authentication for local connections You can change this by editing pg_hba.conf or using the option -A, or --auth-local and --auth-host, the next time you run initdb.
Success. You can now start the database server using:
postgres -D /var/lib/pgsql/data or pg_ctl -D /var/lib/pgsql/data -l logfile start
启动数据库(已经正确安装启动的无需这一步) -bash-4.2$ pg_ctl -D /var/lib/pgsql/data -l logfile start server starting
进入数据库命令行模式 -bash-4.2$ psql psql (9.2.13) Type "help" for help. postgres=# postgres=# \l 查看数据库命令,暂时还没有安装hive所需的hive数据库 List of databases Name | Owner | Encoding | Collate | Ctype | Access privileges -----------+----------+----------+-------------+-------------+----------------------- ambari | postgres | UTF8 | en_US.UTF-8 | en_US.UTF-8 | =Tc/postgres + | | | | | postgres=CTc/postgres+ | | | | | ambari=CTc/postgres ambarirca | postgres | UTF8 | en_US.UTF-8 | en_US.UTF-8 | =Tc/postgres + | | | | | postgres=CTc/postgres+ | | | | | mapred=CTc/postgres postgres | postgres | UTF8 | en_US.UTF-8 | en_US.UTF-8 | template0 | postgres | UTF8 | en_US.UTF-8 | en_US.UTF-8 | =c/postgres + | | | | | postgres=CTc/postgres template1 | postgres | UTF8 | en_US.UTF-8 | en_US.UTF-8 | =c/postgres + | | | | | postgres=CTc/postgres (5 rows)
postgres=# create database hive; 创建hive所需的hive数据库 CREATE DATABASE postgres=# \l List of databases Name | Owner | Encoding | Collate | Ctype | Access privileges -----------+----------+----------+-------------+-------------+----------------------- ambari | postgres | UTF8 | en_US.UTF-8 | en_US.UTF-8 | =Tc/postgres + | | | | | postgres=CTc/postgres+ | | | | | ambari=CTc/postgres ambarirca | postgres | UTF8 | en_US.UTF-8 | en_US.UTF-8 | =Tc/postgres + | | | | | postgres=CTc/postgres+ | | | | | mapred=CTc/postgres hive | postgres | UTF8 | en_US.UTF-8 | en_US.UTF-8 | postgres | postgres | UTF8 | en_US.UTF-8 | en_US.UTF-8 | template0 | postgres | UTF8 | en_US.UTF-8 | en_US.UTF-8 | =c/postgres + | | | | | postgres=CTc/postgres template1 | postgres | UTF8 | en_US.UTF-8 | en_US.UTF-8 | =c/postgres + | | | | | postgres=CTc/postgres (6 rows)
postgres=# postgres=# create user hive; 创建hive所需的hive用户 CREATE ROLE |
为了能够顺利连接上数据库还需要修改两个配置文件:
| /var/lib/pgsql/data/pg_hba.conf # TYPE DATABASE USER ADDRESS METHOD
# "local" is for Unix domain socket connections only local all all peer # IPv4 local connections: host all all 127.0.0.1/32 ident # IPv6 local connections: host all all ::1/128 ident
加上红色的这一句,无需密码和ssl链接 hostnossl hive hive 20.2.37.202/32 trust
# Allow replication connections from localhost, by a user with the # replication privilege. #local replication postgres peer #host replication postgres 127.0.0.1/32 ident #host replication postgres ::1/128 ident
/var/lib/pgsql/data/postgresql.conf #------------------------------------------------------------------------------ # CONNECTIONS AND AUTHENTICATION #------------------------------------------------------------------------------
# - Connection Settings –
去掉注释,改成如下所示 listen_addresses = '*' # what IP address(es) to listen on; # comma-separated list of addresses; # defaults to 'localhost'; use '*' for all # (change requires restart) port = 5432 # (change requires restart) |
| 修改配置完毕,重启postgresql服务 -bash-4.2$ pg_ctl restart waiting for server to shut down............................................................... failed pg_ctl: server does not shut down HINT: The "-m fast" option immediately disconnects sessions rather than waiting for session-initiated disconnection. -bash-4.2$ pg_ctl status pg_ctl: server is running (PID: 17534) /usr/bin/postgres "-D" "/var/lib/pgsql/data" "-p" "5432" -bash-4.2$ pg_ctl stop waiting for server to shut down............................................................... failed pg_ctl: server does not shut down HINT: The "-m fast" option immediately disconnects sessions rather than waiting for session-initiated disconnection. -bash-4.2$ pg_ctl -m fast stop waiting for server to shut down.... done server stopped -bash-4.2$ -bash-4.2$ pg_ctl restart pg_ctl: PID file "/var/lib/pgsql/data/postmaster.pid" does not exist Is server running? starting server anyway server starting |
在web上的hive配置页面测试一下hive数据库是否能正确连接
后面的操作继续按照网页上提示依次进行,直到安装结束,完毕!
Tips:
安装ambari metrics 服务时可将general的配置中默认的embedded改成distributed
以上安装的环境其他的配置应该跟之前的分布式配置默认是配置好的,例如关闭防火墙等等
7、 停止和删除已安装的某项服务
ambari-server在后台通过restapi 停止某项服务
集群名:cluster1
ambari-server节点:node1.dcom
ambari-server服务port:8080
获取集群当前服务信息
curl -u admin:admin -H "X-Requested-By:ambari" -X GET http://node1.dcom:8080/api/v1/clusters/cluster1/services/
| [root@node3 log]# curl -u admin:admin -H "X-Requested-By: ambari" -X GET http://node1.dcom:8080/api/v1/clusters/c1/services { "href" : "http://node1.dcom:8080/api/v1/clusters/c1/services", "items" : [ { "href" : "http://node1.dcom:8080/api/v1/clusters/c1/services/AMBARI_METRICS", "ServiceInfo" : { "cluster_name" : "c1", "service_name" : "AMBARI_METRICS" } }, { "href" : "http://node1.dcom:8080/api/v1/clusters/c1/services/FLUME", "ServiceInfo" : { "cluster_name" : "c1", "service_name" : "FLUME" } }, { "href" : "http://node1.dcom:8080/api/v1/clusters/c1/services/HBASE", "ServiceInfo" : { "cluster_name" : "c1", "service_name" : "HBASE" } }, { "href" : "http://node1.dcom:8080/api/v1/clusters/c1/services/HDFS", "ServiceInfo" : { "cluster_name" : "c1", "service_name" : "HDFS" } }, { "href" : "http://node1.dcom:8080/api/v1/clusters/c1/services/HIVE", "ServiceInfo" : { "cluster_name" : "c1", "service_name" : "HIVE" } }, { "href" : "http://node1.dcom:8080/api/v1/clusters/c1/services/KAFKA", "ServiceInfo" : { "cluster_name" : "c1", "service_name" : "KAFKA" } }, { "href" : "http://node1.dcom:8080/api/v1/clusters/c1/services/MAPREDUCE2", "ServiceInfo" : { "cluster_name" : "c1", "service_name" : "MAPREDUCE2" } }, { "href" : "http://node1.dcom:8080/api/v1/clusters/c1/services/PIG", "ServiceInfo" : { "cluster_name" : "c1", "service_name" : "PIG" } }, { "href" : "http://node1.dcom:8080/api/v1/clusters/c1/services/SPARK", "ServiceInfo" : { "cluster_name" : "c1", "service_name" : "SPARK" } }, { "href" : "http://node1.dcom:8080/api/v1/clusters/c1/services/SQOOP", "ServiceInfo" : { "cluster_name" : "c1", "service_name" : "SQOOP" } }, { "href" : "http://node1.dcom:8080/api/v1/clusters/c1/services/TEZ", "ServiceInfo" : { "cluster_name" : "c1", "service_name" : "TEZ" } }, { "href" : "http://node1.dcom:8080/api/v1/clusters/c1/services/YARN", "ServiceInfo" : { "cluster_name" : "c1", "service_name" : "YARN" } }, { "href" : "http://node1.dcom:8080/api/v1/clusters/c1/services/ZOOKEEPER", "ServiceInfo" : { "cluster_name" : "c1", "service_name" : "ZOOKEEPER" } } ] } |
停止某项服务,这里暂停的是AMBARI_METRICS服务,注意服务名称必须与获取到的一致
| curl -u admin:admin -H "X-Requested-By: ambari" -X PUT -d '{"RequestInfo":{"context":"Stop Service"},"Body":{"ServiceInfo":{"state":"INSTALLED"}}}' http://node1.dcom:8080/api/v1/clusters/cluster1/services/AMBARI_METRICS { "href" : "http://node1.dcom:8080/api/v1/clusters/cluster1/requests/20", "Requests" : { "id" : 20, "status" : "Accepted" } } |
删除AMBARI_METRICS服务
curl -u admin:admin -H "X-Requested-By:ambari" -X DELETEhttp://node1.dcom:8080/api/v1/clusters/cluster1/services/AMBARI_METRICS
8、 附录
| 日期 |
版本 |
修订 |
审批 |
修订说明 |
| 2017.07.05 |
2.0 |
章鑫8 |
|
|
|
|
|
|
|
|


