如何引入依赖包中的Bean? 即@EnableAutoConfiguration和@ComponentScan的使用方法。
工作原因,需要springboot项目启动的时候注入依赖包中的Bean,如何做呢?
一般有两种方式:
Table of Contents
1.使用 @EnableAutoConfiguration
2.使用 @ComponentScan
1.使用 @EnableAutoConfiguration
在项目 spring-boot-autoconfiguration 中:
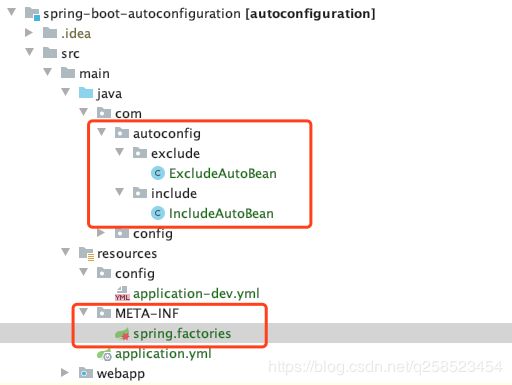
目录结构如下:
代码如下:
@Component
public class ExcludeAutoBean {
    private static Logger logger = LoggerFactory.getLogger(ExcludeAutoBean.class);

    @PostConstruct
    public void init() {
        logger.info("-------------------------------------------------------------------");
        logger.info("--------------------- Auto ExcludeBean @Componet 注入成功 ---------------------");
        logger.info("-------------------------------------------------------------------");
    }
}
@Component
public class IncludeAutoBean {
private static Logger logger = LoggerFactory.getLogger(IncludeAutoBean.class);
@PostConstruct
public void init() {
logger.info("-------------------------------------------------------------------");
logger.info("--------------------- Auto IncludeBean @Componet 注入成功 ---------------------");
logger.info("-------------------------------------------------------------------");
}
}spring.factories 文件目录结构:

内容如下:
org.springframework.boot.autoconfigure.EnableAutoConfiguration=com.autoconfig.include.IncludeAutoBean,\
com.autoconfig.exclude.ExcludeAutoBean
将spring-boot-autoconfiguration打成jar,由其他项目引入。
在项目 spring-boot-autoconfiguration-test 中引入这个jar
            spring-boot-autoconfiguration
            autoconfiguration
            1.0-SNAPSHOT
在该项目中会自动引入上述的Bean。可以手动排除不像要的(注意excludeName只能是EnableAutoConfiguration配置类)
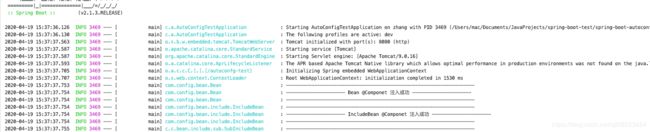
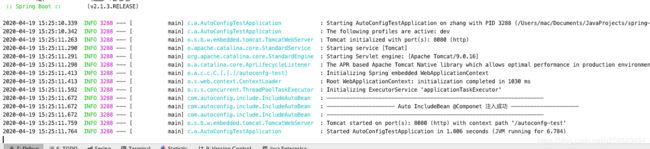
启动日志:
 实际上,我们一般不这么使用。一般是结合 @ConfigurationProperties和@EnableConfigurationProperties来进行自定义starter,做启动配置,来注入启动Bean。(这里不详述,网上有大量例子,可以自行搜索)
2.使用 @ComponentScan
先说一下FilterType的枚举类型:
public enum FilterType {
ANNOTATION, // @注解
ASSIGNABLE_TYPE, // 指定类
ASPECTJ, // ASPECTJ表达式
REGEX, // 正则
CUSTOM // 自定义规则
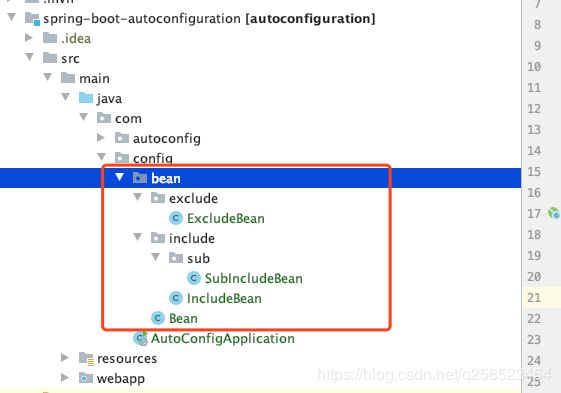
}spring-boot-autoconfiguration 目录结构:
@Component
public class ExcludeBean {
    private static Logger logger = LoggerFactory.getLogger(ExcludeBean.class);

    @PostConstruct
    public void init() {
        logger.info("-------------------------------------------------------------------");
        logger.info("--------------------- ExcludeBean @Componet 注入成功 ---------------------");
        logger.info("-------------------------------------------------------------------");
    }
}
@Component
public class SubIncludeBean {
private static Logger logger = LoggerFactory.getLogger(SubIncludeBean.class);
@PostConstruct
public void init() {
logger.info("-------------------------------------------------------------------");
logger.info("--------------------- SubIncludeBean @Componet 注入成功 ---------------------");
logger.info("-------------------------------------------------------------------");
}
}@Component
public class IncludeBean {
private static Logger logger = LoggerFactory.getLogger(IncludeBean.class);
@PostConstruct
public void init() {
logger.info("-------------------------------------------------------------------");
logger.info("--------------------- IncludeBean @Componet 注入成功 ---------------------");
logger.info("-------------------------------------------------------------------");
}
}
@Component
public class Bean {
    private static Logger logger = LoggerFactory.getLogger(Bean.class);

    @PostConstruct
    public void init() {
        logger.info("-------------------------------------------------------------------");
        logger.info("--------------------- Bean @Componet 注入成功 ---------------------");
        logger.info("-------------------------------------------------------------------");
    }
}
同样发布成依赖包,给spring-boot-autoconfiguration-test调用
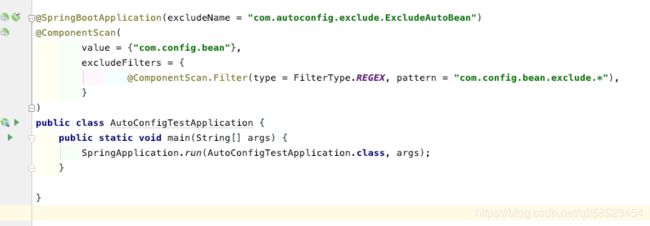
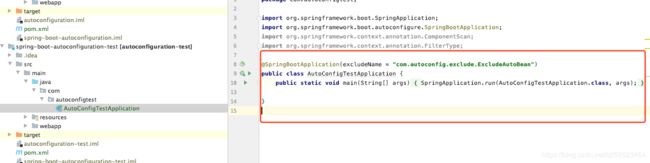
@SpringBootApplication(excludeName = "com.autoconfig.exclude.ExcludeAutoBean")
// 扫描指定包: com.config.bean, 只包含 com.config.bean.include.* 及其该目录下的子包
//@ComponentScan(
//        value = "com.config.bean",
//        includeFilters = {
//                @ComponentScan.Filter(type = FilterType.REGEX, pattern = "com.config.bean.include.*")
//        },
//        // useDefaultFilters默认是true,默认会扫描所有的@Component,所以必须设置为false
//        useDefaultFilters = false
//)
@ComponentScan(
        value = {"com.config.bean"},
        excludeFilters = {
                @ComponentScan.Filter(type = FilterType.REGEX, pattern = "com.config.bean.exclude.*"),
        }
)
public class AutoConfigTestApplication {
    public static void main(String[] args) {
        SpringApplication.run(AutoConfigTestApplication.class, args);
    }
}
上面用的
@ComponentScan.Filter(type = FilterType.REGEX, pattern = "com.config.bean.exclude.*")表示排除一些不想要的Bean.
启动日志:(ExcludeBean没有被加载)