Ubuntu16.04+1080下配置Tensorflow
- 我的电脑配置
- 安装GPU版的Tensorflow注意事项
-
- 参照Tensorflow的官网安装历程
- 官方安装要求如下
- 官方TensorFlow安装历程我们需要做的事如下
- 在满足官方安装历程要求前提下需要做以下事情
-
- 安装TensorFlow
- Step-1安装新版显卡驱动
- 1禁用nouveau驱动
- 禁用Ubuntu 自带的显卡驱动编辑etcmodprobedblacklistconf
- 2卸载所有安装的nvidia驱动
- 3安装显卡驱动
- 下载驱动包
- 安装驱动包
- 判断显卡驱动是否安装成功
- 1禁用nouveau驱动
- Step-2配置CUDA和cudnn
- 1下载和安装CUDA
- CUDA的安装方式有多种这里选择run方案这种较省事
- 2 安装对应的run包
- 3 配置CUDA_HOME等环境变量
- Linux环境变量配置的三个方法介绍参见这篇Blog
- 修改bashrc文件 在文件末尾添加环境变量
- 4 测试CUDA样例
- 5 安装CUDNNv51
- 下载cuDNN
- 安装cuDNN
- 6 添加必要的库文件
- 1下载和安装CUDA
- Step-3安装Anaconda2
- 1 下载Anaconda2
- 2 安装Anaconda2
- Step-4安装TensorFlow-GPU
- 1 参照TensorFlow官方建议按照方式
- 官方建议有四种安装方式
- 参考官方的Installing with Anaconda安装过程
- 2 安装TensorFlow-GPU
- 上一步已经安装好Anaconda
- i创建名为tensorflow的conda环境
- ii依据本机配置选择合适的TensorFlow版本
- iii使用方案A或者方案B都可以安装
- 3 运行一个简单的TensorFlow程序
- 1 参照TensorFlow官方建议按照方式
- Step-5选择配置TensorFlow库的Python
- 1Anaconda2中带有TensorFlow库的Python
- 2修改默认的python解释器
- Step-6用Sublime Text3和PyCharm下引用TensorFlow
- 1Sublime Text3中配置TensorFlow
- 查看Sublime Text3的Python解释器配置文件
- 修改Sublime Text3的Python解释器配置文件
- 运行一个小程序
- 2PyCharm中配置TensorFlow
- PyCharm中为已创建的python工程更改默认解释器即可
- 运行一个程序
- 1Sublime Text3中配置TensorFlow
- Step-1安装新版显卡驱动
- 遇到的错误
- 在Pycharm中编译出现libcudartso80 cannot open shared object file No such file or directory
- 问题描述
- 问题分析
- 网上的解决办法
- 最后我的电脑解决办法
- 在Pycharm中编译出现libcudartso80 cannot open shared object file No such file or directory
- 参考文章
我的电脑配置
- 双系统:win10+Ubuntu16.04(在Ubuntu下配置)
- CPU:i7-7700k
- GPU:GTX-1080
安装GPU版的Tensorflow注意事项
参照Tensorflow的官网安装历程:
官方安装教程地址: http://www.tensorflow.org/install/install_linux
该网页打开需要.(建议整体安装过程都,下载个green或者其他)
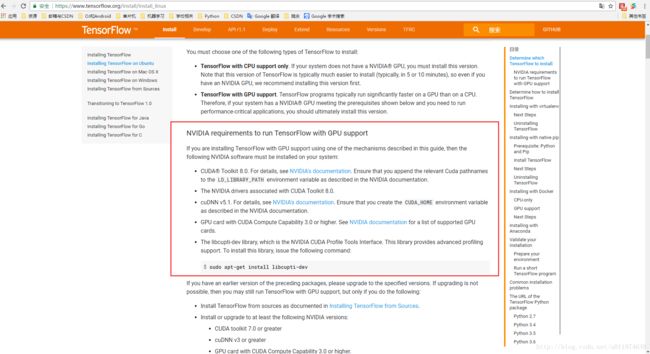
官方安装要求如下:
NVIDIA requirements to run TensorFlow with GPU support
If you are installing TensorFlow with GPU support using one of the mechanisms described in this guide, then the following NVIDIA software must be installed on your system:
  ● CUDA® Toolkit 8.0. For details, see NVIDIA's documentation. Ensure that you append the relevant Cuda pathnames to the LD_LIBRARY_PATH environment variable as described in the NVIDIA documentation.
  ● The NVIDIA drivers associated with CUDA Toolkit 8.0.
  ● cuDNN v5.1. For details, see NVIDIA's documentation. Ensure that you create the CUDA_HOME environment variable as described in the NVIDIA documentation.
  ● GPU card with CUDA Compute Capability 3.0 or higher. See NVIDIA documentation for a list of supported GPU cards.
  ● The libcupti-dev library, which is the NVIDIA CUDA Profile Tools Interface. This library provides advanced profiling support. To install this library, issue the following command:
    $ sudo apt-get install libcupti-dev
官方TensorFlow安装历程我们需要做的事如下
- 需要CUDA8.0版本 配置了LD_LIBRARY_PATH/CUDA_HOME 环境变量
- 需要cuDNN5.1版本.需要CUDA8.0版本
- 执行sudo apt-get install libcupti-dev
在满足官方安装历程要求前提下,需要做以下事情
- 安装新版显卡驱动
- 配置CUDA和cudnn
- 执行sudo apt-get install libcupti-dev
- 安装Anaconda2
- 安装TensorFlow-GPU
- 选择配置TensorFlow库的Python
- 用Sublime Text3和PyCharm下引用TensorFlow
下面开始一步一步的安装-.-
安装TensorFlow
Step-1:安装新版显卡驱动
Ubuntu下安装显卡驱动,要先禁用Ubuntu软件系统自带驱动,再安装指定的驱动包
1.1:禁用nouveau驱动
禁用Ubuntu 自带的显卡驱动:编辑/etc/modprobe.d/blacklist.conf:
sudo vim /etc/modprobe.d/blacklist.conf添加以下内容,屏蔽可能有影响的驱动包
blacklist amd76x_edac
blacklist vga16fb
blacklist nouveau
blacklist nvidiafb
blacklist rivatv
1.2:卸载所有安装的nvidia驱动
sudo apt-get remove --purge nvidia-*1.3:安装显卡驱动
下载驱动包
在http://www.geforce.cn/drivers上下载对应的显卡驱动包
我选择的是(NVIDIA-Linux-x86_64-375.66.run)
安装驱动包
Ctrl+Alt+F1进入命令提示符tty1:输入对应的username和passwd进入命令行.
sudo service lightdm stop #关闭图形界面
#进入驱动目录
sudo chmod 755 NVIDIA-Linux-x86_64-375.66.run  #修改权限
sudo ./NVIDIA-Linux-x86_64-375.66.run –no-x-check –no-nouveau-check –no-opengl-files #安装驱动
#–no-x-check 关闭X服务
#–no-nouveau-check 禁用nouveau
#–no-opengl-files 不安装OpenGL文件

#...安装完成后
sudo update-initramfs -u
sudo reboot
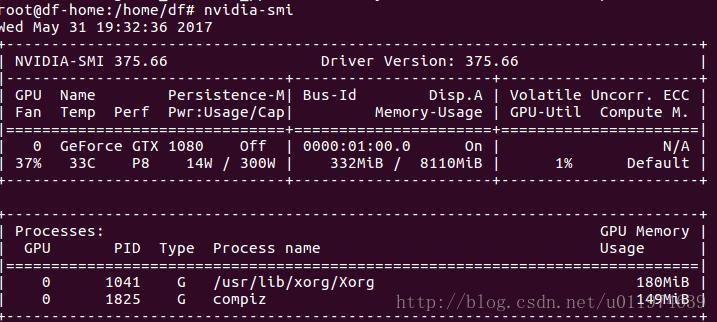
判断显卡驱动是否安装成功
nvidia-smi #输入指令查看显卡信息 出现如下信息,表示显卡驱动安装成功
Step-2:配置CUDA和cudnn
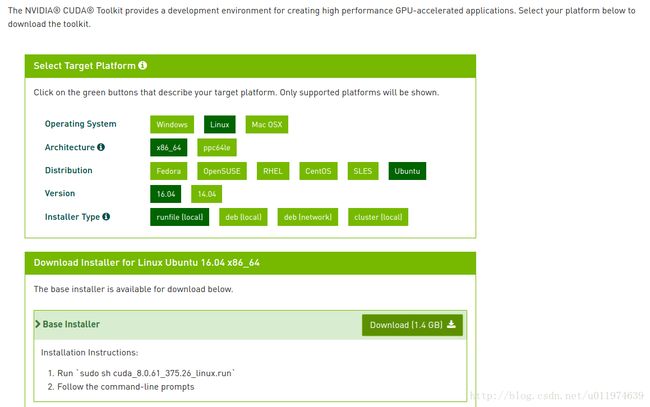
2.1:下载和安装CUDA
CUDA的安装方式有多种,这里选择run方案(这种较省事)
找到NVIDIA官网,根据系统下载cuda包(依据Tensorflow的官方历程要求,我们选择安装CUDA-8.0)
如图下载run方案安装包:
2.2: 安装对应的run包
找到下载好的cuda_8.0.61_375.26_linux.run文件
输入指令,安装过程需要配置安装选项:
sudo sh cuda_8.0.61_375.26_linux.run #开始安装

#..一堆协议说明...
#直接按q退出协议说明.
root@df-home: accept/decline/quit: accept  #接受协议

Install NVIDIA Accelerated Graphics Driver for Linux-x86_64 375.26?
y)es/(n)o/(q)uit: n  #是否显卡驱动包,选择n

Install the CUDA 8.0 Toolkit?
(y)es/(n)o/(q)uit: y #是否安装工具包,选择y

Enter Toolkit Location
[ default is /usr/local/cuda-8.0 ]: #工具包安装地址,默认回车即可

Do you want to install a symbolic link at /usr/local/cuda?
(y)es/(n)o/(q)uit: y #添加链接

Install the CUDA 8.0 Samples?
(y)es/(n)o/(q)uit: y #安装样例

Enter CUDA Samples Location
 [ default is /root ]:  #样例安装地址默认即可

# ***安装信息***
Installing the CUDA Toolkit in /usr/local/cuda-8.0 ...

Missing recommended library: libXi.so
Missing recommended library: libXmu.so

Installing the CUDA Samples in /root ...
Copying samples to /root/NVIDIA_CUDA-8.0_Samples now...
Finished copying samples.

===========
= Summary =
===========
Driver:   Not Selected
Toolkit:  Installed in /usr/local/cuda-8.0
Samples:  Installed in /root, but missing recommended libraries

Please make sure that
 -   PATH includes /usr/local/cuda-8.0/bin
 -   LD_LIBRARY_PATH includes /usr/local/cuda-8.0/lib64, or, add /usr/local/cuda-8.0/lib64 to /etc/ld.so.conf and run ldconfig as root

To uninstall the CUDA Toolkit, run the uninstall script in /usr/local/cuda-8.0/bin

Please see CUDA_Installation_Guide_Linux.pdf in /usr/local/cuda-8.0/doc/pdf for detailed information on setting up CUDA.

***WARNING: Incomplete installation! This installation did not install the CUDA Driver. A driver of version at least 361.00 is required for CUDA 8.0 functionality to work.

To install the driver using this installer, run the following command, replacing  with the name of this run file:

    sudo .run -silent -driver

Logfile is /tmp/cuda_install_6388.log
# ***安装完成***
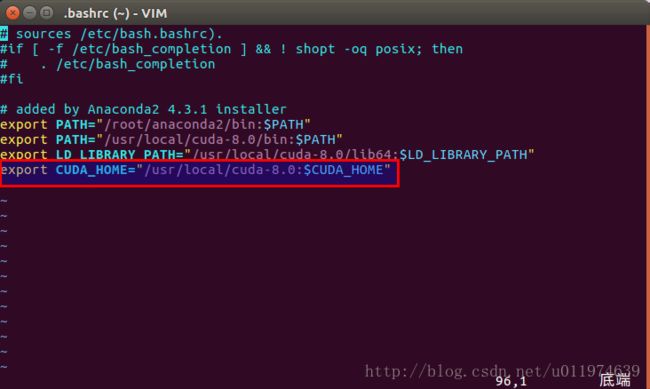
2.3: 配置CUDA_HOME等环境变量
Linux环境变量配置的三个方法介绍参见这篇Blog
修改~/.bashrc文件 在文件末尾添加环境变量
Tensorflow官方安装历程要求注意的是:配置PATH和LD_LIBRARY_PATH和CUDA_HOME环境变量.
 vim ~/.bashrc  #修改配置文件

#在文件结尾处添加
export PATH="/usr/local/cuda-8.0/bin:$PATH"
export LD_LIBRARY_PATH="/usr/local/cuda-8.0/lib64:$LD_LIBRARY_PATH"
export CUDA_HOME="/usr/local/cuda-8.0:$CUDA_HOME"
操作如图:
2.4: 测试CUDA样例
CUDA安装完成,用提供的样例试试能不能用:
#进入样例工程文件夹
root@df-home:/usr# cd /root/NVIDIA_CUDA-8.0_Samples/1_Utilities/deviceQuery/

root@df-home:~/NVIDIA_CUDA-8.0_Samples/1_Utilities/deviceQuery# ls
deviceQuery.cpp  Makefile  NsightEclipse.xml  readme.txt

#make编译工程
root@df-home:~/NVIDIA_CUDA-8.0_Samples/1_Utilities/deviceQuery# make

"/usr/local/cuda-8.0"/bin/nvcc -ccbin g++ -I../../common/inc  -m64    -gencode arch=compute_20,code=sm_20 -gencode arch=compute_30,code=sm_30 -gencode arch=compute_35,code=sm_35 -gencode arch=compute_37,code=sm_37 -gencode arch=compute_50,code=sm_50 -gencode arch=compute_52,code=sm_52 -gencode arch=compute_60,code=sm_60 -gencode arch=compute_60,code=compute_60 -o deviceQuery.o -c deviceQuery.cpp

nvcc warning : The 'compute_20', 'sm_20', and 'sm_21' architectures are deprecated, and may be removed in a future release (Use -Wno-deprecated-gpu-targets to suppress warning).

"/usr/local/cuda-8.0"/bin/nvcc -ccbin g++   -m64      -gencode arch=compute_20,code=sm_20 -gencode arch=compute_30,code=sm_30 -gencode arch=compute_35,code=sm_35 -gencode arch=compute_37,code=sm_37 -gencode arch=compute_50,code=sm_50 -gencode arch=compute_52,code=sm_52 -gencode arch=compute_60,code=sm_60 -gencode arch=compute_60,code=compute_60 -o deviceQuery deviceQuery.o

nvcc warning : The 'compute_20', 'sm_20', and 'sm_21' architectures are deprecated, and may be removed in a future release (Use -Wno-deprecated-gpu-targets to suppress warning).

mkdir -p ../../bin/x86_64/linux/release

cp deviceQuery ../../bin/x86_64/linux/release

#查看生成的可执行文件
root@df-home:~/NVIDIA_CUDA-8.0_Samples/1_Utilities/deviceQuery# ls
deviceQuery      deviceQuery.o  NsightEclipse.xml
deviceQuery.cpp  Makefile       readme.txt

#执行
root@df-home:~/NVIDIA_CUDA-8.0_Samples/1_Utilities/deviceQuery# ./deviceQuery

#输出如下表示可用
./deviceQuery Starting...
 CUDA Device Query (Runtime API) version (CUDART static linking)

Detected 1 CUDA Capable device(s)

Device 0: "GeForce GTX 1080"
  CUDA Driver Version / Runtime Version          8.0 / 8.0
  CUDA Capability Major/Minor version number:    6.1
  Total amount of global memory:                 8111 MBytes (8504868864 bytes)
  (20) Multiprocessors, (128) CUDA Cores/MP:     2560 CUDA Cores
  GPU Max Clock rate:                            1873 MHz (1.87 GHz)
  Memory Clock rate:                             5005 Mhz
  Memory Bus Width:                              256-bit
  L2 Cache Size:                                 2097152 bytes

  Maximum Texture Dimension Size (x,y,z)         1D=(131072), 2D=(131072, 65536), 3D=(16384, 16384, 16384)
  Maximum Layered 1D Texture Size, (num) layers  1D=(32768), 2048 layers
  Maximum Layered 2D Texture Size, (num) layers  2D=(32768, 32768), 2048 layers
  Total amount of constant memory:               65536 bytes
  Total amount of shared memory per block:       49152 bytes
  Total number of registers available per block: 65536
  Warp size:                                     32
  Maximum number of threads per multiprocessor:  2048
  Maximum number of threads per block:           1024
  Max dimension size of a thread block (x,y,z): (1024, 1024, 64)
  Max dimension size of a grid size    (x,y,z): (2147483647, 65535, 65535)
  Maximum memory pitch:                          2147483647 bytes
  Texture alignment:                             512 bytes
  Concurrent copy and kernel execution:          Yes with 2 copy engine(s)
  Run time limit on kernels:                     Yes
  Integrated GPU sharing Host Memory:            No
  Support host page-locked memory mapping:       Yes
  Alignment requirement for Surfaces:            Yes
  Device has ECC support:                        Disabled
  Device supports Unified Addressing (UVA):      Yes
  Device PCI Domain ID / Bus ID / location ID:   0 / 1 / 0

  Compute Mode:
     < Default (multiple host threads can use ::cudaSetDevice() with device simultaneously) >

deviceQuery, CUDA Driver = CUDART, CUDA Driver Version = 8.0, CUDA Runtime Version = 8.0, NumDevs = 1, Device0 = GeForce GTX 1080

Result = PASS
2.5: 安装CUDNNv5.1
下载cuDNN
找到NVIDIA官网,根据系统下载cudnn包(依据Tensorflow的官方安装历程要求cudnn-v5.1)
下载页面(截图是6.0,注意历程要求是5.1)

安装cuDNN
下载完成后找到cudnn-8.0-linux-x64-v5.1.tgz文件
tar -zxvf cudnn-8.0-linux-x64-v5.1.tgz #解压
uda/include/cudnn.h
cuda/lib64/libcudnn.so
cuda/lib64/libcudnn.so.5
cuda/lib64/libcudnn.so.5.1.10
cuda/lib64/libcudnn_static.a
#添加cudnn到cudn库
sudo cp cuda/include/cudnn.h /usr/local/cuda/include/
sudo cp cuda/lib64/libcudnn* /usr/local/cuda/lib64/
#修改添加到cuda库的cudnn权限
sudo chmod a+r /usr/local/cuda/include/cudnn.h
sudo chmod a+r /usr/local/cuda/lib64/libcudnn*
2.6: 添加必要的库文件
依据TensorFlow历程:执行下列命令:
sudo apt-get install libcupti-devStep-3:安装Anaconda2
3.1: 下载Anaconda2
找到Anaconda的下载网站点击这里

3.2: 安装Anaconda2
使用指令安装Anaconda2即可
bash Anaconda2-4.4.0-Linux-x86_64.sh #一路默认即可Step-4:安装TensorFlow-GPU
4.1: 参照TensorFlow官方建议按照方式
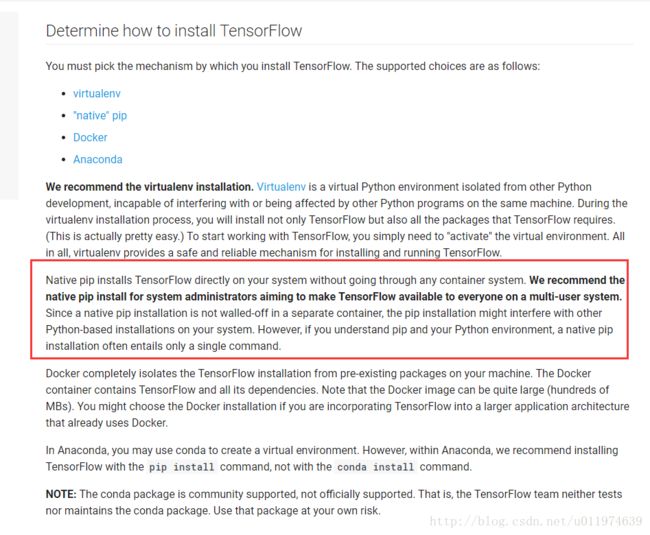
官方建议有四种安装方式:
- virtualenv
- “native” pip
- Docker
- Anaconda
对于个人用户,因为Anaconda集成了大量工具包,建议使用Anaconda方式安装TensorFlow(上一步安装Anaconda也是为这一步铺垫)
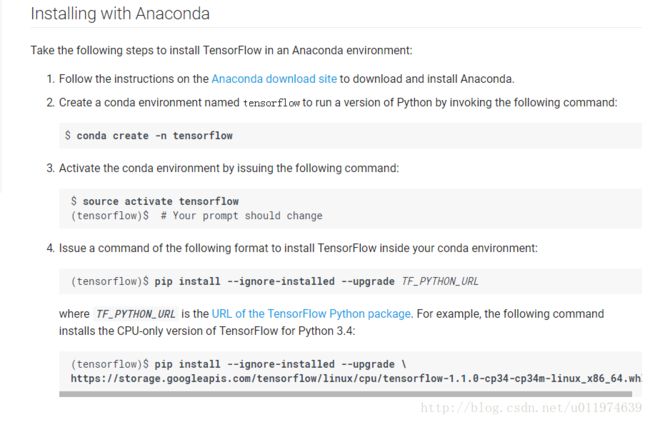
参考官方的Installing with Anaconda安装过程:
- 安装好Anaconda
- 创建名为tensorflow的conda环境
- 使用pip工具安装对应的tensorflow版本
4.2: 安装TensorFlow-GPU
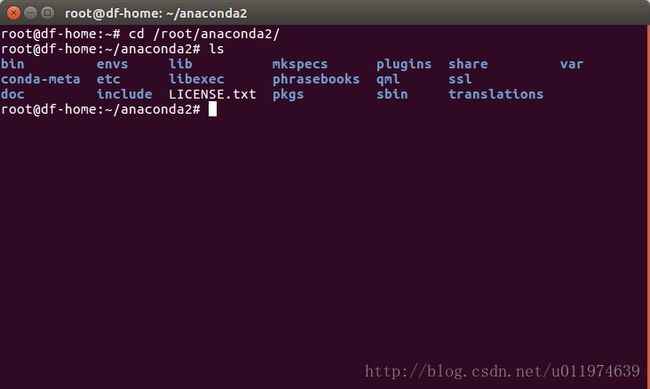
上一步已经安装好Anaconda
我的安装位置/root/anaconda2
i.创建名为tensorflow的conda环境
 conda create -n tensorflow #创建tensorflow环境空间
 source activate tensorflow #激活conda tensorflow
 (tensorflow)$  # 此时用户名前多了一个(tensorflow),表示已激活命名环境
ii.依据本机配置选择合适的TensorFlow版本
参考TensorFlow官方给的安装包地址点击这里
我们选择的GPU support:
https://storage.googleapis.com/tensorflow/linux/gpu/tensorflow_gpu-1.1.0-cp27-none-linux_x86_64.whl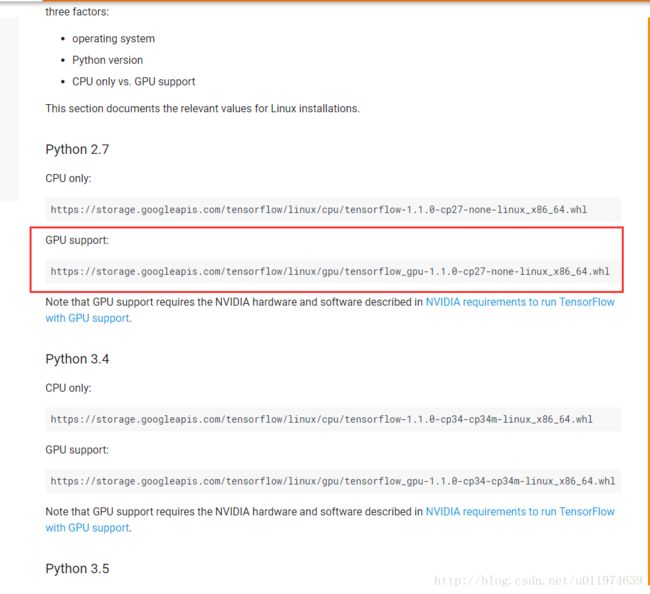
iii.使用方案A或者方案B都可以安装:
* A:使用安装命令:*
(tensorflow)$ pip install --ignore-installed --upgrade \
https://storage.googleapis.com/tensorflow/linux/gpu/tensorflow_gpu-1.1.0-cp27-none-linux_x86_64.whl
* B:或者先配置一个环境变量:*
(tensorflow)$ export TF_BINARY_URL=https://storage.googleapis.com/tensorflow/linux/gpu/tensorflow_gpu-1.1.0-cp27-none-linux_x86_64.whl

# 再使用pip安装
(tensorflow)$ pip install --ignore-installed --upgrade $TF_BINARY_URL
等待下载完成.
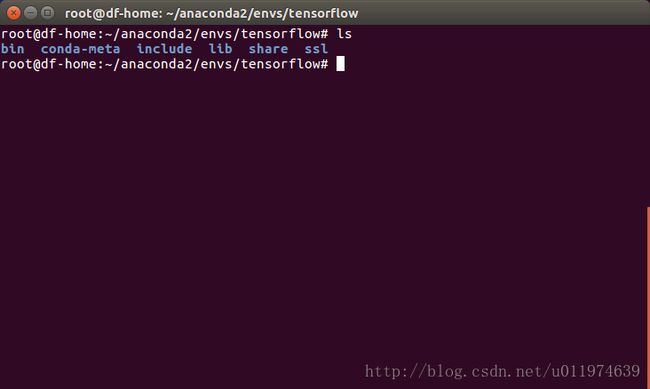
可以在找到/root/anaconda2/envs/tensorflow目录.
4.3: 运行一个简单的TensorFlow程序
编写程序步骤:
- 进入/root/anaconda2/bin,运行该目录下的python
- 导入tensorflow包,导入正常表示环境配置成功
- 编写其他代码,写出自己的Hello World!
#运行本目录的Python command:./python
root@df-home:~/anaconda2/bin# ./python

Python 2.7.13 |Anaconda custom (64-bit)| (default, Dec 20 2016, 23:09:15)
[GCC 4.4.7 20120313 (Red Hat 4.4.7-1)] on linux2
Type "help", "copyright", "credits" or "license" for more information.
Anaconda is brought to you by Continuum Analytics.
Please check out: http://continuum.io/thanks and https://anaconda.org
>>> import tensorflow as tf  #导包
>>> hello = tf.constant('Hello,TensorFlow!')
>>> sess = tf.Session()
W tensorflow/core/platform/cpu_feature_guard.cc:45] The TensorFlow library wasn't compiled to use SSE4.1 instructions, but these are available on your machine and could speed up CPU computations.
W tensorflow/core/platform/cpu_feature_guard.cc:45] The TensorFlow library wasn't compiled to use SSE4.2 instructions, but these are available on your machine and could speed up CPU computations.
W tensorflow/core/platform/cpu_feature_guard.cc:45] The TensorFlow library wasn't compiled to use AVX instructions, but these are available on your machine and could speed up CPU computations.
W tensorflow/core/platform/cpu_feature_guard.cc:45] The TensorFlow library wasn't compiled to use AVX2 instructions, but these are available on your machine and could speed up CPU computations.
W tensorflow/core/platform/cpu_feature_guard.cc:45] The TensorFlow library wasn't compiled to use FMA instructions, but these are available on your machine and could speed up CPU computations.
I tensorflow/stream_executor/cuda/cuda_gpu_executor.cc:910] successful NUMA node read from SysFS had negative value (-1), but there must be at least one NUMA node, so returning NUMA node zero
I tensorflow/core/common_runtime/gpu/gpu_device.cc:885] Found device 0 with properties:
name: GeForce GTX 1080
major: 6 minor: 1 memoryClockRate (GHz) 1.873
pciBusID 0000:01:00.0
Total memory: 7.92GiB
Free memory: 7.34GiB
I tensorflow/core/common_runtime/gpu/gpu_device.cc:906] DMA: 0
I tensorflow/core/common_runtime/gpu/gpu_device.cc:916] 0:   Y
I tensorflow/core/common_runtime/gpu/gpu_device.cc:975] Creating TensorFlow device (/gpu:0) -> (device: 0, name: GeForce GTX 1080, pci bus id: 0000:01:00.0)
>>> print(sess.run(hello))
Hello,TensorFlow!  #大功告成
(图片内的使用python而不是./python是因为的配置了系统默认启动的python解释器,参见step-5)
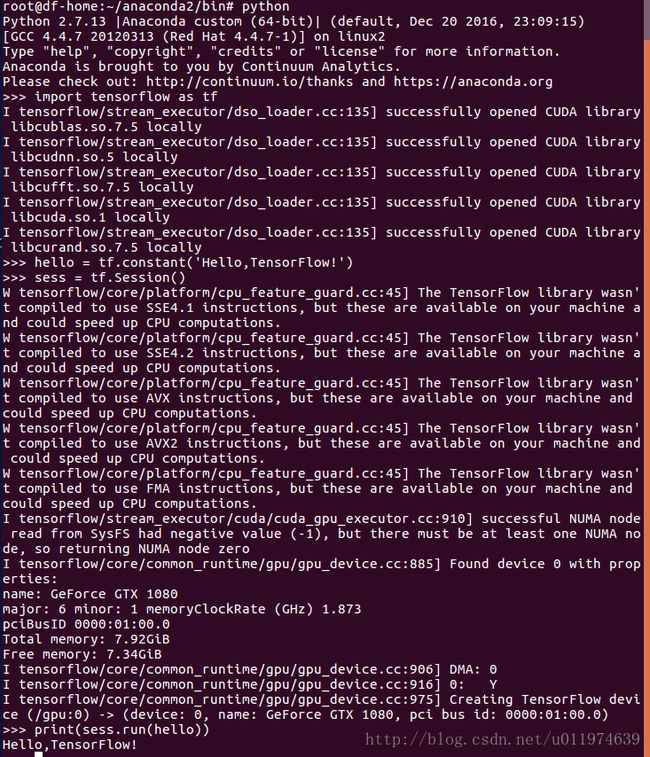
运行成功,终于hello出来了~
Step-5:选择配置TensorFlow库的Python
5.1:Anaconda2中带有TensorFlow库的Python
带有TensorFlow库的Python环境安装在Anaconda2下,该Python解释器是位于/root/acaconda2/bin/下的python,所以上一节我们使用./python命令启动.
现在我们需要把系统默认的python解释器修改为该python解释器
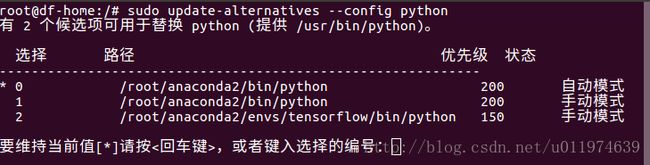
5.2:修改默认的python解释器
# 使用 update-alternatives –install 指令添加python启动器选项  数字200为启动优先级(大的优先)
sudo update-alternatives –install /usr/bin/python python /root/acaconda2/bin/python 200

#使用update-alternatives –config 指令查看当前python启动器可选项
sudo update-alternatives –config python
我的电脑python解释器可选项如下:
Step-6:用Sublime Text3和PyCharm下引用TensorFlow
6.1:Sublime Text3中配置TensorFlow
查看Sublime Text3的Python解释器配置文件
在Sublime中安装PackageResourceViewer插件
- 按Ctrl+Shift+P
- 输入install,选择Package Control: Install Package
- 选择PackageResourceViewer,安装
查看默认的 Python.sublime-build
- Ctrl+Shift+P
- 输入 resource,选择PackageResourceViewer:Open Resource
- 再选择Python,再再选择Python.sublime-build
Python.sublime-build内容如下图:
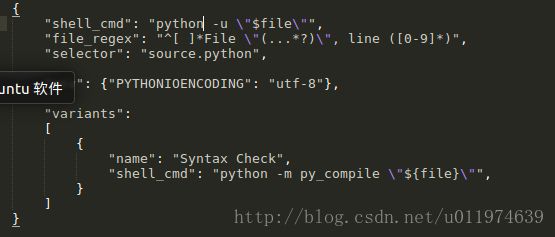
修改Sublime Text3的Python解释器配置文件
配置文件Python.sublime-build内容:
{
    "shell_cmd": "python -u \"$file\"",
    "file_regex": "^[ ]*File \"(...*?)\", line ([0-9]*)",
    "selector": "source.python",

    "env": {"PYTHONIOENCODING": "utf-8"},

    "variants":
    [
        {
            "name": "Syntax Check",
            "shell_cmd": "python -m py_compile \"${file}\"",
        }
    ]
}
其中”shell_cmd”:指定python解释器的
  # 如果系统默认启动器带有tensorflow,这样配置即可使用
  "shell_cmd": "python -u \"$file\"", 指定python解释器的地址

  #如果系统默认解释器不带有,可以指定解释器的绝对位置
  "shell_cmd": "/root/anaconda2/bin/python -u \"$file\"",

  #使用绝对路径的配置文件如下
  {
    "shell_cmd": "/root/anaconda2/bin/python -u \"$file\"",
    "file_regex": "^[ ]*File \"(...*?)\", line ([0-9]*)",
    "selector": "source.python",

    "env": {"PYTHONIOENCODING": "utf-8"},

    "variants":
    [
        {
            "name": "Syntax Check",
            "shell_cmd": "python -m py_compile \"${file}\"",
        }
    ]
}
运行一个小程序
程序代码:
import tensorflow as tf

hello = tf.constant("Hello,TF")
sess = tf.Session()
print(sess.run(hello))
print('fan')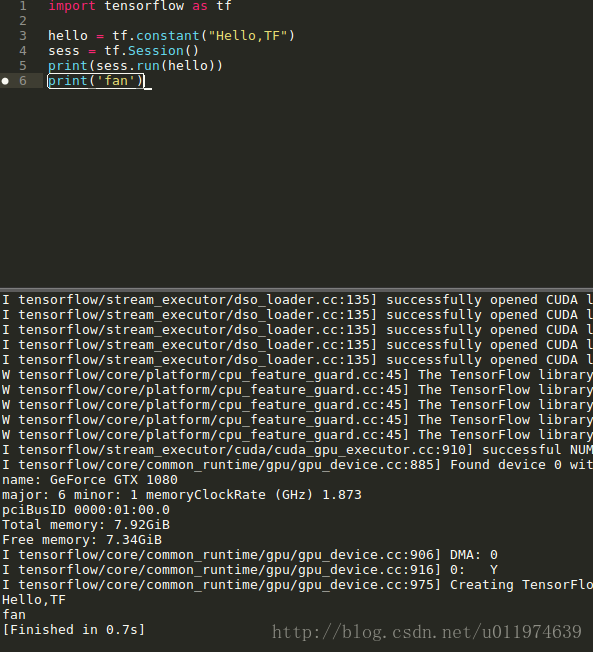
运行成功,嘿嘿~
6.2:PyCharm中配置TensorFlow
PyCharm中为已创建的python工程更改默认解释器即可.
操作过程如下:
- 创建工程:demo2
- | File |Settings | 左栏Project: demo2 | Project Interpreter
- |点击小齿轮(选择工程的解释器)|Add Local | 选择解释器地址
配置如图:
我的电脑带有TensorFlow的Python解释器地址是:/root/acaconda2/bin/python

运行一个程序
import tensorflow as tf

hello = tf.constant("Hello,TF")
config = tf.ConfigProto(allow_soft_placement=True)
gpu_options = tf.GPUOptions(per_process_gpu_memory_fraction=0.7)
config.gpu_options.allow_growth = True
sess = tf.Session(config=config)
print(sess.run(hello))
运行成功,哈哈~
终于配置完成了,后面先学习一些机器学习的算法,再来整TensorFlow~
遇到的错误
在Pycharm中编译出现libcudart.so.8.0: cannot open shared object file: No such file or directory
问题描述
在Pycharm中编译出现libcudart.so.8.0: cannot open shared object file: No such file or directory。但是在的终端使用python没有任何异常。
问题分析
找不到libcudart.so.8.0这个文件,说明应该是没配置好环境,或者是缺失这个文件。这个文件属于CUDA的,我在/usr/local/cuda-8.0/lib64下是有找到这个文件的。所以不是没有这个文件。那应该是就是环境问题。
网上的解决办法:
使用如下命令:
export LD_LIBRARY_PATH=$LD_LIBRARY_PATH:/usr/local/cuda/lib64/这个方法是针对没有配置好环境变量,事实上我已经在~/.bashrc里面配置好了这个环境变量了。这里我发现/usr/local/cuda是一个软链接目录,可能是这个软连接的问题。故采取下面的办法。
最后我的电脑解决办法
觉得应该是软连接出了问题,所以就重新配置了一下。使用以下命令:
sudo ldconfig /usr/local/cuda/lib64 成功在Pycharm下编译工程了
参考文章
https://www.tensorflow.org/install/install_linux
http://www.jianshu.com/p/d72905e9bec5
https://zhuanlan.zhihu.com/p/27168325
http://www.cnblogs.com/net66/p/5598383.html