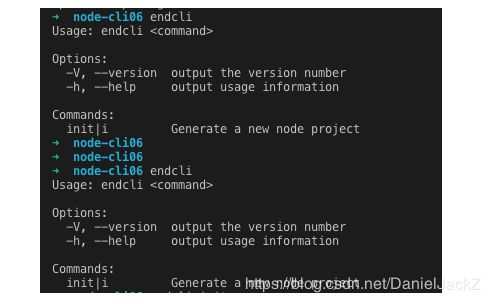
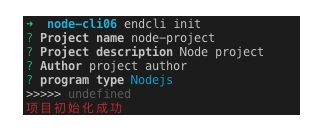
使用node搭建一个脚手架子
Program-cli文档
项目需求:
- 实现一个 cli 小工具用于快速创建后端项目。
项目难点:
- 多工具的集成(根据用户选择的语言去安装不同的代码检测工具jslint or tslint,并实现交互)
- 多语言配置文件的交互选择
- nodejs转typescript
需要用到的相关模块
commander.js,可以自动的解析命令和参数,用于处理用户输入的命令。
download-git-repo,下载并提取 git 仓库,用于下载项目模板。
Inquirer.js,通用的命令行用户界面集合,用于和用户进行交互。
handlebars.js,模板引擎,将用户提交的信息动态填充到文件中。(一版本暂时未用到)
ora,下载过程久的话,可以用于显示下载中的动画效果。(暂时未用到)
chalk,可以给终端的字体加上颜色。
项目实现流程
1.下载安装nvm(node版本管理工具)
2.下载nodejs版本(建议下载v10.15.3)
3.新建文件夹,切换到文件夹中并初始化文件夹(npm init -y),生成package.json文件
4.在package.json文件中加入bin命令(命令自己随便定义,加入命令后在终端输入bin命令会自动执行bin后对应的文件)
5.中端输入npm install -g
注意点
- 当你修改bin命令的名称时需要再次npm install -g,否则命令将不会生效
- 关于npm install -g的作用
关于npm install -g的解释:
我们在写命令行工具的时候,需要指定一个可执行文件。在package.json中,
bin字段用来映射命令名和可执行文件。在通过npm install -g全局安装的时候,npm会symlink可执行文件到prefix/bin文件夹。
如果通过npm install本地安装的时候, npm会symlink可执行文件到./node_modules/.bin/文件夹。
6.安装上面提到过的这几个脚手架依赖工具,执行npm install chalk commander download-git-repo inquirer ora --save完成安装
补充关于npm各种安装的差异详见:
npm安装的差异
7.生成项目目录
root = true

[*]
charset = utf-8
indent_style = space
indent_size = 4
end_of_line = lf
insert_final_newline = true
trim_trailing_whitespace = true
在bin目录下创建main.js编写项目入口文件
注意事项 :
- 文件开头需要加上
#! /usr/bin/env node(对应的项目运行环境) - 使用commander命令最后需要加上program.parse(process.argv)
#! /usr/bin/env node

process.env.NODE_PATH = __dirname + "/../node_modules";
const { resolve } = require("path");
const res = command => resolve(__dirname, '../commands/', command);
const program = require("commander");
const pkg = require("../package.json");

program
    .version(pkg.version)

program
    .usage("")

program
    .command("init")
    .description("Generate a new node project")
    .alias("i")
    .action(() => {
        require(res("init"))
    })

program.parse(process.argv)

// 判断终端上输入出来bin中的命令是否还有其他值,如果没有终端会直接输出help
if(!program.args || !program.args.length){
    program.help()
    }
在commands中的init.js编写具体命令代码
const inquirer = require("inquirer");
const program = require("commander");
const chalk = require("chalk");
const download = require("download-git-repo");
const ora = require("ora");
const spinner = ora("Downloading please wait......");
const fs = require("fs");
const path = require("path");
const option = program.parse(process.argv).args[0];
// 生产项目默认名
const defaultName = typeof option === "string" ? option : "node-project";
// 交互使用的问题
const questionList = [
    {
        type: 'input',
        name: 'Project name',
        message: 'Project name',
        default: defaultName,
        filter(val) {
          return val.trim()
        },
        // 验证数据
        validate(val) {
          const validate = (val.trim().split(" ")).length === 1
          return validate || 'Project name is not allowed to have spaces ';
        },
        transformer(val) {
          return val;
        }
      },{
        type: 'input',
        name: 'description',
        message: 'Project description',
        default: 'Node project',
        validate (val) {
          return true;
        },
        transformer(val) {
          return val;
        }
      }, {
        type: 'input',
        name: 'author',
        message: 'Author',
        default: 'project author',
        validate (val) {
          return true;
        },
        transformer(val) {
          return val;
        }
      },{
        type: "list",
        name: "program type",
        message: "program type",
        choices: [
            "Nodejs",
            "Typescript",
            "Python"
        ],
        default:"nodejs",
        // 使用filter将回答变成小写
        filter: function(val){
            return val.toLowerCase();
        }
    }
]
// 生成项目目录
fs.mkdir(defaultName, err => {
    if(err){
        console.log("项目目录生成失败")
    }
})

// 根据用户选择的语言去配置对应的配置文件
inquirer.prompt(questionList).then(answers => {
    if (answers["program type"] === "nodejs"){
      spinner.start();
      download("direct:https://gitlab.com/zjiahuizjh/auto-cli#node-conf", answers["Project name"] + "/config", { clone: true }, (err) => {
        if(err){
            spinner.stop();
            console.log(err)
        }else{
            spinner.stop();
            console.log(chalk.red("项目初始化成功"));
        }
    });
    }else if(answers["program type"] === "typescript"){
      spinner.start();
      download("direct:https://gitlab.com/zjiahuizjh/auto-cli#ts-conf", answers["Project name"] + "/config", { clone: true }, (err) => {
        if(err){
            spinner.stop();
            console.log(err)
        }else{
            spinner.stop();
            console.log(chalk.red("项目初始化成功"));
        }
    });
    }else{
      spinner.start();
      download("direct:https://gitlab.com/zjiahuizjh/auto-cli#py-config", answers["Project name"] + "/config", { clone: true }, (err) => {
        if(err){
            spinner.stop();
            console.log(err)
        }else{
            spinner.stop();
            console.log(chalk.red("项目初始化成功"));
        }
    });
    }
})
配置项目的配置文件
.gitignore(不需要上传的文件)
node_modules
.npmrc(锁定npm版本)
save-exact=true
8.将编写好的cli发布到npm中
参考:发布一个npm包


