spring boot+mybatis实现简单的CRUD
spring boot+mybatis实现简单的CRUD
- 创建spring boot项目
- 测试
- 步入正题
- 运行结果
本人现在是一位专科大二学生,我的专业是软件开发。由于寒假疫情缘故无法正常开学,大一基本是混过来的,想到开学就大三了,专业知识没学多少,所以决心在家猛补Java。
使用工具:IDEA、Navicat Premium 12
创建spring boot项目
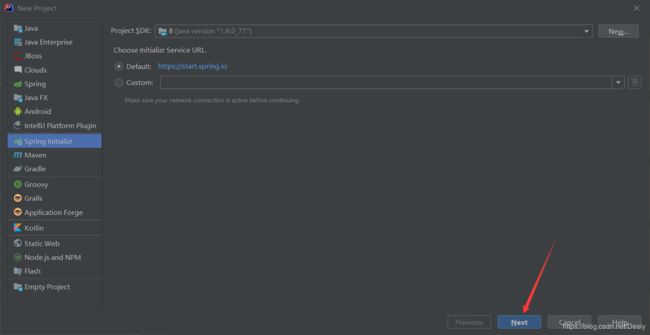
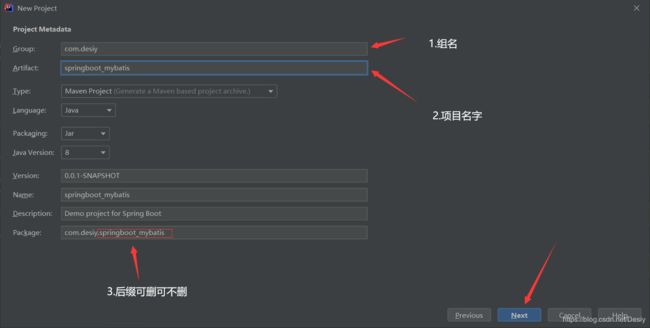
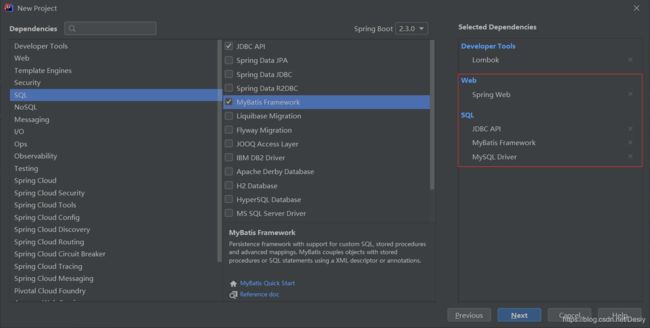
Lombok可以不点,不知道这个依赖怎么用的我后面用到的时候简单说一下。如果要使用必须下载Lombok插件!项目创建完成了。
最后检查pom文件。
<?xml version="1.0" encoding="UTF-8"?>
<project xmlns="http://maven.apache.org/POM/4.0.0" xmlns:xsi="http://www.w3.org/2001/XMLSchema-instance"
         xsi:schemaLocation="http://maven.apache.org/POM/4.0.0 https://maven.apache.org/xsd/maven-4.0.0.xsd">
    <modelVersion>4.0.0</modelVersion>
    <parent>
        <groupId>org.springframework.boot</groupId>
        <artifactId>spring-boot-starter-parent</artifactId>
        <version>2.3.0.RELEASE</version>
        <relativePath/> <!-- lookup parent from repository -->
    </parent>
    <groupId>com.desiy</groupId>
    <artifactId>springboot_mybatis</artifactId>
    <version>0.0.1-SNAPSHOT</version>
    <name>springboot_mybatis</name>
    <description>Demo project for Spring Boot</description>

    <properties>
        <java.version>1.8</java.version>
    </properties>

    <dependencies>
        <dependency>
            <groupId>org.springframework.boot</groupId>
            <artifactId>spring-boot-starter-jdbc</artifactId>
        </dependency>
        <dependency>
            <groupId>org.springframework.boot</groupId>
            <artifactId>spring-boot-starter-web</artifactId>
        </dependency>
        <dependency>
            <groupId>org.mybatis.spring.boot</groupId>
            <artifactId>mybatis-spring-boot-starter</artifactId>
            <version>2.1.2</version>
        </dependency>

        <dependency>
            <groupId>mysql</groupId>
            <artifactId>mysql-connector-java</artifactId>
            <scope>runtime</scope>
        </dependency>
        <dependency>
            <groupId>org.projectlombok</groupId>
            <artifactId>lombok</artifactId>
            <optional>true</optional>
        </dependency>
        <dependency>
            <groupId>org.springframework.boot</groupId>
            <artifactId>spring-boot-starter-test</artifactId>
            <scope>test</scope>
            <exclusions>
                <exclusion>
                    <groupId>org.junit.vintage</groupId>
                    <artifactId>junit-vintage-engine</artifactId>
                </exclusion>
            </exclusions>
        </dependency>
    </dependencies>

    <build>
        <plugins>
            <plugin>
                <groupId>org.springframework.boot</groupId>
                <artifactId>spring-boot-maven-plugin</artifactId>
            </plugin>
        </plugins>
    </build>

</project>
测试
创建完项目首先测试一下能否运行spring。
- 先写好配置文件:application.yml
spring:
  datasource:
    username: root
    password: 123456
    url: jdbc:mysql://localhost:3306/cap?serverTimezone=UTC&useUnicode=true&characterEncoding=UTF-8
    driver-class-name: com.mysql.jdbc.Driver
- 写一个Controller测试环境:
步入正题
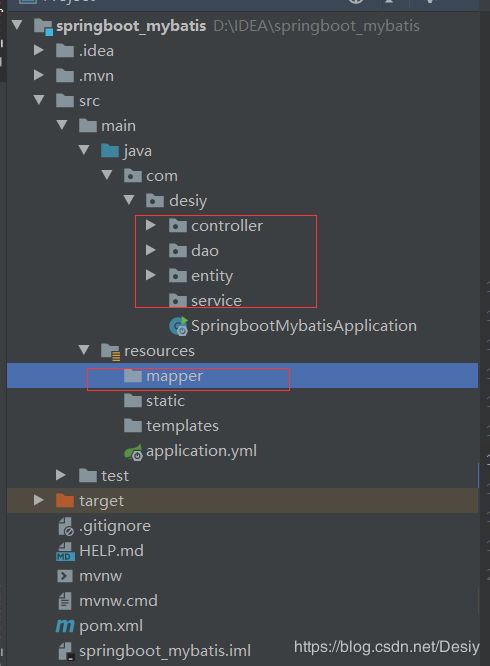
mapper:StudentMapper.xml
<?xml version="1.0" encoding="UTF-8" ?>
<!DOCTYPE mapper PUBLIC "-//mybatis.org//DTD Mapper 3.0//EN"
        "http://mybatis.org/dtd/mybatis-3-mapper.dtd">
<mapper namespace="com.desiy.dao.StudentMapper">

    <select id="queryList" resultType="Student">
        select * from student
    </select>

    <select id="queryById" resultType="Student">
        select * from student where id = #{id}
    </select>

    <insert id="add" parameterType="Student">
        insert into student (id,name,address,phone) values (#{id},#{name},#{address},#{phone})
    </insert>

    <update id="update" parameterType="Student">
        update student set name = #{name},address = #{address},phone = #{phone} where id = #{id}
    </update>

    <delete id="delete" parameterType="int">
        delete from student where id = #{id}
    </delete>
</mapper>
entity:Student
package com.desiy.entity;

import lombok.AllArgsConstructor;
import lombok.Data;
import lombok.NoArgsConstructor;

/**
@Data  作用于类上,是以下注解的集合:@ToString @EqualsAndHashCode @Getter @Setter @RequiredArgsConstructor
@NoArgsConstructor  自动生成无参构造函数。
@AllArgsConstructor  自动生成所有参数的有参构造函数。
*/
@Data
@NoArgsConstructor
@AllArgsConstructor
public class Student {
    private int id;
    private String name;
    private String address;
    private String phone;
}
dao:StudentMapper
package com.desiy.dao;

import com.desiy.entity.Student;
import org.apache.ibatis.annotations.Mapper;
import java.util.List;

/**
 * @author Desiy
 * @date 2020/6/4 16:19
 */
//这个注解表示了这是一个mybatis的mapper类与component用法一样
@Mapper
public interface StudentMapper {
    List<Student> queryList();
    Student queryById(int id);
    int add(Student student);
    int update(Student student);
    int delete(int id);
}
service:StuentService and StudentServiceImpl
package com.desiy.service;

import com.desiy.entity.Student;
import java.util.List;

/**
 * @author Desiy
 * @date 2020/6/4 16:30
 */
public interface StudentService {
    List queryList();
    Student queryById(int id);
    int add(Student student);
    int update(Student student);
    int delete(int id);
}
package com.desiy.service;

import com.desiy.dao.StudentMapper;
import com.desiy.entity.Student;
import org.springframework.stereotype.Service;

import javax.annotation.Resource;
import java.util.List;

/**
 * @author Desiy
 * @date 2020/6/4 16:32
 */
@Service
public class StudentServiceImpl implements StudentService{

    @Resource
    StudentMapper studentMapper;

    @Override
    public List<Student> queryList() {
        return studentMapper.queryList();
    }
    @Override
    public Student queryById(int id) {
        return studentMapper.queryById(id);
    }
    @Override
    public int add(Student student) {
        return studentMapper.add(student);
    }
    @Override
    public int update(Student student) {
        return studentMapper.update(student);
    }
    @Override
    public int delete(int id) {
        return studentMapper.delete(id);
    }
}
4.在application.xml中整合mybatis
spring:
  datasource:
    username: root
    password: 123456
    url: jdbc:mysql://localhost:3306/cap?serverTimezone=UTC&useUnicode=true&characterEncoding=UTF-8
    driver-class-name: com.mysql.jdbc.Driver
mybatis:
  type-aliases-package: com.desiy.entity
  mapper-locations: classpath:mapper/**.xml
最后写controller:StudentController
package com.desiy.controller;

import com.desiy.entity.Student;
import com.desiy.service.StudentService;
import org.springframework.web.bind.annotation.GetMapping;
import org.springframework.web.bind.annotation.RequestMapping;
import org.springframework.web.bind.annotation.RestController;

import javax.annotation.Resource;
import java.util.List;

/**
 * @author Desiy
 * @date 2020/6/4 16:19
 */
@RestController
public class StudentController {

    @Resource
    StudentService studentService;

    //查询全部
    @RequestMapping("/queryList")
    List<Student> query(){
        List<Student> students = studentService.queryList();
        return students;
    }
    //添加
    @RequestMapping("/add")
    int add(){
        studentService.add(new Student(1, "s", "a", "15561"));
        return 1;
    }
    //修改
    @RequestMapping("/update")
    int update(){
        studentService.update(new Student(1,"小小","gasdasda","26165165156165"));
        return 1;
    }
    //删除
    @RequestMapping("/del")
    int delete(){
        studentService.delete(3);
        return 1;
    }
}
运行结果
http://localhost:8080/queryList
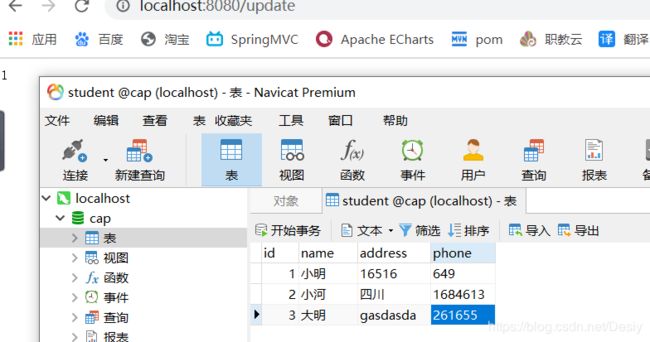
http://localhost:8080/update
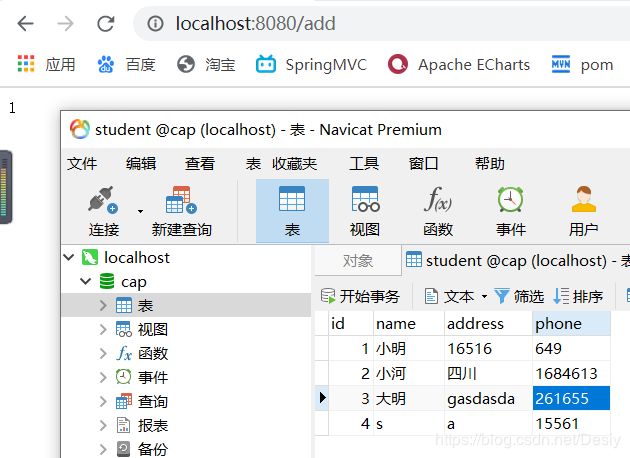
http://localhost:8080/add
http://localhost:8080/del
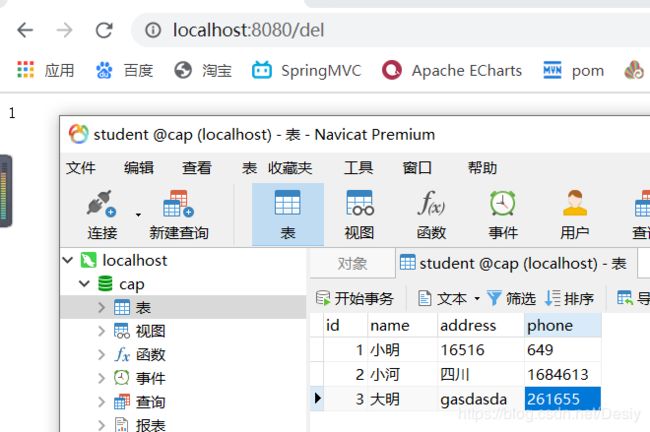
补充:这是我第一篇博客,页面没有花里胡哨,如果代码有什么问题大佬可一定指出,如果是和我一样的小白希望能共同学习,朝着梦想继续加油。当然如果有什么疑问也可在评论区提出来。


