win10家庭版安装使用Docke并使用Docker部署springboot
win10家庭版安装使用Docke并使用Docker部署springboot
win10 家庭版开始使用是Boot2Docker镜像,但是在官方上表明Boot2Docker处于维护状态 2018/12/14 ,不建议使用Boot2Docker,推荐使用 Docker for Mac 或者Docker for Windows。但是Windows 家庭版不支持Docker for Windows,详情查看 :https://github.com/boot2docker/boot2docker#readme,所以就没有使用这个了换了一个CentOS 7。
对于docker的基本知识,命令不再说明
以下是使用CentOS7进行的配置,跟boot2docker效果是一样的。
步骤
-
下载一个虚拟机 安装ubunt 或者CentOS (CentOS7为例)
-
在虚拟机上安装docker
-
配置docker
-
在win10上使用STS创建一个spring boot 项目
-
添加maven 插件 出现问题
-
修改bug
-
运行mvn package docker:build
-
OK
1.CentOS基本信息
准备一个Linux系统的虚拟机 或者服务器。
关闭防火墙,可能会阻挡你连接docker
[root@localhost ~]# systemctl stop firewalld.service之后我又重新配置了网络 ,更换了IP
2.安装docker-ce
为了方便操作,我是用xshell 连接虚拟机,
使用下面这个命令就可以直接在虚拟机上安装Docker,但是官方比较推荐使用 先设置Docker存储库并从中进行安装。
sudo yum install docker-ce在新主机上首次安装Docker CE之前,需要设置Docker存储库。之后,您可以从存储库安装和更新Docker。(推荐方法)
设置存储库并安装Docker

1、安装所需的包

sudo yum install -y yum-utils device-mapper-persistent-data lvm2

2、设置稳定存储库

sudo yum-config-manager --add-repo https://download.docker.com/linux/centos/docker-ce.repo

3、启用边缘和测试存储库 (可选)  即使开启边缘和测试存储库  稳定存储库也是一直开启使用的

sudo yum-config-manager --enable docker-ce-edge    # 边缘

sudo yum-config-manager --enable docker-ce-test    # 测试

4、也可以禁用存储库

sudo yum-config-manager --disable docker-ce-edge

5、安装docker

sudo yum -y install docker-ce

6、安装完成之后启动docker服务

sudo systemctl start docker

7、设置开机启动docker

systemctl enable docker

8、测试

docker run hello-world
出现 下面情景表明docker安装成功
[root@localhost ~]# docker version

Client:
Version:         1.13.1
API version:     1.26
Package version: docker-1.13.1-88.git07f3374.el7.centos.x86_64
Go version:      go1.9.4
Git commit:      07f3374/1.13.1
Built:           Fri Dec  7 16:13:51 2018
OS/Arch:         linux/amd64

Server:
Version:         1.13.1
API version:     1.26 (minimum version 1.12)
Package version: docker-1.13.1-88.git07f3374.el7.centos.x86_64
Go version:      go1.9.4
Git commit:      07f3374/1.13.1
Built:           Fri Dec  7 16:13:51 2018
OS/Arch:         linux/amd64
Experimental:    false

[root@localhost ~]# docker run hello-world

Hello from Docker!
This message shows that your installation appears to be working correctly.
To generate this message, Docker took the following steps:
1. The Docker client contacted the Docker daemon.
2. The Docker daemon pulled the "hello-world" image from the Docker Hub. (amd64)
3. The Docker daemon created a new container from that image which runs the
    executable that produces the output you are currently reading.
4. The Docker daemon streamed that output to the Docker client, which sent it
    to your terminal.
To try something more ambitious, you can run an Ubuntu container with:
$ docker run -it ubuntu bash
Share images, automate workflows, and more with a free Docker ID:
https://hub.docker.com/
For more examples and ideas, visit:
https://docs.docker.com/get-started/
3.配置docker
镜像加速配置

新版的 Docker 使用 /etc/docker/daemon.json(Linux) 或者 %programdata%\docker\config\daemon.json(Windows) 来配置 Daemon。
请在该配置文件中加入(没有该文件的话,请先建一个)

[root@localhost ~]# vim /etc/docker/daemon.json

将下面内容放入就行了
{

  "registry-mirrors": ["https://lb5xe3h9.mirror.aliyuncs.com"]

}
4.win10创建springboot项目(不连接数据库)
1、pom.xml


           org.springframework.boot
           spring-boot-starter-parent
           2.1.1.RELEASE


           org.springframework.boot
           spring-boot-starter-web


2、添加映射

@SpringBootApplication
@RestController
public class DockertestApplication {
      public static void main(String[] args) {
           SpringApplication.run(DockertestApplication.class,  args);

      }
      @RequestMapping("/hello")
      public String gethello() {
           return "hello-world";
      }

}

3、打成jar包

mvn package

4、运行jar包

D:\workspace1\dockertest\target>java -jar dockertest-0.0.1-SNAPSHOT.jar

输入:http://localhost:8080/hello 页面出现“hello-world”
5.添加docker-maven-plugin:1.2.0 maven 插件
1、首先要配置DOCKER_HOST

docker-maven-plugin 插件默认连接本地 Docker 地址为:localhost:2375,所以我们需要先设置下环境变量。

配置环境变量
在环境变量中添加下面

DOCKER_HOST=tcp://172.18.73.55:2375

也可以在  pom.xml 添加
 http://172.18.73.55:2375

下面格式
dockertest
java
http://47.107.148.168:2375


2、项目添加maven 插件

https://github.com/spotify/docker-maven-plugin    参考官方

官方推荐使用 dockerfile-maven-plugin   maven 插件 来打包镜像  但是我使用的是  docker-maven-plugin


                      org.springframework.boot

                       spring-boot-maven-plugin


                      com.spotify

                      docker-maven-plugin

                      http://47.107.148.168:2375

                      1.2.0


                            dockertest

                            java

                            ["java", "-jar",  "/${project.build.finalName}.jar"]


                                       /

                                       ${project.build.directory}

                                       ${project.build.finalName}.jar


3、打包

mvn package docker:build

4、报错

Connect to 172.18.73.55:2375 [/172.18.73.55] failed: connect  timed out

无法连接72.18.73.55:2375、连接超时

如果没有重启或者没有配置环境变量会出现下面报错

Connect to localhost:2375 [localhost/127.0.0.1, localhost/0:0:0:0:0:0:0:1] failed: connect  timed out
6.修改bug
以下配置只能测试使用,不可在云服务器使用,有超级大的漏洞。
这个是虚拟机中的docker拒绝远程连接,所以我们要打开docker远程API连接

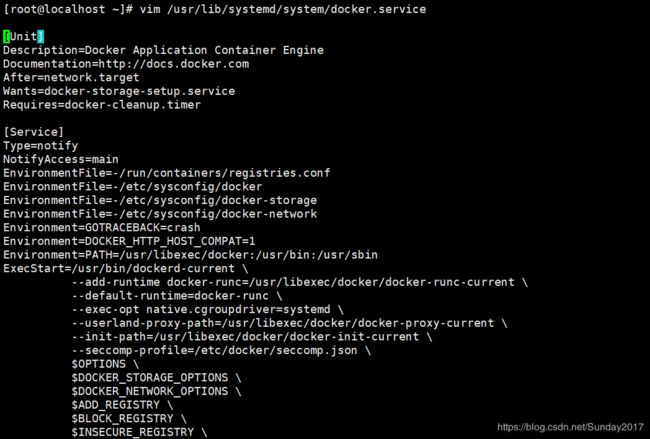
1.打开docker配置文件  上图

[root@localhost ~]# vim /usr/lib/systemd/system/docker.service

2、添加2375 支持

ExecStart=/usr/bin/dockerd-current -H unix://var/run/docker.sock -H tcp://0.0.0.0:2375 \

3、将管理地址写入/etc/profile

[root@localhost ~]# echo 'export DOCKER_HOST=tcp://0.0.0.0:2375' >> /etc/profile

[root@localhost ~]# source /etc/profile

4、重新启动docker

[root@localhost ~]# sudo systemctl daemon-reload

[root@localhost ~]# sudo systemctl restart docker

5、查看docker进程,发现docker守护进程在已经监听2375的tcp端口

[root@localhost ~]# ps -ef|grep docker

root      1571     1  0 11:51 ?        00:00:00 /usr/bin/dockerd-current -H unix://var/run/docker.sock -H tcp://0.0.0.0:2375 --add-runtime docker-runc=/usr/libexec/docker

7.运行mvn package docker:build

在此在项目上执行mvn clean package docker:build

执行mvn clean package docker:build 命令可能还会出现上面的问题,不能连接docker, 这个是被防火墙阻挡了,所以不能访问,关闭防火墙,还要重启docker   systemtcl restart docker。

第一次运行打包命令的时候,时间交超长一点。

[INFO] Building image dockertest

Step 1/3 : FROM java

---> d23bdf5b1b1b

Step 2/3 : ADD /dockertest-0.0.1-SNAPSHOT.jar //

---> 9ee66c68d342

Removing intermediate container 3035d486ebca

Step 3/3 : ENTRYPOINT java -jar /dockertest-0.0.1-SNAPSHOT.jar

---> Running in e7c8e51b8207

---> f48b3e3ae5ed

Removing intermediate container e7c8e51b8207

Successfully built f48b3e3ae5ed

[INFO] Built dockertest

[INFO]  ------------------------------------------------------------------------

[INFO] BUILD SUCCESS

[INFO]  ------------------------------------------------------------------------

[INFO] Total time: 14.491 s

[INFO] Finished at: 2018-12-13T13:02:55+08:00

[INFO]  ------------------------------------------------------------------------
8.OK
1、在虚拟上查看镜像   已经存在sockertst

[root@localhost ~]# docker images

REPOSITORY              TAG                 IMAGE ID            CREATED             SIZE

dockertest              latest              f48b3e3ae5ed        20 minutes ago      660 MB

docker.io/hello-world   latest              4ab4c602aa5e        3 months ago        1.84 kB

docker.io/java          latest              d23bdf5b1b1b        23 months ago       643 MB

2、运行dockertest镜像   -p: 端口映射,格式为:主机(宿主)端口:容器端口

[root@localhost ~]# docker run -p 80:8080 f48b

  .   ____          _            __ _ _

/\\ / ___'_ __ _ _(_)_ __  __ _ \ \ \ \

( ( )\___ | '_ | '_| | '_ \/ _` | \ \ \ \

\\/  ___)| |_)| | | | | || (_| |  ) ) ) )

  '  |____| .__|_| |_|_| |_\__, | / / / /

=========|_|==============|___/=/_/_/_/

:: Spring Boot ::        (v2.1.1.RELEASE)


2018-12-13 05:30:06.923  INFO 1 --- [           main] com.sjy.DockertestApplication            : Starting DockertestApplication v0.0.1-SNAPSHOT on d1d0d4e45c30 with PID 1 (/dockertest-0.0.1-SNAPSHOT.jar started by root in /)

2018-12-13 05:30:06.952  INFO 1 --- [           main] com.sjy.DockertestApplication            : No active profile set, falling back to default profiles: default

2018-12-13 05:30:11.307  INFO 1 --- [           main] o.s.b.w.embedded.tomcat.TomcatWebServer  : Tomcat initialized with port(s): 8080 (http)

2018-12-13 05:30:11.481  INFO 1 --- [           main] o.apache.catalina.core.StandardService   : Starting service [Tomcat]

2018-12-13 05:30:11.481  INFO 1 --- [           main] org.apache.catalina.core.StandardEngine  : Starting Servlet Engine: Apache Tomcat/9.0.13

2018-12-13 05:30:11.529  INFO 1 --- [           main] o.a.catalina.core.AprLifecycleListener   : The APR based Apache Tomcat Native library which allows optimal performance in production environments was not found on the java.library.path: [/usr/java/packages/lib/amd64:/usr/lib/x86_64-linux-gnu/jni:/lib/x86_64-linux-gnu:/usr/lib/x86_64-linux-gnu:/usr/lib/jni:/lib:/usr/lib]

2018-12-13 05:30:11.745  INFO 1 --- [           main] o.a.c.c.C.[Tomcat].[localhost].[/]       : Initializing Spring embedded WebApplicationContext

2018-12-13 05:30:11.745  INFO 1 --- [           main] o.s.web.context.ContextLoader            : Root WebApplicationContext: initialization completed in 4459 ms

2018-12-13 05:30:12.374  INFO 1 --- [           main] o.s.s.concurrent.ThreadPoolTaskExecutor  : Initializing ExecutorService 'applicationTaskExecutor'

2018-12-13 05:30:12.981  INFO 1 --- [           main] o.s.b.w.embedded.tomcat.TomcatWebServer  : Tomcat started on port(s): 8080 (http) with context path ''

2018-12-13 05:30:12.991  INFO 1 --- [           main] com.sjy.DockertestApplication            : Started DockertestApplication in 7.512 seconds (JVM running for 8.471)

2018-12-13 05:30:16.607  INFO 1 --- [nio-8080-exec-1] o.a.c.c.C.[Tomcat].[localhost].[/]       : Initializing Spring DispatcherServlet 'dispatcherServlet'

2018-12-13 05:30:16.607  INFO 1 --- [nio-8080-exec-1] o.s.web.servlet.DispatcherServlet        : Initializing Servlet 'dispatcherServlet'

2018-12-13 05:30:16.627  INFO 1 --- [nio-8080-exec-1] o.s.web.servlet.DispatcherServlet        : Completed initialization in 19 ms
效果
问题总结
1、
[ERROR] No plugin found for prefix 'docker' in the current project and in the plugin groups [org.apache.maven.plugins, org.codehaus.mojo] available from the
repositories [local (D:\xxxxxxx), nexus (http://repo2.maven.org/maven2/), skynet (http://maven2.mirrors.skynet.be/pub/maven2/)] -> [Help 1]
解决
在maven setting.xml 添加
2、连接超时之类的错
Connect to localhost:2375 [localhost/127.0.0.1, localhost/0:0:0:0:0:0:0:1] failed: connect timed out
都是docker无法连接造成的,查看本地是否设置环境变量,防火墙,docker是否可以远程访问.
配置一下就行了


