licode pre-v7.3开启屏幕共享功能
由于工作需要,所以开始研究licode的共享屏幕功能,但在简单修改代码后,并没有成功开启屏幕共享功能。于是潜心Google+度娘,虽然最终结果只在firefox 69版本中开启了屏幕共享功能(chrome 77版本没能成功),但至少验证licode的屏幕共享是OK的。Mac平台上具体步骤如下:
编译及安装licode
- 下载licode pre-v7.3源码并解码
wget https://github.com/lynckia/licode/releases/tag/pre-v7.3
- 编译licode
licode官网
./scripts/installMacDeps.sh
./scripts/installErizo.sh
./scripts/installNuve.sh
./scripts/installBasicExample.sh
在执行./scripts/installNuve.sh的时候,过程中会报错,大致的意思是找不到google-closure-compiler-js命令
原因:在licode/nuve/installNuve.sh脚本中有条语句出错,把
npm install --loglevel error -g google-closure-compiler-js
改成
npm install --loglevel error -g google-closure-compiler-js@20180204
- 运行demo
./licode/scripts/initLicode.sh
./scripts/initBasicExample.sh
- 备注
有时候需要重启licode中相关node服务,之后basicExample无法正常运行,我的操作是重启mongodb及rabbitMQ,重启mongodb把缓存一并清除,同时执行./script/installNuve.sh(不执行它则无法获取到superKey,因为mongodb的数据已经清空了),再重启所有的node服务
https自签证书安装及配置
自签证书的目的主要是为了建立https安全连接
- 创建openssl.cnf文件,文件内容如下:
[req]
prompt = no
default_bits = 4096
default_md = sha256
distinguished_name = dn
x509_extensions = v3_req

[dn]
C=CN
ST=HangZhou
L=HangZhou
O=TEST
OU=Testing Domain
CN=localhost
emailAddress=admin@localhost

[v3_req]
keyUsage=keyEncipherment, dataEncipherment
extendedKeyUsage=serverAuth
subjectAltName=@alt_names

[alt_names]
DNS.1=localhost
- 生成key
openssl genrsa -out ssl.key 4096
- 生成csr
openssl req -new -config openssl.cnf -key ssl.key -out ssl.csr
- 生成crt证书
openssl req -new -newkey rsa:2048 -sha1 -days 365 -nodes -x509 -keyout ssl.key -out ssl.crt -config openssl.cnf
- 信任自签证书
sudo security add-trusted-cert -d -r trustRoot -k /Library/Keychains/System.keychain ./ssl.crt
- 验证自签证书
https服务端server.js代码为:
const https = require('https');
const fs = require('fs');

const ssl_option = {
	key: fs.readFileSync('./ssl.key'),
	cert: fs.readFileSync('./ssl.crt')
};

const server = https.Server(ssl_option, (req, res) => {
	res.writeHead(200, {"Content-Type":"text/plain"})
	res.end("hello world\n");
});
server.listen(443, () => console.log("https listening on port: 443"));
运行server.js
sudo node server.js
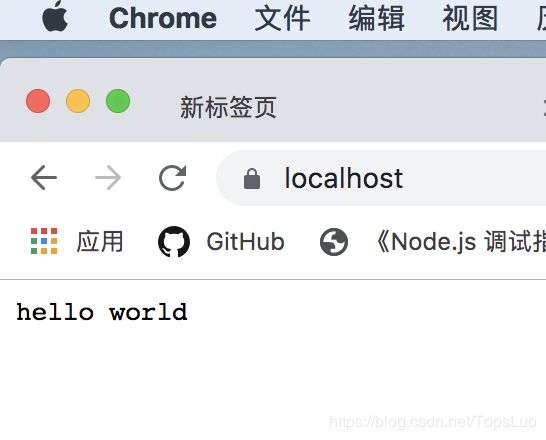
打开chrome浏览器并输入https://localhost地址,最终运行结果画面如下:
licode的basicExample代码修改
- 修改licode_config.js
......
config.erizoController.hostname = 'localhost'; //一定要改成localhost,否则socket.io连接会报证书错话,因为证书的域名是localhost,不可用ip来直接连接socket
......
config.erizoController.ssl = true;
config.erizoController.listen_ssl = true;
......
//使用全路径
config.erizoController.ssl_key = '/Users/topsluo/workspace/Github/licode/cert/ssl.key';
config.erizoController.ssl_cert = '/Users/topsluo/workspace/Github/licode/cert/ssl.crt';
- 修改basicServer.js
打开basicServer.js
vim extras/basic_example/basicServer.js
修改与证书相关的代码为:
const options = {
   key: fs.readFileSync('../../cert/ssl.key').toString(),
   cert: fs.readFileSync('../../cert/ssl.crt').toString(),
 };
- 修改licode web client端代码
打开web client端代码:
vim extras/basic_example/public/script.js
把创建localStream代码改成:
const config_screen = {screen: true, video: {mandatory: {maxWidth: 1280, maxHeight: 720}, attributes: {name: 'MyScreen'}}};
 config_screen.extensionId = 'okeephmleflklcdebijnponpabbmmgeo';//licode共享屏幕插件ID,为静态值
localStream = Erizo.Stream(config_screen);
运行结果
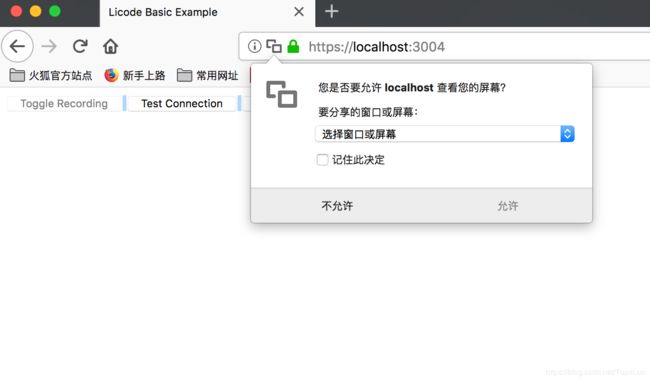
备注:运行chrome前,需要先安装licode源码目录中自带的插件,具体方法为:
//打开manifest.json
vim erizo_controller.erizoClient/extras/chrome-extension/manifest.json
//修改matches字段,如果访问域名为localhost,则改为
"matches":["*/localhost/*"]
//如果访问的是IP,不是域名,则改为
"matches":["*//192.168.10.203/*"]
OK,打开chrome浏览器,安装刚才修改过的屏幕共享插件,获取插件ID(如图):

用此ID替换extras/basic_example/public/script.js(前面有讲过)文件中的config_screen.extensionId
OK,到最终验证阶段了
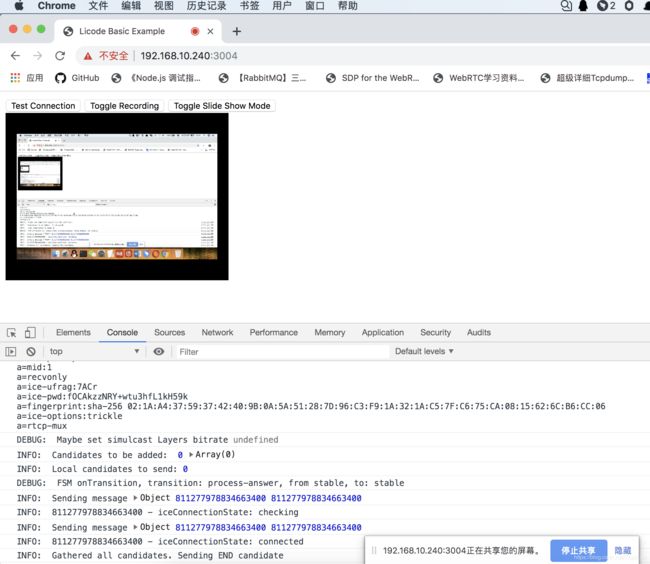
- Chrome运行结果(因为之前的ssl域名为localhost,所以此时显示为不安全连接)
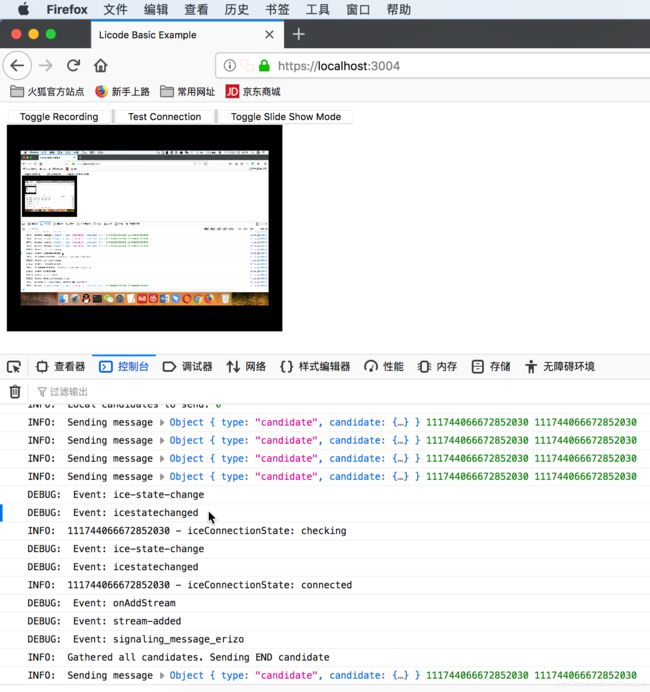
- firefox运行结果:
注意,打开licode客户端前,在火狐首页输入栏输入about:config
然后 【点击我了解风险】输入 security.enterprise_roots.enabled,把这个key改成true
参考文档 - https://www.cnblogs.com/cther/p/4634189.html
- https://moxo.io/blog/2017/08/01/problem-missing-subjectaltname-while-makeing-self-signed-cert/
- https://chotis2.dit.upm.es/room?id=5d936e52a0497e214118f724
- https://blog.csdn.net/qq_40155820/article/details/82383165