微信小程序中使用Echarts(折线图)
一、微信中使用 Echars
直接在官网小程序使用Echarts中(文档-教程-在微信中使用Echarts),找到GitHub上的DEMO下载链接,官网有详细的使用步骤
官网:http://echarts.baidu.com/
github:https://github.com/ecomfe/echarts-for-weixin
首先,在 pages/index目录下新建以下几个文件:index.js、 index.json、 index.wxml、 index.wxss。并且在 app.json 的 pages 中增加 'pages/index/index'。
index.json:
{
  "navigationBarTitleText": "图表A",
  "enablePullDownRefresh": true,
  "usingComponents": {
    "ec-canvas": "../../ec-canvas/ec-canvas"
  }
}index.js:
import * as echarts from '../../ec-canvas/echarts';
const app = getApp();
function initChart(canvas, width, height) {
  const chart = echarts.init(canvas, null, {
    width: width,
    height: height
  });
  canvas.setChart(chart);
  var option = {
    title: {
      // text: '数据统计',
      left: 'center'
    },
    color: ["#37A2DA"],
    legend: {
      data: ['A','B'],
      top: 20,
      left: 'center',
      backgroundColor: '#dbdbdb',
      z: 100
    },
    grid: {
        left: 0,//折线图距离左边距
        right: 50,//折线图距离右边距
        top: 30,//折线图距离上边距
        bottom: 10,
        containLabel: true
    },
    tooltip: {
      show: true,
      trigger: 'axis'
    },
    xAxis: {
      name: '相位',
      type: 'category',
      boundaryGap: false,
      data: ['0°', '90°', '180°', '270°', '360°'],
      // axisTick: {
      //   alignWithLabel:false
      // },
      // axisLine: {
      //   lineStyle: {
      //     color: '#666666'
      //   }
      // },
      //设置x轴的样式
      axisLabel: {
        //横坐标最后的标注颜色变深
        // interval: 0,
        show: true,
        textStyle: {
          color: '#000',
          fontSize: '14',
        }
      },
      show: true
    },
    yAxis: {
      name: '值',
      x: 'center',
      type: 'value',
      splitLine: {
        lineStyle: {
          type: 'solid'
        }
      },
      //设置y轴字体样式
      axisLabel: {
        show: true,
        textStyle: {
          color: '#000',
          fontSize: '14',
        }
      },
      show: true
    },
    series: [{
      name: 'A',
      type: 'line',
      smooth: true,
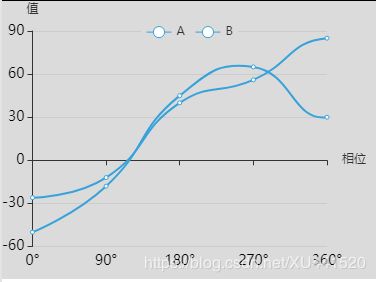
      data: [-50,-18, 45, 65, 30, 78, 40, 0]
    },{
        name: 'B',
        type: 'line',
        smooth: true,
        data: [-26, -12, 40, 56, 85, 65, 20, 10]
      }]
  };
  chart.setOption(option);
  return chart;
}
Page({
  data: {
    ec: {
      onInit: initChart
    }
  },
  onReady() {
  }
});index.wxml:
index.wxss:
/* pages/weather/weather.wxss */
ec-canvas {
width: 100%;
height: 50%;
}

.container {
  position: absolute;
  top: 0;
  bottom: 0;
  left: 0;
  right: 0;
  display: flex;
  flex-direction: column;
  align-items: center;
  justify-content: space-between;
  box-sizing: border-box;
}

.picker-pos {
margin-top: -130rpx;
margin-left: 150rpx;
color: blueviolet;
}


/* .head {
  overflow: hidden;
  margin: 10rpx;
}

.head_config {
  float: left;
  margin-left: 6rpx;
  width: 200rpx;
  height: 100rpx;
  padding: 8rpx;
  border-radius: 12rpx;
  background-color: green;
  color: white;
  font-size: 36rpx;
}

.head_train{
  margin-left:8rpx;
  float: left;
  width: 40rpx;
  height: 110rpx;
  background-color: #dbdbdb;
}

.three{
  width: 160rpx;
}

.prompt{
  width: 100%;
  height: 60rpx;
  line-height: 60rpx;
  margin-top: 10rpx;
  display: flex;
  flex-direction: row;
  align-items: center;
  justify-content: space-between;
  box-sizing: border-box;
  background-color: lightblue;
  overflow: hidden
}
.prompt_span{
  float: left;
  font-size: 28rpx;
}
.prompt_first{
  color: white;
}
.prompt_second{
  color: red;
}  */
效果如下:
其中对于全局的Echarts的样式改法,找到ec-canvas文件,如下所示,若设置背景颜色、边框之类的问题,可以在ec-canvas.wxss文件里面修改:
.ec-canvas {
  width: 100%;
  height: 100%;
  /* 给echarts图形添加边框 */
  /* border: 2rpx solid #DBDBDB; */
  /* 修改图形距离上边距 */
  margin-top: 0;
  /*给eecharts图形添加背景颜色*/
  background-color: #DBDBDB;
}
使用中遇到的问题:
- 不得不说,很多可用的信息没有,没有那么完整的为小程序服务的文档。
- 比如我的需求是怎么将x轴的精确度缩小的很小,假如我可以显示50个点,范围是[0,50],最小的刻度即是1,那么wx-echarts是怎么设置的呢?
- 还有我的横坐标轴的样式问题可以在axisLabel 对象中设置,比如color、fontSize,那么如果我想改我的坐标轴的标题,即图中的“相位”和“值”,他们分别对应是xAxis和yAxis对象中的name属性值,这个我该如何修改显示的样式呢?
- 通过设置option中的grid对象的属性值,可以将图表内容显示在所给宽高的最大化,
grid: {

left: 0,//折线图距离左边距

right: 50,//折线图距离右边距

top: 30,//折线图距离上边距

bottom: 10,

containLabel: true

}-
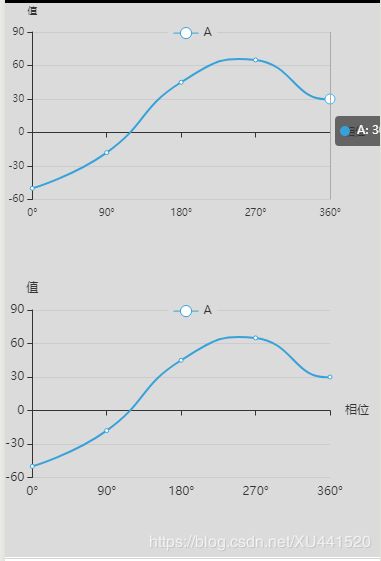
对于横纵坐标轴中的axisLabel 属性对象特别重要,比如我要复制一份表格,如果我可能一个轴设置了,另一个轴没有设置,结果会导致复制到别的地方的图表显示大小不至于的问题。如下所示:
本期的微信小程序中关于echarts的部分介绍就到这里结束了,2019的最后一个月,祝大家都能"庆余年",在工作中收获满满。

