git 的release-notes以及对应的changelog管理
文章目录
- 创建仓库
- 增加commit
- 通过javascript解析git log
- 写入CHANGELOG.md
- 解决git log 中同一feature重复写入的问题
- 解决git log显示重复问题后的新代码
- 总结
- 参考文档
我们在github 或者gitlab上做项目管理的时候需要对 对应的项目做历史版本的管理,同时包括每个版本中所做的一些改动:feature,bugfix,improv。
如果我们能够有一个统一的自动化管理方式,那么对于我们后续的版本回顾就能提供巨大的便捷,同时能够提供每个commit对应的commit链接,那就更好了。
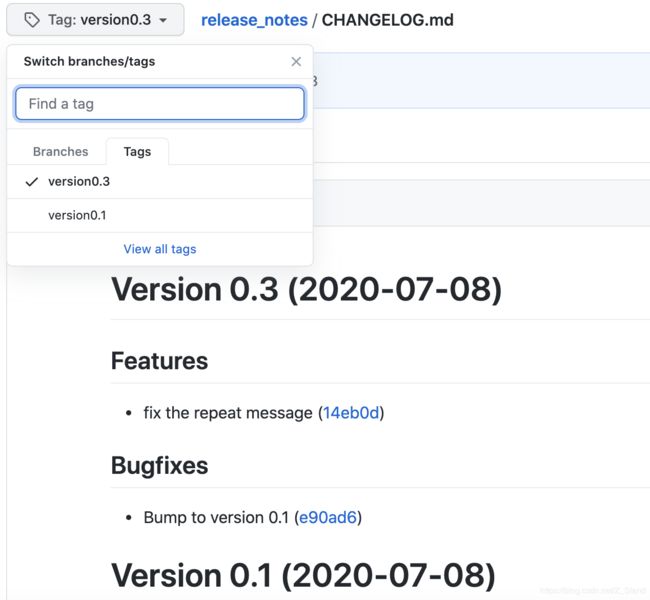
最终的版本管理CHANGELOG.md文件的效果如下:
创建仓库
按照自己的方式或者根据github的创建仓库的过程进行仓库的创建,我这里是从github上new出来的仓库,clone到本地
-
本地
mkdir test_release && cd test_release -
将github上创建的仓库链接clone到本地,
git clone https://github.com/BaronStack/release_notes.git -
填写对应的用户名和github的密码,或者提前在本地仓库进行配置
git config --local user.name "xxxname",git config --local user.email "xxx.email" -
按照git给定的步骤添加readme文件,并向远端合入
echo "# release_notes" >> README.md git init git add README.md git commit -m "first commit" git remote add origin https://github.com/BaronStack/release_notes.git #可以省略,默认已经添加进去了 git push -u origin master -
我们当前是在master分支上,建议按照规范的开发流程checkout一个子分支,在子分支上做变更,后续合入到master之中
git checkout -b develop-v0.1-feature-add_release_and_changelog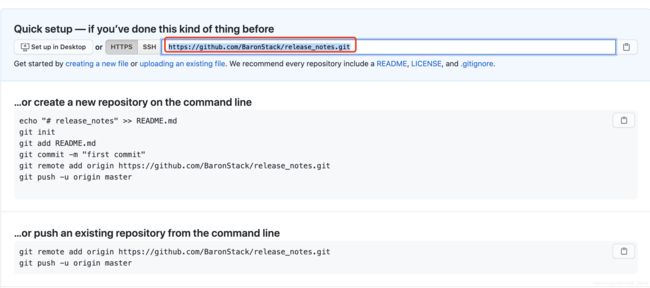
增加commit
这里多做一些变更, 多增加一些commit,方便后续的样例演示。
- 增加一个json文件,保存版本信息
touch release_version.json
向其中添加内容:{ "version":"0.0" } - 创建一个空的
CHANGELOG.md文件,touch CHANGELOG.md - 将以上两个文件作为一个commit进行提交,commit信息"feature: add version file and changelog.md file"
git add . git commit -m"feature: add version file and changelog.md file" - 再对README.md做一些简单修改, 并提交一个bugfix属性的commit
git add README.md
git commit -m"bugfix: fix some info for readme.md"
通过javascript解析git log
执行命令 git log,我们能够看到提交的commit信息以及对应的commit id(之前我们说过是64位的hash值,用来标识唯一的commit对象)
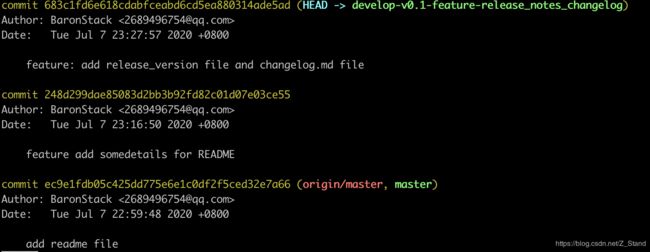
通过命令 git log --format=%B%H 可以对log的输出进行简化,仅仅保留commit信息和commitid的信息
feature: add release_version file and changelog.md file
683c1fd6e618cdabfceabd6cd5ea880314ade5ad
feature add somedetails for README
248d299dae85083d2bb3b92fd82c01d07e03ce55
add readme file
ec9e1fdb05c425dd775e6e1c0df2f5ced32e7a66
编写release_produce.js
const child = require('child_process');

//增加一些用作区分上下行的标记
const output = child.execSync(`git log --format=%B%H----DELIMITER----`).toString('utf-8');

//拆分标记到一个管理commit message 和 commit id的映射表中
const commitsArray = output.split('----DELIMITER----\n').map(commit => {
  const [message, sha] = commit.split('\n');
  return { sha, message };
}).filter(commit => Boolean(commit.sha));

console.log({ commitsArray });
执行node release_produce.js最后的输出如下:
{
  commitsArray: [
    {
      sha: '683c1fd6e618cdabfceabd6cd5ea880314ade5ad',
      message: 'feature: add release_version file and changelog.md file'
    },
    {
      sha: '248d299dae85083d2bb3b92fd82c01d07e03ce55',
      message: 'feature add somedetails for README'
    },
    {
      sha: 'ec9e1fdb05c425dd775e6e1c0df2f5ced32e7a66',
      message: 'add readme file'
    }
  ]
}
我们就发现已经能够获取到message和sha的信息了,接下来我们想要对上面组合的map数组进行解析,将结果按照feature以及message信息写入到CHANGELOG.md之中
写入CHANGELOG.md
这段代码是根据我们上面获取到的message和sha的数组写的,它能够将最终的结果写入到CHANGELOG之中。
const child = require("child_process");
const fs = require("fs");

const output = child
  .execSync(`git log --format=%B%H----DELIMITER----`)
  .toString("utf-8");

const commitsArray = output
  .split("----DELIMITER----\n")
  .map(commit => {
    const [message, sha] = commit.split("\n");

    return { sha, message };
  })
  .filter(commit => Boolean(commit.sha));

const currentChangelog = fs.readFileSync("./CHANGELOG.md", "utf-8");
const currentVersion = Number(require("./release_version.json").version);
const newVersion = currentVersion + 1;

// 用version和时间作为release 标记
let newChangelog = `# Version ${newVersion} (${
  new Date().toISOString().split("T")[0]
})\n\n`;

const features = [];
const Bugfixes = [];

// 分别维护features和bugfixes的内容,并将message和commit的链接进行绑定
commitsArray.forEach(commit => {
  if (commit.message.startsWith("feature: ")) {
    features.push(
      `* ${commit.message.replace("feature: ", "")} ([${commit.sha.substring(
        0,
        6
      )}](https://github.com/BaronStack/release_notes/commit/${
        commit.sha
      }))\n`
    );
  }
  if (commit.message.startsWith("chore: ")) {
    Bugfixes.push(
      `* ${commit.message.replace("chore: ", "")} ([${commit.sha.substring(
        0,
        6
      )}](https://github.com/BaronStack/release_notes/commit/${
        commit.sha
      }))\n`
    );
  }
});

if (features.length) {
  newChangelog += `## Features\n`;
  features.forEach(feature => {
    newChangelog += feature;
  });
  newChangelog += '\n';
}

if (Bugfixes.length) {
  newChangelog += `## Bugfixes\n`;
  bugfixes.forEach(bugfix => {
    newChangelog += bugfix;
  });
  newChangelog += '\n';
}

// prepend the newChangelog to the current one
fs.writeFileSync("./CHANGELOG.md", `${newChangelog}${currentChangelog}`);
node relaease_produce.js 运行后查看对应的CHANGELOG.md文件,能够看到我们的CHANGELOG的结果如下

这里还是有一些问题的,当我们第二次进行变更的时候,将之前CHANGELOG的内容再次commit提交一个feature的信息
git add CHANGELOG.md , git commit -m "feature:mod some file for release-notes"
此时再次执行node relaease_produce.js,能够看到CHANGELOG.md内容变更为:

这里的同一个feature提交了两次,原因我们也很好理解,是因为我们直接解析的git log信息,而第一次和第二次git log内容是一样的,也就是同一个feature会被包含两次,就出现上面的现象了。
解决git log 中同一feature重复写入的问题
这个问题我们知道是由git log的统一显示导致的,因为git log默认显示的是当前分支所有的commit日志信息,但我们当前所需要的是让git log的显示和版本号绑定,即提交一个版本,只需要显示当前版本所做的变更,不需要将上一个版本的变更也显示进来。
那么这个时候就需要使用git tag命令来进行里程碑的标记,执行git tag -a -m "tag a version 0.1" version0.1 能够对之前所有的变更打一个tag,这个tag的名称叫做version0.1
此时再次通过git log能够看到当前的log信息的最新的commit中多了一个version0.1的信息
我们可以通过git describe --long 当前rep最新的tag
▶ git describe --long
version0.1-0-g1851661
以上输出含义如下:
version0.1当前最新的tag名称- 数字’0‘ 表示最新的tag 和 HEAD 之间 commit的次数
g50df655表示最新的tag所指向的最近一次的commit id,字母g是其前缀
其他git tag相关的命令还有如下几个
git tag -s显示当前有多少个taggit show显示指定tag名称的描述信息git tag -d删除指定名称的taggit tag -a -m"describe message"前面描述过,这个是添加tag
此时我们可以通过tag查看当前tag起始commit 与最新的HEAD 所指向的commit之间都有哪一些提交日志
git log version0.1..HEAD ,可以看到我们只做了两次变更。
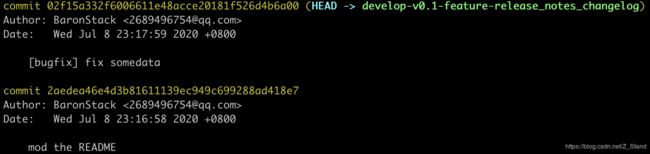
那么在打了tag的情况下我们就够获取本次相比于上次的tag之间的日志,而不会重复,这正是我们release-notes所想要提取的信息。
解决git log显示重复问题后的新代码
重新编写release_produce.js,需要增加如下功能
- 修改output的message获取方式为
git decribe --logconst latestTag = child.execSync('git describe --long').toString('utf-8').split('-')[0]; const output = child .execSync(`git log ${latestTag}..HEAD --format=%B%H----DELIMITER----`) .toString("utf-8"); - 在最后写入到CHANGELOG.md之后需要根据新的version打上tag,并将version版本号更新到json文件中,且还需要提交修改后的json文件。
// update package.json
fs.writeFileSync("./package.json", JSON.stringify({ version: String(newVersion) }, null, 2));

// create a new commit
child.execSync('git add .');
child.execSync(`git commit -m "chore: Bump to version ${newVersion}"`);

// tag the commit
child.execSync(`git tag -a -m "Tag for version ${newVersion}" version${newVersion}`);
将以上代码添加到release_produce.js中之后我们再次提交一些信息,完成之后将当前分支提交到远端
git push origin develop-v0.1-feature-release_notes_changelog
同时也把我们打的tags添加到远端
git push origin --tags
github上查看对应的changelog.md ,会发现我们每次的version变更仅仅是当前的version和上一个version之间差异的信息。

对应的version tag信息也都同步到了github之上了。
总结
通过对git命令的灵活运用,我们能够完成对项目的版本管理。能够清晰的看到每一个版本都提交了哪些信息,开发了哪一些新特性,优化了什么功能。
希望能对大家有所帮助~
参考文档
git tags
git log
git describe