三维重建-使用开源库openMVG与openMVS
在前面我们已经介绍了编译openMVG与openMVS的方法,得到了openMVG与openMVS的x64位的Debug版本和Release版本
vcpkg问题-环境配置
关于使用vcpkg的一些技巧补充
openMVG编译
openMVS编译
参考博客:
https://blog.csdn.net/qq_39615622/article/details/80967378
:放置照片组的文件夹;
 :/openMVG/src/openMVG/exif/sensor_width_database/sensor_width_camera_database.txt
//一般都是这个目录,记得将我们的相机的参数添加进去,注意格式;
:输出的目录;
images-dir G:\VS2017code\openMVG_openMVS\IMG1\images
output-dir G:\VS2017code\openMVG_openMVS\IMG1\build
sensor-database-dir
G:\VS2017code\openMVG\openMVG\src\openMVG\exif\sensor_width_database\sensor_width_camera_database.txt
首先是MVG的步骤:
1. openMVG_main_SfMInit_ImageListing -i  -d  -o :

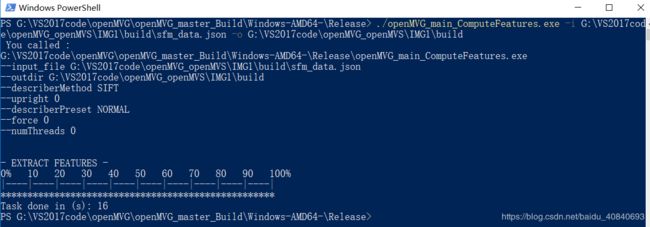
2. openMVG_main_ComputeFeatures -i /sfm_data.json -o :

3. openMVG_main_ComputeMatches -i /sfm_data.json  -o :

4. openMVG_main_IncrementalSfM -i /sfm_data.json -m  -o /reconstruction
注意:/reconstration 后面的reconstruction这是我们自定义的文件夹;

5. openMVG_main_ComputeSfM_DataColor -i /reconstrution/sfm_data.bin -o  /colored.ply:

注意这里的colored.ply是自己命名的文件但是必须要以.ply为后缀;

6. openMVG_main_ComputeStructureFromKnownPoses -i /reconstrution/sfm_data.bin -m . -o /reconstrution/robust.bin -f /matches.f.bin:

注意:这里的robust.bin是我们自己命令的文件,但是必须以.bin为后缀名;
1、
./openMVG_main_SfMInit_ImageListing.exe -i G:\VS2017code\openMVG_openMVS\IMG1\images -d G:\VS2017code\openMVG\openMVG\src\openMVG\exif\sensor_width_database\sensor_width_camera_database.txt -o G:\VS2017code\openMVG_openMVS\IMG1\build 2、
./openMVG_main_ComputeFeatures.exe -i G:\VS2017code\openMVG_openMVS\IMG1\build\sfm_data.json -o G:\VS2017code\openMVG_openMVS\IMG1\build./openMVG_main_ComputeMatches.exe -i G:\VS2017code\openMVG_openMVS\IMG1\build\sfm_data.json -o G:\VS2017code\openMVG_openMVS\IMG1\build这里有这么一句话:
'neato' 不是内部或外部命令,也不是可运行的程序或批处理文件。
并不是错误,是一个库,我们没安装他,他是一个可视化工具库,官方解释:
4、
./openMVG_main_IncrementalSfM.exe -i G:\VS2017code\openMVG_openMVS\IMG1\build\sfm_data.json -m G:\VS2017code\openMVG_openMVS\IMG1\build -o G:\VS2017code\openMVG_openMVS\IMG1\build\reconstruction5、
./openMVG_main_ComputeSfM_DataColor.exe -i G:\VS2017code\openMVG_openMVS\IMG1\build\reconstruction\sfm_data.bin -o G:\VS2017code\openMVG_openMVS\IMG1\build\colored.ply6、
参考:
https://openmvg.readthedocs.io/en/latest/software/SfM/ComputeStructureFromKnownPoses/
./openMVG_main_ComputeStructureFromKnownPoses.exe -i G:\VS2017code\openMVG_openMVS\IMG1\build\reconstruction\sfm_data.bin -m G:\VS2017code\openMVG_openMVS\IMG1\build -o G:\VS2017code\openMVG_openMVS\IMG1\build\reconstruction\robust.bin -f G:\VS2017code\openMVG_openMVS\IMG1\build\matches.f.bin
这一步,其实有两种方式:
meshlab打开robust.ply
此时此刻
MVG的全部工作结束
接下来进行MVS
说这么几句话,是为了分割。。。。。。。。。。。。。。。。
。。。
。。。
。。。
好,下面是openMVS的步骤了,在使用openMVS之前,还需要进行一步:

7. openMVG_main_openMVG2openMVS -i /reconstrution/robust.bin -o scene.mvs
注意:这里的scene.mvs,文件是我们自己命名的;

8. DensifyPointCloud scene.mvs

9. ReconstructMesh -d 4 scene_dense.mvs;

注意:scene_dense自己命名;目前不需要理解参数的意思,需要理解不加后面的参数,直接运行,会有usage;

10. RefineMesh --resolution-level=4 scene_dense_mesh.mvs

11. TextureMesh scene_dense_mesh_refine.mvs
其次是MVS的步骤
不对,MVG还缺一步:
7、
./openMVG_main_openMVG2openMVS.exe -i G:\VS2017code\openMVG_openMVS\IMG1\build\reconstruction\robust.bin -o G:\VS2017code\openMVG_openMVS\IMG1\build\reconstruction\scene.mvs
接下来进行MVS的程序运行
将scene.mvs拷贝到MVS的程序目录下运行剩下4个步骤:
8、
./DensifyPointCloud.exe scene.mvs出错
我们需要在这个MVS目录下新建一个:
undistorted_images
在里面放入之前的图片数据集
ok,错误消失
除了原来的scene.mvs,还新生成了一些东西
9、
./ReconstructMesh.exe -d 4 scene_dense.mvs再次新生成了三个文件
10、
./RefineMesh.exe --resolution-level=4 scene_dense_mesh.mvs再次新生成三个文件
11、
./TextureMesh.exe scene_dense_mesh_refine.mvs再次新生成四个文件:
meshLab打开文件scene_dense_mesh_refine_texture.ply
最后看一下png的纹理贴图的文件:


