Centos 7下通过zabbix监控nfs client的读写性能
操作环境
Centos 7.2
zabbix 3.2
nfs v4
zabbix-server:10.10.200.193
zabbix-agent:10.10.200.227(nfs-client)
我们通过zabbix对10.10.200.227nfs client的读写性能进行监控。
操作说明
1.在nfs-client上配置zabbix agent环境,参照 《Centos 7下搭建Zabbix监控软件》
2.查看nfs-client的目录,并查看mount信息,这个nfs client上面挂载了两个nfs server目录
[root@ovirt-host-227 ~]# df
Filesystem               1K-blocks      Used Available Use% Mounted on
/dev/mapper/centos-root   52403200  27339848  25063352  53% /
devtmpfs                   3986908         0   3986908   0% /dev
tmpfs                      3997236         0   3997236   0% /dev/shm
tmpfs                      3997236      8956   3988280   1% /run
tmpfs                      3997236         0   3997236   0% /sys/fs/cgroup
/dev/mapper/centos-home  915094976 212562560 702532416  24% /home
/dev/sda1                   508588    159696    348892  32% /boot
tmpfs                       799448         0    799448   0% /run/user/0
10.10.200.193:/home/nfs   18348032   5031936  13316096  28% /mnt
10.10.200.219:/home/nfs3  14356992   3983360   9644544  30% /nfs
[root@ovirt-host-227 ~]# mount
sysfs on /sys type sysfs (rw,nosuid,nodev,noexec,relatime)
proc on /proc type proc (rw,nosuid,nodev,noexec,relatime)
devtmpfs on /dev type devtmpfs (rw,nosuid,size=3986908k,nr_inodes=996727,mode=755)
securityfs on /sys/kernel/security type securityfs (rw,nosuid,nodev,noexec,relatime)
tmpfs on /dev/shm type tmpfs (rw,nosuid,nodev)
devpts on /dev/pts type devpts (rw,nosuid,noexec,relatime,gid=5,mode=620,ptmxmode=000)
tmpfs on /run type tmpfs (rw,nosuid,nodev,mode=755)
tmpfs on /sys/fs/cgroup type tmpfs (ro,nosuid,nodev,noexec,mode=755)
cgroup on /sys/fs/cgroup/systemd type cgroup (rw,nosuid,nodev,noexec,relatime,xattr,release_agent=/usr/lib/systemd/systemd-cgroups-agent,name=systemd)
pstore on /sys/fs/pstore type pstore (rw,nosuid,nodev,noexec,relatime)
cgroup on /sys/fs/cgroup/devices type cgroup (rw,nosuid,nodev,noexec,relatime,devices)
cgroup on /sys/fs/cgroup/cpu,cpuacct type cgroup (rw,nosuid,nodev,noexec,relatime,cpuacct,cpu)
cgroup on /sys/fs/cgroup/freezer type cgroup (rw,nosuid,nodev,noexec,relatime,freezer)
cgroup on /sys/fs/cgroup/net_cls type cgroup (rw,nosuid,nodev,noexec,relatime,net_cls)
cgroup on /sys/fs/cgroup/blkio type cgroup (rw,nosuid,nodev,noexec,relatime,blkio)
cgroup on /sys/fs/cgroup/memory type cgroup (rw,nosuid,nodev,noexec,relatime,memory)
cgroup on /sys/fs/cgroup/hugetlb type cgroup (rw,nosuid,nodev,noexec,relatime,hugetlb)
cgroup on /sys/fs/cgroup/cpuset type cgroup (rw,nosuid,nodev,noexec,relatime,cpuset)
cgroup on /sys/fs/cgroup/perf_event type cgroup (rw,nosuid,nodev,noexec,relatime,perf_event)
configfs on /sys/kernel/config type configfs (rw,relatime)
/dev/mapper/centos-root on / type xfs (rw,relatime,attr2,inode64,noquota)
systemd-1 on /proc/sys/fs/binfmt_misc type autofs (rw,relatime,fd=35,pgrp=1,timeout=300,minproto=5,maxproto=5,direct)
hugetlbfs on /dev/hugepages type hugetlbfs (rw,relatime)
mqueue on /dev/mqueue type mqueue (rw,relatime)
debugfs on /sys/kernel/debug type debugfs (rw,relatime)
sunrpc on /var/lib/nfs/rpc_pipefs type rpc_pipefs (rw,relatime)
nfsd on /proc/fs/nfsd type nfsd (rw,relatime)
/dev/mapper/centos-home on /home type xfs (rw,relatime,attr2,inode64,noquota)
/dev/sda1 on /boot type xfs (rw,relatime,attr2,inode64,noquota)
tmpfs on /run/user/0 type tmpfs (rw,nosuid,nodev,relatime,size=799448k,mode=700)
10.10.200.193:/home/nfs on /mnt type nfs4 (rw,relatime,vers=4.0,rsize=524288,wsize=524288,namlen=255,hard,proto=tcp,port=0,timeo=600,retrans=2,sec=sys,clientaddr=10.10.200.227,local_lock=none,addr=10.10.200.193)
10.10.200.219:/home/nfs3 on /nfs type nfs4 (rw,relatime,vers=4.0,rsize=524288,wsize=524288,namlen=255,hard,proto=tcp,port=0,timeo=600,retrans=2,sec=sys,clientaddr=10.10.200.227,local_lock=none,addr=10.10.200.219)
查看到以上信息后,我们编写以下脚本,在nfs-client上自动获取nfs server的ip地址
[root@ovirt-host-227 ~]# vi /etc/zabbix/zabbix_agentd.d/nfs-find.sh
#!/bin/bash
nfsarray=(`cat /proc/net/nfsfs/servers | sed -n '2,$p' | awk '{print $5}'|sort|uniq   2>/dev/null`)
length=${#nfsarray[@]}
printf "{\n"
printf  '\t'"\"data\":["
for ((i=0;i<$length;i++))
do
         printf '\n\t\t{'
         printf "\"{#NFS_SERVER}\":\"${nfsarray[$i]}\"}"
         if [ $i -lt $[$length-1] ];then
                 printf ','
         fi
done
printf  "\n\t]\n"
printf "}\n"
授权后,运行进行测试
[root@ovirt-host-227 ~]# /etc/zabbix/zabbix_agentd.d/nfs-find.sh
{
        "data":[
                {"{#NFS_SERVER}":"10.10.200.193"},
                {"{#NFS_SERVER}":"10.10.200.219"}
        ]
}
完成自动发现nfs-server后,我们通过nfsiostat进行监控nfs-client的nfs读写性能
[root@ovirt-host-227 ~]# nfsiostat 1

10.10.200.193:/home/nfs mounted on /mnt:

   op/s         rpc bklog
   8.96    0.00
read:            ops/s             kB/s           kB/op         retrans         avg RTT (ms)    avg exe (ms)
                  0.124  30.649 248.164       0 (0.0%)   66.803  66.836
write:           ops/s             kB/s           kB/op         retrans         avg RTT (ms)    avg exe (ms)
                  8.663 2153.044        248.537       0 (0.0%)   62.286 8964.707

10.10.200.219:/home/nfs3 mounted on /nfs:

   op/s         rpc bklog
   0.02    0.00
read:            ops/s             kB/s           kB/op         retrans         avg RTT (ms)    avg exe (ms)
                  0.000   0.000   0.000       0 (0.0%)    0.000   0.000
write:           ops/s             kB/s           kB/op         retrans         avg RTT (ms)    avg exe (ms)
                  0.000   0.000   0.000       0 (0.0%)    0.000   0.000
并将显示信息写入文本
#nfsiostat 1 >> /tmp/nfsper &
添加以下内容至zabbix-agentd.conf配置文件中
UserParameter=nfs.server[*],/etc/zabbix/zabbix_agentd.d/nfs-find.sh $1
UserParameter=nfs.readKBps[*],/usr/bin/tail -18 /tmp/nfsper | grep -A 8 "\b$1\b"|tail -l| awk '{print $$2}' | sed -n '6,1p'
UserParameter=nfs.writeKBps[*],/usr/bin/tail -18 /tmp/nfsper | grep -A 8 "\b$1\b"|tail -l| awk '{print $$2}' | sed -n '8,1p'
重启zabbix-agent
#systemctl restart zabbix-agent
3.在zabbix-server端通过zabbix_get测试是否能获取到nfs-client中定义的参数值
[root@centos7-zabbix-193 home]# zabbix_get -s 10.10.200.227 -k nfs.readKBps[10.10.200.193]
0.000
[root@centos7-zabbix-193 home]# zabbix_get -s 10.10.200.227 -k nfs.writeKBps[10.10.200.193]
0.000
[root@centos7-zabbix-193 home]# zabbix_get -s 10.10.200.227 -k nfs.server
{
        "data":[
                {"{#NFS_SERVER}":"10.10.200.193"},
                {"{#NFS_SERVER}":"10.10.200.219"}
        ]
}
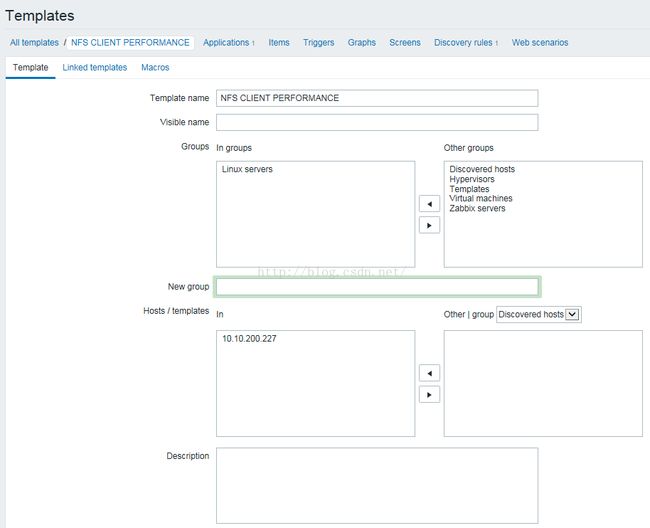
4.在zabbix web console端创建template NFS CLIENT PERFORMANCE
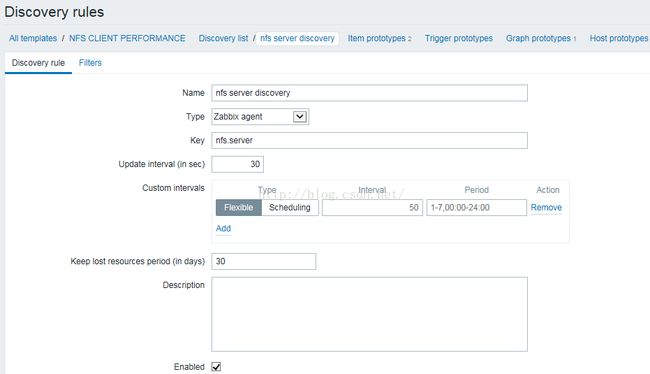
创建discovery rule
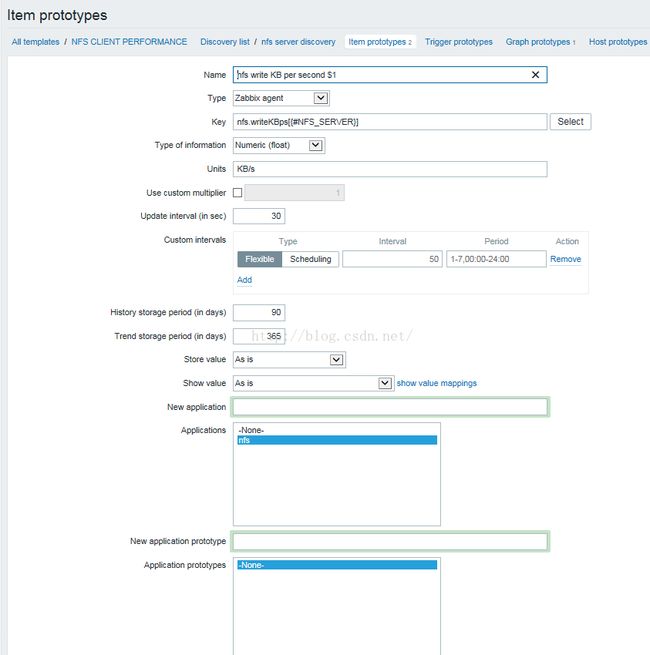
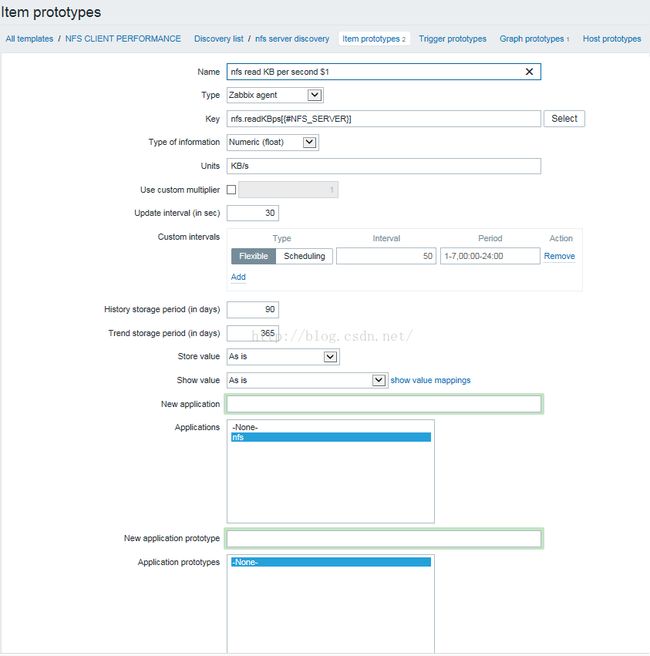
分别创建读写性能的item prototype
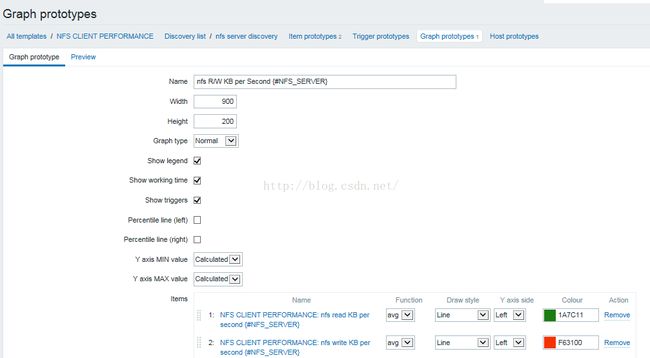
创建graph prototype
通过以上步骤就完成了创建Template的步骤,将该Template 添加至Host nfs-client中
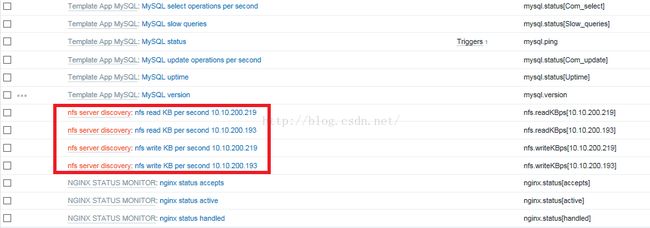
添加Template后,查看该host的item
查看graph
点击查看graph
通过以上操作就完成了通过zabbix监控nfs client的全部操作
