微信小程序开发—(四)上传图片
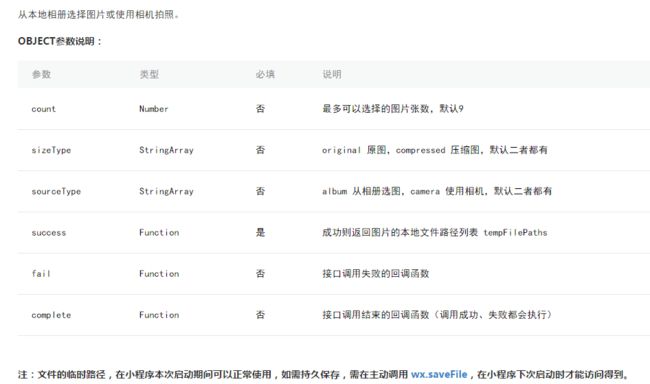
一.了解wx.chooseImage(OBJECT)
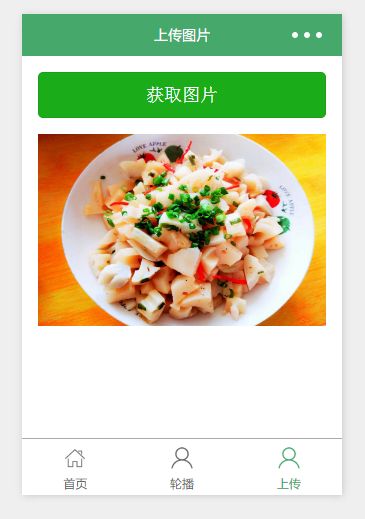
二.代码编程
在pages文件里面创建uploadimg文件夹
1.编写页面结构:uploadimg.wxml
这是单图片上传
//获取应用实例
var app = getApp()
Page({
	data: {
       tempFilePaths: '',
	},
	/**
	 * 选择图片
	 */
	chooseimage: function () {
		var _this = this;
		wx.chooseImage({
			count: 1, // 默认9
			// 可以指定是原图还是压缩图,默认二者都有
			sizeType: ['original', 'compressed'],
			// 可以指定来源是相册还是相机,默认二者都有
			sourceType: ['album', 'camera'],
		 // 返回选定照片的本地文件路径列表,tempFilePath可以作为img标签的src属性显示图片
			success: function (res) {
                //执行上传图片到服务端
                _this.setData({
				  tempFilePaths:res.tempFilePaths
				})
                _this.uploadFile(res.tempFilePaths);
			}
		})
	},
    //上传图片
    uploadFile:function(imgPaths){


        wx.uploadFile({
			url: Api.valiFaceApi, // 接口地址
			filePath:imgPaths[0],//这个是默认的传参 图片地址
			name: 'img',//如果是图片则img,如果是文件则file,视频则video
			formData: {
				id:"2222" //这个是其他的参数
			},
			success(res) {
				wx.hideLoading();
				if(JSON.parse(res.data).success ==true){
					setTimeout(function(){
						wx.showToast({
							title:"上传成功",
							icon: 'none',
							duration: 2000
						});
					},100);

				}else{

					setTimeout(function(){
						wx.showToast({
							title: JSON.parse(res.data).msg,
							icon: 'none',
							duration:5000
						});
					},100)
				}
			}
		})

        //或是后端重新定义的 字段 ,不走默认filePath

		 wx.uploadFile({
			url: Api.valiFaceApi, // 接口地址
			name: 'file',//这个是根据后台接口写的名字文件对应的 key,开发者在服务端可以通过这个 key 获取文件的二进制内容
            header: {
                'Content-Type': 'multipart/form-data'
            },
            formData: {
                'file': imgPaths[0]
            },
			success(res) {
				wx.hideLoading();
				if(JSON.parse(res.data).success ==true){
					setTimeout(function(){
						wx.showToast({
							title:"上传成功",
							icon: 'none',
							duration: 2000
						});
					},100);

				}else{

					setTimeout(function(){
						wx.showToast({
							title: JSON.parse(res.data).msg,
							icon: 'none',
							duration:5000
						});
					},100)
				}
			}
		})
    }

})
多张图上传
//获取应用实例
var app = getApp()
Page({
	data: {
       picUrl:[],//这个是上传成功后,后端返回来的图片地址 ,最后要传给后端的
       photosList:[],//这是预览的图片地址
	},
	/**
	 * 选择图片
	 */
	chooseimage: function () {
		var _this = this;
        if (this.data.picUrl.length >= 9) {
            wx.showToast({
                title: '添加图片最多9张',
                icon: 'none',
                duration: 1000
            })
            return;
        }
        wx.chooseImage({
            count: 9,
            sizeType: ['original', 'compressed'],
            sourceType: ['album', 'camera'],
            success: function (res) {
                var successUp = 0; //成功
                var length = res.tempFilePaths.length; //总数
                var count = 0; //第几张
                this.uploadOneByOne(res.tempFilePaths, successUp, count, length);
            },
        });
	},
    //上传图片
    uploadFile:function( imgPaths, successUp, count, length){
        let photosUrl = [], photosListshow=[];
        var that = this;
        wx.uploadFile({
            url: API.upload(), //仅为示例,非真实的接口地址 "https://twzx.191cn.com/pat-api/file/upload",//
            filePath: imgPaths[count],
            name: 'file',//这个是根据后台接口写的名字文件对应的 key,开发者在服务端可以通过这个 key 获取文件的二进制内容
            header: {
                'Content-Type': 'multipart/form-data'
            },
            formData: {
                'file': imgPaths[count]
            },
            success: function (e) {
                let res = JSON.parse(e.data);
                if (res.success == true) {
                    console.log("请求成功2")
                    successUp++;//成功+1
                    photosUrl = mythis.data.picUrl;
                    photosListshow = mythis.data.photosList;
                    photosListshow.push(imgPaths[count]);
                    photosUrl.push(res.entity);
                    console.log(photosUrl, photosListshow)
                    that.setData({
                        photosList: photosListshow
                    })
                }
            },
            complete: function (e) {
                count++;//下一张
                if (count == length) {
                    //上传完毕,作一下提示
                    console.log('上传成功' + successUp);
                    wx.showToast({
                        title: '这次上传成功' + successUp + "张",
                        icon: 'none',
                        duration: 1000
                    })
                } else {
                    // photosUrl.push(count);
                    console.log(photosListshow, "图片地址")
                    if (photosUrl.length >= 9) {
                        wx.showToast({
                            title: '添加图片最多9张,请重新选择图片',
                            icon: 'none',
                            duration: 1000
                        })
                        return;
                    } else {
                        that.setData({
                            picUrl: photosUrl,
                            photosList:photosListshow
                        })
                        //递归调用,上传下一张
                        uploadOneByOne(imgPaths, successUp, count, length);
                    }
                }
            }
        })
    }

})
材料参考
三.注意问题
1. wx.uploadFile 只能一张一张上传


