JAVA框架篇(一)spring介绍,基础搭建,Bean的配置,属性注入,生命周期
Spring
- Spring基础搭建和JAVA对象配置
- 1,配置Spring
- 使用工厂函数实例化
- 使用有参构造实例化
- 2,属性注入
- 3,Scope属性,bean的作用域,单例和多例模式
- 4,Bean的生命周期
- 5,Bean的懒加载.
- 引入其他配置文件
Spring是一个轻量级的开源框架,它操作简单维护容易。
Spring的核心是IOC反转控制器和AOP
Spring是一个容器,它本身没有什么功能。当你放了什么样的对象进去它就会有什么功能。
Spring有7大模块,其中core是基础.。开发时根据需要选择必要的组件而忽略其他组件,达到最小依赖.也就是这几大模块中都有对应的jar包。用到那个组件就导对应的包进去就好。

Spring的基础使用就是要会进行Spring的基础搭建和Bean的配置和属性注入。
Spring基础搭建和JAVA对象配置
IOC反转控制器
IOC就是将我们平时new对象和给对象的属性set值的动作交给IOC来完成.我们搭建的Spring将会有什么功能就靠这个IOC了
1,配置Spring
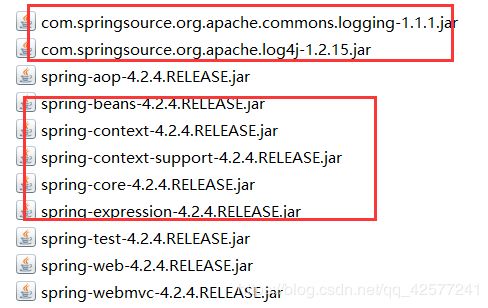
(1)首先要导入Spring的jar包。即包括beans,core,context,expression和log包.
Spring包下载地址:https://repo.spring.io/libs-release-local/org/springframework/spring/
(2)接着创建一个applicationContext.xml放在src目录下,这个是Spring的配置文件的名称。这个名称不是固定的。但这是个约定。为了人们方便维护所有项目的Spring配置文件所以都叫这个.
然后往这个XML添加一下头信息。
(3)创建一个类,把这个类配置到applicationContext.xml
public class SpringEntity {
    public void springTest(){
        System.out.println("spring配置完成");
    }
}
XML
Test类
    @Test
    public void springFun(){
        //创建一个ClassPathXmlApplicationContext对象并将applicationContext.xml的路径写进去
        ApplicationContext applicationContext =  new ClassPathXmlApplicationContext("applicationContext.xml");
        //接着在使用getBean(String beanName);方法来获取对象
        SpringEntity springEntity = (SpringEntity)applicationContext.getBean("SpringEntity");
        springEntity.springTest();
        //这样就完成了Spring的入门使用。让Spring来帮我们创建一个对象
    }
效果如下:

–>Spring中配置bean的基本方式.使用
–>配置好后的操作步骤
(1)创建一个Spring容器
   //创建一个ClassPathXmlApplicationContext对象并传入applicationContext的路径
     ApplicationContext applicationContext =  new ClassPathXmlApplicationContext("applicationContext.xml");
(2)然后在调用getBean(String beanName)时beanName对应这个id.
上面只是基础的配置一个JAVABean。Spring默认使用这个bean的无参构造来实例化该对象。Spring还可以通过工厂函数的方式来实例化对象。在实例化对象的同时也可以往里面的属性注入值。也能够使用有参构造来实例化。
使用工厂函数实例化
–>静态工厂函数实例化对象:
创建一个类添加一个静态方法
public class FactoryMethod {
    /**
     * 静态函数,返回一个对象
     */
    public static SpringEntity getSpringEntity(){
        return new SpringEntity();
    }
}
xml:
class:填工厂函数所在的全包名
id:填对应的静态函数返回的类的对象的名称
factory-method:静态函数的函数名
test:
    @Test
    public void springFun(){
        ApplicationContext applicationContext =  new ClassPathXmlApplicationContext("applicationContext.xml");
        //静态工厂函数实例化一个对象.在xml配置好后直接根据id来获取对象
        SpringEntity springEntity = (SpringEntity)applicationContext.getBean("springEntity");
        springEntity.springTest();
    }
–>动态工厂函数实例化对象:
创建一个类添加一个普通方法
public class FactoryMethod {
    /**
     * 动态函数,返回一个对象
     */
    public SpringEntity getSpringEntity(){
        return new SpringEntity();
    }
}
xml:
由于不是静态的所以要先配置FactoryMethod的实例化bean,在配置目标对象的bean.然后在目标对象中添加两个属性
factory-bean:工厂函数的bean
factory-method:对应的动态工厂函数
使用有参构造实例化
有这么一个构造方法
public class SpringEntity {
    private String name;
    private String sex;
    public SpringEntity(String name, String sex) {
        this.name = name;
        this.sex = sex;
        System.out.println(this.name+"="+this.sex);
    }
}
xml:在xml配置的bean默认调用的无参构造来实例化。如果要使用有参构造实例化。则需要在bean的标签体内添加constructor-arg标签,其属性如下:
index:参数的位置从0开始,比如上述的构造方法中index=0就表示String name.根据这个属性可以选择自己需要调用的那个构造方法。
type:参数的类型
value:要注入的值
test:
    @Test
    public void springFun(){
        ApplicationContext applicationContext =  new ClassPathXmlApplicationContext("applicationContext.xml");
        SpringEntity springEntity = (SpringEntity)applicationContext.getBean("springEntity");
    }
效果如下:
2,属性注入
在普通的情况下,要对一个对象的属性注入值都用setter方法或者构造方法。
上述的使用有参构造实例化就是使用有参构造来完成属性注入.所以接下来说setter方式注入
在配置注入之前要确保这个类的属性有对应的setter和getter方法
(1)基础类型注入
在bean标签体内添加property表示属性。
name:属性名
value:值
这样在实例化的同时给属性赋值.效果如下

(2)ref引用注入
有时候你的实体会有一个引用类型即你的属性是一个类
public class SpringEntity {
    /**
     * 引用类型,定义一个类的属性
     */
    private Human human;
    //setter和getter
}
public class Human {
   private String name;

   //setter和getter
}
在xml中配置一个这样类型是一个类的属性。则要先配置这个属性对应的类的bean,然后在property中添加ref属性引用这个bean
效果如下:

(3)复杂类型注入
一个类中有时会定义一些复杂类型。比如数组,集合,map
public class SpringEntity {
private Object[] array;
private Listxml:在property标签体中添加内容。为map
1
2
(4)prop类型注入
类中有Properties类型的属性时,使用props来注入
public class SpringEntity {
   private Properties properties;
   //setter和getter
   }
xml:使用props标签来给Properties类型的属性注入值
               com.mysql.jdbc.Driver
               root
效果如下:
3,Scope属性,bean的作用域,单例和多例模式
bean标签里面有个Scope属性,它用来指定配置的这个bean是多例还是单例。如果是单例那么无论getBean()多少次获得的都是同一个实例。如果是多例那么每次getBean()都会获得一个新实例。
设置Scope=“singleton” 表示单例
设置Scope=“prototype” 表示多例
Scope默认是单例
(1)singleton作用域
单例模式,bean不指定scope时默认为singleton.单例,即这个bean在这个容器中只会创建一个实例,无论多少次getbean获取的都是同一个实例
User user1 = (User) context.getBean("user");
User user2 = (User) context.getBean("user");
System.out.println(user1==user2);
结果返回true
(2),prototype作用域
多例模式,当指定bean的scope属性为prototype时,则这个bean在这个容器可以创建多个实例,即每次getbean获取的实例都是不相同的
User user1 = (User) context.getBean("user");
User user2 = (User) context.getBean("user");
System.out.println(user1==user2);
结果返回false
4,Bean的生命周期
spring中Bean的生命周期默认是容器创建的时候创建,容器关闭的时候销毁。
即执行:
ApplicationContext applicationContext = new ClassPathXmlApplicationContext(“applicationContext.xml”);
这句话时,对象就创建了。
在执行
((AbstractApplicationContext)applicationContext).close();时对象销毁
Bean里面有两个属性init-method和destroy-method表示在对象创建时执行的方法和对象销毁前执行的方法。用这两个属性来观察Bean的生命周期
(1)首先在Bean对应的类上添加init和destroy方法
public class SpringEntity {
  public void init(){
      System.out.println("对象创建了");
  }
  public void destroy(){
      System.out.println("对象销毁了");
  }
}
xml:然后在bean配上init-method和destroy-method
test:
//开启容器,创建对象
ApplicationContext applicationContext =  new ClassPathXmlApplicationContext("applicationContext.xml");
//关闭容器,销毁对象
((AbstractApplicationContext)applicationContext).close();
效果如下:

至于关闭的方法。由于ClassPathXmlApplicationContext没有close方法但是AbstractApplicationContext有。所以需要强转
5,Bean的懒加载.
上面说到,Bean在容器创建时就会创建。Bean标签有一个属性Lazy-Init它可以实现这个Bean在我们调用getBean()获取的时候才创建。
Lazy-Init:默认值是default表示当容器创建时就实例化此对象,当设置成true时表示当调用getBean()方法时才实例化此对象。设置成false时和default效果一样。
(1)未设置Lazy-Init时
效果如下:

(2)设置Lazy-Init且值为true时
效果如下,中间设置了个3秒延迟。:

引入其他配置文件
1,引入xml
一个项目一般会有多个模块.每个模块都可能会有一个application.xml,而部署服务的时候为了将这么多的xml的内容都整合到一个里面。就需要用到import标签。它能够把其他xml的内容导入进来.
xml1:
xml2:
xml1的bean引用xml2的bean
效果如下:

2,引入properties
如果要在applicationContext.xml中引入properties的配置则需要用到context.
首先准备好一个properties和一个实体;
properties:
jdbc.driver=com.mysql.jdbc.Driver
实体:
public class SpringEntity {
   private String driver;
   //setter和getter
   }
步骤:
1,首先要配置context的xml头信息
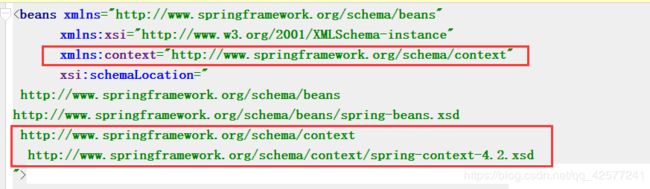
2,接着使用以下标签
格式固定,注意db.properties的路径。如果放在src下就这样写.引入后使用${key}给实体的属性注入值
xml:
效果如下: