文章目录
一、控制器
二、视图
三、读取数据
一、控制器
先找到TP框架下位于application/index/controller/Index.php的Index控制器,打开文件,将index方法修改为hello world!。
namespace app\index\controller;
class Index
{
    public function index()
    {
        return 'hello world!';
    }
}
这时我们通过浏览器访问URL地址:
http://tp5/public/
就可以看到hello world!输出结果。
为操作方法定义参数:
这时我们可以带name参数访问入口文件地址
http://localhost/tp5/public/?name=ThinkPHP
我们可以得到输出hello ThinkPHP!
继承公共控制器类
ps:这里使用了use导入一个命名空间,然后就可以在当前文件中直接使用该别名,而不用使用完整的命名空间路径去访问类库,如果没有使用:
use app\index\controller\Base;
那么我们就必须使用完整路径:
class Index extends app\index\controller\Base
有不熟悉命名空间的可以参考:命名空间
修改访问路径
public是项目部署后的对外访问路径,我们可以修改位于public目录下的index.php入口文件,修改为:
// 定义应用目录
define('APP_PATH', __DIR__ . '/application/');
// 加载框架引导文件
require __DIR__ . '/thinkphp/start.php';
然后将index.php移动到根目录下,此时我们的访问路径变为了:
http://localhost/tp5/?name=Thinkphp //也可以不使用 ?name=Thinkphp
当然也可以使用修改vhost的方法修改访问路径(此处不做讲述)
一个控制器类包含多个操作方法
只有public类型的发方法才能通过URL访问,private或者protected是无法直接通过URL访问的。
修改Index控制器类的方法为:
使用URL访问以下地址:
http://tp5.com/index.php/index/index/index
http://tp5.com/index.php/index/index/test
http://tp5.com/index.php/index/index/test2
http://tp5.com/index.php/index/index/test3
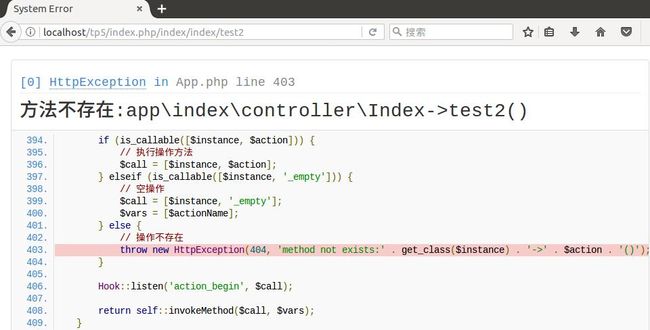
前两个地址能正常访问,访问test2和test3时会提示异常:
因为我们开启了调试模式,所以异常页面包含了详细的错误信息,关闭调试模式只会提示
页面错误!请稍后再试~
二、视图
我们先在application/index目录下创建view目录然后添加视图文件view/index/hello.html,在文件中添加以下内容:
 hello {$name}

    hello {$name}!
要输出视图,就必须在控制器中进行模板渲染输出操作,现在修改之前的控制器类:
assign('name',$name); //对模板变量赋值
        return $this->fetch();  //输出模板
    }
}
TP5中display()好像和TP3.2中的show一样了,还是用fetch()吧
Index控制器继承了think\Controller类之后,就可以直接使用封装好的assign和fetch方法进行模板变量赋值和渲染输出。
由于我们没有为fetch方法指定任何模板,所以系统按照默认的视图目录/控制器/操作方法输出了view/index/hello.html模板文件。
通过浏览器访问:
http://localhost/tp5/index.php/index/index/hello?name=TP
三、读取数据
首先在我们的测试数据库(mysql)中新建一张表tp_data:
CREATE TABLE IF NOT EXISTS `tp_data`(
  `id` int(8) unsigned NOT NULL AUTO_INCREMENT,
  `data` varchar(255) NOT NULL,
  PRIMARY KEY (`id`)
) ENGINE=MyISAM DEFAULT CHARSET=utf8 ;
INSERT INTO `tp_data`(`id`,`data`) VALUES
  (1,'thinkphp'),
  (2,'php'),
  (3,'framework');
想要进行图像化操作的:
Windows平台可以使用navicat for mysql
linux平台可以使用phpmyadmin
然后我们需要在application/database.php中修改数据库的连接信息:
return [
// 数据库类型
'type' => 'mysql',
// 服务器地址
'hostname' => '127.0.0.1',
// 数据库名
'database' => 'test',
// 数据库用户名
'username' => 'root',
// 数据库密码
'password' => '',
// 数据库连接端口
'hostport' => '',
// 数据库连接参数
'params' => [],
// 数据库编码默认采用utf8
'charset' => 'utf8',
// 数据库表前缀
'prefix' => 'tp_',
// 数据库调试模式
'debug' => true,
]
接下来在控制器中添加访问数据库的代码:
find();
        $this->assign('result',$data);
        $this->assign('name',$name);
        return $this->fetch();
    }
}
修改模板文件,添加数据输出标签:
 hello {$name}


    {$result.id}=>{$result.data}
施工ing


