ElasticSearch集群安装,Kibana安装,Logstash安装,Logstash-input-plugin-jdbc的配置使用
1.安装elasticsearch
参考:https://www.2cto.com/kf/201802/723573.html
1.1 三台机器创建es运行的用户
Es不能再root用户下启动,需要为es的运行创建用户
[root@bigdata1 elasticsearch-6.2.2]# useradd es
[root@bigdata1 elasticsearch-6.2.2]# passwd es
密码:xxxxxx
1.2 下载安装elasticsearch
下载之后,将之上传到服务器的/home/bigdata/software上。(3台服务器)
[es@bigdata1 ~]$ pwd
/home/es
[es@bigdata1 ~]$ ll
总用量 246032
-rwxrwxrwx 1 root root  29049540 4月  16 00:59 elasticsearch-6.2.2.tar.gz
-rwxrwxrwx 1 root root  83415765 4月  16 01:00 kibana-6.2.2-linux-x86_64.tar.gz
-rwxrwxrwx 1 root root 139464029 4月  16 01:00 logstash-6.2.2.tar.gz
[es@bigdata1 ~]$
1.3 解压和创建数据目录(3台服务器执行以下命令)
cd /home/es
[es@bigdata1 ~]$ tar -zxvf elasticsearch-6.2.2.tar.gz
三台机器上都创建data数据目录
[es@bigdata1 elasticsearch-6.2.2]$ cd /home/es/elasticsearch-6.2.2
[es@bigdata1 elasticsearch-6.2.2]$ mkdir data
1.4 修改config/elasticsearch.yml
Bigdatga1机器:
node.name: node-140
path.data: /home/es/elasticsearch-6.2.2/data
path.logs: /home/es/elasticsearch-6.2.2/logs
bootstrap.memory_lock: false

network.host: bigdata1
http.port: 9200

# 集群发现
#集群节点ip或者主机
discovery.zen.ping.unicast.hosts: ["bigdata1", "bigdata2", "bigdata3"]
#设置这个参数来保证集群中的节点可以知道其它N个有master资格的节点。默认为1,对于大的集群来说,可以设置大一点的值(2-4)
discovery.zen.minimum_master_nodes: 3

# 下面两行配置为haad插件配置,三台服务器一致。
http.cors.enabled: true
http.cors.allow-origin: "*"

Bigdatga2机器:
node.name: node-141
path.data: /home/es/elasticsearch-6.2.2/data
path.logs: /home/es/elasticsearch-6.2.2/logs
bootstrap.memory_lock: false

network.host: bigdata2
http.port: 9200

# 集群发现
#集群节点ip或者主机
discovery.zen.ping.unicast.hosts: ["bigdata1", "bigdata2", "bigdata3"]
#设置这个参数来保证集群中的节点可以知道其它N个有master资格的节点。默认为1,对于大的集群来说,可以设置大一点的值(2-4)
discovery.zen.minimum_master_nodes: 3

# 下面两行配置为haad插件配置,三台服务器一致。
http.cors.enabled: true
http.cors.allow-origin: "*"
Bigdatga3机器:
node.name: node-143
path.data: /home/es/elasticsearch-6.2.2/data
path.logs: /home/es/elasticsearch-6.2.2/logs
bootstrap.memory_lock: false

network.host: bigdata3
http.port: 9200

# 集群发现
#集群节点ip或者主机
discovery.zen.ping.unicast.hosts: ["bigdata1", "bigdata2", "bigdata3"]
#设置这个参数来保证集群中的节点可以知道其它N个有master资格的节点。默认为1,对于大的集群来说,可以设置大一点的值(2-4)
discovery.zen.minimum_master_nodes: 3

# 下面两行配置为haad插件配置,三台服务器一致。
http.cors.enabled: true
http.cors.allow-origin: "*"
1.5 配置es内存
下面是一个可选参数配置,配置的文件是:/home/es/elasticsearch-6.2.2/config/jvm.options(ES中默认的内存大小时2G)
-Xms512m
-Xmx512m
1.6 修改Linux操作系统最大打开的Linux的数量
修改的文件是:/etc/security/limits.conf
*               soft nofile 262144
*               hard nofile 262144    #更改linux的锁内存限制要求
es soft memlock unlimited              #这里es是es用户
es hard memlock unlimited [root@bigdata1 ~]# cd /etc/security
[root@bigdata1 security]# scp -r limits.conf root@bigdata2:$PWD
limits.conf 100% 2546 2.1MB/s 00:00
[root@bigdata1 security]# scp -r limits.conf root@bigdata3:$PWD
limits.conf 100% 2546 2.1MB/s 00:00
[root@bigdata1 security]#1.7 修改Linux的最大线程数
修改文件是:/etc/security/limits.d/20-nproc.conf
* soft nproc unlimited1.8 三台机器都修改配置 Linux下/etc/sysctl.conf文件设置
(root用户下修改)
更改linux一个进行能拥有的最多的内存区域要求,添加或修改如下:
vm.max_map_count = 262144 更改linux禁用swapping,添加或修改如下:
vm.swappiness = 1
并执行如下命令:
sysctl -p1.9 三台机器都启动(es用户启动)
es@bigdata1 elasticsearch-6.2.2]# cd /home/es/elasticsearch-6.2.2
修改bin/elasticsearch,添加上:
export JAVA_HOME=/home/bigdata/installed/jdk1.8.0_161[es@bigdata3 elasticsearch-6.2.2]$ nohup bin/elasticsearch 1>/dev/null 2>&1 &分别访问:
http://bigdata1:9200/
http://bigdata2:9200/
http://bigdata3:9200/
1.10 使用命令检查ES状态
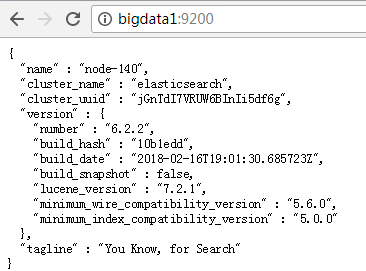
浏览器访问测试是否正常(以下为正常)
[es@bigdata1 config]$ curl http://bigdata1:9200/
{
  "name" : "node-140",
  "cluster_name" : "elasticsearch",
  "cluster_uuid" : "jGnTdI7VRUW6BInIi5df6g",
  "version" : {
    "number" : "6.2.2",
    "build_hash" : "10b1edd",
    "build_date" : "2018-02-16T19:01:30.685723Z",
    "build_snapshot" : false,
    "lucene_version" : "7.2.1",
    "minimum_wire_compatibility_version" : "5.6.0",
    "minimum_index_compatibility_version" : "5.0.0"
  },
  "tagline" : "You Know, for Search"
}
利用API查看状态
[es@bigdata1 config]$ curl -i -XGET 'bigdata1:9200/_count?pretty'
HTTP/1.1 200 OK
content-type: application/json; charset=UTF-8
content-length: 114

{
  "count" : 0,
  "_shards" : {
    "total" : 0,
    "successful" : 0,
    "skipped" : 0,
    "failed" : 0
  }
}
1.11 安装elasticsearch-analysis-ik中文分词器
Ik介绍:ik是一款中文的分词插件,支持自定义词库。
1.11.1 下载ik分词器
下载地址:https://github.com/medcl/elasticsearch-analysis-ik/releases
下载指定版本的分词器(zip版本)
1.11.2 解压ik分词器
[es@bigdata1 plugins]$ cd /home/es/
[es@bigdata1 ~]$ ls
elasticsearch-6.2.2                  jdk1.8.0_161                kibana-6.2.2-linux-x86_64.tar.gz
elasticsearch-6.2.2.tar.gz           jdk-8u161-linux-x64.tar.gz  logstash-6.2.2.tar.gz
elasticsearch-analysis-ik-6.2.2.zip  kibana-6.2.2-linux-x86_64
[es@bigdata1 ~]$ unzip elasticsearch-analysis-ik-6.2.2.zip
Archive:  elasticsearch-analysis-ik-6.2.2.zip
   creating: elasticsearch/
  inflating: elasticsearch/elasticsearch-analysis-ik-6.2.2.jar
  inflating: elasticsearch/httpclient-4.5.2.jar
  inflating: elasticsearch/httpcore-4.4.4.jar
  inflating: elasticsearch/commons-logging-1.2.jar
  inflating: elasticsearch/commons-codec-1.9.jar
  inflating: elasticsearch/plugin-descriptor.properties
   creating: elasticsearch/config/
  inflating: elasticsearch/config/extra_single_word_full.dic
  inflating: elasticsearch/config/quantifier.dic
  inflating: elasticsearch/config/IKAnalyzer.cfg.xml
  inflating: elasticsearch/config/main.dic
  inflating: elasticsearch/config/extra_single_word_low_freq.dic
  inflating: elasticsearch/config/extra_stopword.dic
  inflating: elasticsearch/config/preposition.dic
  inflating: elasticsearch/config/extra_main.dic
  inflating: elasticsearch/config/extra_single_word.dic
  inflating: elasticsearch/config/suffix.dic
  inflating: elasticsearch/config/surname.dic
  inflating: elasticsearch/config/stopword.dic
[es@bigdata1 ~]$ ls
elasticsearch               elasticsearch-analysis-ik-6.2.2.zip  kibana-6.2.2-linux-x86_64
elasticsearch-6.2.2         jdk1.8.0_161                         kibana-6.2.2-linux-x86_64.tar.gz
elasticsearch-6.2.2.tar.gz  jdk-8u161-linux-x64.tar.gz           logstash-6.2.2.tar.gz
[es@bigdata1 ~]$ mv elasticsearch/* ./elasticsearch-6.2.2/plugins/ik/
[es@bigdata1 ~]$ vim ./elasticsearch-6.2.2/config/elasticsearch.yml
1.11.3 重新启动Elasticsearch服务
ps -ef | grep elasticsearch然后kill掉相关的进程。
然后按照18.8的方式启动elasticsearch进程
1.11.4 然后执行以下命令
GET _analyze
{
  "analyzer":"ik_smart",
  "text":"2018年5月全球编程语言排行榜"
}
运行结果是:
{
  "tokens": [
    {
      "token": "2018年",
      "start_offset": 0,
      "end_offset": 5,
      "type": "TYPE_CQUAN",
      "position": 0
    },
    {
      "token": "5月",
      "start_offset": 5,
      "end_offset": 7,
      "type": "TYPE_CQUAN",
      "position": 1
    },
    {
      "token": "全球",
      "start_offset": 7,
      "end_offset": 9,
      "type": "CN_WORD",
      "position": 2
    },
    {
      "token": "编程",
      "start_offset": 9,
      "end_offset": 11,
      "type": "CN_WORD",
      "position": 3
    },
    {
      "token": "语言",
      "start_offset": 11,
      "end_offset": 13,
      "type": "CN_WORD",
      "position": 4
    },
    {
      "token": "排行榜",
      "start_offset": 13,
      "end_offset": 16,
      "type": "CN_WORD",
      "position": 5
    }
  ]
}2 安装Kibana
将Kibana上传到:/home/es
解压kibana
[es@bigdata1 ~]$ cd ~
[es@bigdata1 ~]$ tar -zxvf kibana-6.2.2-linux-x86_64.tar.gz
修改kibana的参数配置(三台机器上均可按照上面的方式进行操作,实际上只需要安装一个kibana)
cd /home/es/kibana-6.2.2-linux-x86_64/config
修改的内容如下:
server.host: "bigdata1"
elasticsearch.url: "http://bigdata1:9200"
守护进程启动kibana
[es@bigdata1 bin]$ pwd
/home/es/kibana-6.2.2-linux-x86_64/bin
[es@bigdata1 bin]$ nohup ./kibana &
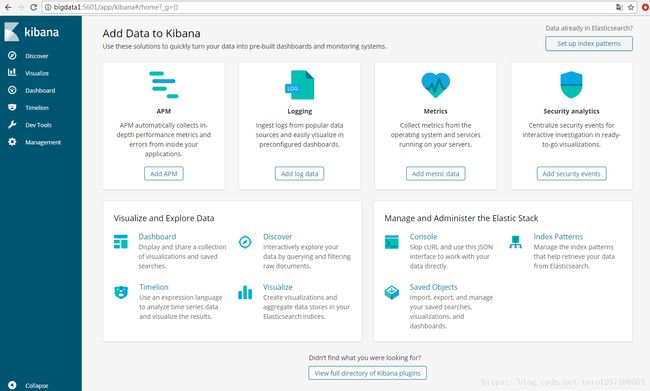
在浏览器上输入:http://bigdata1:5601/app/kibana#/home?_g=()

同样访问:http://bigdata2:5601/app/kibana#/home?_g=()
http://bigdata3:5601/app/kibana#/home?_g=()
可以见到上面同样的界面
3 Logstash
3.1 Logstash入门资料:
https://www.elastic.co/guide/en/logstash/current/getting-started-with-logstash.html
3.2 Logstash介绍
一个Logstash管道有两个必须的元素,input 和 output,和一个可选的元素filter。Input插件从source端消费数据,filter插件按照你指定的方式修改数据,output插件将数据写到一个目标地址。示意图如下:

3.3 环境准备
1、Logstash需要java8的环境,java9不支持。
2、在有些环境下,完成logstash的安装还需要JAVA_HOME环境变量。否则有可能安装失败。3、下载logstash安装包,下载地址:https://www.elastic.co/downloads/logstash
3.4 安装启动
参考资料:
https://blog.csdn.net/opera95/article/details/77855021 (网友博文)
https://www.elastic.co/guide/en/logstash/current/installing-logstash.html (官方文档)
下载logstash.将logstash上传到/home/es

解压
[es@bigdata3 ~]$ tar -zxvf logstash-6.2.2.tar.gz
[es@bigdata3 ~]$ cd logstash-6.2.2
注意:
安装路径中不要有冒号
启动logstash
[es@bigdata3 logstash-6.2.2]$ bin/logstash -e 'input { stdin {} } output { stdout {} }'

后台运行的方式:nohup bin/logstash -e 'input { stdin {} } output { stdout {} }' &注意:通过上面的方式启动之后,运行一段时间后,然后执行ps –ef | grep logstash操作,发现开始有进程信息,最后没有进程信息了,这属于正常现象
如果是yum安装:
sudo yum install logstash运行在docker上,可以参考:https://www.elastic.co/guide/en/logstash/current/docker.html
3.5 logstash内存参数配置
Logstash的默认的内存的值是1g,前期的时候,有些浪费,为了节省内存资源,这里将内存调整成128m
[es@bigdata3 config]$ cd /home/es/logstash-6.2.2/config
[es@bigdata3 config]$ vim jvm.options
-Xms128m
-Xmx128m
4 elasticsearch插件使用
4.1 logstash-input-plugin-jdbc
logstash之Input Plugins,参考文档地址:
https://www.elastic.co/guide/en/logstash/5.3/plugins-inputs-jdbc.html#plugins-inputs-jdbc-jdbc_driver_library在/home/es/logstash-6.2.2/myconf/test-project下编写xxx.conf.以test.conf为例,
文件结构:

内容:
input {
    stdin {}
    jdbc {
        #数据库地址    端口    数据库名
        jdbc_connection_string => "jdbc:mysql://xxx.xxx.xxx.166/youxuan_test?useUnicode=true&characterEncoding=utf-8&zeroDateTimeBehavior=convertToNull&transformedBitIsBoolean=true&useSSL=false&allowMultiQueries=true"
        #数据库用户名
        jdbc_user => "youxuan_test"
        #数据库密码
        jdbc_password => "youxuan_test"
        #mysql java驱动地址
        jdbc_driver_library => "/home/es/logstash-6.2.2/mylib/mysql-connector-java-5.1.46.jar"
        jdbc_driver_class => "com.mysql.jdbc.Driver"
        jdbc_paging_enabled => "true"
        jdbc_page_size => "100000"
        # sql 语句文件,也可以直接写SQL,如statement => "select * from table1"
        statement_filepath => "/home/es/logstash-6.2.2/myconf/test-project/test.sql"
        schedule => "* * * * *"
        type => "jdbc"
    }
}
output {
    stdout {
        codec => json_lines
    }
    elasticsearch {
        hosts => "bigdata3:9200"
        #索引名称
        index => "tb_qt_oto_order"
        #type名称
        document_type => "order"
        #id必须是待查询的数据表的序列字段
        document_id => "%{id}"
    }
}
其中/home/es/logstash-6.2.2/myconf/test-project/test.sql的内容如下:
SELECT * FROM `tb_qt_oto_order`Logstatsh中没有mysql的lib包,这里将mysql的lib包放到/home/es/logstash-6.2.2/mylib下:
[es@bigdata3 mylib]$ pwd
/home/es/logstash-6.2.2/mylib
[es@bigdata3 mylib]$ ls
mysql-connector-java-5.1.46.jar
[es@bigdata3 mylib]$
运行logstash脚本导入数据(开发环境,只在bigdata3上启动):
[es@bigdata3 logstash-6.2.2]$ nohup bin/logstash -f ./myconf/test-project/test.conf &
如果想进行检查测试,可以使用:
nohup bin/logstash -f ./myconf/test-project/test.conf –config.test_and_exit &
自动重新加载配置文件的内容:
nohup bin/logstash -f ./myconf/test-project/test.conf –config.reload.automatic &
在启动第二个logstash的时候,需要制定—path.data.比如:
nohup bin/logstash -f ./myconf/logger-project/xxxxxx.conf –path.data=/home/es/logstash-6.2.2/projectdata/log_analyze_result –config.reload.automatic &
在运行完成之后,在kibana中查看结果,和mysql中的数据进行对比:

在项目中有时候通过logstash jdbc将mysql数据导入到ES,这时候就会出现数库字段、ES中的字段、Java Bean中的字段不一致的问题。为了让ES中的字段和java Bean中的字段保持一致,可以使用Logstash的filter对mysql数据同步过程中的字段名称进行修改。配置案例如下:
input {
    stdin {}
    jdbc {
        #数据库地址    端口    数据库名
        jdbc_connection_string => "jdbc:mysql://bigdata3:3306/nginx_logger?useUnicode=true&characterEncoding=utf8&zeroDateTimeBehavior=convertToNull&transformedBitIsBoolean=true&useSSL=false&allowMultiQueries=true&autoReconnect=true"
        #数据库用户名
        jdbc_user => "root"
        #数据库密码
        jdbc_password => "123456"
        #mysql java驱动地址
        jdbc_driver_library => "/home/es/logstash-6.2.2/mylib/mysql-connector-java-5.1.46.jar"
        jdbc_driver_class => "com.mysql.jdbc.Driver"
        jdbc_paging_enabled => "true"
        jdbc_page_size => "100000"
        # sql 语句文件,也可以直接写SQL,如statement => "select * from table1"
        statement_filepath => "/home/es/logstash-6.2.2/myconf/logger-project/log_analyze_result.sql"
        schedule => "* * * * *"
        type => "jdbc"
    }
}

filter {
    mutate {
        #将字段名称request_url 变成 requestUrl
        rename => {
        "request_url" => "requestUrl"
                "access_date" => "accessDate"
                "avg_request_time" => "avgRequestTime"
    }
    }
}

output {
    stdout {
        codec => json_lines
    }
    elasticsearch {
        hosts => "bigdata3:9200"
        #索引名称
        index => "log_analyze_result"
        #type名称
        document_type => "url_analyze_result"
        #id必须是待查询的数据表的序列字段
        document_id => "%{id}"
    }
}
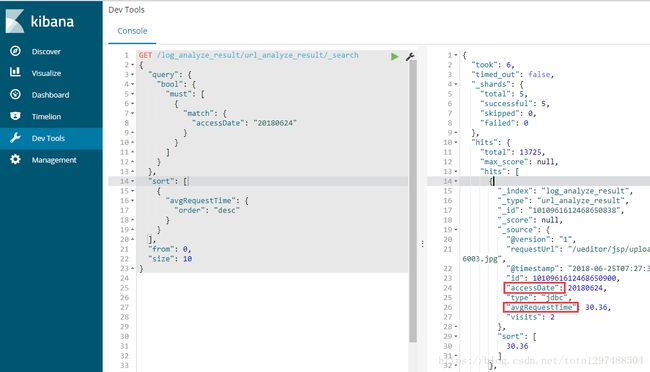
经过改造之后,在kibana中输入:
GET /log_analyze_result/url_analyze_result/_search
{
  "query": {
    "bool": {
      "must": [
        {
          "match": {
            "accessDate": "20180624"
          }
        }
      ]
    }
  },
  "sort": [
    {
      "avgRequestTime": {
        "order": "desc"
      }
    }
  ],
  "from": 0,
  "size": 10
}
通过上面的效果,发现已经被改过来了。


