Rust开发操作系统系列:全新Hello World系统
如果想看更好的排版,建议这个链接:http://www.iouyi.top/index.php/archives/235.html
注意:文章篇幅较长,如果想提前拿到代码,可以直接下载附件,大小仅为57k
正如标题,这篇文章是关于如何用Rust开发一个船新的操作系统,而这个操作系统只会打印一句话: Hello World
在这之前,我们需要了解有关计算机底层的基础知识,包括IO、接口、网络底层等等,当然如果你是老手或者是对Rust一窍不通的人,通过这篇文章也能清楚的了解如何制作一个微型的、有Terminal的操作系统
首先让我们了解一下Rust
Rust是一门系统编程语言 ,专注于安全 ,尤其是并发安全,支持函数式和命令式以及泛型等编程范式的多范式语言。Rust在语法上和C++类似 ,但是设计者想要在保证性能的同时提供更好的内存安全。 Rust最初是由Mozilla研究院的Graydon Hoare设计创造,然后在Dave Herman, Brendan Eich以及很多其他人的贡献下逐步完善的。Rust的设计者们通过在研发Servo网站浏览器布局引擎过程中积累的经验优化了Rust语言和Rust编译器。Rust编译器是在MIT License 和 Apache License 2.0双重协议声明下的免费开源软件。 Rust已经连续三年(2016,2017,2018)在Stack Overflow开发者调查的“最受喜爱编程语言”评选项目中折取桂冠。
上面的内容采摘自百度百科(本人语言组织不行,请多多见谅)
Rust的官网是 https://www.rust-lang.org/
关于自制操作系统
Rust官网本来就有这个项目的,其文章是英文的,作者也打算计划制作X86_64位系统,因此我准备针对这个计划开发
Rust官网开发单片机系统文章链接: https://rust-embedded.github.io/book
安装开发环境
由于作者目前只在Mac下工作,因此关于 Windows 和 Linux 的就只有等待以后更新!
-------------Mac下安装-------------
下面的命令一键安装Rust
$ curl https://sh.rustup.rs -sSf | sh开发环境:推荐用微软的 Visual Studio code 或者 Idea,在插件一栏搜索关键词 rust即可
其他软件环境:
cargo-binutils
$ cargo install cargo-binutils

$ rustup target add thumbv6m-none-eabi thumbv7m-none-eabi thumbv7em-none-eabi thumbv7em-none-eabihf

$ rustup component add llvm-tools-preview

$ brew cask install gcc-arm-embedded

$ brew install openocd

$ brew install qemu

$ #如果该brew cask命令不起作用(例如error: unknown command: cask),则首先运行brew tap Caskroom/tap并再次尝试。
书写代码
到了开始锻炼手的灵活度了,评论区回复打字速度有机会获得奖品哦(其实没有奖品,而是撒子都没得!!!)
使用cargo来创造一个新项目(不瞒你说,其实也可以用IDE直接创建的)
命令:
$ cargo new app接下来就是进入app文件夹
$ cd app然后在 Cargo.toml 设置一下添加这些
[dependencies]
cortex-m = "0.5.8"
cortex-m-rt = "0.6.5"
cortex-m-semihosting = "0.3.2"
panic-halt = "0.2.0"

[[bin]]
name = "testos" # 注意!这个name的参数必须与[package]里的name一致
test = false
bench = false

[profile.release]
codegen-units = 1
debug = true
lto = true
就像下面这样
[package]
name = "testos"
version = "0.1.0"
authors = ["moyan"]
edition = "2018"

[dependencies]
cortex-m = "0.5.8"
cortex-m-rt = "0.6.5"
cortex-m-semihosting = "0.3.2"
panic-halt = "0.2.0"

[[bin]]
name = "testos"
test = false
bench = false

[profile.release]
codegen-units = 1 # 更好的优化
debug = true
lto = true # 更好的优化
接下来就是设置Rust的 .config文件夹下的 config 文件
注意:Mac下用访达是无法直接看到这种带 . 的文件夹,可以用IDE看到,也可以用下面的命令看
$ defaults write com.apple.finder AppleShowAllFiles -bool true;

$ KillAll Finder
在 config 文件里添加这些代码
[build]
#代表给 Cortex-M3 的CPU编译系统
target = "thumbv7m-none-eabi"    # Cortex-M3

[target.thumbv7m-none-eabi]
#添加这些命令可以直接使用 cargo run 来运行,如果无法理解这些命令,可以在自己通过本片文章成功运行系统后看Rust官方的文章
runner = "qemu-system-arm -cpu cortex-m3 -machine lm3s6965evb -semihosting-config enable=on,target=native -kernel"

rustflags = [
#链接
  "-C", "link-arg=-Tlink.x",
]
完成后就可以设置好内存和储存走向了
因为 Rust 官网为我们解决了很多的问题,因此我们只需要些一个文章,那就是 memory.x 文件。注意这个文件创建在src的外面。
在文件里面添加
MEMORY
{
    FLASH : ORIGIN = 0x00000000, LENGTH = 256K
    RAM : ORIGIN = 0x20000000, LENGTH = 64K
}
终于。。。。到了最后一步:修改 main.rs 文件!!!
就像下面这样:
//这个代码是不使用Rust的标准库
#![no_std]
//这个代码表示不使用默认main方法
#![no_main]

//使用panic_halt库
extern crate panic_halt;

use cortex_m_rt::entry;
use cortex_m_semihosting::{hprintln};

#[entry]
fn main() -> ! {
    loop {
        //无限打印 Hello World
        hprintln!("hello world").unwrap();
    }
}
保存之后等待最后一步操作
运行
使用命令:
$ cargo build

$ cargo run
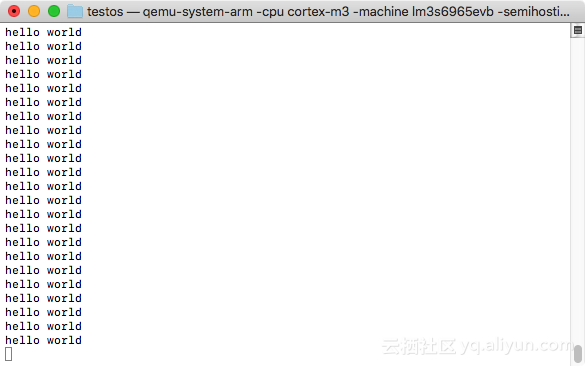
附上运行:
结尾
成功运行,感觉良好,希望您们关注收藏点一个赞
