【配置】SSM-配置Editor.md开源MarkDown编辑器
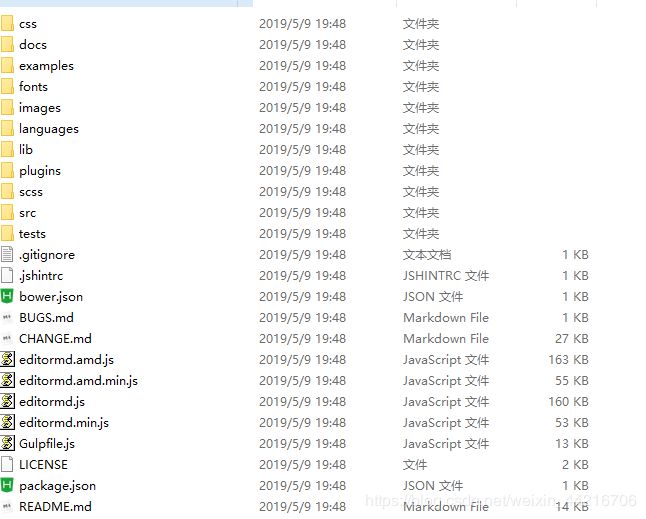
下载Editor资源
将如下放到自己的SSM项目下,建议在static下新建一个editor目录,方便管理
HTML页面(我自己根据我的需求修改过)
模板:Thymeleaf 3.0.11.RELEASE
这里配置的有:图片上传和主题
<html xmlns="http://www.w3.org/1999/xhtml"
xmlns:th="http://www.thymeleaf.org" lang="en">
<head>
<meta charset="utf-8"/>
<title>新建笔记title>
<link rel="stylesheet" th:href="@{/static/editor/css/style.css}"/>
<link rel="stylesheet" th:href="@{/static/editor/css/editormd.css}"/>
<link rel="stylesheet" type="text/css" th:href="@{/static/css/bootstrap.min.css}"/>
<link rel="stylesheet" type="text/css" th:href="@{/static/css/self/demo.css}"/>
head>
<body class="body-left-hidden">
<div id="layout">
<div class="container-fluid">
<div class="row">
<div th:replace="public::slidebar">div>
<div class="col-10 max-height rounded">
<form id="article_form">
<div class="input-group mb-3">
//这是我自己加的input文本框,用来提交标题
<div class="input-group-prepend">
<span class="input-group-text">标题span>
div>
<input type="text" name="title" class="form-control" placeholder="Title"/>
div>
//这里就是写笔记的地方
<div id="test-editormd">
<textarea style="display:none;">textarea>
div>
//这里是提交按钮和清空按钮
<div class="row mx-auto">
<div class="col-1 mx-auto">
<a id="article_save" class="btn btn-primary text-white mx-auto d-block">保存a>
div>
<div class="col-1 mx-auto">
<a id="article_cancel" class="btn btn-dark text-white mx-auto d-block">清空a>
div>
div>
form>
div>
div>
div>
div>
<script th:src="@{/static/editor/js/jquery.min.js}">script>
<script th:src="@{/static/editor/js/editormd.min.js}">script>
<script th:src="@{/static/js/bootstrap.min.js}">script>
<script th:src="@{/static/js/bootstrap.bundle.min.js}">script>
<script th:src="@{/static/js/self/demo.js}">script>
<script th:src="@{/static/editor/js/self/article.js}">script>
<script type="text/javascript">
let testEditor;
const height = $(window).height() - 150;
//一下代码是配置的主题颜色,具体看官网的示例
function themeSelect(id, themes, lsKey, callback) {
var select = $("#" + id);
for (var i = 0, len = themes.length; i < len; i++) {
var theme = themes[i];
var selected = (localStorage[lsKey] == theme) ? " selected=\"selected\"" : "";
select.append("");
}
select.bind("change", function () {
var theme = $(this).val();
if (theme === "") {
alert("theme == \"\"");
return false;
}
console.log("lsKey =>", lsKey, theme);
localStorage[lsKey] = theme;
callback(select, theme);
});
return select;
}
//这里是配置编辑器各种属性、功能
$(function () {
testEditor = editormd("test-editormd", {
width: "100%",
height: height,
syncScrolling: "single",
//注意注意:这里的path记得为自己的
path: "../../static/editor/lib/",
//开启图片上传
imageUpload: true,
imageFormats: ["jpg", "jpeg", "gif", "png", "bmp", "webp"],
//图片上传路径 对应Controller层的
imageUploadURL: "/editor/upload",
//主题
theme: (localStorage.theme) ? localStorage.theme : "dark",
previewTheme: (localStorage.previewTheme) ? localStorage.previewTheme : "dark",
editorTheme: (localStorage.editorTheme) ? localStorage.editorTheme : "pastel-on-dark",
});
themeSelect("editormd-theme-select", editormd.themes, "theme", function ($this, theme) {
testEditor.setTheme(theme);
});
themeSelect("editor-area-theme-select", editormd.editorThemes, "editorTheme", function ($this, theme) {
testEditor.setCodeMirrorTheme(theme);
});
themeSelect("preview-area-theme-select", editormd.previewThemes, "previewTheme", function ($this, theme) {
testEditor.setPreviewTheme(theme);
});
});
script>
body>
html>
Controller-图片上传
@PostMapping("/editor/upload")
@ResponseBody
//注意editormd-image-file这个参数是Editor官方定义好的名字
public JSONObject fileUpload(@RequestParam("editormd-image-file") MultipartFile file) throws IOException {
	//这里可以动态获取项目目录来设置,因为在这里获取到的是tomcat的目录所以我自己指定了
    File realPath = new File("E:\\Framework\\SSM\\SSM\\SSM_04\\upload\\");
    if (!realPath.exists()){
        realPath.mkdirs();
    }
    //可有可无,自定文件保存名
    String filename = new SimpleDateFormat("yyyy-MM-dd").format(new Date())+".jpg";
    File newFile = new File(realPath, filename);
    //直接使用transferTo来保存文件
    file.transferTo(newFile);
    //返回JSON
    JSONObject res = new JSONObject();
    res.put("url","/upload/"+filename);
    res.put("success", 1);
    res.put("message", "upload success!");
    return res;
}
spring-mvc的设置
location就是上边配置的图片保存的位置
将这个路径映射到/upload/**
这样就可以通过/upload/xxx.jpg来访问了
效果
总结
写的有点简陋,不过说起来也就一下几点
- 官网下载好资源
- 放到项目里
- 在把html里的js,css,font这些资源的路径配置好就OK了
- 然后再写Controller就行了
- 需要再配置什么功能就去官网看示例,照着配置就行了


