Spring Security:整合Spring Data Jpa
Spring Security+Spring Data Jpa 强强联手,安全管理没有简单,只有更简单!
创建工程
首先我们创建一个新的 Spring Boot 工程,添加如下依赖:
	org.springframework.boot</groupId>
	spring-boot-starter-web</artifactId>
</dependency>

	org.springframework.boot</groupId>
	spring-boot-starter-security</artifactId>
</dependency>

	mysql</groupId>
	mysql-connector-java</artifactId>
</dependency>

	org.springframework.boot</groupId>
	spring-boot-starter-data-jpa</artifactId>
</dependency>

	org.projectlombok</groupId>
	lombok</artifactId>
</dependency>
注意,除了 Spring Security 依赖之外,我们还需要数据依赖,lombok和 Spring Data Jpa 依赖。
工程创建完成后,我们再在数据库中创建一个空的库,就叫做 javakf_test1,里边什么都不用做,这样我们的准备工作就算完成了。
准备模型
接下来我们创建两个实体类,分别表示用户角色了用户类:
用户角色:
@Data
@Entity(name = "t_role")
public class Role {

	@Id
	@GeneratedValue(strategy = GenerationType.IDENTITY)
	private Long id;
	private String name;
	private String nameZh;

}
这个实体类用来描述用户角色信息,有角色 id、角色名称(英文、中文),@Entity 表示这是一个实体类,项目启动后,将会根据实体类的属性在数据库中自动创建一个角色表。
用户实体类:
@Data
@Entity(name = "t_user")
public class User implements UserDetails {

	private static final long serialVersionUID = -5470916854745278810L;
	@Id
	@GeneratedValue(strategy = GenerationType.IDENTITY)
	private Long id;
	private String username;
	private String password;
	private boolean accountNonExpired;
	private boolean accountNonLocked;
	private boolean credentialsNonExpired;
	private boolean enabled;
	@ManyToMany(fetch = FetchType.EAGER, cascade = CascadeType.PERSIST)
	private List<Role> roles;

	@Override
	public Collection<? extends GrantedAuthority> getAuthorities() {
		List<SimpleGrantedAuthority> authorities = new ArrayList<>();
		for (Role role : getRoles()) {
			authorities.add(new SimpleGrantedAuthority(role.getName()));
		}
		return authorities;
	}

}
用户实体类主要需要实现 UserDetails 接口,并实现接口中的方法。
这里的字段基本都好理解,几个特殊的我来稍微说一下:
- accountNonExpired、accountNonLocked、credentialsNonExpired、enabled这四个属性分别用来描述用户的状态,表示账户是否没有过期、账户是否没有被锁定、密码是否没有过期、以及账户是否可用。
- roles 属性表示用户的角色,User 和 Role 是多对多关系,用一个 @ManyToMany 注解来描述。
- getAuthorities 方法返回用户的角色信息,我们在这个方法中把自己的 Role 稍微转化一下即可。
配置
数据模型准备好之后,我们再来定义一个 UserDao:
public interface UserDao extends JpaRepository<User, Long> {

	User findUserByUsername(String username);

}
在接下来定义 UserService ,如下:
@Service
public class UserService implements UserDetailsService {

	@Autowired
	UserDao userDao;

	@Override
	public UserDetails loadUserByUsername(String username) throws UsernameNotFoundException {
		User user = userDao.findUserByUsername(username);
		if (user == null) {
			throw new UsernameNotFoundException("用户不存在");
		}
		return user;
	}

}
我们自己定义的 UserService 需要实现 UserDetailsService 接口,实现该接口,就要实现接口中的方法,也就是 loadUserByUsername ,这个方法的参数就是用户在登录的时候传入的用户名,根据用户名去查询用户信息(查出来之后,系统会自动进行密码比对)。
配置完成后,接下来我们在 Spring Security 中稍作配置,Spring Security 和测试用的 HelloController 我还是沿用之前文章中的(Spring Security:用户数据存入数据库),主要列出来需要修改的地方。
在 SecurityConfig 中,我们通过如下方式来配置用户:
@Autowired
UserService userService;
@Override
protected void configure(AuthenticationManagerBuilder auth) throws Exception {
    auth.userDetailsService(userService);
}
大家注意,还是重写 configure 方法,只不过这次我们不是基于内存,也不是基于 JdbcUserDetailsManager,而是使用自定义的 UserService,就这样配置就 OK 了。
最后,我们再在 application.properties 中配置一下数据库和 JPA 的基本信息,如下:
spring.datasource.username=root
spring.datasource.password=123456
spring.datasource.url=jdbc:mysql://localhost:3306/javakf_test1?useUnicode=true&characterEncoding=UTF-8&serverTimezone=Asia/Shanghai

spring.jpa.database=mysql
spring.jpa.database-platform=mysql
spring.jpa.hibernate.ddl-auto=update
spring.jpa.show-sql=true
spring.jpa.properties.hibernate.dialect=org.hibernate.dialect.MySQL8Dialect
测试
首先我们来添加两条测试数据,在单元测试中添加如下方法:
@RunWith(SpringRunner.class)
@SpringBootTest(classes = Application.class)
public class UserTest {

	@Autowired
	UserDao userDao;

	@Test
	public void createUser() {
		User u1 = new User();
		u1.setUsername("javakf");
		u1.setPassword("123");
		u1.setAccountNonExpired(true);
		u1.setAccountNonLocked(true);
		u1.setCredentialsNonExpired(true);
		u1.setEnabled(true);
		List<Role> rs1 = new ArrayList<>();
		Role r1 = new Role();
		r1.setName("ROLE_admin");
		r1.setNameZh("管理员");
		rs1.add(r1);
		u1.setRoles(rs1);
		userDao.save(u1);
		User u2 = new User();
		u2.setUsername("test");
		u2.setPassword("456");
		u2.setAccountNonExpired(true);
		u2.setAccountNonLocked(true);
		u2.setCredentialsNonExpired(true);
		u2.setEnabled(true);
		List<Role> rs2 = new ArrayList<>();
		Role r2 = new Role();
		r2.setName("ROLE_user");
		r2.setNameZh("普通用户");
		rs2.add(r2);
		u2.setRoles(rs2);
		userDao.save(u2);
	}

}
运行该方法后,我们会发现数据库中多了三张表:

这就是根据我们的实体类自动创建出来的。
我们来查看一下表中的数据。
用户表:

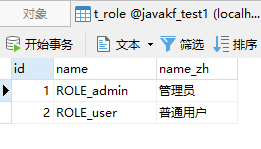
角色表:

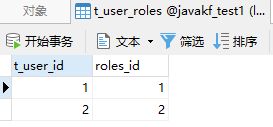
用户和角色关联表:

有了数据,接下来启动项目,我们来进行测试。
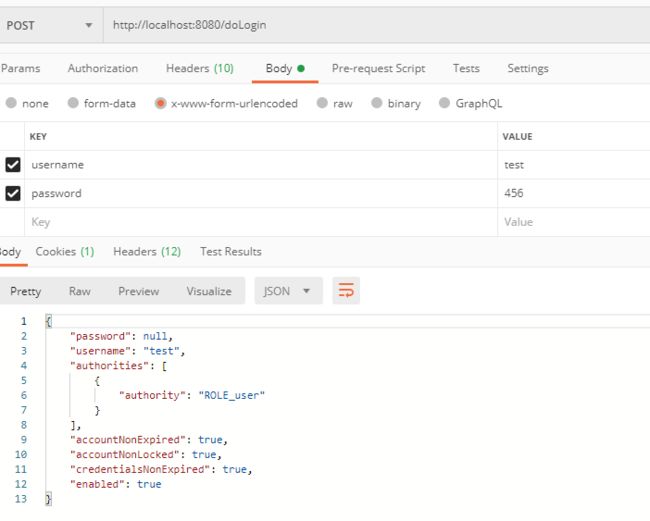
我们首先以 test 的身份进行登录:

登录成功后,分别访问 /hello,/admin/hello 以及 /user/hello 三个接口,其中:
/hello因为登录后就可以访问,这个接口访问成功。/admin/hello需要 admin 身份,所以访问失败。/user/hello需要 user 身份,所以访问成功。
具体测试效果小伙伴们可以试试,我就不截图了。
在测试的过程中,如果在数据库中将用户的 enabled 属性设置为 false,表示禁用该账户,此时再使用该账户登录就会登录失败。
按照相同的方式,大家也可以测试 javakf 用户。
代码托管:springsecurity_example_6