Spring+SpringMVC+MyBatis整合详细步骤
在这里是用一个web项目实例来演示SSM框架的整合
完整项目下载路径:MyMusic web项目
项目名称:MyMusic
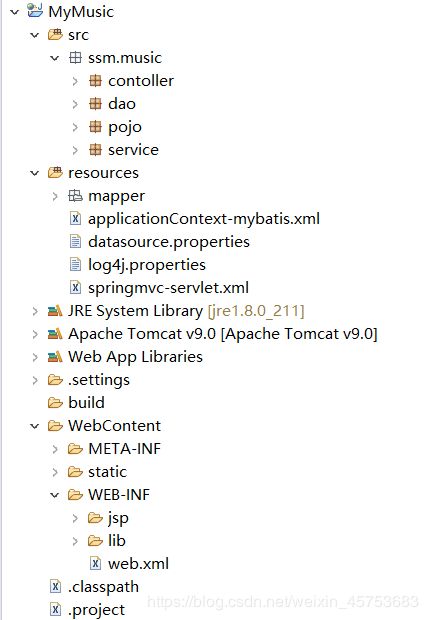
项目结构视图如下:

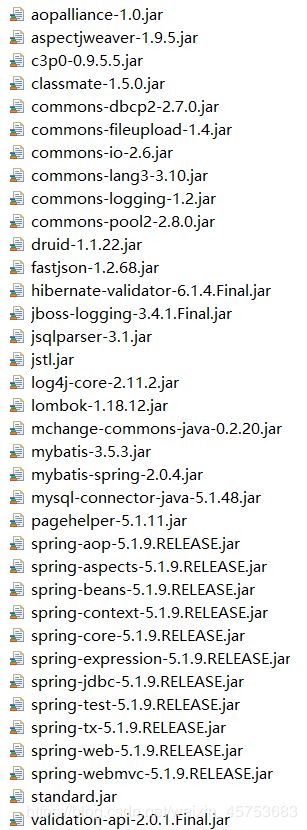
1、将SSM整合所需要的jar包添加到lib文件夹下
2、创建项目所需要的包文件夹,资源文件夹
a、在src文件夹下创建dao,pojo,service,controller
b、鼠标右键创建一个资源文件夹取名resources,在里面创建两个xml文件,分别为:
	spring的配置文件:applicationContext-mybatis.xml
	springMVC的配置文件:springmvc-servlet.xml
c、创建一个普通文件为数据源文件datasource.properties,创建一个普通文件为日志文件log4j.properties
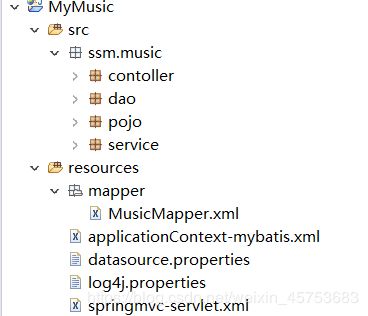
d、在resources文件夹下在创建一个mapper文件夹,用于专门存放连接dao接口的mybaits的映射文件,这里我写的是一个叫做MusicMapper.xml的mapper文件
~~如下图所示:~~
3、书写spring的配置文件(要在头部引入context,aop,p,tx等)
如下:
<?xml version="1.0" encoding="UTF-8"?>
<beans xmlns="http://www.springframework.org/schema/beans"
    xmlns:xsi="http://www.w3.org/2001/XMLSchema-instance"
    xmlns:context="http://www.springframework.org/schema/context"
    xmlns:aop="http://www.springframework.org/schema/aop"
    xmlns:p="http://www.springframework.org/schema/p"
    xmlns:tx="http://www.springframework.org/schema/tx"
    xsi:schemaLocation="http://www.springframework.org/schema/beans
        https://www.springframework.org/schema/beans/spring-beans.xsd
        http://www.springframework.org/schema/context
        https://www.springframework.org/schema/context/spring-context.xsd
        http://www.springframework.org/schema/aop
        https://www.springframework.org/schema/aop/spring-aop.xsd
        http://www.springframework.org/schema/tx
        https://www.springframework.org/schema/tx/spring-tx.xsd">
	<!--1、扫描所有有注解的类,让spring进行管理
		这里的意思是扫描ssm.music下的所有包,除开controller层的包
	-->
	<context:component-scan base-package="ssm.music">
       	<context:exclude-filter type="annotation" expression="org.springframework.stereotype.Controller"/>
    </context:component-scan>

 	<!-- 2、加载数据源文件,这里是去将写好的datasource.properties这个文件加载进来使用 -->
    <context:property-placeholder location="classpath:datasource.properties"/>

	<!-- 3、加载数据源BasicDataSource,基于DBCP2的方式,这里是来使用加载进来的数据源文件 -->
        <bean id="dataSource" class="org.apache.commons.dbcp2.BasicDataSource">
        	<property name="driverClassName" value="${driver}"/>
        	<property name="url" value="${url}"/>
        	<property name="username" value="${user}"/>
        	<property name="password" value="${password}"/>
        	<property name="initialSize" value="${initialSize}"/>
        	<property name="maxIdle" value="${maxIdle}"/>
        	<property name="maxTotal" value="${maxActive}"/>
        	<property name="maxWaitMillis" value="${maxWait}"/>
        	<property name="minIdle" value="${minIdle}"/>

        	<!-- sql心跳包 -->
        	<property name="testWhileIdle" value="true"/>
			<property name="testOnBorrow" value="false"/>
			<property name="testOnReturn" value="false"/>
			<property name="validationQuery" value="select 1"/>
			<property name="timeBetweenEvictionRunsMillis" value="6000"/>
			<property name="numTestsPerEvictionRun" value="${maxActive}"/>
        </bean>

	<!-- 4、配置SqlSessionFactoryBean 这一步就相当于mybatis核心配置文件的省略步骤,是将写好的数据源应用,配置实体类别名,设置mapper文件的加载-->
        <bean id="sqlSessionFactoryBean" class="org.mybatis.spring.SqlSessionFactoryBean">
        	<property name="dataSource" ref="dataSource"/>
        	<property name="typeAliasesPackage" value="ssm.music.pojo"/>
        	<property name="mapperLocations" value="classpath:mapper/*.xml"/>
        </bean>
	<!-- 5、扫描所有的dao MapperScannerConfigurer 这一步是将dao中写好的接口方法与写好的mapper文件整合进行数据的加载 -->
        <bean class="org.mybatis.spring.mapper.MapperScannerConfigurer">
        	<property name="basePackage" value="ssm.music.dao"/>
        	<property name="sqlSessionFactoryBeanName" value="sqlSessionFactoryBean"/>
        </bean>
	<!-- 6、配置事务增强 DataSourceTransactionManager -->
        <bean id="transactionManager" class="org.springframework.jdbc.datasource.DataSourceTransactionManager">
        	<property name="dataSource" ref="dataSource"/>
        </bean>

        <!-- 7、定义为哪些方法进行增强 -->
        <tx:advice id="txAdvice">
        	<tx:attributes>
        		<tx:method name="*" propagation="REQUIRED"/>
        	</tx:attributes>
        </tx:advice>

        <!-- 8、配置切面,并与事务增强进行组合 -->
        <aop:config>
        	<aop:pointcut expression="execution(* cn.erp..*(..))"  id="myPointcut"/>
        	<!-- 使AOP和事务增强进行组合 -->
        	<aop:advisor advice-ref="txAdvice" pointcut-ref="myPointcut"/>
        </aop:config>
</bean>
到这里spring的配置文件就书写完成,后面如有其它功能可自行添加;
4、书写springmvc的配置文件
<?xml version="1.0" encoding="UTF-8"?>
<beans xmlns="http://www.springframework.org/schema/beans"
    xmlns:xsi="http://www.w3.org/2001/XMLSchema-instance"
    xmlns:context="http://www.springframework.org/schema/context"
    xmlns:mvc="http://www.springframework.org/schema/mvc"
    xsi:schemaLocation="http://www.springframework.org/schema/beans
        https://www.springframework.org/schema/beans/spring-beans.xsd
        http://www.springframework.org/schema/context
        https://www.springframework.org/schema/context/spring-context.xsd
        http://www.springframework.org/schema/mvc
        https://www.springframework.org/schema/mvc/spring-mvc.xsd">

        <!-- 1、扫描所有有注解的类 ,这里去直接扫描controller里面所有有注解的类-->
       <context:component-scan base-package="ssm.music.contoller"/>

       <!-- 2、一键式配置 -->
       <mvc:annotation-driven/>

       <!-- 3、解决静态资源的访问 -->
        <mvc:default-servlet-handler/>

        <!-- 4、配置视图解析器 -->
        <bean class="org.springframework.web.servlet.view.InternalResourceViewResolver">
        	<property name="prefix" value="/WEB-INF/jsp/"/>
        	<property name="suffix" value=".jsp"/>
        </bean>

</beans>
5、配置WEB-INF下面的web.xml文件,整个程序都是从这里开始运行的。
<?xml version="1.0" encoding="UTF-8"?>
<web-app xmlns:xsi="http://www.w3.org/2001/XMLSchema-instance" xmlns="http://xmlns.jcp.org/xml/ns/javaee" xsi:schemaLocation="http://xmlns.jcp.org/xml/ns/javaee http://xmlns.jcp.org/xml/ns/javaee/web-app_4_0.xsd" id="WebApp_ID" version="4.0">
  <display-name>MyMusic</display-name>
  <welcome-file-list>
    <welcome-file>index.html</welcome-file>
    <welcome-file>index.htm</welcome-file>
    <welcome-file>index.jsp</welcome-file>
    <welcome-file>default.html</welcome-file>
    <welcome-file>default.htm</welcome-file>
    <welcome-file>default.jsp</welcome-file>
  </welcome-file-list>

   <!-- 1、加载Spring配置文件 -->
  <context-param>
  	<param-name>contextConfigLocation</param-name>
  	<param-value>classpath:applicationContext-*.xml</param-value>
  </context-param>

  <!-- 2、设置程序的监听器,让程序已启动就去读取Spring配置文件,并完成所有组件的注入
		这里引用ContextLoaderListener这个类
	 -->
  <listener>
  	<listener-class>org.springframework.web.context.ContextLoaderListener</listener-class>
  </listener>

  <!-- 3、配置一个过滤器,让所有的访问和响应都使用UTF-8的编码进行 -->
  <filter>
  	<filter-name>encodingFilter</filter-name>
  	<filter-class>org.springframework.web.filter.CharacterEncodingFilter</filter-class>
  	<init-param>
  		<param-name>encoding</param-name>
  		<param-value>UTF-8</param-value>
  	</init-param>
  	<init-param>
  		<param-name>forceRequestEncoding</param-name>
  		<param-value>true</param-value>
  	</init-param>
  	<init-param>
  		<param-name>forceResponseEncoding</param-name>
  		<param-value>true</param-value>
  	</init-param>
  </filter>
  <filter-mapping>
  	<filter-name>encodingFilter</filter-name>
  	<url-pattern>/*


  	dispatcherServlet
  	org.springframework.web.servlet.DispatcherServlet

  		contextConfigLocation
  		classpath:springmvc-servlet.xml


  	dispatcherServlet
  	/
到这里所有的配置就写完了,接下来就需要去书写dao接口,service的接口和实现类,controller层的方法,以及页面的跳转等。

