【日常】CCB网上银行“云宠物”喂食自动化脚本
目录
序言
问题缘起
问题分析与解决
ccb_hyperparameters.py
ccb_utils.py
ccb_kdxfocr.py
结语(附链接)
序言
鸽了挺久,差不多有三周没有写博客了。本来计划七月开始学个立身保命的Linux,结果天天在Azure上跟spark斗智斗勇,零零散散地遇到很多坑也都设法解决了,没想特别为了spark再水几篇博客,就都简单记录在每日的POST博客里凑数了。在这么说起来MARS也挺抠门的,给自己的员工一人分配了一个96G + 12核的spark集群,到头来给我们的项目总共才分了12G + 4核的spark集群,最后软磨硬泡才给加到24G + 8核的下水道配置,还经常算力不够中途卡死,本地半小时的任务在Azure里能跑上一个多小时,急得项目经理zkz就差要骂娘了。
在如此艰苦地条件下,实习生算上周末竟然也连续四五天加班到零点之后,终于IPM系统今天正式上线,宣告阶段性解脱。
于是笔者又捡起了半年前的idea —— 中国建设银行(CCB)网上银行“云宠物”喂食自动化脚本的编写。
问题缘起
半年前,也就是今年的寒假开始那阵子,笔者看到老妈输数字,万恶之源由此而起

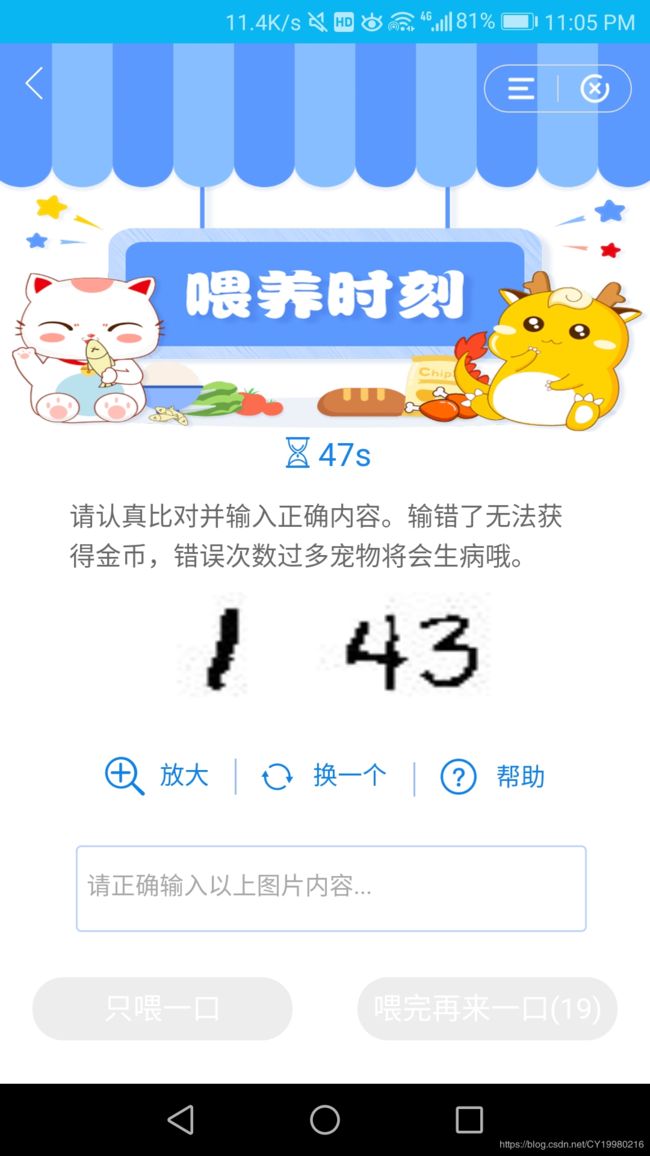
这是中国建设银行网上银行里推出的一款活动,表面上是一个云养宠物的小游戏,其实就是个输数字==>得金币==>换话费,这个活动刚推出的时候大概优惠力度是非常大的,因为直到今天只要坚持每天在早八点到晚八点间喂养600次(即输入600次的验证图片上的数字),每周在工作日坚持五天完成,就能在周六有机会兑换到20元的话费。可想而知半年前的优惠力度就更大了,听老妈说有的同事都白嫖了几千块的话费,听起来确实很诱人。
当时笔者的第一感这是中国建设银行在积累手写数字的标注数据,大概是有什么项目需求,这么算起来花费至多20元来买得3000个已标注的高质量手写数字的数据(实际上其实话费是要抢的,并不是每周都能运气好抢到20元的兑换券),看起来出手还挺阔绰。
笔者向老妈夸下海口说最多两天我给你写个脚本自动做这个喂养任务,然后尝试使用pytessoract来识别手写数字的图片,但效果很不理想,这个任务的对识别精确性要求很高,大概每十次至多允许输错一次,否则今天的喂养就直接报销,在之前的爬虫里用过pytessoract对于简单的数字或字母型验证图片的识别,大概有60%左右的正确率,显然是完全不管用的。
正好寒假那阵子正值疫情,老妈在医院三天才上一整天班,闲得就不谈。笔者估摸着这个送钱的活动不会长久,也困于两篇毕业设计和实习工作,并没有时间设法去解决这个OCR问题。然而后来到了四月份疫情缓和,老妈开始忙起来了,于是每天抓笔者跟老爸来输数字,那真的是各种折磨人,每天要加班,要跑实验,还要做这个无聊的任务,笔者一双麒麟臂到后来已经练到可以做到10分钟输200次的水平,每次输数字跟打激素一样,输完整个人像虚脱一样。
五月中旬返校六月底回来,这个活动竟然还没有结束!笔者受不了了,下决心要解决这个任务,正好发现讯飞开放平台推出了手写识别的试用款,限期90天可以获得10万次的服务量,掐指一算,每天600次输入,90天也就54000次,绰绰有余呀。测试了几个比较难以识别的图片,发现讯飞的接口的识别效果相当精准,并没有因为是免费试用而打折扣,于是笔者正式开始起手做这个自动化喂养脚本。

上图为讯飞开放平台提供的手写文字识别免费包获取链接页面:https://www.xfyun.cn/services/wordRecg
问题分析与解决
笔者选择使用python+adb来通过截图分析(如果还没有adb请参考https://caoyang.blog.csdn.net/article/details/82770410,里面应该有提及,不过建议还是去查一下为好,链接博客不是专门写ADB的),编写脚本解决云宠物喂养的任务。本身脚本编写并没有太多技术含量,只是很费时间,需要费时间找到各种可能的情形,需要费时间解决各种情形下的处理方式,费时间把各种情形下的截图元素坐标给分割出来。笔者没有OpenCV的应用经验,也不知道怎么查看andriod-app的页面源,因此不晓得怎么自动识别截图上的元素位置,因此全部依靠原始的刻度尺来量出页面上所有元素的坐标位置
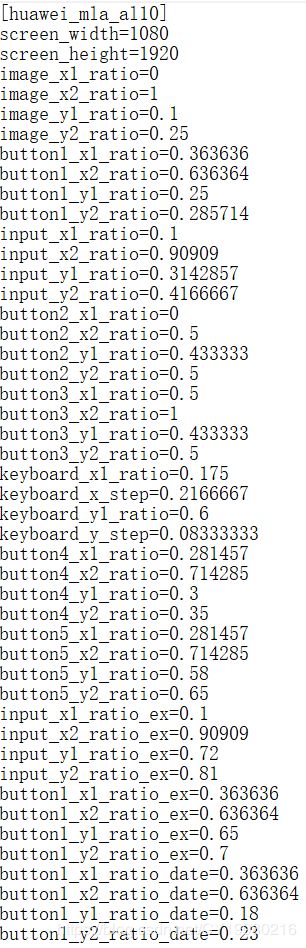
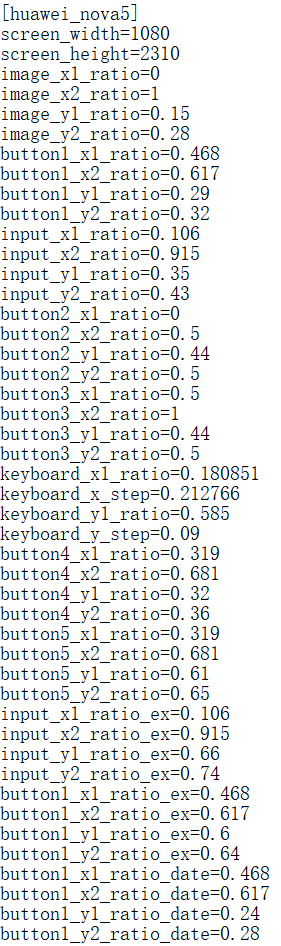
然后笔者掌握像这样的配置数据(这是下文中涉及到的ccb.ini文件中的截图)
既然掌握了如何确定截图元素的坐标点的核心科技后,就是确定云宠物喂养的业务逻辑。
其实这个输数字的任务并没有想象中的那么单纯,输完下一个输完下一个,除了占出现次数总数极大比重的手写数字图片识别输入外,还有日期型图片识别输入和选择型图片的识别输入
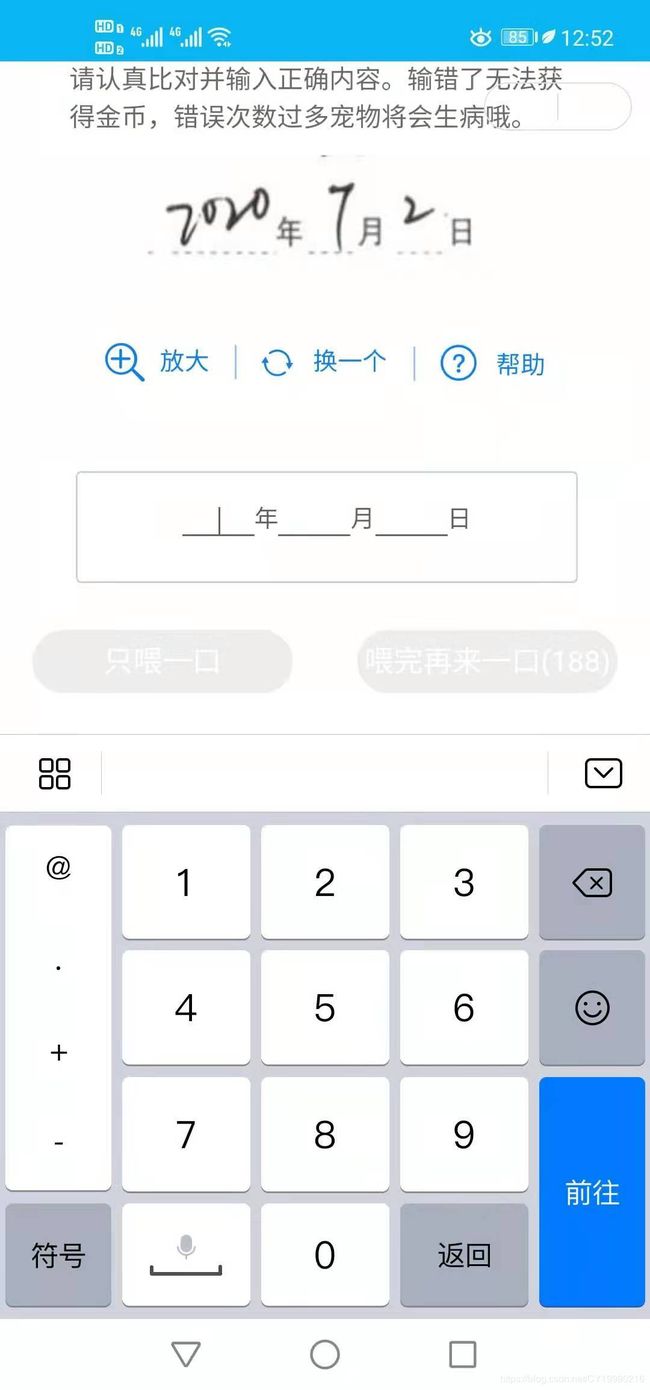
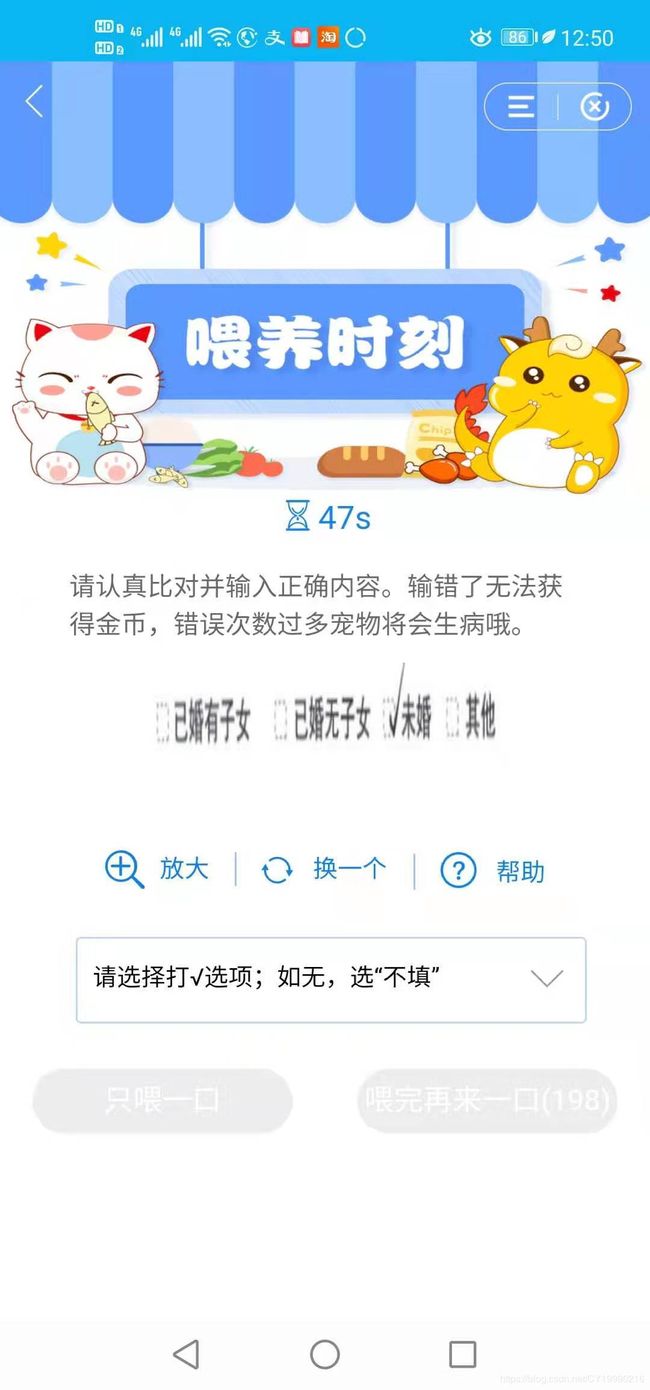
好在这两种验证图片的出现频率相当低,大概每二百次出现总次数不会超过10次,笔者也懒得费力解决这两种情况的处理方式了,直接点击页面上的换一个按钮换一张验证图片就完事了。
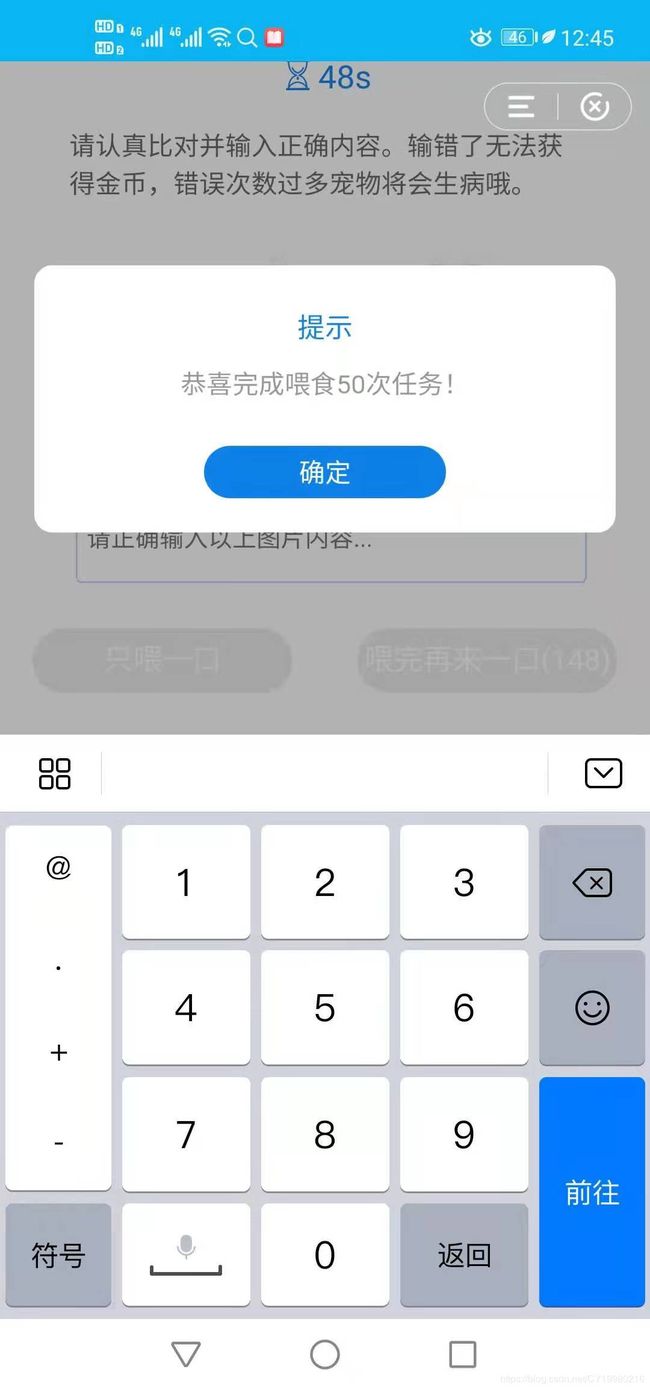
除了这两种偶尔出现来骚扰人的异常图片外,输入数字错误以及每天完成5次,50次,190次输入后都会跳出提示框
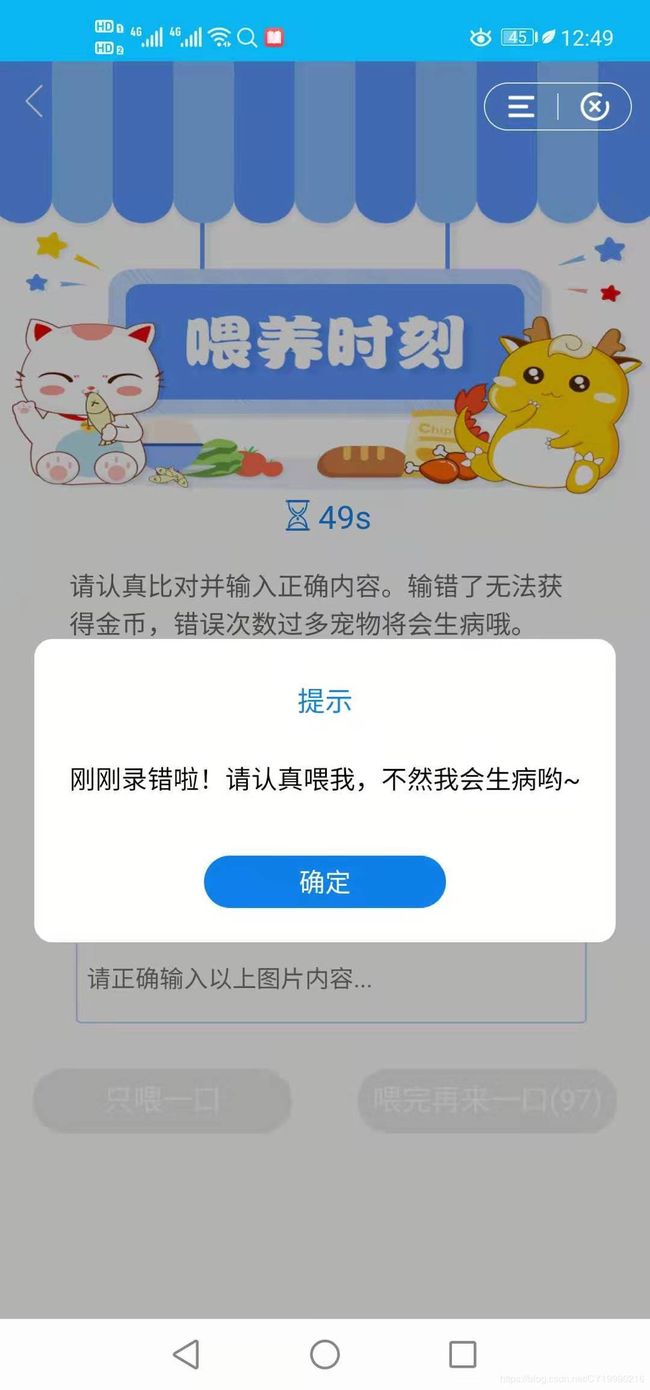
此外,还需要对屏幕下方的数字键盘是否出现进行判断,如果没有数字键盘还得设法把数字键盘先点出来,比如输入错误后,点击提示框上的确认按钮就会发现数字键盘已经不存在了。
基于上述地各种情形,笔者认为在每种型号的手机使用该脚本前,需要先收集下面的六种不同情况的截图(目前可以不需要select.png,因为这种情况和ex.png的处理方式)

关于各个图片的意义以及参数设置可以参照ccb_hyperparameters.py中各个参数的定义以及help字段说明
ccb_hyperparameters.py
# -*- coding: UTF-8 -*-
# @author: caoyang
# @email: [email protected]
# 项目超参数

import argparse

class HyperParameters:

	parser = argparse.ArgumentParser("--")

	# 1. 常用文件(夹)目录
	## 1.1 常用文件夹
	parser.add_argument("--dir_temp",default="temp",help="临时数据文件夹",type=str)
	parser.add_argument("--dir_log",default="log",help="日志数据文件夹",type=str)
	parser.add_argument("--dir_image",default="image",help="图像数据文件夹",type=str)
	parser.add_argument("--dir_test",default="test",help="测试数据文件夹",type=str)
	parser.add_argument("--dir_test_screencaps",default="screencaps",help="测试数据文件夹中的截屏文件夹",type=str)
	parser.add_argument("--dir_test_elements",default="elements",help="测试数据文件夹中的元素文件夹",type=str)

	## 1.2 用于验证截屏参数的图片
	parser.add_argument("--image_complete",default="complete.png",help="任务完成截屏",type=str)
	parser.add_argument("--image_error",default="error.png",help="输入错误截屏",type=str)
	parser.add_argument("--image_date",default="date.png",help="日期型截屏",type=str)
	parser.add_argument("--image_select",default="select.png",help="选择型截屏",type=str)
	parser.add_argument("--image_normal",default="normal.png",help="数字键盘出现后正常类型截屏",type=str)
	parser.add_argument("--image_ex",default="ex.png",help="数字键盘出现后正常类型截屏",type=str)

	## 1.3 元素切割图片文件: 可由ccb_cloudpet.py中的CloudPet().verify_hparams生成, 前提需要准备好1.2中的六张图片
	parser.add_argument("--element00",default="键盘0.png",help="数字键盘按键0切割图",type=str)
	parser.add_argument("--element01",default="键盘1.png",help="数字键盘按键1切割图",type=str)
	parser.add_argument("--element02",default="键盘2.png",help="数字键盘按键2切割图",type=str)
	parser.add_argument("--element03",default="键盘3.png",help="数字键盘按键3切割图",type=str)
	parser.add_argument("--element04",default="键盘4.png",help="数字键盘按键4切割图",type=str)
	parser.add_argument("--element05",default="键盘5.png",help="数字键盘按键5切割图",type=str)
	parser.add_argument("--element06",default="键盘6.png",help="数字键盘按键6切割图",type=str)
	parser.add_argument("--element07",default="键盘7.png",help="数字键盘按键7切割图",type=str)
	parser.add_argument("--element08",default="键盘8.png",help="数字键盘按键8切割图",type=str)
	parser.add_argument("--element09",default="键盘9.png",help="数字键盘按键9切割图",type=str)
	parser.add_argument("--element10",default="换一个_常规.png",help="换一个_常规切割图",type=str)
	parser.add_argument("--element11",default="换一个_日期型.png",help="换一个_日期型切割图",type=str)
	parser.add_argument("--element12",default="换一个_数字键盘出现前.png",help="换一个_数字键盘出现前切割图",type=str)
	parser.add_argument("--element13",default="任务完成确认.png",help="任务完成确认切割图",type=str)
	parser.add_argument("--element14",default="输入错误确认.png",help="输入错误确认切割图",type=str)
	parser.add_argument("--element15",default="输入框.png",help="输入框切割图",type=str)
	parser.add_argument("--element16",default="输入框_数字键盘出现前.png",help="输入框_数字键盘出现前切割图",type=str)
	parser.add_argument("--element17",default="喂完再来一口.png",help="喂完再来一口切割图",type=str)
	parser.add_argument("--element18",default="验证图片.png",help="验证图片切割图",type=str)
	parser.add_argument("--element19",default="只喂一口.png",help="只喂一口切割图",type=str)

	## 1.4 日志文件
	parser.add_argument("--file_image2text",default="image2text.txt",help="标注验证图片的文本",type=str)
	parser.add_argument("--file_image2response",default="image2response.txt",help="图片路径对应科大讯飞接口响应的文本",type=str)

	# 2. 云宠物喂食界面GUI参数: 可以通过外部configparser
	## 2.1 数字键盘出现后, 正常数字型验证的各元素坐标
	parser.add_argument("--screen_width",default=1080.,help="手机屏幕像素宽",type=float)
	parser.add_argument("--screen_height",default=1920.,help="手机屏幕像素高",type=float)

	parser.add_argument("--image_x1_ratio",default=0.,help="数字键盘出现后: 验证图片左沿",type=float)
	parser.add_argument("--image_x2_ratio",default=1.,help="数字键盘出现后: 验证图片右沿",type=float)
	parser.add_argument("--image_y1_ratio",default=1/10,help="数字键盘出现后: 验证图片上沿",type=float)
	parser.add_argument("--image_y2_ratio",default=1/4,help="数字键盘出现后: 验证图片下沿",type=float)

	parser.add_argument("--button1_x1_ratio",default=4/11,help="数字键盘出现后: '换一个'按钮左沿",type=float)
	parser.add_argument("--button1_x2_ratio",default=7/11,help="数字键盘出现后: '换一个'按钮右沿",type=float)
	parser.add_argument("--button1_y1_ratio",default=1/4,help="数字键盘出现后: '换一个'按钮上沿",type=float)
	parser.add_argument("--button1_y2_ratio",default=2/7,help="数字键盘出现后: '换一个'按钮下沿",type=float)

	parser.add_argument("--input_x1_ratio",default=1/10,help="数字键盘出现后: 输入框左沿",type=float)
	parser.add_argument("--input_x2_ratio",default=10/11,help="数字键盘出现后: 输入框右沿",type=float)
	parser.add_argument("--input_y1_ratio",default=11/35,help="数字键盘出现后: 输入框上沿",type=float)
	parser.add_argument("--input_y2_ratio",default=5/12,help="数字键盘出现后: 输入框下沿",type=float)

	parser.add_argument("--button2_x1_ratio",default=0.,help="数字键盘出现后: '只喂一口'按钮左沿",type=float)
	parser.add_argument("--button2_x2_ratio",default=1/2,help="数字键盘出现后: '只喂一口'按钮右沿",type=float)
	parser.add_argument("--button2_y1_ratio",default=13/30,help="数字键盘出现后: '只喂一口'按钮上沿",type=float)
	parser.add_argument("--button2_y2_ratio",default=1/2,help="数字键盘出现后: '只喂一口'按钮下沿",type=float)

	parser.add_argument("--button3_x1_ratio",default=1/2,help="数字键盘出现后: '喂完再来一口'按钮左沿",type=float)
	parser.add_argument("--button3_x2_ratio",default=1.,help="数字键盘出现后: '喂完再来一口'按钮右沿",type=float)
	parser.add_argument("--button3_y1_ratio",default=13/30,help="数字键盘出现后: '喂完再来一口'按钮上沿",type=float)
	parser.add_argument("--button3_y2_ratio",default=1/2,help="数字键盘出现后: '喂完再来一口'按钮下沿",type=float)

	parser.add_argument("--keyboard_x1_ratio",default=7/40,help="数字键盘区域的左沿",type=float)
	parser.add_argument("--keyboard_x_step",default=13/60,help="数字键盘按钮宽率",type=float)
	parser.add_argument("--keyboard_y1_ratio",default=3/5,help="数字键盘区域的上沿",type=float)
	parser.add_argument("--keyboard_y_step",default=1/12,help="数字键盘按钮高率",type=float)

	parser.add_argument("--button4_x1_ratio",default=2/7,help="'签到成功/任务完成'提示框'确定'按钮左沿",type=float)
	parser.add_argument("--button4_x2_ratio",default=5/7,help="'签到成功/任务完成'提示框'确定'按钮右沿",type=float)
	parser.add_argument("--button4_y1_ratio",default=3/10,help="'签到成功/任务完成'提示框'确定'按钮上沿",type=float)
	parser.add_argument("--button4_y2_ratio",default=7/20,help="'签到成功/任务完成'提示框'确定'按钮下沿",type=float)

	parser.add_argument("--button5_x1_ratio",default=2/7,help="'输入错误'提示框'确定'按钮左沿",type=float)
	parser.add_argument("--button5_x2_ratio",default=5/7,help="'输入错误'提示框'确定'按钮右沿",type=float)
	parser.add_argument("--button5_y1_ratio",default=29/50,help="'输入错误'提示框'确定'按钮上沿",type=float)
	parser.add_argument("--button5_y2_ratio",default=13/20,help="'输入错误'提示框'确定'按钮下沿",type=float)

	## 2.2 数字键盘出现前各元素坐标(选择型只要出现一定是数字键盘出现前, 且它的'换一个'的位置与数字型的数字键盘出现前的位置相同)
	parser.add_argument("--input_x1_ratio_ex",default=1/10,help="数字键盘出现前: 输入框左沿",type=float)
	parser.add_argument("--input_x2_ratio_ex",default=10/11,help="数字键盘出现前: 输入框右沿",type=float)
	parser.add_argument("--input_y1_ratio_ex",default=18/25,help="数字键盘出现前: 输入框上沿(参考数字键盘第二排中间线的高度)",type=float)
	parser.add_argument("--input_y2_ratio_ex",default=81/100,help="数字键盘出现前: 输入框下沿(参考数字键盘第三排中间线的高度)",type=float)

	parser.add_argument("--button1_x1_ratio_ex",default=4/11,help="数字键盘出现前: '换一个'按钮左沿",type=float)
	parser.add_argument("--button1_x2_ratio_ex",default=7/11,help="数字键盘出现前: '换一个'按钮右沿",type=float)
	parser.add_argument("--button1_y1_ratio_ex",default=13/20,help="数字键盘出现前: '换一个'按钮上沿",type=float)
	parser.add_argument("--button1_y2_ratio_ex",default=7/10,help="数字键盘出现前: '换一个'按钮下沿",type=float)


	## 2.3 数字键盘出现后, 非数字型元素的坐标
	parser.add_argument("--button1_x1_ratio_date",default=4/11,help="数字键盘出现后: '换一个'按钮左沿(日期型验证)",type=float)
	parser.add_argument("--button1_x2_ratio_date",default=7/11,help="数字键盘出现后: '换一个'按钮右沿(日期型验证)",type=float)
	parser.add_argument("--button1_y1_ratio_date",default=9/50,help="数字键盘出现后: '换一个'按钮上沿(日期型验证)",type=float)
	parser.add_argument("--button1_y2_ratio_date",default=23/100,help="数字键盘出现后: '换一个'按钮下沿(日期型验证)",type=float)

if __name__ == "__main__":
	hyperparameters = HyperParameters()
	parser = hyperparameters.parser
	hp = parser.parse_args()
	print(hp)
当我们确实的得到了这六张截图后,根据ccb_hyperparameters.py中设置好的参数配置,在ccb_cloudpet.py中编写类与方法后立刻可以得到各个元素的截图(文末会附上该项目代码压缩包的链接)
# -*- coding: UTF-8 -*-
# @author: caoyang
# @email: [email protected]
# 云宠物操作类
import os
import time
import numpy as np

from PIL import Image
from matplotlib import pyplot as plt
from pytesseract import image_to_string
from ccb_utils import *
from ccb_kdxfocr import KDXFOCR

class CloudPet():

	def __init__(self,hp,mobile_model):

		# 1. 类构造参数
		self.hp = hp
		self.mobile_model = mobile_model

		# 2. 定义0~9十个数字键盘按键的位置
		x0 = hp.keyboard_x1_ratio
		x1 = x0 + hp.keyboard_x_step
		x2 = x1 + hp.keyboard_x_step
		x3 = x2 + hp.keyboard_x_step
		y0 = hp.keyboard_y1_ratio
		y1 = y0 + hp.keyboard_y_step
		y2 = y1 + hp.keyboard_y_step
		y3 = y2 + hp.keyboard_y_step
		y4 = y3 + hp.keyboard_y_step
		self.keyboard_locations = {
			0: (x1,x2,y3,y4),
			1: (x0,x1,y0,y1),
			2: (x1,x2,y0,y1),
			3: (x2,x3,y0,y1),
			4: (x0,x1,y1,y2),
			5: (x1,x2,y1,y2),
			6: (x2,x3,y1,y2),
			7: (x0,x1,y2,y3),
			8: (x1,x2,y2,y3),
			9: (x2,x3,y2,y3),
		}
		del x0,x1,x2,x3,y0,y1,y2,y3,y4

		# 3. 常用变量
		self.screencap_name = "screencap"								 # 每次截屏保存的文件名
		self.kdxfocr = KDXFOCR()										 # 科大讯飞手写识别接口
		self.error_dict = {												 # 用于常见的识别错误替换
			"。": "0",
			"o": "0",
			"O": "0",
			"〇": "0",
			"D": "0",
			"Q": "0",
			"|": "1",
			"I": "1",
			"i": "1",
			"l": "1",
			"Z": "2",
			"z": "2",
			"A": "4",
			"b": "6",
			"S": "8",
			"s": "8",
			"q": "9",
			"g": "9",
		}

		self.element_arrays = [
			np.asarray(
				Image.open(
					os.path.join(
						hp.dir_test,
						hp.dir_test_elements,
						mobile_model,
						hp.__getattribute__("element{}".format(str(i).zfill(2))),
					)
				)
			)[:,:,:3].reshape(-1,) for i in range(20)					 # 注意只保留RGB三个轨道, 部分截图是RGBA的四个轨道, 很离谱, 反正我的华为麦芒5还是RGB三轨道, nova5是四轨道
		]																 # 将各个元素的切割图保存为类成员变量(转为矩阵后拉成一维向量), 便于check_screencap()函数中的比对

		#for i in self.element_arrays: print(i.shape)

	def verify_hparams(self,
		image_normal=None,												 # 数字键盘出现后正常类型的验证图片截图
		image_error=None,												 # 输入错误后的截图
		image_complete=None,											 # 任务完成后的截图
		image_date=None,												 # 日期型验证图片截图
		image_select=None,												 # 选择型验证图片截图
		image_ex=None,													 # 数字键盘出现前截图
	):																	 # 验证hparams中各个坐标的正确性: 截各个块到temp中交由人工检查
		# 1. image_normal: 数字键盘出现后正常类型的验证图片截图各元素坐标确认
		if image_normal is not None:
			cut_image(
				image=image_normal,
				x1=int(self.hp.screen_width*self.hp.image_x1_ratio),
				y1=int(self.hp.screen_height*self.hp.image_y1_ratio),
				x2=int(self.hp.screen_width*self.hp.image_x2_ratio),
				y2=int(self.hp.screen_height*self.hp.image_y2_ratio),
				save_path=os.path.join(self.hp.dir_temp,self.hp.element18),
			)
			cut_image(
				image=image_normal,
				x1=int(self.hp.screen_width*self.hp.button1_x1_ratio),
				y1=int(self.hp.screen_height*self.hp.button1_y1_ratio),
				x2=int(self.hp.screen_width*self.hp.button1_x2_ratio),
				y2=int(self.hp.screen_height*self.hp.button1_y2_ratio),
				save_path=os.path.join(self.hp.dir_temp,self.hp.element10),
			)
			cut_image(
				image=image_normal,
				x1=int(self.hp.screen_width*self.hp.input_x1_ratio),
				y1=int(self.hp.screen_height*self.hp.input_y1_ratio),
				x2=int(self.hp.screen_width*self.hp.input_x2_ratio),
				y2=int(self.hp.screen_height*self.hp.input_y2_ratio),
				save_path=os.path.join(self.hp.dir_temp,self.hp.element15),
			)
			cut_image(
				image=image_normal,
				x1=int(self.hp.screen_width*self.hp.button2_x1_ratio),
				y1=int(self.hp.screen_height*self.hp.button2_y1_ratio),
				x2=int(self.hp.screen_width*self.hp.button2_x2_ratio),
				y2=int(self.hp.screen_height*self.hp.button2_y2_ratio),
				save_path=os.path.join(self.hp.dir_temp,self.hp.element17),
			)
			cut_image(
				image=image_normal,
				x1=int(self.hp.screen_width*self.hp.button3_x1_ratio),
				y1=int(self.hp.screen_height*self.hp.button3_y1_ratio),
				x2=int(self.hp.screen_width*self.hp.button3_x2_ratio),
				y2=int(self.hp.screen_height*self.hp.button3_y2_ratio),
				save_path=os.path.join(self.hp.dir_temp,self.hp.element19),
			)
			for i in range(10):

				cut_image(
					image=image_normal,
					x1=int(self.hp.screen_width*self.keyboard_locations[i][0]),
					y1=int(self.hp.screen_height*self.keyboard_locations[i][2]),
					x2=int(self.hp.screen_width*self.keyboard_locations[i][1]),
					y2=int(self.hp.screen_height*self.keyboard_locations[i][3]),
					save_path=os.path.join(self.hp.dir_temp,self.hp.__getattribute__("element0{}".format(i))),
				)

		# 2. image_error: 输入数字错误后截图各元素坐标确认
		if image_error is not None:
			cut_image(
				image=image_error,
				x1=int(self.hp.screen_width*self.hp.button5_x1_ratio),
				y1=int(self.hp.screen_height*self.hp.button5_y1_ratio),
				x2=int(self.hp.screen_width*self.hp.button5_x2_ratio),
				y2=int(self.hp.screen_height*self.hp.button5_y2_ratio),
				save_path=os.path.join(self.hp.dir_temp,self.hp.element14),
			)
		# 3. image_complete: 任务完成后截图各元素坐标确认
		if image_complete is not None:
			cut_image(
				image=image_complete,
				x1=int(self.hp.screen_width*self.hp.button4_x1_ratio),
				y1=int(self.hp.screen_height*self.hp.button4_y1_ratio),
				x2=int(self.hp.screen_width*self.hp.button4_x2_ratio),
				y2=int(self.hp.screen_height*self.hp.button4_y2_ratio),
				save_path=os.path.join(self.hp.dir_temp,self.hp.element13),
			)

		# 4. image_date: 日期型验证截图各元素坐标确认
		if image_date is not None:
			cut_image(
				image=image_date,
				x1=int(self.hp.screen_width*self.hp.button1_x1_ratio_date),
				y1=int(self.hp.screen_height*self.hp.button1_y1_ratio_date),
				x2=int(self.hp.screen_width*self.hp.button1_x2_ratio_date),
				y2=int(self.hp.screen_height*self.hp.button1_y2_ratio_date),
				save_path=os.path.join(self.hp.dir_temp,self.hp.element11),
			)

		# 5. image_ex: 数字键盘出现前截图各元素坐标确认
		if image_ex is not None:
			cut_image(
				image=image_ex,
				x1=int(self.hp.screen_width*self.hp.input_x1_ratio_ex),
				y1=int(self.hp.screen_height*self.hp.input_y1_ratio_ex),
				x2=int(self.hp.screen_width*self.hp.input_x2_ratio_ex),
				y2=int(self.hp.screen_height*self.hp.input_y2_ratio_ex),
				save_path=os.path.join(self.hp.dir_temp,self.hp.element16),
			)
			cut_image(
				image=image_ex,
				x1=int(self.hp.screen_width*self.hp.button1_x1_ratio_ex),
				y1=int(self.hp.screen_height*self.hp.button1_y1_ratio_ex),
				x2=int(self.hp.screen_width*self.hp.button1_x2_ratio_ex),
				y2=int(self.hp.screen_height*self.hp.button1_y2_ratio_ex),
				save_path=os.path.join(self.hp.dir_temp,self.hp.element12),
			)


if __name__ == "__main__":
	mobile_model = "huawei_mla_al10"
	mobile_model = "huawei_nova5"
	hp = get_hparams()
	hp = update_params(hp,config_path="ccb.ini",section_name=mobile_model)
	cp = CloudPet(hp=hp,mobile_model=mobile_model)

	image_normal,image_error,image_complete,image_date,image_ex,image_select = None,None,None,None,None,None
	image_normal = Image.open(os.path.join(hp.dir_test,hp.dir_test_screencaps,mobile_model,hp.image_normal))
	image_error = Image.open(os.path.join(hp.dir_test,hp.dir_test_screencaps,mobile_model,hp.image_error))
	image_complete = Image.open(os.path.join(hp.dir_test,hp.dir_test_screencaps,mobile_model,hp.image_complete))
	image_date = Image.open(os.path.join(hp.dir_test,hp.dir_test_screencaps,mobile_model,hp.image_date))
	image_ex = Image.open(os.path.join(hp.dir_test,hp.dir_test_screencaps,mobile_model,hp.image_ex))
	#image_select = Image.open(os.path.join(hp.dir_test,mobile_model,hp.image_normal))

	cp.verify_hparams(
		image_normal=image_normal,										 # 数字键盘出现后正常类型的验证图片截图
		image_error=image_error,										 # 输入错误后的截图
		image_complete=image_complete,									 # 任务完成后的截图
		image_date=image_date,											 # 日期型验证图片截图
		image_ex=image_ex,												 # 数字键盘出现前的截图
		image_select=image_select,										 # 选择型验证图片截图
	)
其中import的ccb_utils模块中的cut_image函数如下所示
ccb_utils.py
# -*- coding: UTF-8 -*-
# @author: caoyang
# @email: [email protected]
# 项目工具函数

import os
import time
import json
import configparser
import numpy as np
from PIL import Image

from ccb_hyperparameters import HyperParameters

def get_hparams():														 # 读取超参数
	hyperparameters = HyperParameters()
	parser = hyperparameters.parser
	hp = parser.parse_args()
	return hp

def save_hparams(hp,save_path=None):									 # 导出超参数
	if save_path is None: save_path = os.path.join(hp.dir_log,"hparams_{}".format(time.strftime("%Y%m%d%H%M%S")))
	json_hparams = json.dumps(vars(hp))
	with open(save_path,"w") as f: f.write(json_hparams)

def update_params(hp,config_path="huawei_nova5.ini",section_name=None):	 # 根据config_path中的参数配置更新hp
	cf = configparser.ConfigParser()
	cf.read(config_path)
	if section_name is None: section_name = cf.sections()[0]			 # 默认取第一个section

	for key,value in cf.items(section_name):
		assert key in dir(hp), "Option {} is not in hparams !".format(key)
		hp.__setattr__(key,float(value))

	return hp


def adb_pull_screencap(image_name="screencap"):							 # 加载手机截图
	if os.path.isfile("{}.png".format(image_name)):
		os.remove("{}.png".format(image_name))
	os.system("adb shell screencap -p /sdcard/{}.png".format(image_name))
	print("  - 导入本地截图...")
	os.system("adb pull /sdcard/{}.png".format(image_name))
	print("  - 完成!")
	image = Image.open("{}.png".format(image_name))
	return image

def adb_input_swipe(x1,y1,x2,y2):										 # 模拟滑屏输入
	os.system("adb shell input swipe {} {} {} {}".format(x1,y1,x2,y2))

def cut_image(image,x1,y1,x2,y2,save_path=None):						 # 裁剪图片并保存
	image_array = np.asarray(image)
	image_block = Image.fromarray(image_array[y1:y2,x1:x2,:].astype("uint8"))
	if save_path is not None: image_block.save(save_path)
	return image_block

def correct_text(text,error_dict):										 # 后处理校正OCR接口结果: 基于相似映射
	text = text.replace(" ","")
	new_text = ""
	for char in text:
		correct_char = error_dict.get(char,char)
		if correct_char in ["0","1","2","3","4","5","6","7","8","9"]: new_text += correct_char
	return new_text


if __name__ == "__main__":

	hp = get_hparams()
	hp = update_params(hp)
	print(hp)
	save_hparams(hp)
然后我们在temp文件夹中可以取得20张元素分割的图片(这是华为NOVA5的配置信息得到的结果)
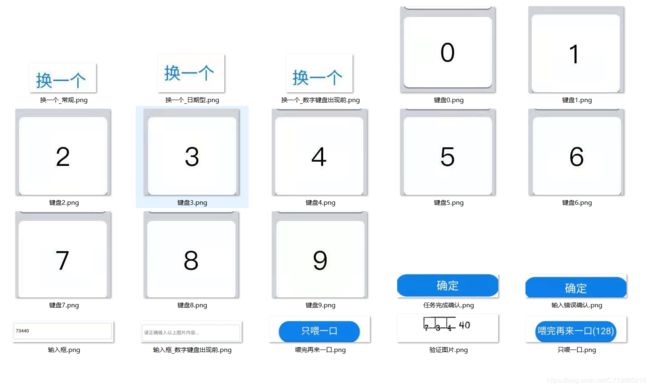
这是华为麦芒5的配置信息得到的结果

笔者每次只要看看这些分割出来的图片是否合理就可以判断参数的配置是否正确了。
接下来在ccb_cloudpet.py中编写截屏检查的代码逻辑(check_screencap函数),因为我们需要判断每次的截屏到底属于上述六种截屏的哪一种,以分别给出不同的处理方式,笔者在这里对截屏检查的代码逻辑做了简述
1. 截屏一共分为六种不同情况:
  - normal: 数字键盘出现后的正常数字型验证
  - date: 数字键盘出现后的日期型验证
  - error: 输入错误后出现提示框
  - complete: 日常任务完成后出现提示框
  - ex: 数字键盘出现前的非选择型验证
  - select: 选择型验证(为了省事select可以并入ex的情况, 都用点击'换一个'按钮来简单解决)
  > 以上六种情况基本覆盖所有截屏类型, 从上到下check_screencap()函数分别返回0~5
  > 目前ex和select可能难以区分都返回4即可, 两者后处理相同都是点击'换一个'按钮进入下一次截屏检验

2. 简要说明截屏检验的逻辑:
  - 检查数字键盘是否存在:
	+ 截取0~9共计10个按键OCR识别, 都识别出(亦可以设定置信度阈值)则认为数字键盘存在(keyboard_ratio变量组)
  - 若存在数字键盘: 则为(complete,date,normal)之一
	+ 如果识别到complete对应的确认按钮存在则返回complete(button4_ratio变量组)
	+ 如果没有识别到complete对应的确认按钮则根据'换一个'按钮的位置来判定:
	  * 位置较高则返回date(button1_ratio_date变量组)
	  * 位置较低则返回normal(button1_ratio变量组)
  - 若不存在数字键盘: 则为(error,select,ex)之一
	+ 如果识别到error对应的确认按钮存在则返回error(button5_ratio变量组)
	+ 目前不区分select与ex, 如果未识别到前者则直接返回select/ex即可
	  * select与ex可以都以点击'换一个'按钮处理
* 最优的方法是通过点击ex中的输入框来进入normal模式依据这样的业务逻辑则可以在ccb_cloudpet.py编写出check_screencap函数
	def check_screencap(self,screencap,threshold=0.75):					 # 验证当前截图是否合法, 并返回合法或不合法的原因
		"""
		1. 截屏一共分为六种不同情况:
		  - normal: 数字键盘出现后的正常数字型验证
		  - date: 数字键盘出现后的日期型验证
		  - error: 输入错误后出现提示框
		  - complete: 日常任务完成后出现提示框
		  - ex: 数字键盘出现前的非选择型验证
		  - select: 选择型验证(为了省事select可以并入ex的情况, 都用点击'换一个'按钮来简单解决)
		  > 以上六种情况基本覆盖所有截屏类型, 从上到下check_screencap()函数分别返回0~5
		  > 目前ex和select可能难以区分都返回4即可, 两者后处理相同都是点击'换一个'按钮进入下一次截屏检验

		2. 简要说明截屏检验的逻辑:
		  - 检查数字键盘是否存在:
		    + 截取0~9共计10个按键OCR识别, 都识别出(亦可以设定置信度阈值)则认为数字键盘存在(keyboard_ratio变量组)
		  - 若存在数字键盘: 则为(complete,date,normal)之一
		    + 如果识别到complete对应的确认按钮存在则返回complete(button4_ratio变量组)
		    + 如果没有识别到complete对应的确认按钮则根据'换一个'按钮的位置来判定:
		      * 位置较高则返回date(button1_ratio_date变量组)
		      * 位置较低则返回normal(button1_ratio变量组)
		  - 若不存在数字键盘: 则为(error,select,ex)之一
		    + 如果识别到error对应的确认按钮存在则返回error(button5_ratio变量组)
		    + 目前不区分select与ex, 如果未识别到前者则直接返回select/ex即可
		      * select与ex可以都以点击'换一个'按钮处理
		      * 最优的方法是通过点击ex中的输入框来进入normal模式
		"""
		print("正在检验数字键盘是否存在")
		count = 0
		for i in range(10):
			element = cut_image(
				image=screencap,
				x1=int(self.hp.screen_width*self.keyboard_locations[i][0]),
				y1=int(self.hp.screen_height*self.keyboard_locations[i][2]),
				x2=int(self.hp.screen_width*self.keyboard_locations[i][1]),
				y2=int(self.hp.screen_height*self.keyboard_locations[i][3]),
				save_path=os.path.join(self.hp.dir_temp,self.hp.__getattribute__("element0{}".format(i))),
			)
			element_array = np.asarray(element)[:,:,:3].reshape(-1,)	 # 图片转矩阵再拉成一维向量
			print(element_array.shape[0],self.element_arrays[i].shape[0])

			coef = np.corrcoef(element_array,self.element_arrays[i])[0,1]
			print("  - 按键{}的相似度为: {}".format(i,coef))
			if coef>=threshold: count += 1

		if count>=5:													 # 数字键盘出现后
			print("  - 数字键盘出现!")
			element13 = cut_image(
				image=screencap,
				x1=int(self.hp.screen_width*self.hp.button4_x1_ratio),
				y1=int(self.hp.screen_height*self.hp.button4_y1_ratio),
				x2=int(self.hp.screen_width*self.hp.button4_x2_ratio),
				y2=int(self.hp.screen_height*self.hp.button4_y2_ratio),
				save_path=os.path.join(self.hp.dir_temp,self.hp.element13),
			)
			element13_array = np.asarray(element13)[:,:,:3].reshape(-1,)
			coef = np.corrcoef(element13_array,self.element_arrays[13])[0,1]
			print("  - 任务完成确认按钮的相似度为: {}".format(coef))
			if coef>threshold:											 # 有任务完成提示框跳出
				print("  - 处于任务完成确认状态! 返回3")
				return 3												 # - complete模式返回3
			else:														 # 没有任务完成提示框跳出
				print("  - 不处于任务完成确认状态!")
				element10 = cut_image(
					image=screencap,
					x1=int(self.hp.screen_width*self.hp.button1_x1_ratio),
					y1=int(self.hp.screen_height*self.hp.button1_y1_ratio),
					x2=int(self.hp.screen_width*self.hp.button1_x2_ratio),
					y2=int(self.hp.screen_height*self.hp.button1_y2_ratio),
					save_path=os.path.join(self.hp.dir_temp,self.hp.element10),
				)
				element11 = cut_image(
					image=screencap,
					x1=int(self.hp.screen_width*self.hp.button1_x1_ratio_date),
					y1=int(self.hp.screen_height*self.hp.button1_y1_ratio_date),
					x2=int(self.hp.screen_width*self.hp.button1_x2_ratio_date),
					y2=int(self.hp.screen_height*self.hp.button1_y2_ratio_date),
					save_path=os.path.join(self.hp.dir_temp,self.hp.element11),
				)
				element10_array = np.asarray(element10)[:,:,:3].reshape(-1,)
				element11_array = np.asarray(element11)[:,:,:3].reshape(-1,)
				coef1 = np.corrcoef(element10_array,self.element_arrays[10])[0,1]
				coef2 = np.corrcoef(element11_array,self.element_arrays[11])[0,1]
				print("  - '换一个_常规'的相似度为: {}".format(coef1))
				print("  - '换一个_日期型'的相似度为: {}".format(coef2))
				if coef1>=threshold and coef2>=threshold: raise Exception("相似度都很高, 无法区分是常规或是日期型")
				elif coef1>=threshold:
					print("  - 正常型! 返回0")
					return 0											 # - normal模式返回0
				elif coef2>=threshold:
					print("  - 日期型! 返回1")
					return 1											 # - date模式返回1
				else: raise Exception("相似度都很低, 无法区分是常规或是日期型")

		else:															 # 数字键盘出现前
			print("  - 数字键盘未出现!")
			element14 = cut_image(
				image=screencap,
				x1=int(self.hp.screen_width*self.hp.button5_x1_ratio),
				y1=int(self.hp.screen_height*self.hp.button5_y1_ratio),
				x2=int(self.hp.screen_width*self.hp.button5_x2_ratio),
				y2=int(self.hp.screen_height*self.hp.button5_y2_ratio),
				save_path=os.path.join(self.hp.dir_temp,self.hp.element14),
			)
			element14_array = np.asarray(element14)[:,:,:3].reshape(-1,)
			coef = np.corrcoef(element14_array,self.element_arrays[14])[0,1]
			print("  - 任务完成确认按钮的相似度为: {}".format(coef))
			if coef>threshold:											 # 有任务完成提示框跳出
				print("  - 处于输入错误确认状态! 返回2")
				return 2												 # - error模式返回2
			else:														 # 没有任务完成提示框跳出: 目前不区分这种情况下的ex和select
				print("  - 不处于输入错误确认状态! 返回4")
				return 4
依据check_screencap函数的不同返回值,我们在ccb_cloudpet.py中编写demo函数,其中每次截屏后需要先对截屏进行check_screencap,根据返回值flag进行不同的处理,只有normal的情况才配进入后续的逻辑中调用讯飞接口进行识别
	def demo(self,mode="manual"):
		assert mode in ["manual","auto"]
		while True:
			print("正在截屏...")
			image = adb_pull_screencap(image_name=self.screencap_name)	 # 获取当前截屏
			print("  - 完成截屏...")

			'''
			  - normal: 数字键盘出现后的正常数字型验证
			  - date: 数字键盘出现后的日期型验证
			  - error: 输入错误后出现提示框
			  - complete: 日常任务完成后出现提示框
			  - ex: 数字键盘出现前的非选择型验证
			  - select: 选择型验证(为了省事select可以并入ex的情况, 都用点击'换一个'按钮来简单解决)
			'''

			print("验证截屏...")
			flag = self.check_screencap(image,threshold=0.75)
			if flag==0: print("  - 正常型: 直接进入手写识别!")
			elif flag==1:
				print("  - 日期型: 点击'换一个'")
				adb_input_swipe(
					x1=int(self.hp.screen_width*(self.hp.button1_x1_ratio_date+self.hp.button1_x2_ratio_date)/2)-5,
					y1=int(self.hp.screen_height*(self.hp.button1_y1_ratio_date+self.hp.button1_y2_ratio_date)/2),
					x2=int(self.hp.screen_width*(self.hp.button1_x1_ratio_date+self.hp.button1_x2_ratio_date)/2)-5,
					y2=int(self.hp.screen_height*(self.hp.button1_y1_ratio_date+self.hp.button1_y2_ratio_date)/2),
				)
				time.sleep(2)
				continue

			elif flag==2:
				print("  - 上次输入数字错误: 点击'确认'")
				adb_input_swipe(
					x1=int(self.hp.screen_width*(self.hp.button5_x1_ratio+self.hp.button5_x2_ratio)/2)-5,
					y1=int(self.hp.screen_height*(self.hp.button5_y1_ratio+self.hp.button5_y2_ratio)/2),
					x2=int(self.hp.screen_width*(self.hp.button5_x1_ratio+self.hp.button5_x2_ratio)/2)-5,
					y2=int(self.hp.screen_height*(self.hp.button5_y1_ratio+self.hp.button5_y2_ratio)/2),
				)
				time.sleep(2)
				continue
			elif flag==3:
				print("  - 日常任务完成: 点击'确认'")
				adb_input_swipe(
					x1=int(self.hp.screen_width*(self.hp.button4_x1_ratio+self.hp.button4_x2_ratio)/2)-5,
					y1=int(self.hp.screen_height*(self.hp.button4_y1_ratio+self.hp.button4_y2_ratio)/2),
					x2=int(self.hp.screen_width*(self.hp.button4_x1_ratio+self.hp.button4_x2_ratio)/2)-5,
					y2=int(self.hp.screen_height*(self.hp.button4_y1_ratio+self.hp.button4_y2_ratio)/2),
				)
				time.sleep(2)
				continue

			elif flag==4:
				print("  - 数字键盘未出现: 点击'换一个'")
				adb_input_swipe(
					x1=int(self.hp.screen_width*(self.hp.button1_x1_ratio_ex+self.hp.button1_x2_ratio_ex)/2)-5,
					y1=int(self.hp.screen_height*(self.hp.button1_y1_ratio_ex+self.hp.button1_y2_ratio_ex)/2),
					x2=int(self.hp.screen_width*(self.hp.button1_x1_ratio_ex+self.hp.button1_x2_ratio_ex)/2)-5,
					y2=int(self.hp.screen_height*(self.hp.button1_y1_ratio_ex+self.hp.button1_y2_ratio_ex)/2),
				)
				time.sleep(2)
				continue

			else: raise Exception("未知类型的截图检验结果!")

			image_ocr_save_name = "image_{}.png".format(time.strftime("%Y%m%d%H%M%S"))
			image_ocr = cut_image(
				image=image,
				x1=int(self.hp.screen_width*self.hp.image_x1_ratio),
				y1=int(self.hp.screen_height*self.hp.image_y1_ratio),
				x2=int(self.hp.screen_width*self.hp.image_x2_ratio),
				y2=int(self.hp.screen_height*self.hp.image_y2_ratio),
				save_path=os.path.join(
					self.hp.dir_image,
					image_ocr_save_name,
				),														 # 将验证图片保存到image文件夹: 积累人工标注数据
			)															 # 获取验证图片
			print("  - 完成保存验证图片...")
			if mode=="manual":
				plt.imshow(image_ocr)
				print("  - imshow完成")
				plt.pause(0.1)
				input_string = input("请输入图片中的数字")
				input_string = input_string.replace(" ","")
				input_list = map(int,list(input_string))
				for number in input_list:									 # 输入数字
					x1,x2,y1,y2 = self.keyboard_locations[number]
					adb_input_swipe(
						x1=int(self.hp.screen_width*(x1+x2)/2)-5,
						y1=int(self.hp.screen_height*(y1+y2)/2),
						x2=int(self.hp.screen_width*(x1+x2)/2)+5,
						y2=int(self.hp.screen_height*(y1+y2)/2),
					)
				time.sleep(0.5)
				adb_input_swipe(											 # 喂完再来一口
					x1=int(self.hp.screen_width*(self.hp.button3_x1_ratio+self.hp.button3_x2_ratio)/2)-5,
					y1=int(self.hp.screen_height*(self.hp.button3_y1_ratio+self.hp.button3_y2_ratio)/2),
					x2=int(self.hp.screen_width*(self.hp.button3_x1_ratio+self.hp.button3_x2_ratio)/2)+5,
					y2=int(self.hp.screen_height*(self.hp.button3_y1_ratio+self.hp.button3_y2_ratio)/2),
				)
				with open(os.path.join(self.hp.dir_log,self.hp.file_image2text),"a") as f:
					f.write("{}\t{}\n".format(image_ocr_save_name,input_string))
				time.sleep(5)

			if mode=="auto":
				text = self.kdxfocr.image2text(
					image_path=os.path.join(
						self.hp.dir_image,
						image_ocr_save_name,
					),language="en",split="",
					log_path=os.path.join(
						self.hp.dir_log,
						self.hp.file_image2response,
					),
				)														 # 调用科大讯飞接口手写文字识别
				text = correct_text(text,self.error_dict)				 # 后处理校正: 基于相似映射
				print("  - 识别结果为:{}".format(text))
				input_list = map(int,list(text))
				for number in input_list:								 # 输入数字
					print("    + 正在输入{}".format(number))
					x1,x2,y1,y2 = self.keyboard_locations[number]
					start_point = ()
					end_point = ()
					adb_input_swipe(
						x1=int(self.hp.screen_width*(x1+x2)/2)-5,
						y1=int(self.hp.screen_height*(y1+y2)/2),
						x2=int(self.hp.screen_width*(x1+x2)/2)+5,
						y2=int(self.hp.screen_height*(y1+y2)/2),
					)
					time.sleep(0.5)
				adb_input_swipe(										 # 喂完再来一口
					x1=int(self.hp.screen_width*(self.hp.button3_x1_ratio+self.hp.button3_x2_ratio)/2)-5,
					y1=int(self.hp.screen_height*(self.hp.button3_y1_ratio+self.hp.button3_y2_ratio)/2),
					x2=int(self.hp.screen_width*(self.hp.button3_x1_ratio+self.hp.button3_x2_ratio)/2)+5,
					y2=int(self.hp.screen_height*(self.hp.button3_y1_ratio+self.hp.button3_y2_ratio)/2),
				)
				with open(os.path.join(self.hp.dir_log,self.hp.file_image2text),"a") as f:
					f.write("{}\t{}\n".format(image_ocr_save_name,text))
time.sleep(5)注意demo函数中如果设置mode="manual"可以实现手动输入,虽然不如直接在手机上输入,但是会将你的输入结果和图片配对保存下来,可以用于积累一个标注的数据集。 ccb_cloudpet.py中调用的ccb_kdxfocr模块如下所示
ccb_kdxfocr.py
# -*- coding: UTF-8 -*-
# @author: caoyang
# @email: [email protected]
# 重写科大讯飞手写识别调用接口
import os
import json
import time
import base64
import hashlib
import requests
from urllib import parse
from PIL import Image
class KDXFOCR:
def __init__(self,
api_url = "http://webapi.xfyun.cn/v1/service/v1/ocr/handwriting",
app_id = <你的app_id>,
app_key = <你的app_key>,
):
self.api_url = api_url
self.app_id = app_id
self.app_key = app_key
def request(self,image_path,language="en",location="true"):
def _get_headers():
curTime = str(int(time.time()))
param = "{\"language\":\""+language+"\",\"location\":\""+location+"\"}"
paramBase64 = base64.b64encode(param.encode("utf-8"))
m2 = hashlib.md5()
str1 = self.app_key + curTime + str(paramBase64,"utf-8")
m2.update(str1.encode("utf-8"))
checkSum = m2.hexdigest()
headers = {
"X-CurTime": curTime,
"X-Param": paramBase64,
"X-Appid": self.app_id,
"X-CheckSum": checkSum,
"Content-Type": "application/x-www-form-urlencoded; charset=utf-8",
}
return headers
def _get_data(image_path):
with open(image_path,"rb") as f: image_bytes = f.read()
data = {"image": str(base64.b64encode(image_bytes),"utf-8")}
return data
r = requests.post(self.api_url,headers=_get_headers(),data=_get_data(image_path))
return r.content
def image2text(self,image_path,language="en",split="",priority="left",log_path=None):
assert priority in ["left","top","right","bottom"] # 我发现有些图片是左下和上右的数字结构, 然后就会先输出上右的数字, 因此输出OCR结果时先做一个排序, 默认按照数字块的左边沿排序输出, 也可以按照右边缘, 上下不推荐, 可能不是很好
response = self.request(image_path,language=language)
json_response = json.loads(response)
words = {} # 存储各个区位的数字块及其 上/下/左/右 的坐标
for dic in json_response["data"]["block"]:
lines = dic.get("line")
if lines is not None:
for line in lines:
for word in line["word"]:
if priority=="left":
left = line["location"]["top_left"]["x"]
word = word["content"]
if left in words: words[left].append(word)
else: words[left] = [word]
if priority=="top":
top = line["location"]["top_left"]["y"]
word = word["content"]
if top in words: words[top].append(word)
else: words[top] = [word]
if priority=="right":
right = line["location"]["right_bottom"]["x"]
word = word["content"]
if right in words: words[right].append(word)
else: words[right] = [word]
if priority=="bottom":
bottom = line["location"]["right_bottom"]["y"]
word = word["content"]
if bottom in words: words[bottom].append(word)
else: words[bottom] = [word]
text_blocks = []
index = list(words.keys())
index.sort()
for indice in index:
text_blocks.extend(words[indice])
text = split.join(text_blocks)
if log_path is not None:
with open(log_path,"a") as f: f.write("{}\t{}\t{}\n".format(image_path,text,response))
return text
if __name__ == "__main__":
k = KDXFOCR()
root = "image/"
'''
image_path = root + "image_20200703175132.png"
text = k.image2text(image_path,language="en",split="",priority="left",log_path="1.txt")
print(text)
input()
'''
for _,_,image_names in os.walk(root): pass
for image_name in image_names:
image_path = root + image_name
print(image_path,end="\t")
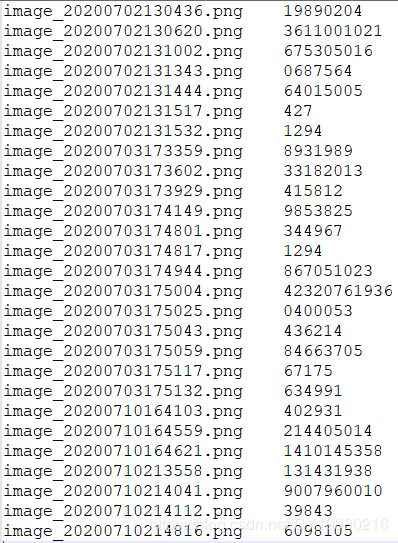
text = k.image2text(image_path,language="en",split="",log_path="1.txt")
print(text)
上面的代码里没有给app_id和app_key,去讯飞开放平台免费申请个账号注册个app,领取一下手写识别的免费礼包,很容易的。这里有个讯飞的坑,调用接口返回的结果如果直接拼接可能会有问题,因为讯飞给的默认排序是从上到下,而输入的验证图片上的数字要求是从左到右,因此如果数字型验证图片的结构是"左下+右上",讯飞接口识别的数字块返回顺序将是先右上后左下,上述代码里已经对这个情形做了考虑并修正了数字块的顺序。
笔者稍微提一下关于如何判断数字键盘或者按钮是否存在的方法,笔者用的方法是很笨的,就是拿当前截屏的元素分割图片与已经准备好的那些元素分割图片进行相似度比照,如果大于某个阈值就认为元素是存在的,本来像数字键盘或者换一个按钮这种元素笔者以为是可以用pytessoract识别出数字或文字的,依此可以判断元素是否存在,但是实际效果并不理想,似乎pytessoract对需要识别的图片的质量要求还是很高的,不是什么阿猫阿狗都能识别出来的,毕竟是一个只是静态的模型库。
此外代码里还有很多处理细节笔者不再一一赘述,文末会给该脚本代码的压缩包的下载链接。
最后笔者直接展示一下运行效果吧
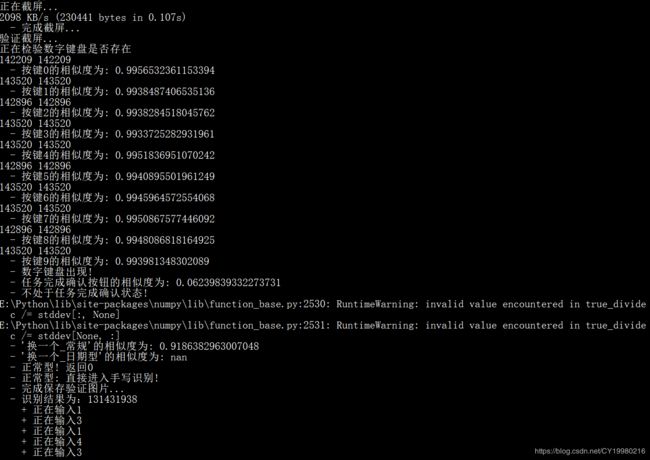
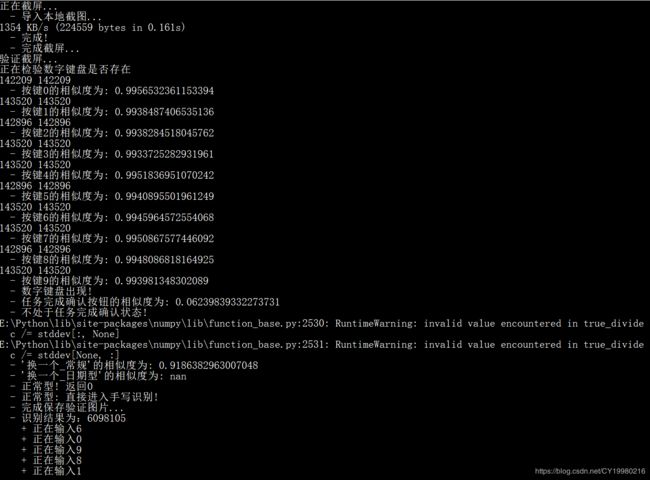
然后每次识别的图片,识别结果,讯飞接口相应结果都会被保存到外部文件


结语(附链接)
不管怎么说感谢你能看到这里,该项目的压缩包的BaiduCloud链接如下所示,永久有效
链接:https://pan.baidu.com/s/1ARbXz_xVFvbFETLtTeD4LA
提取码:c8k9
如果看到压缩包里包含了笔者的隐私信息的话,可能的话还是提醒一下我吧,评论或者邮箱,笔者感激不尽!
打卡,凌晨一点。一个人确实还是挺累的了。
分享学习,共同进步!