数据库创建表

SET NAMES utf8mb4;
SET FOREIGN_KEY_CHECKS = 0;

-- ----------------------------
-- Table structure for book
-- ----------------------------
DROP TABLE IF EXISTS `book`;
CREATE TABLE `book`  (
  `id` int(10) NOT NULL,
  `name` varchar(20) CHARACTER SET utf8 COLLATE utf8_general_ci NULL DEFAULT NULL,
  `author` varchar(20) CHARACTER SET utf8 COLLATE utf8_general_ci NULL DEFAULT NULL,
  `publish` varchar(20) CHARACTER SET utf8 COLLATE utf8_general_ci NULL DEFAULT NULL,
  `pages` int(10) NULL DEFAULT NULL,
  `price` float(10, 2) NULL DEFAULT NULL,
  `bookcaseid` int(10) NULL DEFAULT NULL,
  `abled` int(255) NULL DEFAULT NULL,
  PRIMARY KEY (`id`) USING BTREE
) ENGINE = InnoDB CHARACTER SET = utf8 COLLATE = utf8_general_ci ROW_FORMAT = Compact;

-- ----------------------------
-- Records of book
-- ----------------------------
INSERT INTO `book` VALUES (1, '上下五千年', '曹操', '中国人民出版社', 999, 99.99, 10, 1);
INSERT INTO `book` VALUES (2, 'SPSS统计', '王五', 'SPSS出版社', 330, 26.00, 1, 1);
INSERT INTO `book` VALUES (3, '四级必备词汇', '李四', '清华出版社', 150, 17.30, 1, 1);
INSERT INTO `book` VALUES (4, '六级必备词汇', '张三', '北大出版社', 220, 59.00, 3, 1);
INSERT INTO `book` VALUES (5, '高考必备', '王强', '上海出版公司', 300, 27.30, 4, 1);
INSERT INTO `book` VALUES (6, '考研必备', '郭德纲', '天津出版社', 225, 22.80, 1, 1);

SET FOREIGN_KEY_CHECKS = 1;
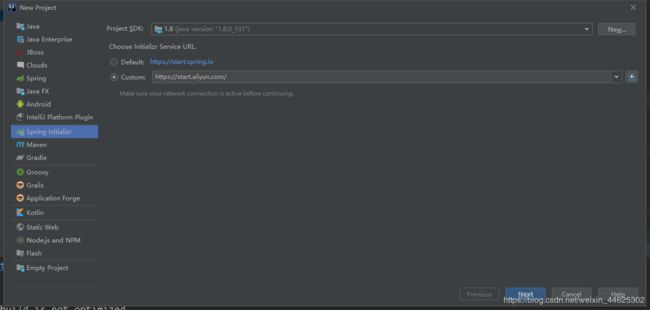
1.创建项目

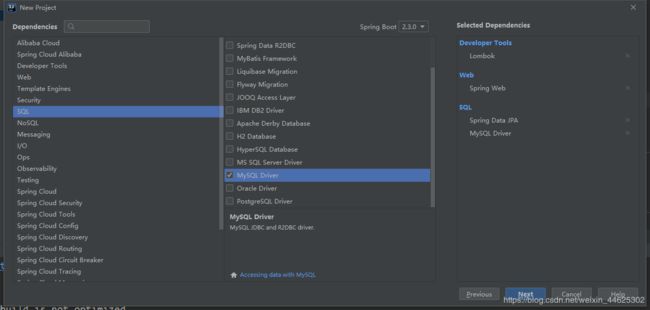
2.勾选的依赖

3.目录结构

4.配置application.yml
spring:
  datasource:
    url: jdbc:mysql://localhost:3306/library?useUnicode=true&characterEncoding=UTF-8&serverTimezone=Asia/Shanghai
    username: root
    password: 123456
    driver-class-name: com.mysql.cj.jdbc.Driver
  jpa:
    show-sql: true
    properties:
      hibernate:
        format_sql: true
server:
  port: 8181
5.Book实体类(使用JPA)
package com.xyj.entity;
import lombok.Data;
import javax.persistence.Entity;
import javax.persistence.Id;
@Entity
@Data
public class Book {
@Id
private Integer id;
private String name;
private String author;
}
6.BookRepository接口
package com.xyj.repository;

import com.xyj.entity.Book;
import org.springframework.data.jpa.repository.JpaRepository;


public interface BookRepository extends JpaRepository<Book,Integer> {
}
7.BookHandleer(实现查询功能)
package com.xyj.controller;
import com.xyj.entity.Book;
import com.xyj.repository.BookRepository;
import org.springframework.beans.factory.annotation.Autowired;
import org.springframework.web.bind.annotation.GetMapping;
import org.springframework.web.bind.annotation.RequestMapping;
import org.springframework.web.bind.annotation.RestController;
import java.util.List;
@RestController
@RequestMapping("/book")
public class BookHandleer {
@Autowired
private BookRepository bookRepository;
@GetMapping("/findAll")
public List<Book>findAll(){
return bookRepository.findAll();
}
}
8.我们可以在测试类中查询BookSpringbootApplicationTests(控制台显示)
package com.xyj;

import com.xyj.repository.BookRepository;
import org.junit.jupiter.api.Test;
import org.springframework.beans.factory.annotation.Autowired;
import org.springframework.boot.test.context.SpringBootTest;

@SpringBootTest
class BookSpringbootApplicationTests {

    @Autowired
    private BookRepository bookRepository;
    @Test
    void contextLoads() {
        System.out.println(bookRepository.findAll());
    }

}
9.直接启动springboot项目,在页面可以显示所有查询的数据(我们只查询三个字段进行测试)

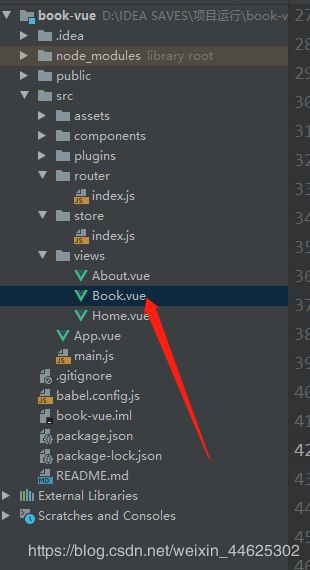
10.接下来我们需要与前端交互数据(创建的vue工程都是自动生成的,自己添加一个Book.vue)

补充–Vue-cli 3.x 添加axios插件

11.Book.vue(其中data(){}中的数据都是测试用的,created中是从后端获取的数据–数据库中)
<template>
    <div>
        <table>
            <tr>
                <td>编号</td>
                <td>图书名称</td>
                <td>作者</td>
            </tr>
            <tr v-for="item in books">
                <td>{{item.id}}</td>
                <td>{{item.name}}</td>
                <td>{{item.author}}</td>
            </tr>
        </table>

    </div>
</template>

<script>
    export default {
        name: "Book",
        data(){
            return{
                msg:'hello xyj',
                books:[
                    {
                        id:1,
                        name:'xyj',
                        author:'AAAAAA',
                    },
                    {
                        id:2,
                        name:'wangwu',
                        author:'王五',
                    }
                ]
            }
        },
        created() {
            const _this =this
            axios.get('http://localhost:8181/book/findAll/').then(function(resp) {
               _this.books=resp.data
            })
        }
    }
</script>

<style scoped>

</style>
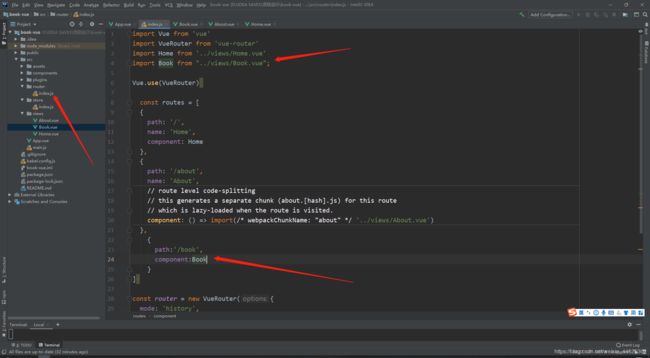
12.在index.js中添加路由

13.由于端口不能相同,我们需要在springboot项目里添加CrosConfig
package com.xyj.config;
import org.springframework.context.annotation.Configuration;
import org.springframework.web.servlet.config.annotation.CorsRegistry;
import org.springframework.web.servlet.config.annotation.WebMvcConfigurer;
@Configuration
public class CrosConfig implements WebMvcConfigurer {
@Override
public void addCorsMappings(CorsRegistry registry) {
registry.addMapping("/**")
.allowedOrigins("*")
.allowedMethods("GET", "HEAD", "POST", "PUT", "DELETE", "OPTIONS")
.allowCredentials(true)
.maxAge(3600)
.allowedHeaders("*");
}
}
14.这个时候我们可以启动项目
cnpm run serve

这样就可以把数据库数据拿过来了!
上一篇:vue ui可视化界面进行创建vue项目安装
下一篇:springboot+vue项目大型实战(二)Elemen UI深入浅出分页操作


