最近实验室新买了小觅深度版相机(型号D1000-IR-120/Color),这里记录一下跑vins-mono的过程。由于虚拟机usb可能出现不兼容问题,我使用的是双系统的Ubuntu16.04,对应ROS版本为kinetic。
1.安装ROS
Ubuntu16.04对应的ros版本为kinetic,安装的方法网上已有很多,比如可以参考此博客。如果安装出错,请换个源或者用VPN试试。推荐安装ros-kinetic-desktop-full全套版,pcl和opencv库等会直接包含在里面下载。
2.编译小觅SDK
cd ~
git clone https://github.com/slightech/MYNT-EYE-D-SDK.git
cd MYNT-EYE-D-SDK
make init
make ros
make all
echo "source ~/MYNT-EYE-D-SDK/wrappers/ros/devel/setup.bash" >> ~/.bashrc
source ~/.bashrc
编译完成后,就可以运行samples中的例程了,同时可以运行ros节点发布及可视化图像和imu数据。需要注意ros默认设置的帧率和图像分辨率是必须使用usb3.0的,如果要使用usb2.0,就必须更改.launch文件中分辨率和帧率两个地方。这部分具体的操作及参数设置方法,可以参考小觅深度版SDK官方文档,其专门提供了图像分辨率支持列表。
另外,因为跑vins-mono只会用到左目影像和imu,所以最好更改.launch文件,将红外结构光关掉。
3.编译vins-mono
首先安装依赖库ceres
sudo apt-get install liblapack-dev libsuitesparse-dev libcxsparse3.1.4 libgflags-dev libgoogle-glog-dev libgtest-dev
git clone https://github.com/ceres-solver/ceres-solver
cd ceres-solver
mkdir build
cd build
cmake ..
make -j4
sudo make install
然后开始编译vins-mono
mkdir -p ~/catkin_ws/src
cd ~/catkin_ws/src
git clone -b mynteye https://github.com/slightech/MYNT-EYE-VINS-Sample.git
cd ~/catkin_ws
catkin_make -j4
source devel/setup.bash
echo "source ~/catkin_ws/devel/setup.bash" >> ~/.bashrc
source ~/.bashrc
编译成功后,在运行之前,还必须要更改vins的默认参数(位于MYNT-EYE-VINS-Sample/config/mynteye/mynteye_d_config.yaml)。主要更改话题名称及保存路径、相机内参、畸变系数、是否开启回环检测、imu到相机的外参、及imu参数几个地方。前面几个参数可以通过运行小觅SDK例程得到(./samples/_output/bin/get_img_params和./samples/_output/bin/get_imu_params),而imu参数我是通过询问小觅技术人员得到的默认值,下面是我的设置,仅供参考。这部分如果设置有误,很可能在初始化成功后很快出现漂移现象。
%YAML:1.0

#common parameters
imu_topic: "/mynteye/imu/data_raw"
image_topic: "/mynteye/left/image_mono"
output_path: "/home/gjh/catkin_ws/src/MYNT-EYE-VINS-Sample/config/mynteye"

#camera calibration, please replace it with your own calibration file.
model_type: PINHOLE
camera_name: camera
image_width: 640
image_height: 480
distortion_parameters:
   k1: -0.29901885986328125
   k2: 0.08110046386718750
   p1: -0.00021743774414062
   p2: -0.00006866455078125
projection_parameters:
   fx: 354.25241088867187500
   fy: 354.28451538085937500
   cx: 326.56863403320312500
   cy: 254.24504089355468750

# Extrinsic parameter between IMU and Camera.
estimate_extrinsic: 0   # 0  Have an accurate extrinsic parameters. We will trust the following imu^R_cam, imu^T_cam, don't change it.
                        # 1  Have an initial guess about extrinsic parameters. We will optimize around your initial guess.
                        # 2  Don't know anything about extrinsic parameters. You don't need to give R,T. We will try to calibrate it. Do some rotation movement at beginning.
#If you choose 0 or 1, you should write down the following matrix.
#Rotation from camera frame to imu frame, imu^R_cam
extrinsicRotation: !!opencv-matrix
   rows: 3
   cols: 3
   dt: d
   data: [ 0.99996652,  0.00430873,  0.00695718,
           0.00434878,  -0.99997401,  -0.00575128,
           0.00693222,  0.00578135,  -0.99995926]
#Translation from camera frame to imu frame, imu^T_cam
extrinsicTranslation: !!opencv-matrix
   rows: 3
   cols: 1
   dt: d
   data: [-0.04777362000000000108,-0.00223730999999999991, -0.00160071000000000008]

#feature traker paprameters
max_cnt: 150            # max feature number in feature tracking
min_dist: 30            # min distance between two features
freq: 10                # frequence (Hz) of publish tracking result. At least 10Hz for good estimation. If set 0, the frequence will be same as raw image
F_threshold: 1.0        # ransac threshold (pixel)
show_track: 1           # publish tracking image as topic
equalize: 1             # if image is too dark or light, trun on equalize to find enough features
fisheye: 0              # if using fisheye, trun on it. A circle mask will be loaded to remove edge noisy points

#optimization parameters
max_solver_time: 0.04  # max solver itration time (ms), to guarantee real time
max_num_iterations: 8   # max solver itrations, to guarantee real time
keyframe_parallax: 10.0 # keyframe selection threshold (pixel)

#imu parameters       The more accurate parameters you provide, the better performance
acc_n: 2.1657228523252730e-02   # accelerometer measurement noise standard deviation.
gyr_n: 2.1923690143745844e-03   # gyroscope measurement noise standard deviation.
acc_w: 3.8153871149178200e-04   # accelerometer bias random work noise standard deviation.
gyr_w: 1.4221215955051228e-05   # gyroscope bias random work noise standard deviation.

g_norm: 9.806   # gravity magnitude

#loop closure parameters
loop_closure: 1                    # start loop closure
load_previous_pose_graph: 0        # load and reuse previous pose graph; load from 'pose_graph_save_path'
fast_relocalization: 0             # useful in real-time and large project
pose_graph_save_path: "/home/gjh/catkin_ws/src/MYNT-EYE-VINS-Sample/config/mynteye/pose_graph/" # save and load path

#unsynchronization parameters
estimate_td: 0                      # online estimate time offset between camera and imu
td: 0                       # initial value of time offset. unit: s. readed image clock + td = real image clock (IMU clock)

#rolling shutter parameters
rolling_shutter: 0                  # 0: global shutter camera, 1: rolling shutter camera
rolling_shutter_tr: 0               # unit: s. rolling shutter read out time per frame (from data sheet).

#visualization parameters
save_image: 1                   # save image in pose graph for visualization prupose; you can close this function by setting 0
visualize_imu_forward: 0        # output imu forward propogation to achieve low latency and high frequence results
visualize_camera_size: 0.4      # size of camera marker in RVIZ
4.运行vins-mono
插入小觅相机后,分别在两个终端运行小觅相机及vins-mono
roscore
roslaunch mynt_eye_ros_wrapper mynteye.launch
roslaunch vins_estimator mynteye_d.launch
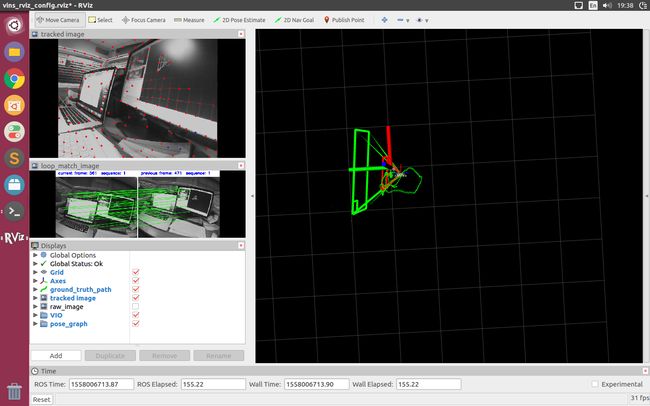
在初始化的过程中,缓慢移动相机。最后附上我自己的实验结果图。
个人理解错误的地方还请不吝赐教,转载请标明出处
