ASP.NET Core SignalR 入门教程
本教程介绍使用 SignalR 生成实时应用的基础知识。 您将学习:
1. 创建 Web 项目。
2. 添加 SignalR 客户端库。
3. 创建 SignalR 中心。
4. 配置项目以使用 SignalR。
5. 添加可将消息从任何客户端发送到所有连接客户端的代码。
最后,你将拥有一个工作聊天应用:
创建 Web 项目
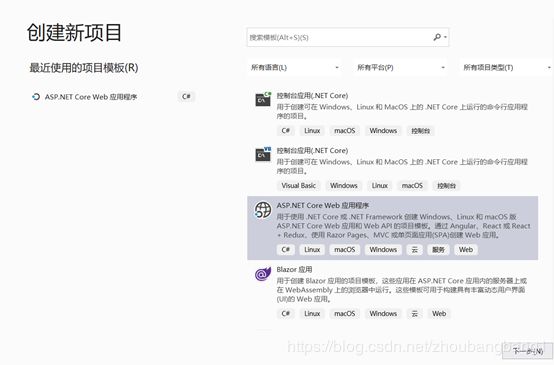
1.从菜单中选择“文件”>“新建项目” 。
2.在“新建项目”对话框中,选择“已安装”>“Visual C#”>“Web”>“ASP.NET Core Web 应用” 。 将项目命名为“SignalRChat” 。
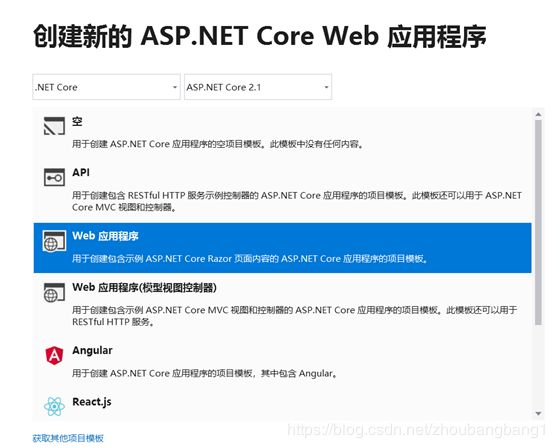
3.选择“Web 应用”,以创建使用 Razor Pages 的项目 。
4. 选择“.NET Core”目标框架,选择“ASP.NET Core 2.1”,然后单击“确定” 。
添加 SignalR 客户端库
Microsoft.AspNetCore.App 元包中包括 SignalR 服务器库。 JavaScript 客户端库不会自动包含在项目中。 对于此教程,使用库管理器 (LibMan) 从 unpkg 获取客户端库。 unpkg 是一个内容分发网络 (CDN),可以分发在 npm(即 Node.js 包管理器)中找到的任何内容。
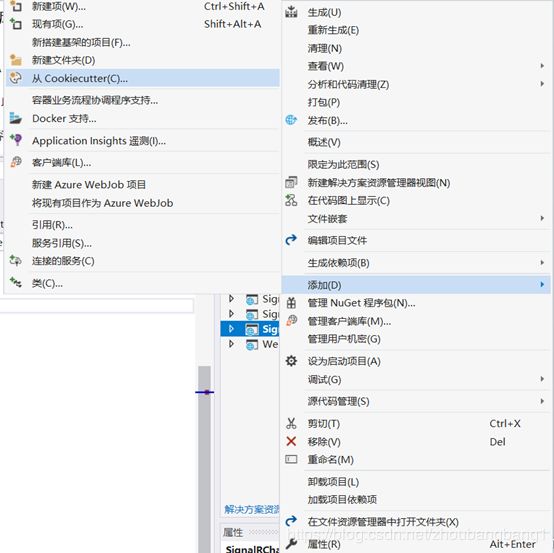
- 在“解决方案资源管理器” 中,右键单击项目,然后选择“添加” >“客户端库” 。
2. 在“添加客户端库” 对话框中,对于“提供程序” ,选择“unpkg” 。
3. 对于“库” ,输入 @aspnet/signalr@1,然后选择不是预览版的最新版本。
4. 选择“选择特定文件” ,展开“dist/browser” 文件夹,然后选择“signalr.js” 和“signalr.min.js” 。
5. 将“目标位置” 设置为 wwwroot/lib/signalr/ ,然后选择“安装” 。
创建 SignalR 中心
中心是一个类,用作处理客户端 - 服务器通信的高级管道。
? 在 SignalRChat 项目文件夹中,创建 Hubs 文件夹 。
? 在 Hubs 文件夹中,使用以下代码创建 ChatHub.cs 文件 :
ChatHub 类继承自 SignalR Hub。 Hub 类管理连接、组和消息。
可通过已连接客户端调用 SendMessage,以向所有客户端发送消息。 本教程后面部分将显示调用该方法的 JavaScript 客户端代码。 SignalR 代码是异步模式,可提供最大的可伸缩性。
namespace SignalRChatTest.Hubs
{
    public class ChatHub : Hub
    {
        public async Task SendMessage(string user, string message)
        {
            await Clients.All.SendAsync("ReceiveMessage", user, message);
        }
    }
}
配置 SignalR
必须将 SignalR 服务器配置为将 SignalR 请求传递给 SignalR。
1. 将以下突出显示的代码添加到 Startup.cs 文件
using System;
using System.Collections.Generic;
using System.Linq;
using System.Threading.Tasks;
using Microsoft.AspNetCore.Builder;
using Microsoft.AspNetCore.Hosting;
using Microsoft.AspNetCore.Http;
using Microsoft.AspNetCore.HttpsPolicy;
using Microsoft.AspNetCore.Mvc;
using Microsoft.Extensions.Configuration;
using Microsoft.Extensions.DependencyInjection;
using SignalRChatTest.Hubs;

namespace SignalRChatTest
{
    public class Startup
    {
        public Startup(IConfiguration configuration)
        {
            Configuration = configuration;
        }

        public IConfiguration Configuration { get; }

        // This method gets called by the runtime. Use this method to add services to the container.
        public void ConfigureServices(IServiceCollection services)
        {
            services.Configure(options =>
            {
                // This lambda determines whether user consent for non-essential cookies is needed for a given request.
                options.CheckConsentNeeded = context => true;
                options.MinimumSameSitePolicy = SameSiteMode.None;
            });


            services.AddMvc().SetCompatibilityVersion(CompatibilityVersion.Version_2_1);
            services.AddSignalR();
        }

        // This method gets called by the runtime. Use this method to configure the HTTP request pipeline.
        public void Configure(IApplicationBuilder app, IHostingEnvironment env)
        {
            if (env.IsDevelopment())
            {
                app.UseDeveloperExceptionPage();
            }
            else
            {
                app.UseExceptionHandler("/Error");
                app.UseHsts();
            }

            app.UseHttpsRedirection();
            app.UseStaticFiles();
            app.UseCookiePolicy();
            app.UseSignalR(routes =>
            {
                routes.MapHub("/chatHub");
            });
            app.UseMvc();
        }
    }
}
添加 SignalR 客户端代码
@*@page
@model IndexModel
@{
ViewData["Title"] = "Home page";
}
Application uses
- Sample pages using ASP.NET Core Razor Pages
- Theming using Bootstrap
How to
Overview
*@
@page
User..........
Message...
在 wwwroot/js 文件夹中,使用以下代码创建 chat.js 文件 :
"use strict";

var connection = new signalR.HubConnectionBuilder().withUrl("/chatHub").build();

//Disable send button until connection is established
document.getElementById("sendButton").disabled = true;

connection.on("ReceiveMessage", function (user, message) {
    var msg = message.replace(/&/g, "&").replace(//g, ">");
    var encodedMsg = user + " says " + msg;
    var li = document.createElement("li");
    li.textContent = encodedMsg;
    document.getElementById("messagesList").appendChild(li);
});

connection.start().then(function () {
    document.getElementById("sendButton").disabled = false;
}).catch(function (err) {
    return console.error(err.toString());
});

document.getElementById("sendButton").addEventListener("click", function (event) {
    var user = document.getElementById("userInput").value;
    var message = document.getElementById("messageInput").value;
    connection.invoke("SendMessage", user, message).catch(function (err) {
        return console.error(err.toString());
    });
    event.preventDefault();
});
运行应用
1.从地址栏复制 URL,打开另一个浏览器实例或选项卡,并在地址栏中粘贴该 URL。
2.选择任一浏览器,输入名称和消息,然后选择“发送消息”按钮 。
3.两个页面上立即显示名称和消息
请关注我的微信公众号,我们一起进步:


