在ubuntu16.04下安装Anaconda配置TensorFlow-GPU+MNIST: Resource exhausted: OOM的问题解决
小白在颓废了一个寒假之后,又开始了探坑之旅。正好手上有台闲置的ubuntu机器和很贵的K40显卡,于是打算开始尝试ubuntu下用tensorflow学习神经网络的历程。
1、ubuntu16.04系统安装
这里给出系统下载的镜像地址: https://www.ubuntu.com/download/alternative-downloads
安装Ubuntu16.04系统经验可以看这里:
http://jingyan.baidu.com/article/eb9f7b6d8536a8869364e813.html
说明:
(1)我们直接安装的英文原版系统,语言也是选择英文的。
(2)上述链接在–第三步:安装类型上选择的是–自定义。我们选择的是–清除整个磁盘并且安装,如果你有Windows系统,还会提示安装Ubuntu16.04与Windows并存模式。这个自行选择,切记!这个地方谨慎选择。
(3)感谢百度经验上传者!
2、CUDA8.0下载
https://developer.nvidia.com/cuda-downloads(下载地址)
说明:
(1)在NVIDIA的CUDA下载页面下,选择要使用的CUDA版本进行下载。
(2)我们这里使用CUDA8.0(页面有提示GTX1070、GTX1080支持8.0版本),学员如果没有使用以上两个版本的GPU,可以下载CUDA7.5。DOWNLOAD(下载)。
(3)下载需要注册。
(4)图解选择
3、cuDNN v5下载
下载地址: https://developer.nvidia.com/cudnn(需要登录)
说明:
(1)下载需要填写一个调查问卷,就三个选项,建议认真填写,毕竟人家免费给咱使用。
(2)填写完毕点击 I Agree To 前面的小方框,出现如下:
4、安装NVIDIA驱动
打开terminal输入以下指令:
sudo apt-get update然后在系统设置->软件更新->附加驱动->选择nvidia最新驱动(361)->应用更改
5、安装cuda
在cuda所在目录打开terminal依次输入以下指令:
cd /home/***(自己的用户名)/Desktop/###(这个命令意思是找到刚刚我们用U盘传过来的文件)
sudo dpkg -i cuda-repo-ubuntu1604-8-0-rc_8.0.27-1_amd64.deb
sudo apt-get update
sudo apt-get install cuda如果需要下载历史版本的cuda,这里给出地址:
https://developer.nvidia.com/cuda-toolkit-archive
6、gcc降版本
ubuntu的gcc编译器是5.4.0,然而cuda8.0不支持5.0以上的编译器,因此需要降级,把编译器版本降到4.9:
在terminal中执行(注意这里需要逐条执行):
sudo apt-get install g++-4.9
sudo update-alternatives --install /usr/bin/gcc gcc /usr/bin/gcc-4.9 20
sudo update-alternatives --install /usr/bin/gcc gcc /usr/bin/gcc-5 10
sudo update-alternatives --install /usr/bin/g++ g++ /usr/bin/g++-4.9 20
sudo update-alternatives --install /usr/bin/g++ g++ /usr/bin/g++-5 10
sudo update-alternatives --install /usr/bin/cc cc /usr/bin/gcc 30
sudo update-alternatives --set cc /usr/bin/gcc
sudo update-alternatives --install /usr/bin/c++ c++ /usr/bin/g++ 30
sudo update-alternatives --set c++ /usr/bin/g++
7、安装cuDNN
打开terminal依次输入以下指令:
cd  /home/***(自己的用户名)/Desktop/###(这个命令意思是找到刚刚我们用U盘传过来的文件)
tar xvzf cudnn-8.0-linux-x64-v5.1-ga.tgz###(解压这个文件)
sudo cp cuda/include/cudnn.h /usr/local/cuda/include###(复制)
sudo cp cuda/lib64/libcudnn* /usr/local/cuda/lib64###(复制)
sudo chmod a+r /usr/local/cuda/include/cudnn.h /usr/local/cuda/lib64/libcudnn*
8、配置环境变量
在terminal中输入以下命令:
sudo gedit ~/.bash_profile #打开.bash_profile然后在打开的文本末尾加入:
export LD_LIBRARY_PATH="$LD_LIBRARY_PATH:/usr/local/cuda/lib64:/usr/local/cuda/extras/CUPTI/lib64"
export CUDA_HOME=/usr/local/cuda
继续在terminal中输入:
source ~/.bash_profile #使更改的环境变量生效当然,也有其他教程在文件~/.bashrc文件中写入的,方法与上面的类似。如果在后面配置./config文件出现问题时,可以实现这个方法。
9、安装其他库
https://github.com/tensorflow/tensorflow/blob/master/tensorflow/g3doc/get_started/os_setup.md
我们是在github的Tensorflow官方网页上,根据提示安装,地址如上。
在terminal中输入以下命令:
sudo apt-get install python-pip python-dev 10、安装Tensorflow-gpu
注意GPU版本的不支持CUDNNV5,必须要V5.1以上
pip install https://storage.googleapis.com/tensorflow/linux/gpu/tensorflow_gpu-1.0.0-cp27-none-linux_x86_64.whl如果想装CPU,这里也给出CPU版本:
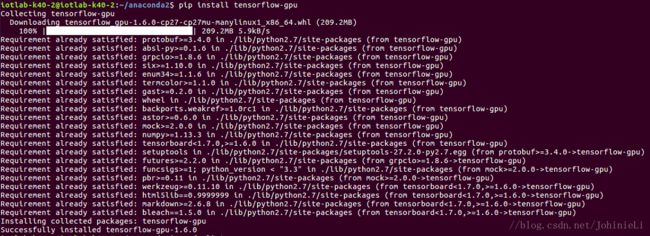
pip install --ignore-installed --upgrade https://storage.googleapis.com/tensorflow/linux/cpu/tensorflow-1.0.0-cp27-none-linux_x86_64.whl笔者是准备在Anaconda的环境下进行开发,所以在Anaconda2的文件夹下面打开终端安装的Tensorflow-gpu,如图:

提示一下,这里的下载速度非常慢,笔者是在一个晚上没管之后成功安装的。
这里给出另一种安装成功的图片:
然后用 conda list 可以看到我们安装好的包,如图:
11、测试Tensorflow-gpu
通过上述的过程,基本上没有什么问题的话,可以成功配置好。
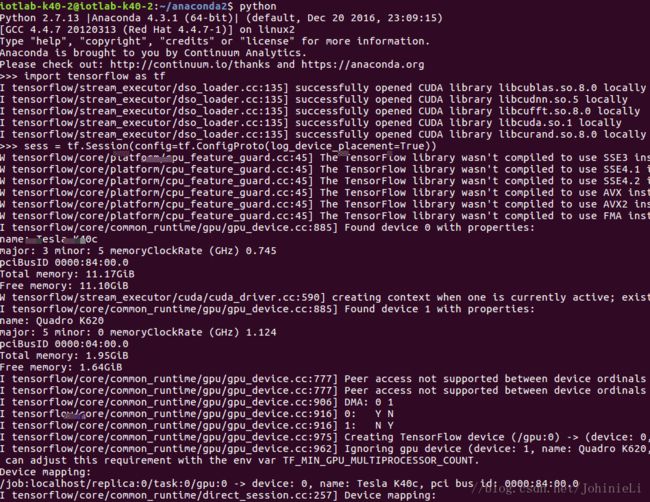
这里就可以先愉快的测试一波了,首先我们现在终端里面测试一哈,如图:
如果看到了显卡的相关信息,就说明成功安装了。
这里给出检测tensorflow是否使用gpu进行计算的测试代码:
import tensorflow as tf
sess = tf.Session(config=tf.ConfigProto(log_device_placement=True))
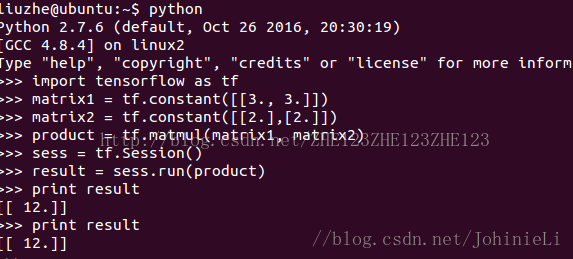
如果还想测试,这里还有一个代码:
import tensorflow as tf
matrix1 = tf.constant([[3., 3.]])
matrix2 = tf.constant([[2.],[2.]])
product = tf.matmul(matrix1, matrix2)
sess = tf.Session()
result = sess.run(product)
print result12、在pycharm中用MNIST代码测试Tensorflow-gpu
这里要知道如何使用anaconda部署python环境可以参考这篇文章:
http://blog.csdn.net/qq_29883591/article/details/78077244
现在我们要用MNIST代码来测试了.
这个是TensorFlow官方教程《深入MNIST》中的完整代码。参考文献8。
# -*- coding: utf-8 -*-

import tensorflow as tf

#导入input_data用于自动下载和安装MNIST数据集
from tensorflow.examples.tutorials.mnist import input_data
mnist = input_data.read_data_sets("MNIST_data/", one_hot=True)

#创建一个交互式Session
sess = tf.InteractiveSession()

#创建两个占位符,x为输入网络的图像,y_为输入网络的图像类别
x = tf.placeholder("float", shape=[None, 784])
y_ = tf.placeholder("float", shape=[None, 10])

#权重初始化函数
def weight_variable(shape):
    #输出服从截尾正态分布的随机值
    initial = tf.truncated_normal(shape, stddev=0.1)
    return tf.Variable(initial)

#偏置初始化函数
def bias_variable(shape):
    initial = tf.constant(0.1, shape=shape)
    return tf.Variable(initial)

#创建卷积op
#x 是一个4维张量,shape为[batch,height,width,channels]
#卷积核移动步长为1。填充类型为SAME,可以不丢弃任何像素点
def conv2d(x, W):
    return tf.nn.conv2d(x, W, strides=[1,1,1,1], padding="SAME")

#创建池化op
#采用最大池化,也就是取窗口中的最大值作为结果
#x 是一个4维张量,shape为[batch,height,width,channels]
#ksize表示pool窗口大小为2x2,也就是高2,宽2
#strides,表示在height和width维度上的步长都为2
def max_pool_2x2(x):
    return tf.nn.max_pool(x, ksize=[1,2,2,1],
                          strides=[1,2,2,1], padding="SAME")


#第1层,卷积层
#初始化W为[5,5,1,32]的张量,表示卷积核大小为5*5,第一层网络的输入和输出神经元个数分别为1和32
W_conv1 = weight_variable([5,5,1,32])
#初始化b为[32],即输出大小
b_conv1 = bias_variable([32])

#把输入x(二维张量,shape为[batch, 784])变成4d的x_image,x_image的shape应该是[batch,28,28,1]
#-1表示自动推测这个维度的size
x_image = tf.reshape(x, [-1,28,28,1])

#把x_image和权重进行卷积,加上偏置项,然后应用ReLU激活函数,最后进行max_pooling
#h_pool1的输出即为第一层网络输出,shape为[batch,14,14,1]
h_conv1 = tf.nn.relu(conv2d(x_image, W_conv1) + b_conv1)
h_pool1 = max_pool_2x2(h_conv1)

#第2层,卷积层
#卷积核大小依然是5*5,这层的输入和输出神经元个数为32和64
W_conv2 = weight_variable([5,5,32,64])
b_conv2 = weight_variable([64])

#h_pool2即为第二层网络输出,shape为[batch,7,7,1]
h_conv2 = tf.nn.relu(conv2d(h_pool1, W_conv2) + b_conv2)
h_pool2 = max_pool_2x2(h_conv2)

#第3层, 全连接层
#这层是拥有1024个神经元的全连接层
#W的第1维size为7*7*64,7*7是h_pool2输出的size,64是第2层输出神经元个数
W_fc1 = weight_variable([7*7*64, 1024])
b_fc1 = bias_variable([1024])

#计算前需要把第2层的输出reshape成[batch, 7*7*64]的张量
h_pool2_flat = tf.reshape(h_pool2, [-1, 7*7*64])
h_fc1 = tf.nn.relu(tf.matmul(h_pool2_flat, W_fc1) + b_fc1)

#Dropout层
#为了减少过拟合,在输出层前加入dropout
keep_prob = tf.placeholder("float")
h_fc1_drop = tf.nn.dropout(h_fc1, keep_prob)

#输出层
#最后,添加一个softmax层
#可以理解为另一个全连接层,只不过输出时使用softmax将网络输出值转换成了概率
W_fc2 = weight_variable([1024, 10])
b_fc2 = bias_variable([10])

y_conv = tf.nn.softmax(tf.matmul(h_fc1_drop, W_fc2) + b_fc2)

#预测值和真实值之间的交叉墒
cross_entropy = -tf.reduce_sum(y_ * tf.log(y_conv))

#train op, 使用ADAM优化器来做梯度下降。学习率为0.0001
train_step = tf.train.AdamOptimizer(1e-4).minimize(cross_entropy)

#评估模型,tf.argmax能给出某个tensor对象在某一维上数据最大值的索引。
#因为标签是由0,1组成了one-hot vector,返回的索引就是数值为1的位置
correct_predict = tf.equal(tf.argmax(y_conv, 1), tf.argmax(y_, 1))

#计算正确预测项的比例,因为tf.equal返回的是布尔值,
#使用tf.cast把布尔值转换成浮点数,然后用tf.reduce_mean求平均值
accuracy = tf.reduce_mean(tf.cast(correct_predict, "float"))

#初始化变量
sess.run(tf.initialize_all_variables())

#开始训练模型,循环20000次,每次随机从训练集中抓取50幅图像
for i in range(20000):
    batch = mnist.train.next_batch(50)
    if i%100 == 0:
        #每100次输出一次日志
        train_accuracy = accuracy.eval(feed_dict={
            x:batch[0], y_:batch[1], keep_prob:1.0})
        print "step %d, training accuracy %g" % (i, train_accuracy)

    train_step.run(feed_dict={x:batch[0], y_:batch[1], keep_prob:0.5})

print "test accuracy %g" % accuracy.eval(feed_dict={
x:mnist.test.images, y_:mnist.test.labels, keep_prob:1.0})
参考文献9也给出了同样的测试代码。
参考文献10给出了可视化的MNIST代码。
但是在测试上述代码的过程中,可能遇到一个问题。
13、12中测试代码可能出现的错误解决
出现的错误信息为:
Tensorflow Deep MNIST: Resource exhausted: OOM when allocating tensor with shape[10000,32,28,28]
解决方法是将最后一行:
print("test accuracy %g"%accuracy.eval(feed_dict={
    x: mnist.test.images, y_: mnist.test.labels, keep_prob: 1.0}))
改成:
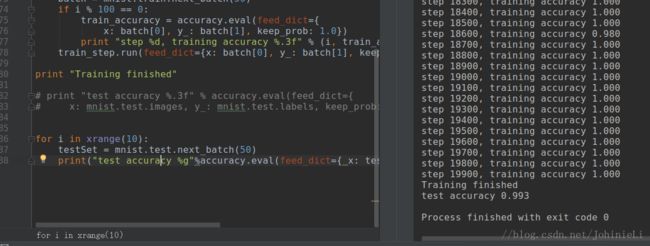
for i in xrange(10):
    testSet = mnist.test.next_batch(50)
    print("test accuracy %g"%accuracy.eval(feed_dict={ x: testSet[0], y_: testSet[1], keep_prob: 1.0}))
原因是GPU OOM,没法分配那么多显存来搞定accuracy evaluation,因此需要改成批处理。
TensorFlow给出的原因解释:
Here is how I solved this problem: the error means that the GPU runs out of memory during accuracy evaluation. Hence it needs a smaller sized dataset, which can be achieved by using data in batches. So, instead of running the code on the whole test dataset it needs to be run in batches.
https://stackoverflow.com/questions/39076388/tensorflow-deep-mnist-resource-exhausted-oom-when-alloc
接下来就开始在ubuntu下利用Tensorflow的深度学习之旅吧。
参考文献:
1、http://blog.csdn.net/zhaoyu106/article/details/52793183 2018.3.17
2、http://blog.csdn.net/u014381600/article/details/65448789 2018.3.17
3、http://blog.csdn.net/han609768249/article/details/78749788 2018.3.17
4、http://blog.csdn.net/u014659656/article/details/53348851 2018.3.17
5、http://blog.csdn.net/castle_cc/article/details/78389082 2018.3.17
6、http://blog.csdn.net/zhe123zhe123zhe123/article/details/53931523 2018.3.17
7、http://blog.csdn.net/qq_29883591/article/details/78077244 2018.3.17
8、http://blog.csdn.net/toormi/article/details/53789562 2018.3.17
9、http://blog.csdn.net/wang_junjie/article/details/51480672 2018.3.17
10、http://blog.csdn.net/wang_junjie/article/details/51480672 2018.3.17
11、http://blog.csdn.net/zsg2063/article/details/74332487 2018.3.17


