简单快速搭建.net core 3.1项目 Asp.Net Core 3.1环境搭建 框架搭建 怎么搭建Asp.Net Core 3.1项目
一、说明:
本文是教大家如何快速搭建一个.net core 项目。为了快速和简单,本项目采用UtilsSharp框架搭建,只需要简单配置就可以马上搭建完成。项目采用简单三层思想,框架采用.net core 3.1,数据库采用mysql+ElasticSearch,大家可以根据自己的项目需求选择删减,包含依赖注入(autofac)、日志输出、数据库处理、出入参规范、swagger、公共工具类等。废话不多说,开始吧!
框架常用Nuget包:
UtilsSharp
UtilsSharp.AspNetCore
UtilsSharp.Redis
UtilsSharp.ElasticSearch
UtilsSharp.MySql
UtilsSharp.MsSql
UtilsSharp.LoggerHelper
二、开始搭建:
1.打开vs2019,创建.net core新项目:
2.为了方便好记,我的项目名称就叫Dnc,意思是Dot Net Core 的首写字母,大家可以根据自己的业务取名称,然后选择好项目要放置的路径。
3.选择好项目框架,创建空的Asp.NET Core 应用程序的空项目模板,大家也可以选择API和Web应用程序(根据项目需求,是前后端分离开接口还是做页面),选择“空”主要是为了不去下载一些没必要的东西。
4.创建数据模型层、数据层、业务逻辑层。右键选择解决方案。
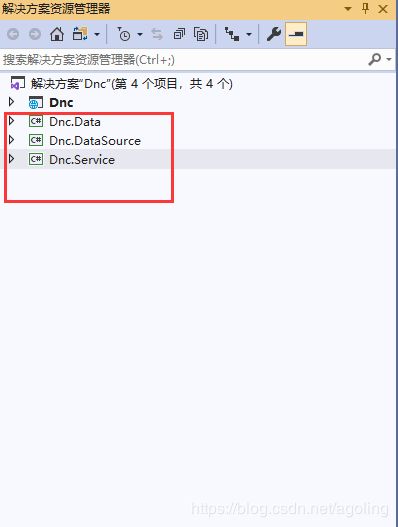
5.创建类库名称分别叫:Dnc.Data、Dnc.DataSource、Dnc.Service,框架选用.net standard2.0版本
6.Dnc下面Nuget,搜索 UtilsSharp.AspNetCore,安装
7.配置Program.cs
8.配置Startup.cs
①默认的程序
using System;
using System.Collections.Generic;
using System.Linq;
using System.Threading.Tasks;
using Microsoft.AspNetCore.Builder;
using Microsoft.AspNetCore.Hosting;
using Microsoft.AspNetCore.Http;
using Microsoft.Extensions.DependencyInjection;
using Microsoft.Extensions.Hosting;

namespace Dnc
{
    public class Startup
    {
        // This method gets called by the runtime. Use this method to add services to the container.
        // For more information on how to configure your application, visit https://go.microsoft.com/fwlink/?LinkID=398940
        public void ConfigureServices(IServiceCollection services)
        {
        }

        // This method gets called by the runtime. Use this method to configure the HTTP request pipeline.
        public void Configure(IApplicationBuilder app, IWebHostEnvironment env)
        {
            if (env.IsDevelopment())
            {
                app.UseDeveloperExceptionPage();
            }

            app.UseRouting();

            app.UseEndpoints(endpoints =>
            {
                endpoints.MapGet("/", async context =>
                {
                    await context.Response.WriteAsync("Hello World!");
                });
            });
        }
    }
}
②配置后
using System;
using System.Collections.Generic;
using System.Linq;
using System.Threading.Tasks;
using AspNetCore;
using AspNetCore.Autofac;
using AspNetCore.Swagger;
using Autofac;
using Microsoft.AspNetCore.Builder;
using Microsoft.AspNetCore.Hosting;
using Microsoft.Extensions.DependencyInjection;
using Microsoft.Extensions.Hosting;

namespace Dnc
{
    public class Startup:AutofacStartup
    {
        // This method gets called by the runtime. Use this method to add services to the container.
        // For more information on how to configure your application, visit https://go.microsoft.com/fwlink/?LinkID=398940
        public void ConfigureServices(IServiceCollection services)
        {
            //添加控制器服务
            services.AddControllers();
            //添加扩展服务,如果参数不填则用默认的swagger配置
            services.AddAspNetCoreExtensions(new SwaggerDocOptions { Name = "v1", OpenApiInfo = { Title = "Dnc项目", Version = "v1", Description = "Dnc项目接口" } });
        }

        // This method gets called by the runtime. Use this method to configure the HTTP request pipeline.
        public void Configure(IApplicationBuilder app, IWebHostEnvironment env)
        {
            if (env.IsDevelopment())
            {
                app.UseDeveloperExceptionPage();
            }

            app.UseRouting();
            //注册扩展
            app.UseAspNetCoreExtensions();
            app.UseEndpoints(endpoints => { endpoints.MapControllers(); });
        }

        ///
        /// 依赖注入映射
        ///
        /// builder
        public override void ConfigureContainer(ContainerBuilder builder)
        {
            //无监控收集错误日志
            Init(builder);
            //aop Exception错误日志监控
            //Init(builder);
        }
    }
}
Init(builder) 是无监控日志,Init
9.大项目都是分功能块的,所以我们创建个Area,对项目各个功能进行分块
10.Dnc.Service Nuget 搜索UtilsSharp工具类安装
11.Dnc.Service 新建Admin功能服务,Implementation文件夹里面是实现
12.IUserInfoService接口实现IUnitOfWorkDependency接口,绑定依赖注入关系
using System;
using System.Collections.Generic;
using System.Text;
using UtilsSharp.Dependency;
using UtilsSharp.Standard;
namespace Dnc.Service.Admin
{
///
/// 用户信息服务
///
public interface IUserInfoService : IUnitOfWorkDependency
{
///
/// 获取用户信息
///
/// Get();
}
///
/// 用户信息
///
public class UserInfo
{
///
/// 用户名
///
public string UserName { set; get; }
///
/// 手机号
///
public string Mobile { set; get; }
///
/// 年龄
///
public int Age { set; get; }
///
/// 支付条数
///
public int PayCount { set; get; }
}
}
13.UserInfoService实现IUserInfoService接口
using System;
using System.Collections.Generic;
using System.Text;
using UtilsSharp.Standard;
namespace Dnc.Service.Admin.Implementation
{
///
/// 用户信息服务
///
public class UserInfoService: IUserInfoService
{
private readonly IPayRecordService _payRecordService;
public UserInfoService(IPayRecordService payRecordService)
{
_payRecordService = payRecordService;
}
///
/// 获取用户信息
///
/// Get()
{
var result=new BaseResult();
//查询数据库.....
//if (false)
//{
// result.SetError("未查询到该条记录");
// return result;
//}
var r = _payRecordService.GetRecord();
if (r.Code != 200)
{
result.SetError(r.Msg,r.Code);
return result;
}
result.Result = new UserInfo {UserName = "Agoling", Mobile = "136xxxxxxxx", Age = 10, PayCount = r.Result};
return result;
}
}
}
14.IPayRecordService接口实现IUnitOfWorkDependency接口,绑定依赖注入关系
using System;
using System.Collections.Generic;
using System.Text;
using UtilsSharp.Dependency;
using UtilsSharp.Standard;
namespace Dnc.Service.Admin
{
///
/// 支付记录服务
///
public interface IPayRecordService : IUnitOfWorkDependency
{
///
/// 获取记录条数
///
/// GetRecord();
}
}
15.PayRecordService实现IPayRecordService接口
using System;
using System.Collections.Generic;
using System.Text;
using UtilsSharp.Standard;
namespace Dnc.Service.Admin.Implementation
{
///
/// 支付记录服务
///
public class PayRecordService: IPayRecordService
{
///
/// 获取记录条数
///
/// GetRecord()
{
var result=new BaseResult();
//查数据库
//if (false)
//{
// result.SetError("无法连接数据库",8000);
// return result;
//}
result.Result = 101;
return result;
}
}
}
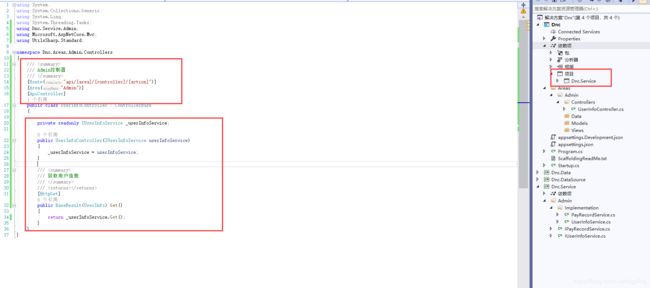
16.Dnc项目添加Dnc.Service项目,控制器调用业务层获取数据,配置好路由。
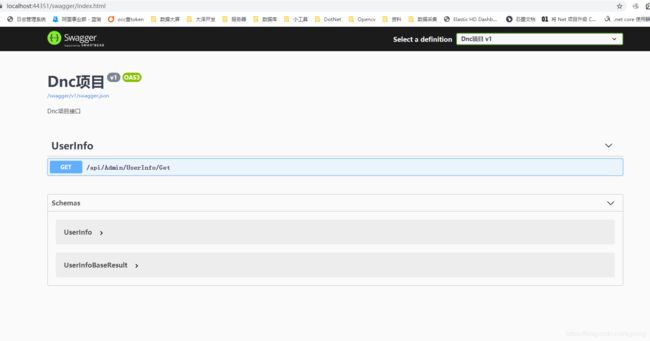
17.启动项目,后缀加swagger即可看到项目
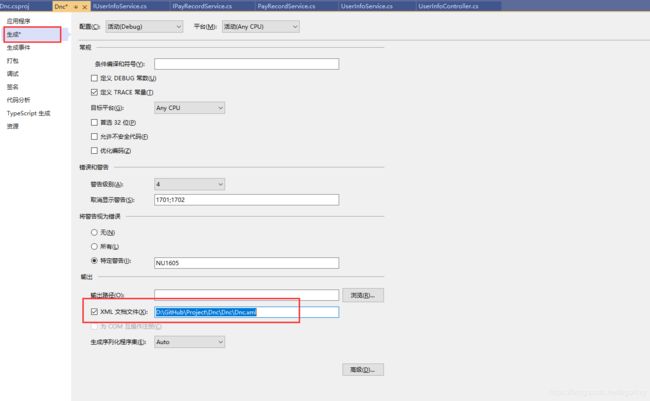
18.由于没有注释,所以大家可以按下面的方法,即可显示出注释。Dnc右键属性->XML文档文件打勾
19.测试数据
20.以上是先简单模拟数据走通依赖注入和swagger功能,数据库这块的后面再单独讲
本项目源代码:https://github.com/agoling/dnc


