【springboot学习 | 2】jpa+mysql8.0增删改查
目录
- 序
- 环境
- jpa方式连接数据库
- 正文
- 1.构建项目
- 2.配置数据源以及JPA
- 3.创建实体
- 4.创建JPA
- 5.编写CRUD方法
- 6.初尝试运行项目
- 总结
序
环境
- jdk8.0+ spring2.1.17+ maven3.6+mysql8.0.11
- IDEA2019+Navicat12+chorme
目前Springboot参考学习内容在 简书
作者:恒宇少年
相关内容:目录:SpringBoot学习目录
本文是对 第三章:SpringBoot使用SpringDataJPA完成CRUD的学习记录,及补充
由于我使用的mysql8.0版本更高,以及IDEA环境和Chrome环境与博主有所不同,这里都是更详细的实际操作记录。
jpa方式连接数据库
选择jpa的原因:
- 原生jdbc:老旧,需要自己写很多数据层方法,抛弃;
- maven:需要大量配置jar包和xml的过程;xml标签令人emmmmm~
- jpa上手非常快,配置简单。具体在后面慢慢说。
springboot连接数据库三种方式(jdbc、jpa、maven)
https://www.jianshu.com/p/414ef5b49a69
正文
目标:学习并且使用SpringBoot访问MySQL8数据库,并且结合SpringDataJPA完成CRUD(Create,Read,Update,Delete)简单操作。
1.构建项目
和之前的构建方法无太大差异,重点是选择依赖部分:(选择好就会自动在pom中引入jar包)
web-》Spring web Starter
(前端网页实现:通过springboot内置tomcat和web服务)
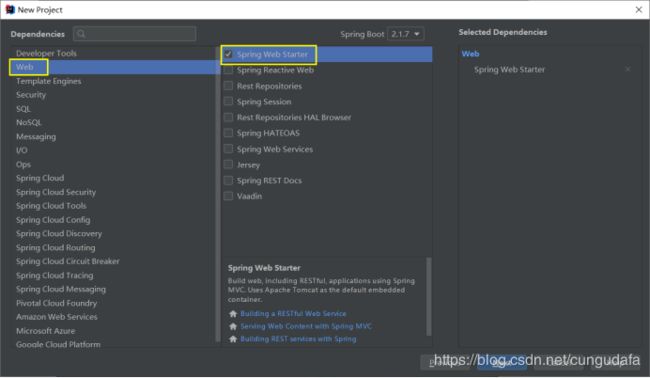
SQL-》Spring Data JPA+ Mysql Driver
(后端数据库实现:jpa依赖和mysql配置)

添加好为我们自动引入的jar包有:

2.配置数据源以及JPA
我们这里配置的是application.properties,参考简书使用的是application.yml
问题参考:IDEA中无法识别yml后缀文件
在应用后,可能是springboot读取.yml的问题,老是出问题,于是放弃了这种方法。
application.properties配置如下:
## 数据源配置
spring.datasource.url=jdbc:mysql://127.0.0.1:3306/springboot_mysql?serverTimezone=UTC&useSSL=false&allowPublicKeyRetrieval=true
spring.datasource.username=root
spring.datasource.password=wy123456
spring.datasource.driver-class-name=com.mysql.cj.jdbc.Driver

spring.jpa.hibernate.ddl-auto=update
spring.jpa.database-platform=org.hibernate.dialect.MySQL5InnoDBDialect
spring.jpa.show-sql=true
application.properties配置解析:
- datasource:
使用了本地的一个mysql数据库,mysql8数据库是我们事先安装好的,并且创建了一个名叫springboot_mysql的数据库,Mysql8的配置不用过多解释; - jpa:
- hibernate:jpa是遵循spring+hibernate规则进行数据操作
- ddl-auto=update:每次运行程序,没有表格会新建表格,表内有数据不会清空,只会更新
- database-platform:是hibernate配置的数据库方言—— InnoDB 给 MySQL 提供了具有事务(commit)、回滚(rollback)和崩溃修复能力等等,总之是优化SQL操作的。(更多参考点这里)
- JPA的配置了show-sql用来在控制台输出JPA自动生成的sql语句。
/*
 Navicat Premium Data Transfer

 Source Server         : mysql
 Source Server Type    : MySQL
 Source Server Version : 80013
 Source Host           : localhost:3306
 Source Schema         : springboot_mysql

 Target Server Type    : MySQL
 Target Server Version : 80013
 File Encoding         : 65001

 Date: 09/08/2019 13:36:18
*/

SET NAMES utf8mb4;
SET FOREIGN_KEY_CHECKS = 0;

-- ----------------------------
-- Table structure for t_user
-- ----------------------------
DROP TABLE IF EXISTS `t_user`;
CREATE TABLE `t_user`  (
  `t_id` int(11) NOT NULL,
  `t_name` varchar(30) CHARACTER SET utf8 COLLATE utf8_general_ci NULL DEFAULT NULL,
  `t_age` int(10) NULL DEFAULT NULL,
  `t_address` varchar(100) CHARACTER SET utf8 COLLATE utf8_general_ci NULL DEFAULT NULL,
  PRIMARY KEY (`t_id`) USING BTREE
) ENGINE = InnoDB CHARACTER SET = utf8 COLLATE = utf8_general_ci ROW_FORMAT = Dynamic;

SET FOREIGN_KEY_CHECKS = 1;
3.创建实体
根据图示创建响应文件夹和文件:
具体需要创建的controller控制层、jpa数据库操作接口层、entity实体类
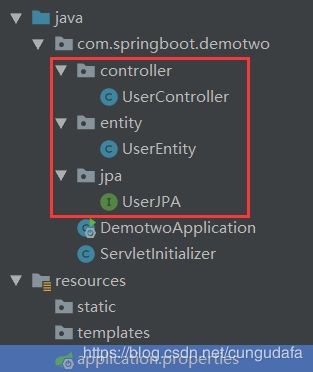
这里是第一部分实体类:
UserEntity.java:
@Entity注释指名这是一个实体Bean
@Table注释指定了Entity所要映射带数据库表,name为表名
@Id:主键
@GeneratedValue 用于标注主键的生成策略(自增等,详情参考点这里)
@Column(name=“t_id”):用于数据库列名t_id对应每一个实体类别名id,每一个都要加。
package com.springboot.demotwo.entity;

import javax.persistence.*;
import java.io.Serializable;

@Entity
@Table(name="t_user")
public class UserEntity implements Serializable{
    @Id
    @GeneratedValue
    @Column(name="t_id")
    private Long id;

    @Column(name = "t_name")
    private String name;

    @Column(name = "t_age")
    private int age;

    @Column(name = "t_address")
    private String address;


    public Long getId() {
        return id;
    }

    public void setId(Long id) {
        this.id = id;
    }

    public String getName() {
        return name;
    }

    public void setName(String name) {
        this.name = name;
    }

    public int getAge() {
        return age;
    }

    public void setAge(int age) {
        this.age = age;
    }

    public String getAddress() {
        return address;
    }

    public void setAddress(String address) {
        this.address = address;
    }
}
4.创建JPA
UserJPA接口: 数据库操作层、运用了SpringBoot+SpringDataJPA
- SpringDataJPA内部使用了类代理的方式
- 让继承了它接口的子接口都以spring管理的Bean的形式存在,
- 也就是说我们可以直接使用@Autowired注解在spring管理bean使用
package com.springboot.demotwo.jpa;

import com.springboot.demotwo.entity.UserEntity;
import org.springframework.data.jpa.repository.JpaRepository;
import org.springframework.data.jpa.repository.JpaSpecificationExecutor;

import java.io.Serializable;

public interface UserJPA extends
        JpaRepository<UserEntity,Long>,//SpringDataJPA提供的简单数据操作接口
        JpaSpecificationExecutor<UserEntity>, //SpringDataJPA提供的复杂查询接口
        Serializable {//序列化接口
}
5.编写CRUD方法
CURD–增删改查
userJps.findAll()方法就是SpringDataJPA为我们提供的内置方法,它可以查询表内所有的数据,除了findAll还有很多有用的方法。
UserController.java
package com.springboot.demotwo.controller;


import com.springboot.demotwo.entity.UserEntity;
import com.springboot.demotwo.jpa.UserJPA;
import org.springframework.beans.factory.annotation.Autowired;
import org.springframework.stereotype.Controller;
import org.springframework.web.bind.annotation.RequestMapping;
import org.springframework.web.bind.annotation.RequestMethod;
import org.springframework.web.bind.annotation.ResponseBody;

import java.util.List;

@Controller
@ResponseBody//只返回数据
@RequestMapping(value = "/user")
public class UserController {
    @Autowired
    private UserJPA userJPA;

    @RequestMapping(value = "/list", method = RequestMethod.GET)
    public List<UserEntity> list() {
        return userJPA.findAll();//SpringDataJPA为我们提供的内置方法,它可以查询表内所有的数据
    }

    /**
     * 添加、更新用户方法
     * @param entity
     * @return
     */
    @RequestMapping(value = "/save",method = RequestMethod.GET)
    public UserEntity save(UserEntity entity){
        return userJPA.save(entity);
    }
    @RequestMapping(value = "/delete",method = RequestMethod.GET)
    public List<UserEntity> delete(Long id){
        userJPA.deleteById(id);
        return userJPA.findAll();
    }
}
6.初尝试运行项目
-
查询
浏览器输入:127.0.0.1:8080/user/list可以看到如下图所示,因为我们数据库中并没有数据,所以我们没有查询到结果:
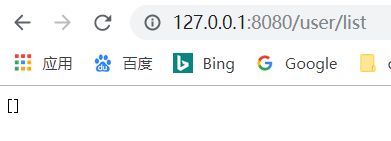
控制台:显示:
Hibernate: select userentity0_.t_id as t_id1_0_, userentity0_.t_address as t_addres2_0_, userentity0_.t_age as t_age3_0_, userentity0_.t_name as t_name4_0_ from t_user userentity0_

-
添加
我们现在添加一条用户信息到数据库,请求地址:http://127.0.0.1:8080/user/save?name=test&age=20&address=shanghai ,效果如下图所示:
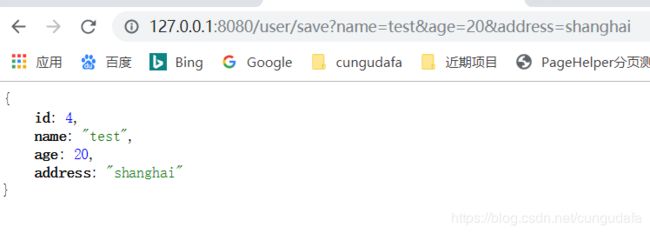
可以看到我们成功的添加了一条数据,并且用户数据主键编号也返回了,我们在执行参数中并没有添加id的值,这个id是数据库自动生成的,springDataJPA查询成功后会自动返回主键的值到实体主键映射字段中。
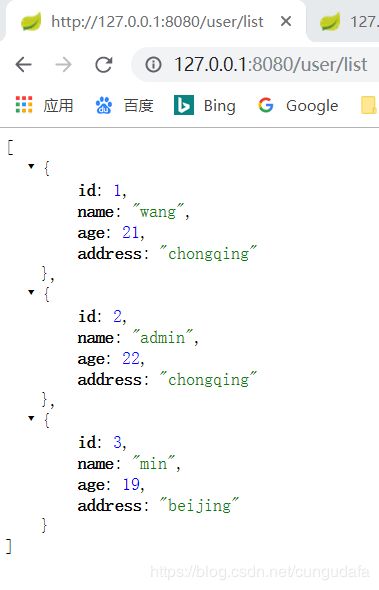
多插入几条数据方便我们下一步操作,插入完成后我们再次访问用户列表请求地址,效果:
-
更新
将前面插入id为4的更改地址,请求地址:http://127.0.0.1:8080/user/save?id=4&name=test&age=20&address=beijing ,效果如图:

-
删除,请求地址:http://127.0.0.1:8080/user/delete?id=1 ,运行结果如图:
总结
- jpa就是另一种基于hibernate的插件,使用简单方便;何乐而不为呢!
- jpa也是一种使用很广的api方式,前面我们的CRUD所有操作实现都是通过api调用;到这里,结合我vue+springboot前后端的后台矿建可以说是轻松搭建好了,(一切都so easy!妈妈再也不用担心我的学习了~滑稽一下 ?)
?源码地址:
https://github.com/cungudafa/SpringBoot


