Linux网络系列--远程访问及控制(构建openSSH服务器、使用SSH客户端工具、学会编写TCP Wrappers访问策略)
文章目录
- 一、SSH远程管理
- 1.1 配置OpenSSH服务端
- 1.1.1 服务监听选项
- 1.1.2 用户登陆控制
- 1.1.3 登录验证方式
- 1.1.4 密钥验证过程
- 二、 使用SSH客户端
- 2.1 SSH客户端程序命令--ssh、scp、sftp
- ssh命令–远程安全登录
- scp远程复制--远程安全复制
- sftp命令--安全FTP
- 2.2 构建密钥对验证的SSH体系
- 三、 TCP Wrappers 访问控制
- 3.1 TCP Wrappers概述
- 3.2 策略配置格式
- 3.3 访问控制的基本原则
- 3.4 配置案例
一、SSH远程管理
SSH(secure shell)是一种安全通道协议,主要用来实现字符界面的远程登录、远程复制等功能。
SSH协议还对通信双方的数据传输进行了加密处理,其中包括用户登录时输入的用户口令,提供了很好的安全性能。
1.1 配置OpenSSH服务端
OpenSSH服务器由openssh、openssh-server等软件包提供,在centos7的系统中默认已经安装。

- 服务名称:sshd
- 服务端主程序:/usr/sbin/sshd
- 服务端配置文件:/etc/ssh/sshd_config
- 客户端配置文件:/etc/ssh/ssh_config
1.1.1 服务监听选项
[root@localhost ~]# vi /etc/ssh/sshd_config
Port 22                    //默认监听端口是22,非必要可以不修改
ListenAddress  IP地址      //表示监听的地址
seDNS no                  //禁止DNS反向解析,可以提高服务器响应速度
1.1.2 用户登陆控制
LoginGraceTime 2m         //会话时间为2分钟(两分钟不进行操作就断开连接)
PermitRootLogin yes       //允许root用户登录,一般不允许
MaxAuthTries 6            //最大尝试次数为6次
MaxSessions 10            //最多允许10个终端登录
PermitEmptyPasswords no   //禁止免密登录
AllowUsers test01 test02@192.168.100.17   //仅允许test01、test02用户登录、test02用户只能以192.168.100.17终端登录
sshd服务默认允许root账户登录,但是我们以普通用户的身份登录,仍然可以切换root账户,给安全带来了隐患,我们可以启用pam认证模块,来保证安全性。
AllowUsers(白名单,仅允许,只有这些可以登录)
DenyUsers(黑名单,仅拒绝,只有这些不行)
AllowUsers不可与DenyUsers同时使用
1.1.3 登录验证方式
sshd服务支持两种验证方式–密码验证、密钥对验证
- 密码验证:以本地系统用户的登录名称、密码进行验证;但是则种方式密码容易被暴力破解,而且服务器也容易被假冒。
- 密钥对验证:提供相匹配的密钥信息才能通过验证,通过公钥和私钥完成客户的认证。
公钥:公钥与私钥是成对生成的,两个密钥互不相同,不能通过一个密钥推算出另外一个密钥。公钥对外公开,类似于支付宝收款码。
私钥:私钥由客户自己保留,一把可以验证客户自己的身份,类似于注册支付宝时验证个人身份的信息。
vi /etc/ssh/sshd_config
PasswordAuthentication yes   //启用密码验证
PubkeyAuthentication yes     //启用密钥对验证
AuthorizedKeysFile      .ssh/authorized_keys    //指定公钥库数据文件
1.1.4 密钥验证过程
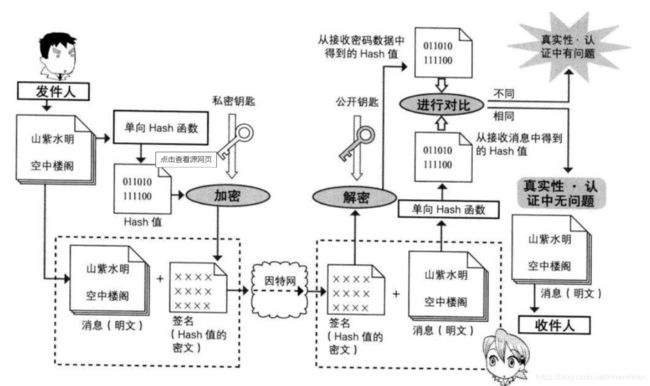
- 将发件人要发送的内容用hash算法进行加密,生成一个私钥和一个序列号,序列号用于验证内容的完整性,有没有被篡改。
- 拥有公钥的人对加密的文件进行解密,同时会对收到的文件进行同样的hash算法,得出序列号
- 将第二次算出的序列号与第一次进行对比,如果是一样的,说明文件没有被篡改,文件是安全的;序列号如果不对,则直接丢弃
二、 使用SSH客户端
2.1 SSH客户端程序命令–ssh、scp、sftp
ssh命令–远程安全登录
通过ssh命令可以远程登录sshd服务,为用户提供一个安全的shell环境,以便对服务器进行管理与维护。使用时应指定登录用户、目标主机地址作为参数。
ssh命令应用:
[root@localhost ~]# ssh shi@192.168.100.20   //192.168.100.47的主机用账户shi切换到192.168.100.20主机
The authenticity of host '192.168.100.20 (192.168.100.20)' can't be established.
ECDSA key fingerprint is SHA256:MrJr/7oBKpWRZ9R/PtsckkVyZZ85dQ3qdHc/4ZSrIfs.
ECDSA key fingerprint is MD5:2e:6d:1b:b4:e3:ff:96:39:de:60:22:a4:1e:27:9b:49.
Are you sure you want to continue connecting (yes/no)? yes   //选择yes
Warning: Permanently added '192.168.100.20' (ECDSA) to the list of known hosts.
shi@192.168.100.20's password:    //输入shi账户的密码
[shi@localhost ~]$
scp远程复制–远程安全复制
通过scp命令可以利用SSH安全连接与远程主机相互复制文件。使用scp命令时,除了必须指定复制源、目标外,还应指定目标主机地址、登录用户,执行后提示验证口令即可。
[root@localhost opt]# touch zhangsan.txt /opt   //在/opt下创建一个文件,并在里面写入内容
[root@localhost opt]# ll
总用量 8276
-rw-r--r--.  1 1001  1002       0 6月  14 18:48 10.txt
-rw-r--r--.  1 root root       90 6月  11 03:26 1.txt
drwxr-xr-x.  2 root root        6 6月  16 00:59 a
drwxr-xr-x. 12  501 games    4096 6月  11 18:30 httpd-2.4.25
-rw-r--r--.  1 root root  8460433 6月  11 18:25 httpd-2.4.25.tar.gz
drwxr-xr-x.  2 root root        6 10月 31 2018 rh
-rw-r--r--.  1 root root       12 7月  12 22:55 zhangsan.txt
[root@localhost opt]# vi zhangsan.txt
[root@localhost /]# mkdir -p /mnt/1/2/3/4 //在第二台虚拟机中创建一个递归目录
然后我们在第二个主机将第一个主机的文件复制过来
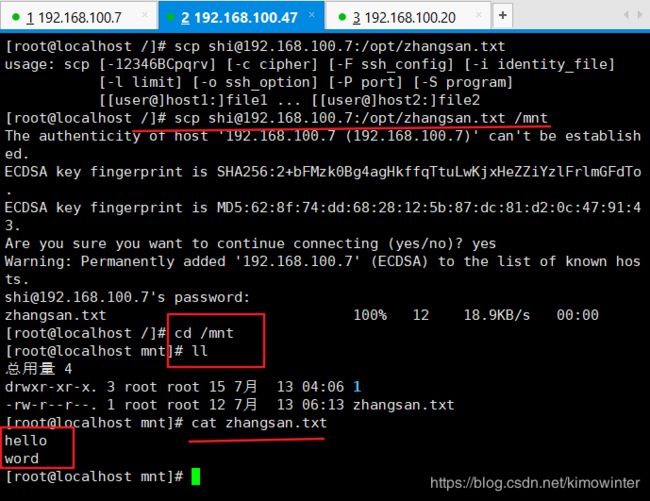
[root@localhost /]# scp shi@192.168.100.7:/opt/zhangsan.txt /mnt   //将192.168.100.7主机的opt目录下的zhangsan.tat复制到当前主机的mnt目录下
The authenticity of host '192.168.100.7 (192.168.100.7)' can't be established.
ECDSA key fingerprint is SHA256:2+bFMzk0Bg4agHkffqTtuLwKjxHeZZiYzlFrlmGFdTo.
ECDSA key fingerprint is MD5:62:8f:74:dd:68:28:12:5b:87:dc:81:d2:0c:47:91:43.
Are you sure you want to continue connecting (yes/no)? yes
Warning: Permanently added '192.168.100.7' (ECDSA) to the list of known hosts.
shi@192.168.100.7's password:     //输入shi账户的密码
zhangsan.txt                             100%   12    18.9KB/s   00:00
[root@localhost /]# cd /mnt   //到mnt目录下
[root@localhost mnt]# ll
总用量 4
drwxr-xr-x. 3 root root 15 7月  13 04:06 1
-rw-r--r--. 1 root root 12 7月  13 06:13 zhangsan.txt
[root@localhost mnt]# cat zhangsan.txt   //查看复制过来的内容
hello
word
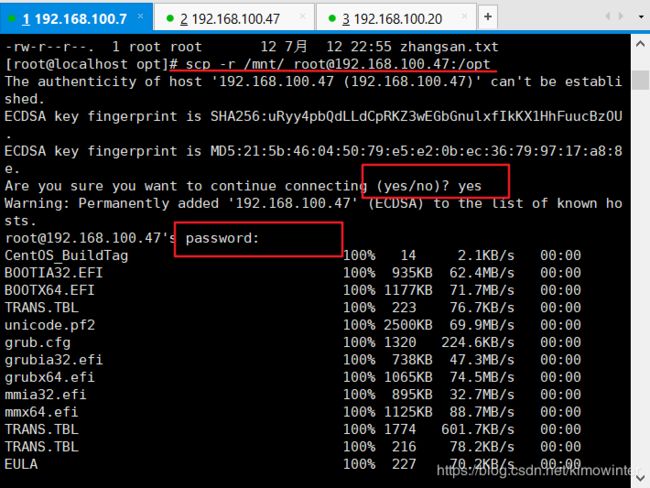
scp -r /mnt/ root@192.168.100.47:/opt //将当前主机的/mnt目录下的所有文件以root账户的名义复制到192.168.100.47主机下的opt目录
sftp命令–安全FTP
通过sftp命令可以利用SSH安全连接与远程主机上传、下载文件,采用了与FTP类似的登录过程和交互式环境,便于目录资源管理。
[root@localhost ~]# sftp root@192.168.100.7   //远程连接192.168.100.7主机
root@192.168.100.7's password:    //输入密码
Connected to 192.168.100.7.
sftp> ls      //查看192.168.100.7主机当前目录,当前目录为192.168.100.7 的家目录
1.txt                    aa                       anaconda-ks.cfg
bb                       initial-setup-ks.cfg     man
man.txt                  yushasha.txt             下载
公共                   图片                   文档
桌面                   模板                   视频
音乐
sftp> cd /opt   //到opt目录下
sftp> ls
1.txt                    10.txt                   a
httpd-2.4.25             httpd-2.4.25.tar.gz      rh
zhangsan.txt
sftp> put /boot/
System.map-3.10.0-957.el7.x86_64
config-3.10.0-957.el7.x86_64
efi/
grub/
grub2/
initramfs-0-rescue-a70b79ece13c49e99b88047c030fe5b5.img
initramfs-3.10.0-957.el7.x86_64.img
initramfs-3.10.0-957.el7.x86_64kdump.img
symvers-3.10.0-957.el7.x86_64.gz
vmlinuz-0-rescue-a70b79ece13c49e99b88047c030fe5b5
vmlinuz-3.10.0-957.el7.x86_64

sftp> put /boot/config-3.10.0-957.el7.x86_64    //上传文件
Uploading /boot/config-3.10.0-957.el7.x86_64 to /opt/config-3.10.0-957.el7.x86_64
/boot/config-3.10.0-957.el7.x86_64       100%  148KB  14.8MB/s   00:00
sftp> bye   //退出登录
2.2 构建密钥对验证的SSH体系
第一步:创建密钥对
- 私钥文件: id_ _rsa
- 公钥文件: id_ _rsa.pub
[root@localhost ~]# ssh-keygen -t rsa   //创建密钥对
Generating public/private rsa key pair.
Enter file in which to save the key (/root/.ssh/id_rsa): sdp   //指定私钥位置
Enter passphrase (empty for no passphrase):   //设置私钥短语
Enter same passphrase again:                  //确认私钥短语
Your identification has been saved in sdp.
Your public key has been saved in sdp.pub.
The key fingerprint is:
SHA256:MDrzfNTjUpYlkUvDbt+pgICEgThUqE+RXIMDqsjoVUM root@localhost.localdomain
The key's randomart image is:
+---[RSA 2048]----+
|+=+BoE   ...     |
|=.B o.    =.     |
|o. + +o  o.o.    |
|* . o.oo .++     |
|++ .+  .So*. . . |
|. o  = ..+... o  |
| .    o o .. .   |
|       . .  .    |
|                 |
+----[SHA256]-----+
[root@localhost ~]#
第二步:.上传公钥文件id _rsa.pub
[root@localhost ~]# ls -a
.   anaconda-ks.cfg  .bash_logout   .bashrc  sdp      .tcshrc
..  .bash_history    .bash_profile  .cshrc   sdp.pub
[root@localhost ~]# ls -lh sdp   //查看生成的密钥文件
-rw-------. 1 root root 1.8K 7月  13 06:46 sdp
[root@localhost ~]# scp ~/sdp.pub root@192.168.100.47:/mnt   //以root账户上传公钥到192.168.100.47主机的mnt目录下
The authenticity of host '192.168.100.47 (192.168.100.47)' can't be established.
ECDSA key fingerprint is SHA256:uRyy4pbQdLLdCpRKZ3wEGbGnulxfIkKX1HhFuucBzOU.
ECDSA key fingerprint is MD5:21:5b:46:04:50:79:e5:e2:0b:ec:36:79:97:17:a8:8e.
Are you sure you want to continue connecting (yes/no)? yes  //选择yes
Warning: Permanently added '192.168.100.47' (ECDSA) to the list of known hosts.
root@192.168.100.47's password:    //输入root账户密码
sdp.pub                                  100%  408   402.7KB/s   00:00
第三步:导入公钥信息
- 公钥库文件: ~/.ssh/authorized_ keys
[root@localhost ~]# mkdir -p /home/shidapeng/.ssh/   //递归创建文件夹
[root@localhost ~]# cat /mnt/sdp.pub >> /home/shidapeng/.ssh/authorized_keys   //查看公钥文件并追加进入刚刚递归创建的文件夹
[root@localhost ~]# tail -l /home/shidapeng/.ssh/authorized_keys   //查看公钥文件
ssh-rsa      AAAAB3NzaC1yc2EAAAADAQABAAABAQDGEagVBTWuZ1pAV3Afw9NnuukohSb4Ff2Ocw5leaNd+QdQ9mu1mBcbLVCx/Vo4nFTl9uj9JrXFojPg0Dc79BsU2rzABXgDVWFekGE4m3OyoFWOOdmfSVuCJt3tuyi9h/lDj55YjC8yg+q3ooR292mBQNkI7ayNB1AB/f6ybsMLjGVhtIYsJ4olrTp5kTtLly0GRBzn1nMDGowdbi7LrrrZJSrlxEnmT5jDulmM8RjAzVVQQaul1OkJ6CNmhpVeshvrK/Ez+M6zjqFKyM+GnIaaO8c/zR35VkwQfM01EV27d7kTj7hhDsiv9/YNma1Hw1XmSMh34la7tkSAYvxa6qhv root@localhost.localdomain
[root@localhost ~]#
第四步:使用密钥对验证方式
输入刚刚我们设置的私钥验证
三、 TCP Wrappers 访问控制
3.1 TCP Wrappers概述
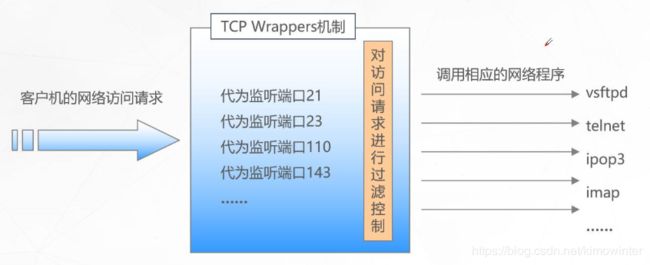
TCP Wrappers将其他的TCP服务程序包装起来,增加一个安全检测过程。外来的连接请求必须先通过这层安全检测,获得许可后才能访问真正的服务控制。
保护机制实现方式有两种
- 方式一
通过tcpd主程序对其他服务程序进行包装
- 方式二
由凄然服务程序调用libwrap.so.*链接库
对应的两个策略文件分别是/etc/hosts.allow和/etc/hosts.deny
3.2 策略配置格式
<服务列表>:<客户机地址列表>
服务列表与客户机地址列表之间用冒号分隔。
- 服务程序列表
ALL表示所有服务
列表内的多个项之间用逗号分隔 - 客户机地址列表
ALL表示任何客户机地址
LOCAL:代表本机地址
网络段地址,如192.168.100 或者 192.168.100.0/255.255.255.0
以.开始的域名
以.结束的网络地址
多个地址以逗号分隔
通配符*和?:前者代表任意长度字符,后者仅代表一个字符
3.3 访问控制的基本原则
- 首先检查/etc/hosts.allow,找到匹配的策略,就允许访问
- 找不到,就检查/etc/hosts.deny,找到匹配的策略,就拒绝访问
- 上述两个都找不到,则允许访问
3.4 配置案例

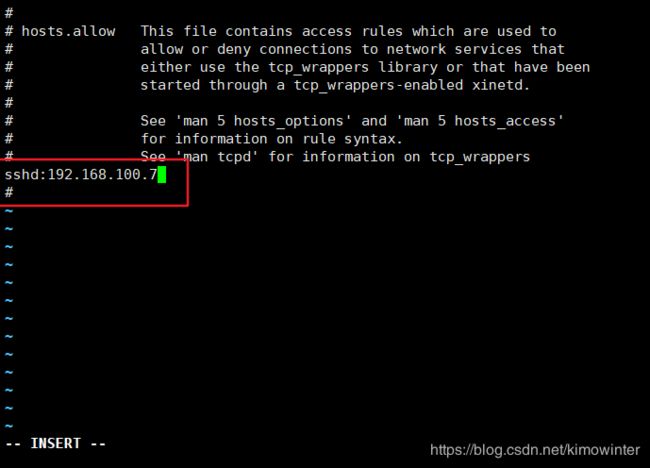

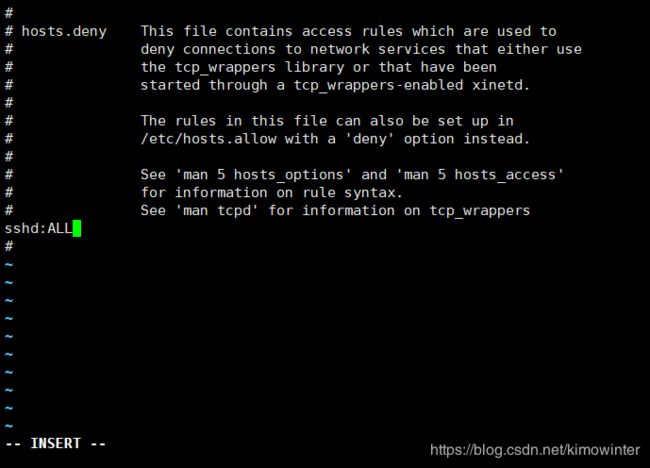
这时候我们分别用192.168.100.7和192.168.100.20去登录192.168.100.47
主机192.168.100.7
[root@localhost ~]# ssh root@192.168.100.7
root@192.168.100.7's password:
Last login: Mon Jul 13 08:38:59 2020 from 192.168.100.1
[root@localhost ~]#
主机192.168.100.20
[root@localhost ~]# ssh root@192.168.100.47
ssh_exchange_identification: read: Connection reset by peer
[root@localhost ~]#

